background image

15

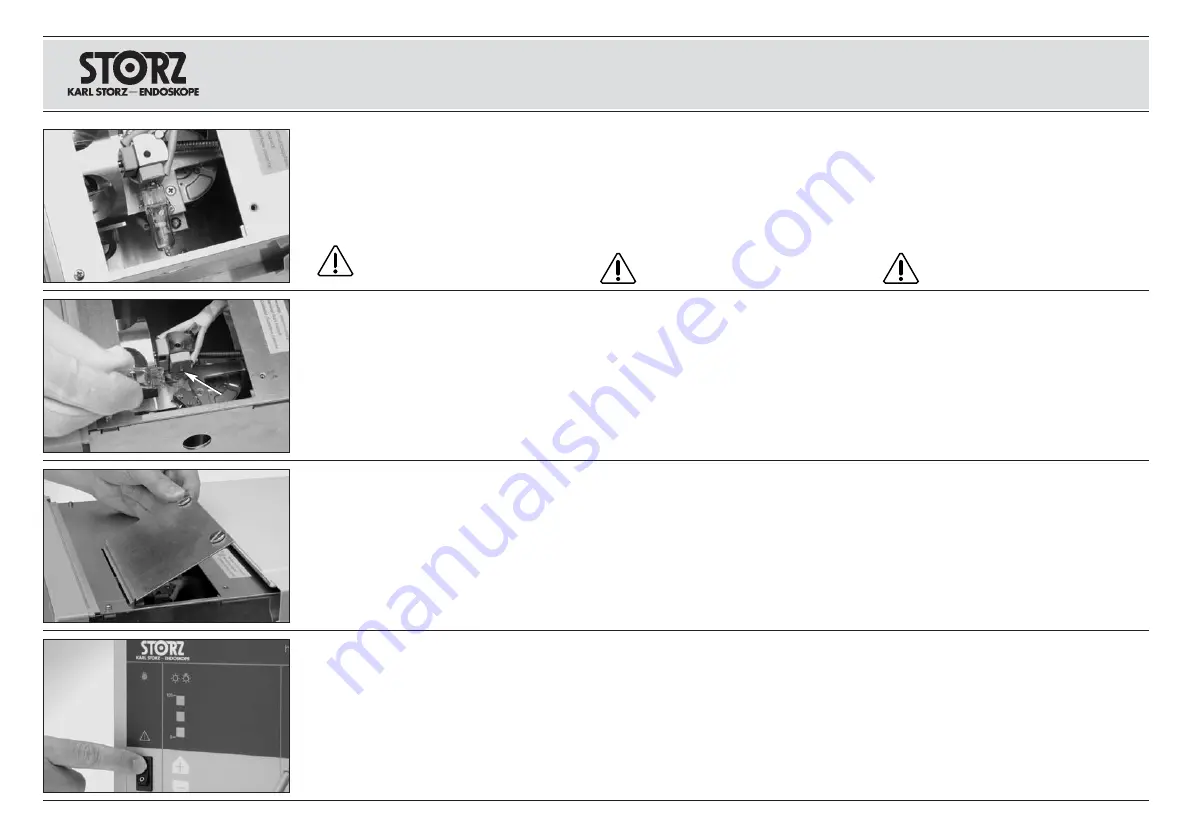
Defekte Halogenlampe aus der Halterung
herausziehen und vorschriftsgemäß entsorgen. 

Hinweis: 

Nur die defekte Lampe ist erreichbar.

D. h. bei 2 defekten Lampen sind die Lampen
nacheinander zu wechseln. Nach Wechseln der
1. Lampe das Gerät ein- und wieder ausschal-
ten; dann die 2. Lampe wechseln.

Warnung: 

Verbrennungsgefahr. 

Lampe kann heiß sein.

Hinweis: 

Glaskolben der neuen Halogenlampe

nicht mit bloßen Fingern berühren. (Ggf. Lampe
vor Inbetriebnahme mit in Alkohol getränktem
Wattetupfer reinigen).

Verwenden Sie bitte den der neuen Lampe bei-
liegenden Berührungsschutz. Neue
Halogenlampe (24 V/250 W) bis zum Anschlag
in die Kontaktbuchsen einschieben. Die Lampe
ist damit automatisch justiert.

Lampenschachtdeckel wieder einbauen.

Gehäusedeckel schließen und Rändelschrauben
wieder einschrauben.
Netzverbindung wieder herstellen.
Funktionstest durchführen.

Remove the defective halogen lamp from its
holder and dispose of it in accordance with the
regulations.

Note: 

Only the defective lamp can be reached.

Therefore, when replacing two defective lamps,
these must be changed one at a time. After
changing the first lamp, the unit must be started
up and shut down again before changing the
second lamp.

Warning: 

Danger of burns. 

Lamp may be hot. 

Note: 

Do not touch the glass bulb of the new

halogen lamp with your bare fingers. (If neces-
sary, clean the lamp with a cotton swab soaked
in alcohol before operation).

Please use the protective cover provided with the
new lamp. Insert new halogen lamp (24 V/250 W)
into the contact socket until firmly in place. 
The lamp is automatically adjusted. 

Reinstall the lamp compartment lid.

Refit the housing cover and tighten the thumb-
screws. 
Reconnect the power cord.
Carry out function test.

Неисправную галогенную лампу следует
извлечь из держателя и утилизировать
надлежащим образом.

Примечание. 

Доступна только неисправная

лампа, т.е. в случае выхода из строя обеих
ламп их следует заменить по очереди. После
замены первой лампы необходимо включить
прибор и снова выключить его; затем заменить
вторую лампу.

Предупреждение. 

Опасность ожога!

Лампа может быть горячей.

Примечание. 

Нельзя прикасаться к лампе

голыми пальцами (при необходимости
протереть лампу перед включением ватным
тампоном, смоченным спиртом).

Следует пользоваться прилагаемым к новой
лампе средством защиты. Вставить новую
галогенную лампу (24 В/250 Вт) до упора 
в контактное гнездо, при этом лампа
автоматически юстируется.

Снова установить крышку гнезда лапы.

Закрыть крышку корпуса и затянуть винты.
Подключить прибор к электросети.
Провести проверку работоспособности
прибора.

Instandhaltung

Lampenwechsel

Maintenance

Lamp replacement 

Техническое обслуживание

Замена лампы

Содержание 20113420

Страница 1: ...Kaltlicht Font ne HALOGEN 250 2 twin Cold light fountain HALOGEN 250 2 twin HALOGEN 250 2 twin 201134 20 201134 20 201134 20...

Страница 2: ......

Страница 3: ...Kaltlicht Font ne HALOGEN 250 2 twin Cold light fountain HALOGEN 250 2 twin HALOGEN 250 2 twin 201134 20 201134 20 201134 20 Gebrauchsanweisung Instruction Manual...

Страница 4: ...ired on your part are clearly present ed and explained We thus ask that you read this manual carefully before proceeding to work with the equipment Insert this manual in its protec tive wallet and kee...

Страница 5: ...III...

Страница 6: ...e Netzspannung Potentialausgleichsanschluss L ftungsschlitze Power switch Lamp defective indicator red Display of brightness Light exits Operating pilot lamp lights up during light output Retainers fo...

Страница 7: ...iertem Service Personal durchf hren Keine Fl ssigkeiten auf oder ber dem Ger t abstellen Ger t au erhalb der Reichweite von Patienten aufstellen Read the instructions carefully before operating the eq...

Страница 8: ...VI...

Страница 9: ...ation for the HALOGEN 250 2 twin 31 II III IV V 2 2 3 3 7 7 8 8 9 9 9 9 10 14 14 16 17 17 17 18 19 19 20 20 22 23 24 24 24 29 29 HALOGEN 250 2 twin 31 Inhalt Contents Allgemeiner Warnhinweis II Ger te...

Страница 10: ...e operation may be continued at the same high lighting power without interrup tion 2 Ger tebeschreibung Die Kaltlicht Font ne HALOGEN 250 2 twin ist eine leistungsstarke Halogenlichtquelle und eig net...

Страница 11: ...en zur sicheren Bedienung des Ger tes Definitions Warning A Warning indicates that the personal safety of the patient or physician may be involved Disregarding a Warning could result in injury to the...

Страница 12: ...n aufstellen Warnung Vor s mtlichen Wartungs oder Reinigungsarbeiten am Ger t ist die Netzverbindung zu trennen WARNINGS Warning The instructions and interface specifi cations for medical devices used...

Страница 13: ...g fluids to enter the unit Caution Do not touch glass bulb with your bare fingers use the protective cover Touching the lamp with bare fingers may result in starting diffi culty Lichtkabel Warnung Ble...

Страница 14: ...tze und Vorschriften sind zu beachten Nach Ablauf der Lebensdauer Ger t als Elektronikschrott entsorgen Caution Do not place connected light cables on combustible materials such as textiles drapes or...

Страница 15: ...nd aus Sicherheitsgr nden unter sagt Intended use The cold light fountain HALOGEN 250 2 twin Model 201134 20 is used as a light source in conjunction with rigid and flexible endoscopes and other instr...

Страница 16: ...example that when using easily combustible and explosive inhalation anesthetics or mixtures thereof the unit must not be operat ed inside the hazard zone shown in the diagram Examples of such substanc...

Страница 17: ...e guide self adhesive 1 HALOGEN 250 2 twin 1 400 2 1 1 Grundausstattung 1 Kaltlicht Font ne HALOGEN 250 2 twin 1 Netzanschlusskabel 400 A 2 Gebrauchsanweisungen 1 Schutzh lle f r Gebrauchsanweisung 1...

Страница 18: ...any air vents Danger of overheating Do not place the backside of the unit directly against the wall since the air vent is on the backside distance from rear panel to wall at least 10 cm When overheate...

Страница 19: ...olgt nur bei eingestecktem Lichtkabel Warnung Nie in das freie Ende des Lichtkabels schauen Blendgefahr Warnung Verbrennungsgefahr Der Kontakt mit dem freien Ende eines an der Kaltlicht Font ne angesc...

Страница 20: ...plan to conduct the light cable to the endoscope right away plug the loose end into the dummy socket Note The entrance and exit faces of the light cable must be kept clean if optimal light trans miss...

Страница 21: ...y lead to burns Installation and operating instructions Aufstellen und Bedienungshinweise Bei Ausfall einer Lampe wird automatisch auf die Ersatzlampe umgeschaltet Bei defekter Halogenlampe leuchtet d...

Страница 22: ...azu R ndelschrauben l sen Lamp replacement Switch off the unit Disconnect the power plug Open the housing cover For this purpose first undo the 2 thumbscrews at the bottom of the unit Then place your...

Страница 23: ...Netzverbindung wieder herstellen Funktionstest durchf hren Remove the defective halogen lamp from its holder and dispose of it in accordance with the regulations Note Only the defective lamp can be re...

Страница 24: ...dung trennen Fuse replacement Switch off the unit and remove the power cord from the electrical outlet 16 Neue Sicherungen einsetzen Vorsicht Nur Sicherungen mit der kor rekten Nennleistung verwenden...

Страница 25: ...ls Hinweis Um einen sicheren Betrieb zu gew hr leisten sollten alle 12 Monate folgende Pr fungen vorgenommen werden 1 Pr fung des Ableitstroms vom Chassis 100 A 2 Pr fung der Erdimpedanz 0 1 Ohm 3 Pr...

Страница 26: ...KARL STORZ Repair program Usually to bridge the repair period you will receive a unit on loan which you then return to KARL STORZ as soon as you receive the repaired unit In Germany you can refer rep...

Страница 27: ...e with its operating instructions at all times Manufacturer s warranty For a period of two years after delivery to the end user we shall replace free of charge equip ment that can be proven to have de...

Страница 28: ...die m gliche Ursache festzustellen Wie und durch welche Abhilfe diese St rungen behoben werden k nnen ist in der Fehlersuch liste angegeben Warnung Vor s mtlichen Wartungsarbeiten am Ger t die Netzve...

Страница 29: ...age 2 or 3 using the button Clean ends of light cables and light entrances and exits on the endoscope Replace light cable In order to reset hold down the button and then switch on the unit 1 2 2 3 Tec...

Страница 30: ...1080 hPa Normenkonformit t f r 201134 20 Nach IEC 60601 1 Art des Schutzes gegen elektr Schlag Schutzklasse I Grad des Schutzes gegen elektr Schlag Anwendungsteil des Typs CF Nach IEC 60601 1 2 2001 B...

Страница 31: ...rung unserer Ger te behalten wir uns vor Technical documentation On request the manufacturer will provide those circuit diagrams itemized parts listings descrip tions sets of adjustment instructions a...

Страница 32: ...a r e p O e d i u g x 9 6 0 6 0 2 6 9 x 9 6 0 6 0 2 6 9 Ersatzteile empfohlenes Zubeh r Spare parts recommended accessories Zubeh r Fiberglas Lichtkabel Fiberglas Lichtkabel enthalten ein B ndel mit e...

Страница 33: ...ww karlstorz de bzw www karlstorz com Cleaning the light cable Note Comprehensive information on cleaning light cables can be found in the Light cable instructions 1 Manual cleaning The light cables m...

Страница 34: ...Fiberglas Fluid Lichtkabel und Endoskop aufeinander abzustimmen siehe nebenstehende Tabelle siehe Seite 27 Fiberoptic light cable Combination of light cable with endoscope For safety reasons the diame...

Страница 35: ...29 30 3 Maschinelle Dekontamination Vorsicht Die maschinelle chemische Desinfektion bei max 65 C durchf h ren Fluid light cables In fluid light cables the light is not transmitted through glass fiber...

Страница 36: ...ie Glasfl chen Lichtein und austritt mit einem weichen Tuch Schwamm oder Wattest b chen getr nkt mit 70 igem Alkohol reinigen Hartn ckige Verschmutzungen und Bel ge auf den Glasfl chen werden mit Rein...

Страница 37: ...8 1 2 3 Stammopur GR 1 3 Bandelin electronic GmbH Stammopur R 1 3 B Braun Medical AG Stabimed 2 Aseptisol 2 3 Korsolex AF 2 3 Bode Chemie GmbH Korsolex Basic 2 3 Deconex 36 Intensiv 1 3 Deconex 50 FF...

Страница 38: ...rd ing material compatibility KARL STORZ HAMOU IMPERATOR Anhang Reinigungs und Desinfektionsmittel Appendix Cleaning agents and disinfectants Typ 1 Reiniger 2 Desinfektionsmittel 3 geeignet f r Ultras...

Страница 39: ...romagnetic Compatibility EMC Observe the EMC instruc tions in this appendix as well as the instruction manual during installation and commissioning The HALOGEN 250 2 twin model 201134 20 cor responds...

Страница 40: ...ty EMC Information for HALOGEN 250 2 twin model 201134 20 Tabelle 201 Leitlinien und Herstellererkl rung Elektromagnetische Aussendungen HALOGEN 250 2 twin Modell 201134 20 ist f r den Betrieb in eine...

Страница 41: ...ons CISPR 11 Class B Harmonic emissions IEC 61000 3 2 Class A Voltage fluctuations flicker emissions IEC 61000 3 3 Complies The HALOGEN 250 2 twin model 201134 20 is suitable for use in all establishm...

Страница 42: ...ersorgungsspannung sollte der einer typischen Gesch fts oder Krankenhausumgebung entsprechen Spannungseinbr che Kurzzeitunterbrechungen und Schwankungen der Versorgungsspannung nach IEC 61000 4 11 5 U...

Страница 43: ...onment Voltage dips short interruptions and voltage variations on power supply input lines IEC 61000 4 11 5 UT 95 dip in UT for 0 5 cycle 40 UT 60 dip in UT for 5 cycles 70 UT 30 dip in UT for 25 cycl...

Страница 44: ...EMC Information for HALOGEN 250 2 twin model 201134 20 202 HALOGEN 250 2 twin 20 1134 20 HALOGEN 250 2 twin 20 1134 20 EN IEC 60601 IEC 61000 4 2 6 8 6 8 30 IEC 61000 4 4 2 1 2 1 IEC 61000 4 5 1 2 1...

Страница 45: ...s Senders in Watt W gem den Angaben des Senderherstellers und d als empfohlenem Schutzabstand in Metern m Die Feldst rke station rer Funksender sollte bei allen Frequenzen gem einer Untersuchung vor O...

Страница 46: ...omagnetic site surveya should be less than the compliance level in each frequency range b Interference may occur in the vicinity of equipment marked with the following symbol Note 1 At 80 MHz and 800...

Страница 47: ...ppendix Electromagnetic Compatibility EMC Information for HALOGEN 250 2 twin model 201134 20 204 HALOGEN 250 2 twin 20 1134 20 HALOGEN 250 2 twin 20 1134 20 EN IEC 60601 IEC 61000 4 6 IEC 61000 4 3 3...

Страница 48: ...Ger t abh ngig von der Ausgangsleistung des Kommunikationsger ts wie unten angegeben einh lt Schutzabstand d m abh ngig von der Sendefrequenz Nennleistung des Senders W 150 kHz bis 80 MHz P d 3 5 3 80...

Страница 49: ...ded below according to the maximum output power of the communications equipment Separation distance d m according to frequency of transmitter Rated maximum output power of transmitter W 150 kHz to 80...

Страница 50: ...in 201134 20 Appendix Electromagnetic Compatibility EMC Information for HALOGEN 250 2 twin model 201134 20 206 HALOGEN 250 2 twin 20 1134 20 HALOGEN 250 2 twin 20 1134 20 W d 150 80 d 3 5 3 P 80 800 d...

Страница 51: ...warranty referred to in our Standard Conditions of Business shall apply To be completed by the supplier importer Company stamp signature Garantiekarte bei Kauf Lieferung ausf llen lassen und m glichst...

Страница 52: ...erschrift Datum Bitte ausreichend frankieren ANTWORTKARTE KARL STORZ GmbH Co KG Postfach 230 78503 Tuttlingen To be filled out by instrument owner Return address company stamp Field of application Typ...

Страница 53: ......

Страница 54: ...ificio Jerusalem Oficina 308 A La Habana Cuba Phone 53 7 2041097 Fax 53 7 2041098 KARL STORZ Endoscopie France S A 12 rue Georges Guynemer Quartier de l Europe 78280 Guyancourt France Phone 33 1 30 48...

Страница 55: ...KARL STORZ GmbH Co KG Mittelstra e 8 78532 Tuttlingen Postfach 230 78503 Tuttlingen Germany Telefon 49 0 7461 708 0 Telefax 49 0 7461 708 105 E Mail info karlstorz de Web www karlstorz de...

Отзывы: