background image

Page 71

GX6500E/GX6000E

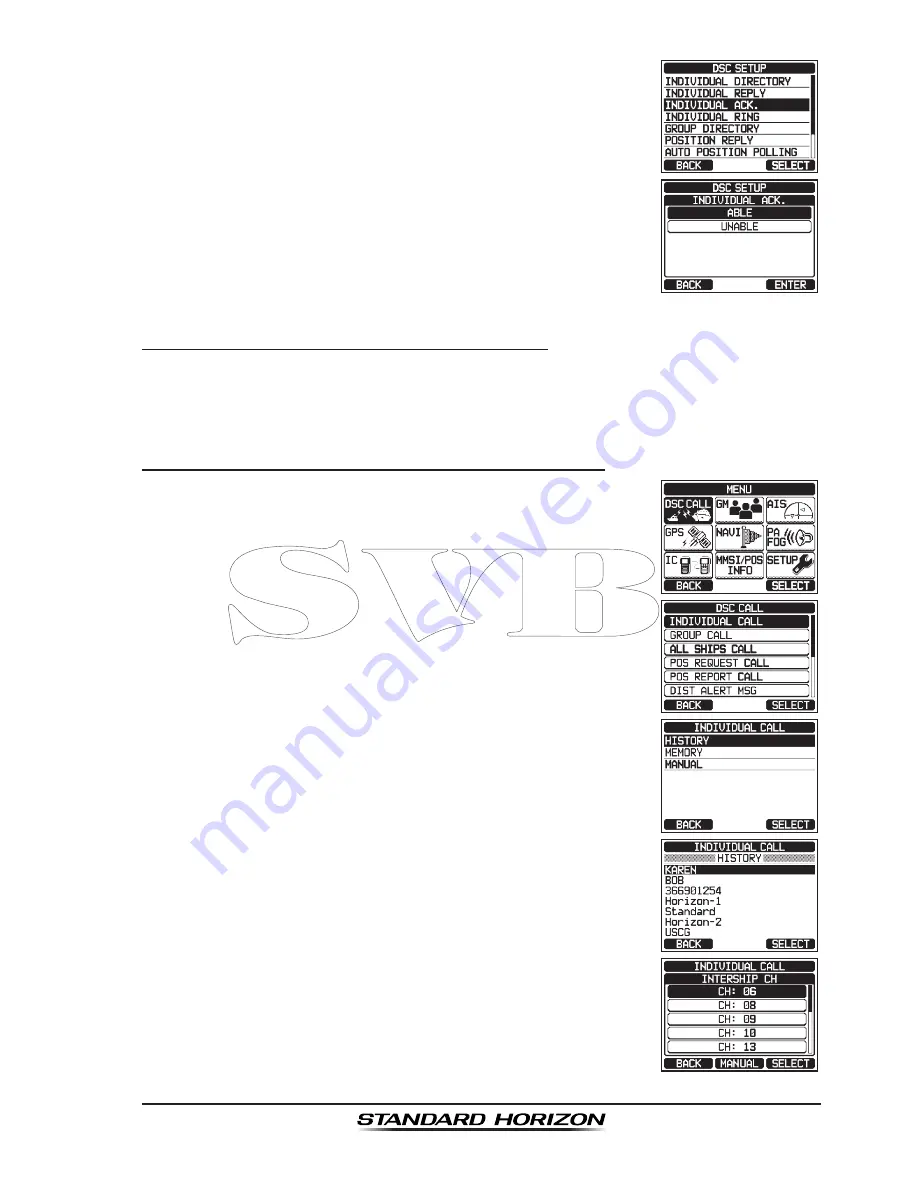
4.  Rotate the 

DIAL/ENT

 knob to select “

INDIVIDUAL 

ACK.

”, then press the 

[SELECT]

 soft key.

5.  Rotate the 

DIAL/ENT

 knob to select “

ABLE

” or 

UNABLE

”.


6.  Press the 

[ENTER]

 soft key to store the selected 

setting.

7.  Press the 

CLEAR

 key to return to radio operation.

9.4.4 

Transmitting an Individual Call

This feature allows the user to contact another vessel with a DSC radio. This 

feature is similar to calling a vessel on CH16 and requesting to go to another 

channel.

Individual Call using the Individual/Position Directory

1.  Press the 

MENU

 key to display “

MENU

”.

2.  Rotate the 

DIAL/ENT

 knob to select “

DSC CALL

”, then 

press the 

[SELECT]

 soft key.

3.  Rotate the 

DIAL/ENT

 knob to select “

INDIVIDUAL 

CALL

”, then press the 

[SELECT]

 soft key. (To cancel, 

press the 

[BACK]

 soft key.)

4.  Rotate the 

DIAL/ENT

 knob to select “

HISTORY

” or 

MEMORY

”, then press the 

[SELECT]

 soft key.

5.  Rotate the 

DIAL/ENT

 knob to select an individual you 

want to contact, press the 

[SELECT]

 soft key.

6.  In the INTERSHIP CH list, rotate the 

DIAL/ENT

 knob 

to select the operating channel on which you want to 

communicate, then press the 

[SELECT]

 soft key. To 

select operating channels from all voice channels, 

press the 

[MANUAL]

 soft key.

Содержание QUANTUM GX6000E

Страница 1: ...QUANTUM GX6500E GX6000E 25 Watt VHF FM Marine Transceiver Owner s Manual...

Страница 2: ...mode 49 7 11 2 Operating the FOG HORN mode 50 7 11 3 Fog Signal Timing Chart 51 7 11 4 Operating the HORN mode 52 7 12 INTERCOM OPERATION 52 7 12 1 Communication 52 7 12 2 Calling 53 7 13 VOICE SCRAM...

Страница 3: ...WEATHERALERT 149 15 3 SCAN MEMORY 149 15 4 SCAN TYPE 149 15 5 SCAN RESUME 150 15 6 MULTI WATCH 150 15 7 PRIORITY CHANNEL 150 15 8 SUB CHANNEL 151 15 9 CHANNEL NAME 151 15 10 NOISE CANCELLATION 152 15...

Страница 4: ...once then press and hold until the radio alarms These three programmable soft keys can be customized through the setup menu mode By pressing one of these keys briefly display the key functions at the...

Страница 5: ...to your location via the Closest Point of Approach CPA Alarm To receive AIS targets from ships with AIS class A or B transponders simply connect the normal VHF antenna only one antenna needed The GX6...

Страница 6: ...nt Template SCU 31 External GPS Antenna GX6500 only T9101606 USB Cable Type USB A plug to Type USB micro B plug 3 OPTIONAL ACCESSORIES MMB 84 Flush Mount Bracket SSM 70H Remote Access Microphone RAM4...

Страница 7: ...transmitter On a fixed mount 25W radio transmission expected distances can be greater than 15 miles for a portable 5W radio transmission the expected distance can be greater than 5 miles in line of si...

Страница 8: ...oldered connections 4 5 DISTRESS AND HAILING CHANNEL 16 Channel 16 is known as the Hail and Distress Channel An emergency may be defined as a threat to life or property In such instances be sure the t...

Страница 9: ...sulting from its use as a hailing channel can be reduced significantly in U S waters by using channel 9 as the initial contact hailing channel for non emergency communications Here also calling time s...

Страница 10: ...manual Some examples for USA use are Channels 24 25 26 27 28 84 85 86 and 87 Call the marine operator and identify yourself by your vessel s name The marine operator will then ask you how you will pay...

Страница 11: ...urrently available in the areas listed below West Coast Sea Tow Newport LA Ch 27 Sea Tow San Diego Ch 27 Northeast Sea Tow Portland Midcoast Maine Ch 27 Sea Tow Boston Ch 27 Sea Tow South Shore Mass C...

Страница 12: ...30 miles away on open water is not uncommon as their antennas are mounted high off the water Class B transponders use lower power for transmissions therefore you can expect Class B vessels to be acqui...

Страница 13: ...ngle Choose a mounting location that is follow the compass safe distances shown in the table below to prevent interference to a magnetic compass Transceiver Unit 1 0 m Handset 0 5 m provides accessibi...

Страница 14: ...nting bracket allows overhead or desktop mounting Use a 13 64 5 2 mm bit to drill the holes to a surface which is more 0 4 10 mm thick and can support more than 3 3 lbs 1 5 kg and secure the bracket w...

Страница 15: ...least 1 2 1 3 cm between the transceiver s heatsink and any wiring cables or structures 2 Cut out the rectangular hole and insert the transceiver 3 Fasten the brackets to the sides of the transceiver...

Страница 16: ...ound 3 If an optional remote extension speaker is to be used refer to section 6 5 for connections 4 It is advisable to have a Certified Marine Technician check the power output and the standing wave r...

Страница 17: ...antenna connection is used to AIS receiver PA Speaker Connection Cable Orange Yellow Green Blue Connects the GX6500E GX6000E to PAspeakers See section 3 OPTION ALACCESSORIES for a list of optional ST...

Страница 18: ...to section 6 6 CONNECTION OF EXTERNAL DEVICES TO THE RADIO Rear MIC Connector Connects the supplied hand microphone if desired This connector provides the same function as that on the front panel and...

Страница 19: ...RMC sentence is recommended If 4800 baud default is selected a If there is a selection for PARITY select NONE b The Blue and Green wires of input are at 4800 baud If 38400 baud is selected The Blue a...

Страница 20: ...e radio may be damaged When connecting the GPS navigation receiver strip off about 1 inch 2 5 cm of the specified wire s insulation then splice the ends together The GX6500E GX6000E uses NMEA0183 prot...

Страница 21: ...SC Output NMEA input of GPS 1 BROWN NMEA DSC Output NMEA input of GPS 1 YELLOW AIS Data Output NMEA HS input of AIS receiver 2 WHITE AIS Data Output NMEA HS input of AIS receiver 2 1 4800 baud 2 38400...

Страница 22: ...connection 2 WHITE AIS Data Output No connection 2 1 The GPS chart plotter ComPort must be setup to 38400 baud HS to receive DSC and AIS sentences from the GX6500E GX6000E Gray and Brown wires 2 The G...

Страница 23: ...EA DSC Output NMEA input of GPS 1 BROWN NMEA DSC Output NMEA input of GPS 1 YELLOW AIS Data Output NMEA HS input of AIS receiver 2 WHITE AIS Data Output NMEA HS input of AIS receiver 2 1 4800 baud 2 3...

Страница 24: ...t No connection 2 1 The GPS chart plotter ComPort must be setup to 38400 baud HS to send GPS coordinates to the GX6500E GX6000E Blue and Green wires and to receive DSC and AIS sentences from the GX650...

Страница 25: ...m audio speaker horn BLUE PA FWD Speaker Negative wire of external 4 Ohm audio speaker horn ORANGE PA AFT Speaker Positive wire of external 4 Ohm audio speaker horn YELLOW PA AFT Speaker Negative wire...

Страница 26: ...t failure 1 Connect the CT 100 extension cable to the RAM 1 or RAM 2 eight pin connector on the rear panel then tighten the cable nut see illustration at the right 2 Install the ferrite core supplied...

Страница 27: ...st be disconnected from the rear panel of the transceiver The routing cable can be cut and spliced however care needs to be taken when reconnecting the wires to ensure water integrity After cutting yo...

Страница 28: ...elow to turn off the RAM4 audio and enable the external speaker wires on the RAM4 routing cable 1 On the RAM4 mic press the MENU key to display MENU c c 2 Rotate the DIAL ENT knob to select SETUP then...

Страница 29: ...visit the following websites to register http www boatus com mmsi https www seatow com tools and education mmsi http wireless fcc gov services index htm job licensing id ship_stations In Canada visit...

Страница 30: ...the MMSI number again Perform steps 4 through 6 above 8 After the second number has been input press the FINISH soft key to store the MMSI 9 Press the OK soft key to return to radio operation NOTE To...

Страница 31: ...up to output GSA and GSV NMEA 0183 sentences 1 Press and hold the key to turn the radio on 2 Press the MENU key to display MENU 3 Rotate the DIAL ENT knob to select GPS then press the SELECT soft key...

Страница 32: ...ime Table 1 Press the MENU key to display MENU c c 2 Rotate the DIAL ENT knob to select SETUP then press the SELECT soft key 3 Rotate the DIAL ENT knob to select GPS SETUP then press the SELECT soft k...

Страница 33: ...press the SELECT soft key 5 Rotate the DIAL ENT knob to select UTC or LOCAL 6 Press the ENTER soft key to store the selected setting 7 Press the CLEAR key to return to radio operation 5 9 3 Changing...

Страница 34: ...COG can be changed to ON 1 Press the MENU key to display MENU c c 2 Rotate the DIAL ENT knob to select SETUP then press the SELECT soft key 3 Rotate the DIAL ENT knob to select GPS SETUP then press th...

Страница 35: ...nnector Connects to the supplied speaker microphone SQL knob Squelch control Adjusting this control clockwise sets the point at which random noise on the channel does not activate the audio circuits b...

Страница 36: ...the operating channel These keys on the microphone can also be used to change the operating channel Press the key momentarily the channel increases decreases one step Holding the key the channel incre...

Страница 37: ...ly Right Green Data Receiving registerd MMSI Orange Data Receiving unregisterd MMSI Red Receive Error DATA jack Use the USB micro type B jack to output the NMEA data configure the transceiver settings...

Страница 38: ...key recalls the SUB channel The default setting is channel 9 Pressing this key again reverts to the previous selected working channel H L key Press this key to toggle between 25 W High and 1 W Low po...

Страница 39: ...quelch threshold 4 Rotate the DIAL ENT knob to select the desired channel Refer to the channel chart on Pages 187 to 189 for available channels 5 When a message is received adjust the volume to the de...

Страница 40: ...When the PTT switch on the microphone is held down transmit time is limited to 5 minutes This limits unintentional transmissions due to a stuck microphone About 10 seconds before automatic transmitter...

Страница 41: ...to select SETUP then press the SELECT soft key 3 Rotate the DIAL ENT knob to select CHANNEL SETUP then press the SELECT soft key 4 Rotate the DIAL ENT knob to select CHANNEL GROUP then press the SELEC...

Страница 42: ...ion If the radio receives communications on the priority channel the radio stops and listens to priority channel until communication ends and then starts dual or triple watch scan again 7 7 1 Setting...

Страница 43: ...ll be displayed as the soft key instead of DUAL WATCH NOTE The priority channel may be changed from CH16 default to another channel Refer to section 16 7 PRIORITY CHANNEL 7 8 SCANNING The GX6500E GX60...

Страница 44: ...12 CH09 CH01A CH15 CH18 CH22A CH61A CH68A CH68A CH88A 7 8 2 Programming Scan Memory 1 Press the MENU key to display MENU c c 2 Rotate the DIAL ENT knob to select SETUP then press the SELECT soft key 3...

Страница 45: ...y repeatedly then press the SCAN soft key MEM SCAN appears on the display Scanning will proceed from the lowest to the highest programmed channel number and preset channel described in the next sectio...

Страница 46: ...lert beep will be emitted from the speaker Before beginning the InstantAccess operation assign the PRESET command into one of the programmable keys refer to section 15 8 SOFT KEYS 7 9 1 Programming 1...

Страница 47: ...ey until the P SET icon and channel number are blinking 4 Press the DELETE soft key to delete the channel from the preset channel memory 5 Repeat steps 2 through 4 to delete the desired chan nels from...

Страница 48: ...n the PAHAIL or FOG HORN mode the GX6500E GX6000E will continue to receive DSC calls and communications on the last selected working channel prior to entering the PA HAIL or FOG HORN mode Then the GX6...

Страница 49: ...Rotate the DIAL ENT knob to select PUBLIC ADDRESS then press the SELECT soft key 4 Press the microphone s PTT switch to speak through the HAIL PA speaker Press the PA VOL soft key then rotate the DIAL...

Страница 50: ...3 Rotate the DIAL ENT knob to select FOG HORN then press the SELECT soft key 4 Rotate the DIAL ENT knob to select one of the six functions described above then press the SELECT soft key 5 On the FOG...

Страница 51: ...1s 1s 1s 5s 5s 2s 2s 2s 2s 120s Listen Back Sailing vessel underway fishing vessel underway or anchored vessel not under command a vessel restricted in her ability to maneuver underway or at anchor o...

Страница 52: ...AIL PA speaker Press the FOG VOL soft key then rotate the DIAL ENT knob to control the AF output level Press the ENTER soft key TheAF output level can be set from 0 to 30 watts 6 To listen back rotate...

Страница 53: ...crophone about 1 2 1 5 cm away from your mouth 9 When finished release the PTT switch 10 Press the CLEAR key to return to radio operation 7 12 2 Calling Pressing the BELL soft key when in intercom mod...

Страница 54: ...e SELECT soft key 3 Rotate the DIAL ENT knob to select ABOUT then press the SELECT soft key 4 Rotate the DIAL ENT knob to select DEMO OPERA TION then press the SELECT soft key 5 Rotate the DIAL ENT kn...

Страница 55: ...s the SELECT soft key DSC CALL The following seven types of DSC Digital Selective Calling are available Individual Group All Ships Position Request Position Report Polling and Auto Position Polling Th...

Страница 56: ...PA speaker For details refer to section 8 12 PA FOG OPERATION IC By connecting two optional RAM4 Remote Station Microphones to the trans ceiver the intercom function will become available enabling yo...

Страница 57: ...T soft key 3 Rotate the DIAL ENT knob to select GPS INFO 4 Press the ENTER soft key to display the numerical display 5 Press the CLEAR key to return to radio operation 8 1 2 GPS Information Compass Di...

Страница 58: ...y to display MENU 2 Rotate the DIAL ENT knob to select GPS then press the SELECT soft key 3 Rotate the DIAL ENT knob to select GPS STATUS 4 Press the ENTER soft key to display the GPS status currently...

Страница 59: ...C and download the log data from the radio by using the PC Programming Software Refer to section 20 CONNECTING A USB DATA TERMINAL TO THE PC Logger operation alert When the memory for log data becomes...

Страница 60: ...l Selective Calling DSC is a semi automated method of establishing a radio call it has been designated by the International Maritime Organization IMO as an international standard for establishing VHF...

Страница 61: ...1 Lift the red spring loaded DISTRESS cover and press then press and hold the DISTRESS key for 3 seconds The radio display will count down 3 2 1 and then transmit the distress call The backlight of t...

Страница 62: ...ST ALERT MSG then press the SELECT soft key To cancel press the BACK soft key 4 Press the NATURE soft key The NATURE OF menu will appear on the display 5 Rotate the DIAL ENT knob to select the desired...

Страница 63: ...il a distress alert is transmitted Pausing a DSC Distress Aleart After a DSC distress call is transmitted the DSC distress call is repeated every 4 minutes until the call is canceled by the user or un...

Страница 64: ...radio operation 9 2 2 Receiving a DSC Distress Aleart 1 When a DSC distress call is received an emergency alarm sounds 2 Press any key to stop the alarm 3 Rotate the DIAL ENT knob several times to sho...

Страница 65: ...display to the waypoint screen The display indi cates the distance and direction of the distressed vessel and also the compass indicates the distressed vessel by dot 6 To stop navigating to a waypoin...

Страница 66: ...be in distress but have a potential problem that may lead to a distress situation This call is the same as saying PAN PAN PAN PAN PAN PAN on Channel 16 9 3 1 Transmitting an All Ships Call 1 Press th...

Страница 67: ...nitor the requested channel until the all ships voice communication is completed On the display you will notice 3 soft key selections These selections are described below ACCEPT Press this key to acce...

Страница 68: ...een the two vessels Up to 100 individual contacts may be programmed 9 4 1 Setting up the Individual Position Call Directory The GX6500E GX6000E has a DSC directory that allows you to store a vessel or...

Страница 69: ...key until the wrong character is selected then perform steps 7 and 8 10 When finished entering the name using fifteen characters or less press the FINISH soft key to advance to the MMSI number entry...

Страница 70: ...3 Rotate the DIAL ENT knob to select DSC SETUP then press the SELECT soft key 4 Rotate the DIAL ENT knob to select INDIVIDUAL REPLY then press the SELECT soft key 5 Rotate the DIAL ENT knob to select...

Страница 71: ...l using the Individual Position Directory 1 Press the MENU key to display MENU 2 Rotate the DIAL ENT knob to select DSC CALL then press the SELECT soft key 3 Rotate the DIAL ENT knob to select INDIVID...

Страница 72: ...ithout storing it in the individual directory 1 Press the MENU key to display MENU 2 Rotate the DIAL ENT knob to select DSC CALL then press the SELECT soft key 3 Rotate the DIAL ENT knob to select IND...

Страница 73: ...usy then press the microphone s PTT switch and talk into the microphone to the other vessel 9 4 5 Receiving an Individual Call When an individual DSC call is received the radio will automatically resp...

Страница 74: ...nt ongoing communications This feature allows commer cial users to suspend channel switching and stay on the working channel selected before the individual call was received QUIT Press this key to qui...

Страница 75: ...efault setting will produce a ringing sound for 2 minutes This selection allows the individual call ringer time to be changed 1 Press the MENU key to display MENU c c 2 Rotate the DIAL ENT knob to sel...

Страница 76: ...SETUP then press the SELECT soft key 4 Rotate the DIAL ENT knob to select DSC BEEP then press the SELECT soft key 5 Rotate the DIAL ENT knob to select INDIVIDUAL CALL then press the SELECT soft key 6...

Страница 77: ...d The last 6 digits are specific to the ships ID Ship MMSI Example If your MMSI is 366123456 366 is MID which denote the country and 123456 is your ships MMSI Group MMSI Group MMSI numbers are not ass...

Страница 78: ...ory 8 Press the SELECT soft key to store the first letter in the name and step to the next letter to the right 9 Repeat steps 7 and 8 until the name is complete The name can consist of up to fifteen c...

Страница 79: ...ep 12 13 When finished entering the MMSI number press the FINISH soft key to confirm 14 To store the data select SAVE then press the SELECT soft key 15 To enter another group address repeat steps 5 th...

Страница 80: ...l the radios in the group will switch to the designated channel 10 Listen to the channel to make sure it is not busy then press the microphone s PTT switch and call the other vessel you desire to comm...

Страница 81: ...erform step 5 7 When finished entering the MMSI number press the FINISH soft key 8 In the INTERSHIP CH list rotate the DIAL ENT knob to select the operating channel on which you want to communicate th...

Страница 82: ...emporarily disable auto matic switching to the requested channel QUIT Press this key to quit the automatic channel switching and revert to the last selected working channel 5 If you want to respond mo...

Страница 83: ...knob to select DSC SETUP then press the SELECT soft key 4 Rotate the DIAL ENT knob to select DSC BEEP then press the SELECT soft key 5 Rotate the DIAL ENT knob to select GROUP CALL then press the SELE...

Страница 84: ...to its DSC radio and must not have its radio set not to deny position requests Refer the section 10 4 INDIVIDUAL CALL to enter information into the individual directory 9 6 1 Setting up a Position Req...

Страница 85: ...l Position Request using the Individual Position Directory Refer to section 10 4 INDIVIDUAL CALL to enter information into the indi vidual directory 1 Press the MENU key to display MENU 2 Rotate the D...

Страница 86: ...press the SELECT soft key 3 Rotate the DIAL ENT knob to select POS REQUEST CALL then press the SELECT soft key 4 Rotate the DIAL ENT knob to select MANUAL then press the SELECT soft key 5 Rotate the D...

Страница 87: ...est 1 When a position request call is received from another vessel a ringing sound will be produced and the display will be as shown in the illustration at the right 2 Press any key to stop the alarm...

Страница 88: ...then press the SELECT soft key 3 Press the POS TM soft key 4 Rotate the DIAL ENT knob to select the first number of latitude then press the SELECT soft key to step to the next number 5 Repeat step 4...

Страница 89: ...DIAL ENT knob to select DSC SETUP then press the SELECT soft key 4 Rotate the DIAL ENT knob DSC BEEP then press the SELECT soft key 5 Rotate the DIAL ENT knob to select POS REQUEST then press the SEL...

Страница 90: ...knob to select DSC CALL then press the SELECT soft key 3 RotatetheDIAL ENTknobtoselect POS REPORT CALL then press the SELECT soft key To cancel press the BACK soft key 4 Rotate the DIAL ENT knob to se...

Страница 91: ...DIAL ENT knob to select the first number of the MMSI which you want to contact then press the SELECT soft key to step to the next number 6 Repeat step 5 to set the MMSI number If a mistake was made en...

Страница 92: ...ion of the station 4 To exit to radio mode press the QUIT soft key 9 7 3 Navigating to the Reported Position The GX6500E GX6000E has a feature that allows you to navigate to a received position report...

Страница 93: ...n report call has been received press the SAVE soft key 2 If you want to change the name of the waypoint rotate the DIAL ENT knob to select NAME then press the SELECT soft key 3 Enter the name of the...

Страница 94: ...T knob to select DSC SETUP then press the SELECT soft key 4 Rotate the DIAL ENT knob to select DSC BEEP then press the SELECT soft key 5 Rotate the DIAL ENT knob to select POS REPORT then press the SE...

Страница 95: ...key 4 Rotate the DIAL ENT knob to select HISTORY or MEMORY then press the SELECT soft key 5 Rotate the DIAL ENT knob to select a name that was stored in the individual position call directory then pr...

Страница 96: ...AL ENT knob to select MANUAL then press the SELECT soft key 5 Rotate the DIAL ENT knob to select the first number in the MMSI and press the SELECT soft key 6 Repeat step 5 until all the digits of the...

Страница 97: ...rammed into the individual directory or to automatically send your position information to the programmed stations 9 9 1 Setting up the Polling Operation 1 Press the MENU key to display MENU c c 2 Rot...

Страница 98: ...rval time 30 second 1 2 3 and 5 minutes and press the ENTER soft key 6 Press the CLEAR key to return to radio operation 9 9 3 Selecting Vessels to be Automatically Polled NOTE The radio uses the indiv...

Страница 99: ...to select a blank row press the SELECT soft key then perform step 6 8 When finished press the CLEAR key to exit to the radio mode 9 9 4 Enabling Disabling Auto POS Polling 1 Press the MENU key to disp...

Страница 100: ...lly enter in the MMSI using the procedure below 9 10 1 Programming MMSI into Individual Directory Refer to section 10 4 1 Setting up the Individual Position Call Directory 9 10 2 Transmitting a DSC Te...

Страница 101: ...3 Rotate the DIAL ENT knob to select DSC TEST CALL then press the SELECT soft key 4 Rotate the DIAL ENT knob to select MANUAL then press the SELECT soft key 5 Rotate the DIAL ENT knob to select the fi...

Страница 102: ...ress calls and other calls individual group all ships etc The DSC log feature is similar to an answer machine where calls are recorded for review and a icon will appear on the radios display The GX650...

Страница 103: ...7 Depending on the type of the DSC LOG selected in step 5 you can check the information of the LOG by pressing the INFO soft key and can reply by press ing the CALL soft key 9 11 2 Reviewing a Logged...

Страница 104: ...Other Logged Calls 1 Press the MENU key to display MENU 2 Rotate the DIAL ENT knob to select DSC CALL then press the SELECT soft key 3 Rotate the DIAL ENT knob to select DSC LOG then press the SELECT...

Страница 105: ...s the SELECT soft key 5 Rotate the DIAL ENT knob to select the category TRANSMITTED RX DISTRESS RX OTHER CALL or ALL LOG to be deleted 6 Press the SELECT soft key The display will show Do you want to...

Страница 106: ...ob to select DSC CALL then press the SELECT soft key 3 Rotate the DIAL ENT knob to select DSC LOOP BACK then press the SELECT soft key 4 Press the YES soft key to start a test To cancel press the NO s...

Страница 107: ...MENU c 2 Rotate the DIAL ENT knob to select NAVI then press the SELECT soft key 3 Rotate the DIAL ENT knob to select WAYPOINT then press the SELECT soft key 4 Rotate the DIAL ENT knob to select the de...

Страница 108: ...Position Call Directory 6 Rotate the DIAL ENT knob to select POSITION then press the SELECT soft key 7 Rotate the DIAL ENT knob to select the first number of latitude then press the SELECT soft key t...

Страница 109: ...IAL ENT knob to select SETUP then press the SELECT soft key 3 Rotate the DIAL ENT knob to select WAYPOINT SETUP then press the SELECT soft key 4 Rotate the DIAL ENT knob to select MARK POSI TION then...

Страница 110: ...n press the SELECT soft key 5 Rotate the DIAL ENT knob to select ADD then press the SELECT soft key 6 Rotate the DIAL ENT knob to select NAME then press the SELECT soft key 7 Enter the waypoint name b...

Страница 111: ...press the SELECT soft key 6 Rotate the DIAL ENT knob to select the waypoint to be edited then press the SELECT soft key to show the waypoint input display 7 Rotate the DIAL ENT knob to select NAME or...

Страница 112: ...ENT knob to select DELETE then press the SELECT soft key 6 Rotate the DIAL ENT knob to select the waypoint to be deleted then press the SELECT soft key 7 Confirm the waypoint to be deleted rotate the...

Страница 113: ...oft key 3 Rotate the DIAL ENT knob to select WAYPOINT SETUP then press the SELECT soft key 4 Rotate the DIAL ENT knob to select DISPLAY RANGE then press the SELECT soft key 5 Rotate the DIAL ENT knob...

Страница 114: ...P then press the SELECT soft key 3 Rotate the DIAL ENT knob to select WAYPOINT SETUP then press the SELECT soft key 4 Rotate the DIAL ENT knob to select ARRIVAL RANGE then press the SELECT soft key 5...

Страница 115: ...rogrammed as waypoints in the GX6500E GX6000E memory Refer to section 11 1 2 Setting Up Waypoint Directory Adding a Route 1 Press the MENU key to display MENU c c 2 Rotate the DIAL ENT knob to select...

Страница 116: ...SELECT soft key 11 Rotate the DIAL ENT knob to select Via1 then press the SELECT soft key 12 Rotate the DIAL ENT knob to select a waypoint then press the SELECT soft key 13 Repeat steps 11 and 12 to...

Страница 117: ...the route is updated 8 Rotate the DIAL ENT knob to select SAVE then press the SELECT soft key to store the edited route into memory 9 Press the CLEAR key to return to radio operation Deleting a Route...

Страница 118: ...ct NAVI then press the SELECT soft key 3 Rotate the DIAL ENT knob to select ROUTE then press the SELECT soft key 4 Rotate the DIAL ENT knob to select the desired category HISTORY or MEMORY then press...

Страница 119: ...This selection allows you to start navigation to the next target automatically or manually when your vessel has arrived at a target point 1 Press the MENU key to display MENU c c 2 Rotate the DIAL ENT...

Страница 120: ...red Refer to section 10 5 1 Setting up a Group Call for details Group members for GM operation can only be selected from the Individual Position Call directory there for all members that you want to m...

Страница 121: ...key 9 Rotate the DIAL ENT knob to select MEMBER then press the SELECT soft key 10 Rotate the DIAL ENT knob to select a list number then press the SELECT soft key 11 Rotate the DIAL ENT knob to select...

Страница 122: ...VAL then press the SELECT soft key 5 Rotate the DIAL ENT knob to select the desired interval time then press the ENTER soft key 6 Press the CLEAR key to return to radio operation 11 1 3 Enabling Disab...

Страница 123: ...tion configure the GM Group Directory setting in advance Otherwise you cannot start the GM operation Refer to section 12 1 1 Setting Up GM Group Directory for details 1 Press the MENU key to display M...

Страница 124: ...key The GM group being monitored changes The GM target display appears 5 Press the CLEAR key to return to radio operation 11 2 2 Transmitting a DSC Call to a Group Member 1 On the GM target display pr...

Страница 125: ...tions 2 Press the TG LIST soft key 3 Rotate the DIAL ENT knob to select a member you want to approach 4 Press the SELECT soft key to display the location distance and bearing of the selected member 5...

Страница 126: ...s and courses of AIS equipped vessels around your vessel AIS is mandatory on passenger ships irrespective of size all ships 300 gross tonnage and larger engaged on international voyages cargo ships of...

Страница 127: ...ngles The line projected from the circle is the AIS vessels course over ground COG 3 Press the key to change theAIS target Pressing the key sequentially displays AIS vessels in order closest to your s...

Страница 128: ...ceived 3 Rotate the DIAL ENT knob to select the MMSI number or vessel name then press the SELECT soft key Pressing the DANGER soft key changes the order to the TCPA time order 4 The AIS target informa...

Страница 129: ...al Call to an AIS Ship It is possible for the GX6500E GX6000E to transmit a DSC individual call to a received AIS target by the procedure below 1 On the AIS screen press one of the soft keys to show t...

Страница 130: ...range set as the CPA Limit For details refer to section 13 3 4 TCPA 1 If other AIS vessels approach your ship the alarm sounds according to the CPA Limit and TCPA Limit that you set in advance 2 Pres...

Страница 131: ...ect SETUP then press the SELECT soft key 3 Rotate the DIAL ENT knob to select AIS SETUP then press the SELECT soft key 4 Rotate the DIAL ENT knob to select TRANSPONDER then press the SELECT soft key 5...

Страница 132: ...ering in the name rotate the DIAL ENT knob to select or press the SELECT soft key until the wrong character is selected then perform steps 6 and 7 9 When finished entering the name using fifteen chara...

Страница 133: ...8 Rotate the DIAL ENT knob to select the desired setting then press the ENTER soft key 19 To store the data select SAVE then press the SELECT soft key 20 Press the CLEAR key to return to radio operati...

Страница 134: ...nt of Approach alarm Setting up a TCPA alarm sets a time point where the radio will alarm when an AIS equipped vessel approaching within the time selected 1 Press the MENU key to display MENU c c 2 Ro...

Страница 135: ...LECT soft key 5 Rotate the DIAL ENT knob to select CPA or TCPA then press the SELECT soft key 6 Rotate the DIAL ENT knob to select OFF or ON 7 Press the ENTER soft key to store the selected setting 8...

Страница 136: ...press the SELECT soft key 5 In the SELECT DEVICE list rotate the DIAL ENT knob to select the external device for which you want to set the device number or the system number 6 Press the SELECT soft ke...

Страница 137: ...key to return to radio operation 13 3 SYSTEM INSTANCE Set the system number of the device selected in 14 1 SELECT DIVICE 1 Press the MENU key to display MENU 2 Rotate the DIAL ENT knob to select SETU...

Страница 138: ...S group 060928 ISO Address Claim 060928 ISO Address Claim 065240 ISO Commanded Address 065240 ISO Commanded Address 126208 NMEA Request group function 126208 NMEA Request group function 126464 Receive...

Страница 139: ...sition Report 129799 Radio Frequency Mode Power 129801 AIS Addressed Safety Related Message 129802 AIS Safety Related Broadcast Message 129808 DSC Call Information 129809 AIS Class B CS Static Data Re...

Страница 140: ...key 3 Rotate the DIAL ENT knob to select CONFIGURA TION then press the SELECT soft key 4 Rotate the DIAL ENT knob to select DISPLAY MODE then press the SELECT soft key 5 Rotate the DIAL ENT knob to se...

Страница 141: ...the ENTER soft key to store the selected level 7 Press the CLEAR key to return to radio operation 14 3 DISPLAY CONTRAST The display contrast can be adjusted to suit your operation environment 1 Press...

Страница 142: ...dio operation 14 5 FOG ALERT TONE FREQUENCY The function allows the radio to be setup to send the proper fog frequency which is dependant on vessel size shown below 70 200Hz Vessel that are 660 feet 2...

Страница 143: ...Rotate the DIAL ENT knob to select SETUP then press the SELECT soft key 3 Rotate the DIAL ENT knob to select CONFIGURA TION then press the SELECT soft key 4 Rotate the DIAL ENT knob to select LISTEN B...

Страница 144: ...ected then perform steps 6 and 7 9 When finished entering the station name using ten characters or less press the FINISH soft key to advance to the second station name entry 10 Rotate the DIAL ENT kno...

Страница 145: ...LECT soft key 5 Rotate the DIAL ENT knob to select KEY ASSIGN MENT then press the SELECT soft key 6 Rotate the DIAL ENT knob to select the key number to be programmed and press the SELECT soft key 7 R...

Страница 146: ...es the Compass display WAYPOINT Enables the Waypoint or Route navigation display PA FOG HORN Select PA FOG HORN or HORN mode INTERCOM Activates intercom between radio and RAM4 mic optional RAM4 requir...

Страница 147: ...L ENT knob to select SETUP then press the SELECT soft key 3 Rotate the DIAL ENT knob to select CONFIGURA TION then press the SELECT soft key 4 Rotate the DIAL ENT knob to select RESET then press the S...

Страница 148: ...djusts the contrast of the LCD 15 KEY BEEP Adjusts the volume of beep tone when a key is pressed 4 FOG FREQUENCY Sets the tone frequency when transmit ting FOG 400Hz LISTEN BACK Sets the operation of...

Страница 149: ...select CHANNEL SETUP then press the SELECT soft key 4 Rotate the DIAL ENT knob to select WEATHER ALERT then press the SELECT soft key 5 Rotate the DIAL ENT knob to select ON or OFF 6 Press the ENTER...

Страница 150: ...e time can be set to 1sec through 5sec 6 Press the ENTER soft key to store the new setting 7 Press the CLEAR key to return to radio operation 15 6 MULTI WATCH This selection is used to select the watc...

Страница 151: ...b to select SUB CHANNEL then press the SELECT soft key 5 Rotate the DIAL ENT knob to select the desired chan nel to be a sub channel 6 Press the ENTER soft key to store the new setting 7 Press the CLE...

Страница 152: ...the wrong character is selected then perform steps 6 and 7 9 When finished entering the channel name using fifteen characters or less press the FINISH soft key to save the name 10 If you want to enter...

Страница 153: ...tion 15 11 AUDIO FILTER OPERATION This menu item allows you to select operation of the internal audio filter for your comfortable listening The default setting is NORMAL 1 Press the MENU key to displa...

Страница 154: ...LECT soft key 5 Rotate the DIAL ENT knob to select ACTIVATION then press the SELECT soft key 6 Rotate the DIAL ENT knob to select ON or OFF then press the ENTER soft key to store the new setting 7 Pre...

Страница 155: ...that indicates the end of recording when recording stops The default setting is ON 1 Press the MENU key to display MENU 2 Rotate the DIAL ENT knob to select SETUP then press the SELECT soft key 3 Rota...

Страница 156: ...key 3 Rotate the DIAL ENT knob to select CHANNEL SETUP then press the SELECT soft key 4 Rotate the DIAL ENT knob to select RX RECORDER then press the SELECT soft key 5 Rotate the DIAL ENT knob to sel...

Страница 157: ...lay MENU 2 Rotate the DIAL ENT knob to select SETUP then press the SELECT soft key 3 Rotate the DIAL ENT knob to select CHANNEL SETUP then press the SELECT soft key 4 Rotate the DIAL ENT knob to selec...

Страница 158: ...or off the Weather Alert function OFF SCAN MEMORY Add or remove a channel to Scan Memory SCAN TYPE Select priority scan or memory scan PRIORITY SCAN RESUME Sets the resume time of scanning 2sec MULTI...

Страница 159: ...alling vessel is shown allowing you to see who is calling This function is similar to caller id on a cellular phone Refer to section 10 4 2 Setting up the Individual Call Reply for details 16 3 INDIVI...

Страница 160: ...to section 10 9 AUTO POSITION POLLING for details 16 8 AUTO POSITION INTERVAL The GX6500E GX6000E has the capability to automatically track seven vessels programmed into the individual directory Selec...

Страница 161: ...X6500E GX6000E will automatically return to radio operation The default selection is 15 minutes 1 Press the MENU key to display MENU 2 Rotate the DIAL ENT knob to select SETUP then press the SELECT so...

Страница 162: ...DIAL ENT knob to select DSC SETUP then press the SELECT soft key 4 Rotate the DIAL ENT knob to select POS UNFIX WAITING TIME then press the SELECT soft key 5 Rotate the DIAL ENT knob to select the des...

Страница 163: ...ts the AUTO POSITION POLLING operation type AUTO POS REQUEST AUTO POS INTERVAL Selects the transmission interval of AUTO POSITION POLLING signal 30 sec AUTO CHANNEL CHANGE Selects the delay time to mo...

Страница 164: ...DIAL ENT knob to select GPS SETUP then press the SELECT soft key 4 Rotate the DIAL ENT knob to select ORDER OF PRIORITY then press the SELECT soft key 5 Rotate the DIAL ENT knob to select PRIMARY then...

Страница 165: ...SELECT soft key 4 Rotate the DIAL ENT knob to select COMPASS DIREC TION then press the SELECT soft key 5 Rotate the DIAL ENT knob to select the desired direc tion from COURSE UP and NORTH UP 6 Press...

Страница 166: ...ction allows the radio to show UTC time or local time with the offset Refer to section 6 9 2 Changing the Time Area for details 17 6 TIME FORMAT This menu selection allows the radio to show time in 12...

Страница 167: ...ver 17 9 NMEA 0183 IN OUT 17 9 1 Data Speed This menu is used to setup the NMEA 0183 baud rate of the GPS input Blue and Green wires and DSC output Gray and Brown wires The default setting is 4800 bps...

Страница 168: ...he DIAL ENT knob to select SETUP then press the SELECT soft key 3 Rotate the DIAL ENT knob to select GPS SETUP then press the SELECT soft key 4 Rotate the DIAL ENT knob to select NMEA 0183 IN OUT then...

Страница 169: ...re set to be output depending on the baud rate not all sentences can be output at intervals of one second or less GSA and GSV sentences will be output at intervals of around five seconds 17 10 OPTION...

Страница 170: ...b to select SETUP then press the SELECT soft key 3 Rotate the DIAL ENT knob to select GPS SETUP then press the SELECT soft key 4 Rotate the DIAL ENT knob to select OPTION GPS UNIT then press the SELEC...

Страница 171: ...ning is turned on the GX6500E GX6000E will not update its position unless the vessel travels over 10Ft OFF When the vessel is underway or stopped the GX6500E GX6000E continuously updates its position...

Страница 172: ...otate the DIAL ENT knob to select SETUP then press the SELECT soft key 3 Rotate the DIAL ENT knob to select GPS SETUP then press the SELECT soft key 4 Rotate the DIAL ENT knob to select OPTION GPS UNI...

Страница 173: ...the DIAL ENT knob to select GPS SETUP then press the SELECT soft key 4 Rotate the DIAL ENT knob to select OPTION GPS UNIT then press the SELECT soft key 5 Rotate the DIAL ENT knob to select LOG ERASE...

Страница 174: ...format to be displayed 12 hour or 24 hour fixed to 24H when UTC is selected in the item TIMEAREA 24hour UNITS OF MEASURE Selects the unit if measure when displaying speed distance and altitude SPEED...

Страница 175: ...SSM 70H mic easy For specific operation of the SSM 70H mic review sections in the radio manual The SSM 70H is supplied with 23 feet 7 m of routing cable and can be extended up to 70 feet 21 m using th...

Страница 176: ...deactivate the key lock function Microphone When spoken into transmits your voice with reduction of background noise using Clear Voice Noise Reduction Technology Note Position your mouth about 1 2 1...

Страница 177: ...essage will light and flash repeatedly From MENU SETUP CONFIGURATION STROBE LED you can select one option from CONTINUOUS SOS BLINK 1 BLINK 2 and BLINK 3 16 S key Pressing this key immediately recalls...

Страница 178: ...0 MAN OVER BOARD Marks the position where a person falls overboard 03 NOISE CANCEL Enables the noise canceling settings display CH NAME Edit channel names STROBE Turns on or off the strobe light LED S...

Страница 179: ...select KEY ASSIGN MENT then press the SELECT soft key 6 Rotate the DIAL ENT knob to select the key number to be programmed and press the SELECT soft key 7 Rotate the DIAL ENT knob to select a new fun...

Страница 180: ...ail marinetech yaesu com You can also download the log data from the radio by using the PC Program ming Software which may be downloaded from the Standard Horizon website The PC Programming Software i...

Страница 181: ...ems please contact your Dealer or our repair facility Address and phone numbers for this facility as well as warranty information are contained in section 23 WARRANTY 20 1 REPLACEMENT PARTS Occasional...

Страница 182: ...e fuse 7A Make sure the red wire is connected to the positive battery post and the black wire is connected to the negative battery post If the fuse still blows contact your Dealer Popping or whin ing...

Страница 183: ...ble connection Some GPS use the battery ground for NMEA connection Setting of the GPS chart plotter Check the output signal format of the GPS navigation receiver This radio requires NMEA 0183 and NMEA...

Страница 184: ...select ATIS SETUP then press the SELECT soft key 4 Rotate the DIAL ENT knob to select ATIS CODE then press the SELECT soft key 5 Rotate the DIAL ENT knob to select the first number of your ATIS then p...

Страница 185: ...UP then press the SELECT soft key 4 Rotate the DIAL ENT knob to select ATIS GROUP then press the SELECT soft key 5 Rotate the DIAL ENT knob to select the channel group International Canadian or USA yo...

Страница 186: ...UPLEX INTL 22 157 100 161 700 DUPLEX INTL 23 157 150 161 750 DUPLEX INTL 24 157 200 161 800 DUPLEX TELEPHONE 25 157 250 161 850 DUPLEX TELEPHONE 26 157 300 161 900 DUPLEX TELEPHONE 27 157 350 161 950...

Страница 187: ...DUPLEX TELEPHONE 86 157 325 161 925 DUPLEX TELEPHONE 87 157 375 157 375 SIMPLEX PORT OPR 88 157 425 157 425 SIMPLEX PORT OPR M 3 157 850 157 850 SIMPLEX M2 3 161 425 161 425 SIMPLEX NOTE Country Chan...

Страница 188: ...of the Product or part s therein which upon examination by STANDARD HORIZON appear to be defective or not up to factory specifications STANDARD HORIZON may at its option repair or replace parts or sub...

Страница 189: ...cified above STANDARD HORIZON shall not be liable under any circumstances for consequential damag es resulting from the use and operation of this Product or from the breach of this LIMITED WARRANTY an...

Страница 190: ...d Call Log 64 Individual Call Directory 80 Group Call Directory 32 Waypoint Directory 100 Display Type 2 75 x 1 33 70 x 34 mm Full Dot Matrix 222 x 162 pixels Dimensions WxHxD 7 1 x 3 1 x 6 3 180 x 80...

Страница 191: ...ejection 80 dB for Voice 75 dB for DSC Intermodulation and Rejection 80 dB for Voice 75 dB for DSC Audio Output 4 5 W at 4 ohms external speaker output Audio Response within 1 3dB of a 6 dB Octave de...

Страница 192: ...400 baud VDM 38400 Baud selected NMEA 0183 HS Input 38400 baud GGA GLL GNS RMC GSA GSV NMEA 0183 HS Output 38400 baud DSC DSE GGA GLL GNS RMC GSA GSV VDM NMEA 0183 HS AIS Output 38400 baud VDM 24 8 SC...

Страница 193: ...Page 193 GX6500E GX6000E Note...

Страница 194: ...out the permission of YAESU MUSEN CO LTD Printed in China YAESU MUSEN CO LTD Tennozu Parkside Building 2 5 8 Higashi Shinagawa Shinagawa ku Tokyo 140 0002 Japan YAESU USA 6125 Phyllis Drive Cypress CA...

Отзывы: