QUASAR-NTE-E – Codice: 3529.0220.80
Rev.0
del 10/03/2003
PT 0303
PP 0303
Arc.T03
MC 0303
Servizio Assistenza Tecnica – Technical Assistance Service
Tel./Phone (+39) 0445.595.111
44
4.4 Interventi di Manutenzione
4.4.1 Sostituzione Cinghia di
Trasmissione
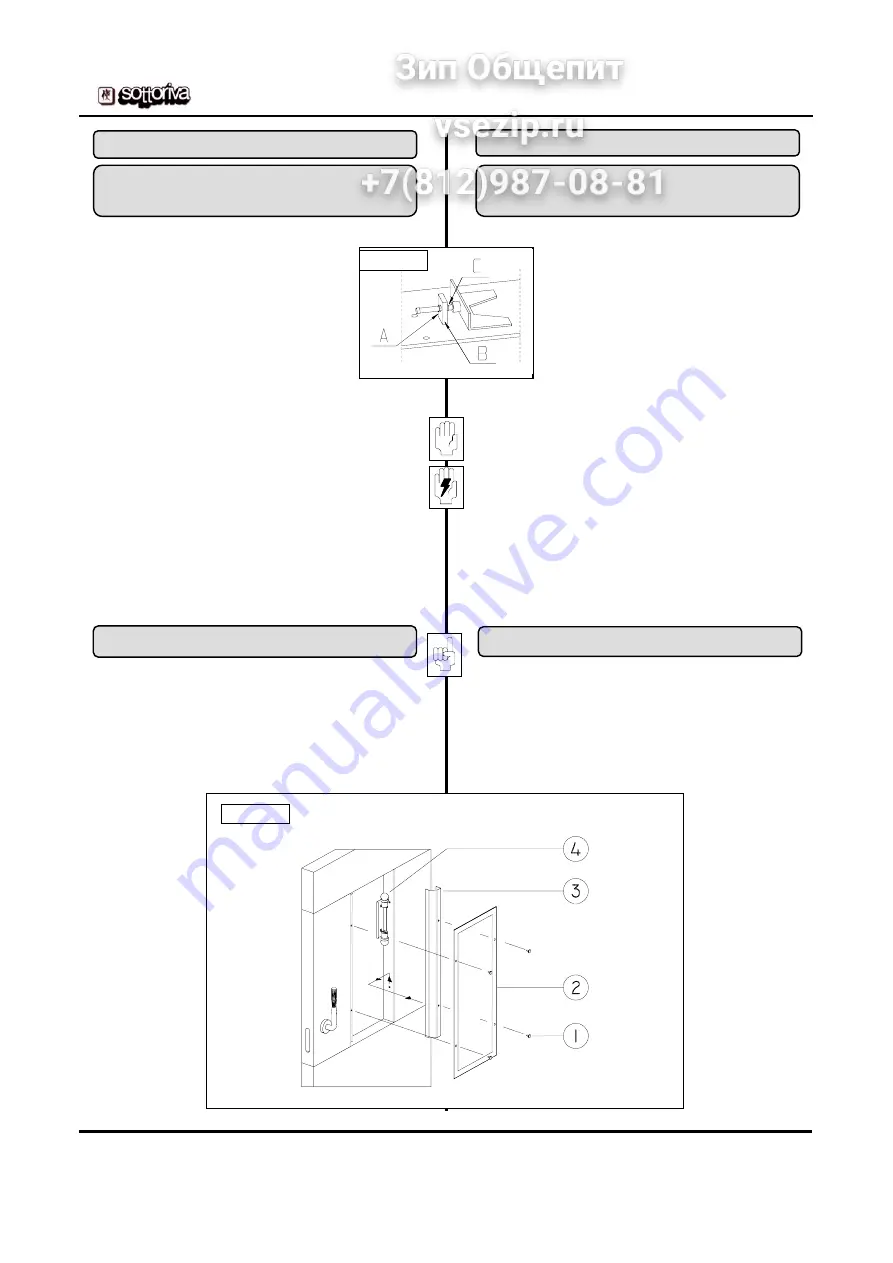
-Allentare le viti che fissano il motoriduttore.
-Allentare il dado "A" sul blocchetto "B"
(Fig.32)
-Ruotare in senso antiorario il tenditore "C"
in modo da ridurre la distanza tra le
pulegge.
-Sostituire la cinghia esausta.
-Ruotare in senso orario il tenditore "C" in
modo da aumentare la distanza tra le
pulegge.
-Stringere il dado "A" sul blocchetto "B".
-Stringere le viti che fissano il motoriduttore.
Non eccedere nel tensionamento delle cinghie per non
provocare sollecitazioni anormali sui cuscinetti.
Far verificare la tensione delle cinghie dal personale
addetto all'assistenza della macchina.
NB :
il gruppo tenditore
(Fig.32)
al variare delle versioni
del forno varia nella sua disloccazione e quantità;
mantenendo comunque la stessa sequenza di
registrazione.
4.4.3 Sostituzione Lampada
Togliere l' alimentazione elettrica al forno
Dopo aver rimosso il vetro esterno (pos.2), sganciare la
lamiera di protezione (pos.3) in modo da poter aver
accesso alle lampade (pos.4) a questo punto procedere
alla sostituzione della lampada con una di pari
tipo.
(Fig.33)
4.4 Maintenance Operations
4.4.1 Replacing the
transmission belt
- Loosen the screws that fasten the
gearmotor
- Loosen nut "A" on block "B"
(Fig. 32)
- Rotate the tightener "C" counterclockwise
to reduce the distance between the pulleys
- Replace the worn belt
- Rotate the tightener "C" clockwise to
increase the distance between the pulleys
- Tighten nut "A" on block "B"
- Tighten the screws that fasten the
gearmotor
Warning: Do not tighten the belts excessively so as not
to apply excessive stress on the bearings
Caution: Have the tension on the belts checked by
service personnel
Note:
The tightener unit
(Fig. 32)
varies in position and
number of parts depending on the oven type, but the
tightening sequence is the same.
4.4.3 Replacing the Oven Light
Note: Cut off power to the oven
After removing the access cover to the lamp(pos.2),
extract the holder (pos.3) and lightbulb and replace the
lightbulb (pos.4) with another of the same type.
(Fig.33)
Fig.32
Fig.33


