35
Calibrating the Screen
The LKRA-PCAB1 (herein referred to as the “calibration
camera”) can be used to automatically calibrate deviations
that may occur in the convergence between the two
projectors that comprise the dual system. You can perform
calibration using the LCD panel and touch sensor via
simple operations with each calibration operation taking
about 5 minutes (when [STATIC] is selected for
[OPTION] - [CALIBRATION MODE]).
Installing the Calibration Camera
Caution
• Install the calibration camera in a stable location free
from vibration.
• Make sure that there are no obstructions between the
calibration camera and screen.
• Make sure the calibration camera’s lens is clean.
• When installing the calibration camera in a projection
room, adhere to the following.
– Keep the projection room as dark as possible.
– Install the calibration camera close to the glass, and
use blackout curtains, for example, to prevent light
from the projector or reflections from other light
sources in the room from entering the calibration
camera.
– Keep the screen gain at 2.4 or below.
– Install the calibration camera so that the T = (distance
between the screen and calibration camera in m) /
(screen width in m) value is between 1.05 and 4.0.
– As a general reference, install the camera within 1 m
of the screen’s center axis.
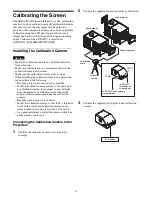
Connecting the Calibration Camera to the
Projectors
1
Stabilize the calibration camera on a tripod, for
example.
2
Connect the supplied connection cables as illustrated.
3
Connect the supplied AC adapter to the calibration
camera.
Main projector
Sub projector
Connection cable
Connection
cable
Calibration
camera
CTRL1
CTRL2
to RS-232C
connector on
sub projector
to RS-232C connector on
main projector
AC adapter
Содержание LKRA-010
Страница 51: ...Sony Corporation ...


