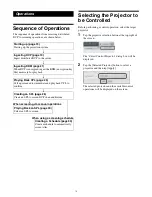
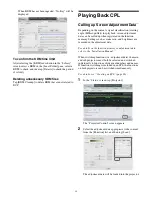
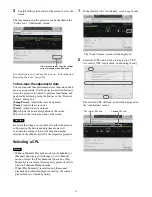
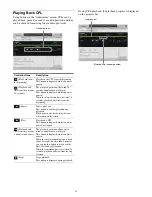
background image

32

2

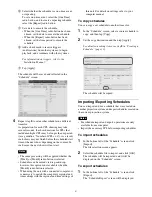
Select a schedule period to export, and then click 
[Apply].

The schedule file is exported.
Schedule files are normally stored in the downloads 
folder. After downloading is complete, we 
recommend renaming the file to a name that is easy to 
remember.

Projecting Images Using 
an External Playback 
Device

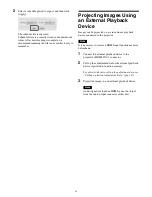
Images can be projected on a screen from a playback 
device connected to the projector.

Note

It is necessary to create an HDMI input function memory 
beforehand.

1

Connect the external playback device to the 
projector’s HDMI IN 1/2 connector.

2

Call up the adjustment data for the external playback 
device registered to function memory. 

For details on how to call up the adjustment data, see 
“Calling up Screen Adjustment Data” (page 23).

3

Project the images on an external playback device.

Note

Audio signals included in HDMI cannot be output 
from the audio output connector of this unit.

Содержание LKRA-010

Страница 1: ...rating Instructions Before operating the unit please read this manual and supplied Safety Regulations thoroughly and retain it for future reference SRX R515P SRX R515 LKRA 010 LKRA 011 LKRA PCAB1 4 573 779 11 1 2015 Sony Corporation ...

Страница 2: ...Projecting Images Using an External Playback Device 32 Manually Controlling Theater Facilities 33 Others Opening Closing the 3D Filter 34 Opening the 3D Filter 34 Closing the 3D Filter 34 Calibrating the Screen 35 Installing the Calibration Camera 35 LCD Panel Displays 36 Preparation 36 Performing Calibration 37 Disconnecting the Calibration Camera 39 Attaching and Removing the Lens 40 Removing th...

Страница 3: ...s guide This includes instructions for screening controls in a theater how to create a screening schedule how to change lenses projector part names and product specifications Be sure to refer to this guide for instructions on daily usage Maintenance Manual This includes information such as instructions on periodic inspection maintenance and cleaning Service Manual This is intended for use by servi...

Страница 4: ...erver LKRA 007 Touch Panel Monitor SRX R515 Digital Cinema Projector sub projector LKRA 010 Dual System Accessory Kit base and conduit kit LKRA 011 3D filter and holder 3D projection kit LKRA PCAB1 Projector Auto Calibration Box camera for automatically calibrating convergence LKRA 007 Main projector LKRA 010 LKRA 011 to sub projector Sub projector Network hub XCT S10 to main projector LKRA 010 LK...

Страница 5: ...moving the Lens page 40 c Lens attachment part Used to attach a separately sold lens For further details see Attaching and Removing the Lens page 40 Rear a Status lights Shows the status of the projector For further details see How to Read the Indicators page 43 b EMERGENCY switch Forcibly shuts off the lamp equipped with a cooling function c STATUS MESSAGE window Displays various messages Touch P...

Страница 6: ... System page 17 Left side a Lamp access panel lamp grill ventilation holes intake air filter A lamp access panel lamp grill ventilation holes intake and air filter are also located on the right side of the unit For details on lamp replacement refer to the Maintenance Manual For details on air filter cleaning refer to the Maintenance Manual b Ventilation holes intake air filter For details on air f...

Страница 7: ...rs page 43 f SERVER connector Used to connect to the server with the supplied PCI express cable 2 m g RS 232C connector This is not used in this system h Link B OUT connector Connect this connector on the main projector to the Link B IN connector on the sub projector This connector is not used on the sub projector i Link B IN connector Connect this connector on the sub projector to the Link B OUT ...

Страница 8: ...holes intake air filter For details on air filter cleaning refer to the Maintenance Manual e INGEST PORT 1 2 connector For inserting HDD or USB memory to ingest DCP KDM These can only be used for a USB HDD or USB memory device For further details see Ingesting from HDD via USB Connector page 19 and Ingesting from a USB Flash Drive page 21 f CRU DATAPORT For inserting HDD to ingest DCP KDM A CRU DA...

Страница 9: ... modular jack For future expansions i DATA connector RJ 45 modular jack Used to connect to a theater network LAN and allow linking and data transfer with other systems Be sure to use a CAT6 or above for the LAN cable j CTRL connector RJ 45 modular jack Used to connect to a theater network LAN and allow linking and data transfer with other systems Be sure to use a CAT6 or above for the LAN cable k ...

Страница 10: ...touch the touch panel monitor screen Doing so may prevent normal operations after start up When the power is on do not remove the touch panel monitor cable e Monitor stand This is equipped with a tilt mechanism The monitor s position can be adjusted in the up down left and right directions Bottom a VGA connector D sub 15 pin female Used to connect to the server s VGA connector with the supplied VG...

Страница 11: ... d Power input connector For connecting the supplied AC adapter LKRA 011 3D filter and holder The 3D filters are installed to open to the left and right in the following sample illustration a Lock pin Locks the 3D filter holder b 3D filter holder Holds the 3D filter c 3D filter For details on using the 3D filter see Opening Closing the 3D Filter page 34 ...

Страница 12: ...ction area of the LCD panel Only the LEDs that correspond to a currently controllable function will light Touching the sensor with a pen or your fingernails may result in erroneous operation Be sure to touch the sensor firmly with your fingertips g Projector status LED Indicates the connection status between the LKRA PCAB1 and the projectors h GND connector Connects to safety grounding i CTRL1 con...

Страница 13: ...te server date c Next SPL title for screening d SPL playback status Displays the SPL playback status using the same icons used for the playback control buttons For details on the buttons see Playing Back CPL page 25 e Current SPL title f Progress bar Displays the progress of the title currently being screened by CPL or SPL frames g Elapsed showing time Displays an approximate time Although there m...

Страница 14: ... see Selecting the Projector to be Controlled page 18 p Playback mode display button Displays the playback mode Tap the button to switch the playback mode Manual Playback is performed manually Scheduled Playback is performed using a schedule You can select the Play Manually checkbox to perform playback manually even in schedule mode q Version information Displays the version information of the pro...

Страница 15: ...tarting up the server do not touch the touch panel monitor screen Doing so may prevent normal operations of the touch panel monitor after start up Logging Into the System Caution It is necessary to pre register as a user to log in to the projection system For further details refer to the Installation Manual 1 Tap your own user name in the user list and then tap the Password column A virtual keyboa...

Страница 16: ...password and new password and then tap OK Tap each field to display a virtual keyboard and enter the necessary information 3 Tap OK when the confirmation screen appears Your password will be changed Changing the login user 1 Tap on the upper right of the screen 2 Select Logout and then tap OK The Login screen will be displayed 3 Change the user and log in Starting the Projectors 1 In the Status sc...

Страница 17: ...indicators and LAMP indicators on the rear of the projectors will turn to blinking green while cooling Once cooling is complete the LAMP indicators will turn to solid red Leave the system as it is at this point 3 Once the MAIN and LAMP indicators turn solid red and the main projector s IMB indicator begins blinking red the sub projector s IMB indicator will remain red move the power switch to off ...

Страница 18: ... Selected Projector button to select a projector and then tap Apply The selected projector and the available control operations will be displayed on the screen Starting up page 15 Starting up the projection system Ingesting DCP page 19 Ingest distributed DCP to the server Ingesting KDM page 21 When DCP is encrypted ingest the KDM encryption key file necessary for playback Playing Back CPL page 23 ...

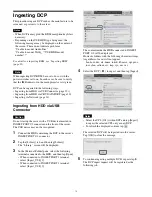
Страница 19: ...NGEST PORT1 2 connector on the front of the server The USB device may not be recognized 1 Connect the HDD containing the DCP to the server s INGEST PORT 1 2 connector 2 Tap the Library tab and then tap Library The Library screen will be displayed 3 In the External Folder pane select the following terminals connected to the HDD and then tap Open When connected to INGEST PORT 1 terminal select Inges...

Страница 20: ... jobs Note If you pause a job and then remove it the next job will enter a paused state Tap Resume to resume that job To check ingested DCP Ingested DCP can be checked in the Library screen s Local Folder list Select DCP to display DCP ingested to the server in the Local Folder list The following operations are available for each button in the Local Folder list Edit The name of the selected DCP ca...

Страница 21: ...n key file to the server When DCP is encrypted a key icon will be displayed on any CPL containing DCP DCP can be opened in the Library screen KDM can be ingested in the following ways Ingesting from a USB Flash Drive page 21 Ingesting from a Network Folder page 22 Ingesting from a USB Flash Drive Caution Do not start up the server with a USB device inserted in INGEST PORT1 2 connector on the front...

Страница 22: ...rom a Network Folder If a KDM is copied to a preset network folder it will be automatically ingested For details on network folder settings see the Installation Manual Execute the following steps to ingest to a network folder that has not been set 1 Tap the Library tab and then tap Library The Library screen will be displayed 2 Select a network folder select the KDM you want to ingest and then tap...

Страница 23: ...registered in the function memory Settings such as zoom ratio and brightness are recorded in the adjustment data For details on the function memory or adjustment data refer to the Installation Manual When switching functions i e adjustment data the main and sub projectors must both be selected and switched individually to functions of identical numbers and names If function switching is included i...

Страница 24: ...ave for either the main or sub projector the fine tuned adjustment data will overwrite the setting values of the function number selected in the Function list for the respective projector Selecting a CPL Notes When in Schedule Playback mode tap Scheduled or Manual the display will change to set to Manual mode or select the Play Manually check box Play Manually is convenient for temporary playback ...

Страница 25: ...l 30 seconds playback will start from the beginning Pause Pauses playback This button is only displayed during playback While paused the last displayed frame will remain on the screen Play Plays back a CPL This button is displayed while content is paused or stopped Playback will start from the previous 5 minutes in advance The playback position will advance 5 minutes and playback will begin This b...

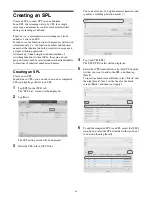
Страница 26: ...o functions of identical numbers and names Creating an SPL Create a new SPL In addition to CPLs you can add cues such as completed SPLs and lighting controls to an SPL 1 Tap SPL in the SPL tab The SPL List screen will be displayed 2 Tap New The SPL setting screen will be displayed 3 Enter the SPL title in SPL Title You can enter up to 128 alphanumeric characters and symbols excluding quotation mar...

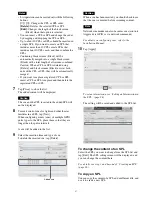
Страница 27: ...splayed Caution The cue and the CPL inserted in the added SPL will not be displayed 8 To insert control cues for lights and other theater facilities in an SPL tap New When configuring events cues of multiple GPIO pulse types to the SPL place them so that they are longer than the pulse intervals A cue will be added to the list 9 Select the insertion time and type of cue To delete the inserted cue t...

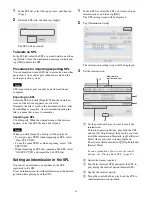
Страница 28: ...ID as when exporting select Old SPL UUID When importing an SPL that contains a Sub SPL select Old SPL UUID and import the Sub SPL first Setting an Intermission in the SPL You can set an intermission anywhere in the CPL registered to the SPL To set an intermission insert the intermission at the desired position while playing back the CPL 1 In the SPL list select the SPL you want to add an intermiss...

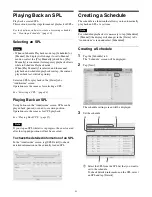
Страница 29: ...SPL tab The GPI Triggered screen will be displayed 2 Select the GPI signal and then tap Edit The Edit GPI triggered SPL screen will be displayed 3 Specify the duration for which playback is enabled 1 Select the SPL for which to start playback 2 Determine the duration for which the playback will be enabled and change the start and end dates 3 Tap Apply Note Tap Details to display detailed informati...

Страница 30: ...um screen SPLs can be played back paused or cued to a certain position Operations are the same as for CPL playback See Playing Back CPL page 25 Note If you stop an SPL while it is in progress the cues located after the stopped position will not be executed To check the detailed information of an SPL In the Auditorium screen tap SPL Detail to check detailed information on the currently loaded SPL C...

Страница 31: ...Month radio button is selected Schedules can be moved via drag and drop however this option is not available when the Month radio button is selected When using the unit with a connected computer it is necessary to match the computer s regional and time settings with the regional and time settings of this unit For details on settings refer to your computer manual To copy schedules You can copy a se...

Страница 32: ...om a playback device connected to the projector Note It is necessary to create an HDMI input function memory beforehand 1 Connect the external playback device to the projector s HDMI IN 1 2 connector 2 Call up the adjustment data for the external playback device registered to function memory For details on how to call up the adjustment data see Calling up Screen Adjustment Data page 23 3 Project t...

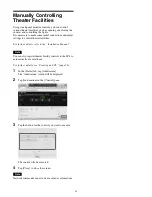
Страница 33: ...ties For further details refer to the Installation Manual Note You can also register theater facility controls to the SPL to automatically execute them For further details see Creating an SPL page 26 1 In the Status tab tap Auditorium The Auditorium screen will be displayed 2 Tap Automation in the Control pane 3 Tap the button for the control you want to execute The control will be executed 4 Tap ...

Страница 34: ... of the filter that opens to the right is located at the bottom of the holder Standard installation Left right opening installation Illustrations of a standard installation are used for the explanations in the following sections Opening the 3D Filter Pull out the 3D filter in the direction of the arrow Even if you pull the filter all the way out it will not fall out of the holder due to the lock p...

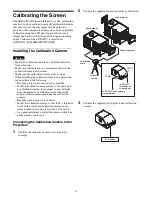
Страница 35: ...following Keep the projection room as dark as possible Install the calibration camera close to the glass and use blackout curtains for example to prevent light from the projector or reflections from other light sources in the room from entering the calibration camera Keep the screen gain at 2 4 or below Install the calibration camera so that the T distance between the screen and calibration camera...

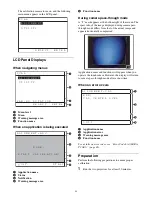
Страница 36: ... names and functions will appear when you operate the touch sensor However the display will return to camera pass through mode after a short time When an error occurs a Application name b Application error c Warning message area d Function name For details on error codes see Error Code List LKRA PCAB1 page 46 Preparation Perform the following preparations to ensure proper calibration 1 Run the two...

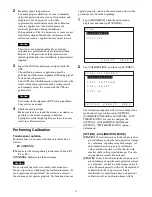
Страница 37: ...s FX XXXXXX FX Indicates the corresponding touch sensor button F1 F2 or F3 XXXXXX Indicates the function name Caution Do not operate the server via touch panel monitor or browser operations while using the calibration camera If such operations are performed the calibration camera s functions may not operate properly If a function does not operate properly return to the main menu and start the proc...

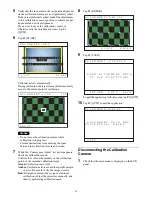
Страница 38: ...e test pattern will switch and the camera position and zoom will be adjusted in step 4 according to the setting 3 Check the test pattern and confirm whether manual adjustment of the projectors was performed properly If manual adjustment was not performed properly tap F1 QUIT and repeat the procedure from Preparation page 36 Note Depending on the screen you can tap F2 SCOPE or F2 FLAT to switch the...

Страница 39: ...the markers on the calibration points of the captured calibration image Green Calibration successful Amber Calibration errors exceed the specific margin of error Be sure to verify the image visually Red Divergence exceeds the scope of electronic calibration Adjust the projectors manually and then try performing calibration again 8 Tap F3 ENTER 9 Tap F3 SAVE To quit the application without saving t...

Страница 40: ...ctor switch must be set to off before changing the lens Caution Changing the lens while the power is on may damage the projector 1 Shut down the projection system 2 Move the projector power switch to the off position For detailed steps see Shutting Down the System page 17 Removing the Lens 1 Press the lock button all the way and after the lock is released press and hold the lock button and lift th...

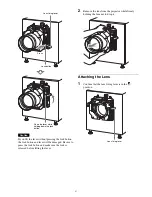
Страница 41: ...ock button and make sure the lock is released before lifting the lever 2 Remove the lens from the projector while firmly holding the lens not to drop it Attaching the Lens 1 Confirm that the lens fixing lever is in the position Raise the lever while holding down the lock button Lock button Press Lens fixing lever Lens fixing lever ...

Страница 42: ... lever while the lens flange and shift base level are contacting each other Caution If locked while there is a gap between the lens flange and shift base level the lens flange base will become warped Be sure to attach the lens while supporting it Make sure there are no gaps in the 4 locations on the shift base level Lens flange Shift base level Check that there are no gaps in each of the four loca...

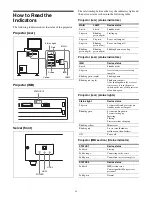
Страница 43: ...linking green rapid Shutting down or cooling IMB Device status Lit red Standby mode Lit green Access from server or start up complete Blinking green rapid Shutting down Blinking red rapid Shutdown complete After shutting down the server it is necessary to turn the power switch on the rear of the projector off and on again Status light Device status Lit green System stable and projector on standby ...

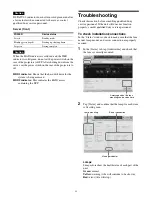
Страница 44: ...onsulting qualified Sony service personnel If the unit still does not function properly consult qualified Sony service personnel To check installation connections In the Status window check to make sure that the lens mount lamp mount and server connection are properly married 1 In the Status tab tap Auditorium and check that the lens is correctly mounted 2 Tap Status and confirm that the lamp for ...

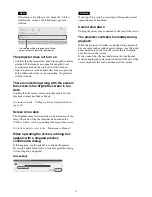
Страница 45: ...atus Status screen and change the lamp if necessary For further details refer to the Maintenance Manual When operating the screen a dialog box appears with a stopped process confirmation dialog If this happens tap Continue to continue the process If you add a check mark to Don t ask me again this dialog will no longer be displayed Screenshot Caution If you tap Stop script processing will stop and ...

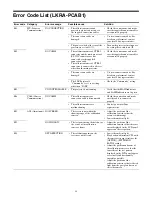
Страница 46: ...the Community setting E03 UNCONTROLLABLE The projector is not running Verify that the MAIN indicators and LAMP indicators are lit green E06 CAM Camera Communication NO COMM The calibration camera s connection cable is disconnected Check the connection and make sure the cable is connected properly The calibration camera is malfunctioning Contact your local Sony representative E43 ADJ Adjustment NO ...

Страница 47: ... centers of the to projectors are as close to each other as possible E62 UNKNOWN SIGNAL The image used for adjustment is not detected Verify that the adjustment CPL is being played back E63 NO CENTER POINT An error had occurred with the image used for adjustment The calibration camera cannot detect the image Return to the main menu and perform calibration again E64 CAMERA SHAKE The calibration cam...

Страница 48: ...ding lens shift block and feet Excluding touch panel monitor and projection parts Status lights ducts etc Weight Approx 145 kg 319 lb Excluding touch panel monitor and lamp Operating temperatures 5 C to 35 C 41 F to 95 F Operating humidity 35 to 85 without condensation Storage temperatures 20 C to 60 C 4 F to 140 F Storage humidity 10 to 90 Supplied accessories Key for removing housing 5 Safety Re...

Страница 49: ...in width height thickness including protrusions Thickness direction changes by adjusting at installation Mass Approx 10 5 kg Approx 23 oz 2 4 lb including LKRA 006 equivalent 3D filter Supplied accessories Filter bracket attaching screws M8 8 Hexagonal spacers 8 Washers 8 Spring washers 8 Filter attaching screws M4 8 Before Using This Unit 1 LKRA PCAB1 Projector Auto Calibration Box Power requirem...

Страница 50: ...TEMS SONY WILL NOT BE LIABLE FOR THE TERMINATION OR DISCONTINUATION OF ANY SERVICES RELATED TO THIS UNIT THAT MAY RESULT DUE TO CIRCUMSTANCES OF ANY KIND Resolution Frame Rate 720 480 59 94p 60p 720 480 59 94i 60i 720 576 50p 720 576 50i 1280 720 59 94p 60p 1280 720 50p 1920 1080 59 94p 60p 1920 1080 50p 1920 1080 23 98p 24p 1920 1080 59 94i 60i 1920 1080 50i VGA 640 480 60 XGA 1024 768 60 UXGA 16...

Страница 51: ...Sony Corporation ...
Отзывы: