


42
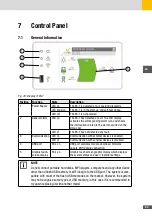
6 Commissioning
6�1
System Switching On
Before starting the system, carry out the following checks
■
Check that the inverter is correctly fixed to the wall.
■
Check that the PV string connections have been made correctly.
■
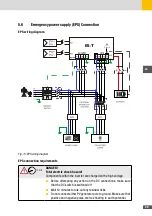
Check that the AC GRID and EPS (if present) connections have been made correctly.
■
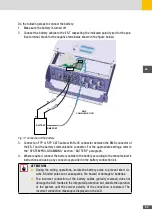
Check that the BATTERY connections have been made correctly.
■
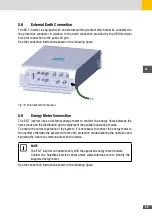
Check that the EARTH connection (MANDATORY) has been made correctly.
■
Verify that the ENERGY METER connections have been made correctly.
■
Verify that SMART LOAD connections (if present) have been made correctly.
■
Check that the connection cover is closed and secured with the fixing screws.
If the checks listed above were successful, proceed as follows:
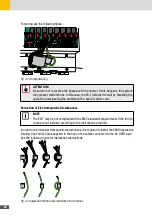
1. Turn on the DC disconnector switch (position 1).
2. Turn on the external main AC line switch.
3. Turn on the AC GRID and EPS (if present) circuit breakers.
4. Turn on the BATTERY circuit breaker (if present) and turn on the HV battery.
5. Wait for the display to turn on.
6. Start the inverter by turning the ON/OFF switch in position 1.
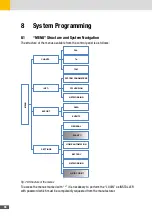
AUTO-TEST execution (Italy - CEI 0-21)
The self-test is relevant only for Italy (CEI-021). If the ES-T is configured for Italy, the self-test
is available through the service menu on the display. The self-test for Italy is aimed at verifying
the upper and lower limits of the voltage and frequency of the network, after exceeding which
the ES-T disconnects from the network. If the test fails, the ES-T will not be able to connect to
the electrical network. Refer to the SYSTEM PROGRAMMING section for operational details.
6�2
System Switching Off
Proceed as follows to switch off the system:
1. Enable the inverter stand-by by turning the ON/OFF switch in the “0” position.
2. Turn off the DC switch (position 0).
3. Turn off the AC GRID and EPS (if present) circuit breakers.
4. Turn off the BATTERY circuit breaker (if present) and turn off the HV battery.
5. Wait for the display to turn off.
10 min
DANGER!
Fatal electric shock hazard!
Components within the inverter are charged with a high voltage.
■
Wait 10 minutes to rule out any residual risks
Содержание 10ES-T
Страница 1: ...Instruction Manual SolarMax ES T series 5ES T 6ES T 8ES T 10ES T ...
Страница 10: ...10 3 2 Function Fig 2 Function of ES T ...
Страница 22: ...22 5 2 Electrical connection diagram ES T Fig 6 Electrical connection diagram ...
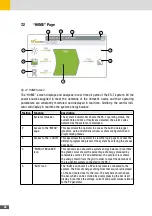
Страница 74: ...74 Fig 52 Login page The HOME page will appear Fig 53 HOME page ...


