background image

SKYZER TECHNOLOGIES 


PAGE 14 OF 81 


INGENICO 5100 ANZ VERSION 4.8 OPERATING GUIDE   

Version 1.1 

2.2.2.2  Green/ENTER Key 

The  ENTER  key  is  used  to  signal  the  end  of  a  PIN  or  Signature  entry  or  a  YES 
response to a question.   

2.2.2.3  Yellow/CLEAR Key 

The CLEAR  key  is  used to clear  data  that has  been  entered  incorrectly  or  to 
signal a NO response to a question. 

2.2.2.4  Red/CANCEL Key 

The CANCEL key is used to cancel the current action and return to the main 
display. 

2.2.2.5  Function Key 

The FUNCTION key is disabled. 

2.2.2.6  Feed Key 

The FEED key is disabled. 

2.2.2.7  'Soft' Function Keys 

These  are  the  three keys  located just  below the  display  screen,  also  referred 
to as CHQ, SAV & CR. They are controlled by the software and their function 
changes  depending  on  the  prompts  displayed  on  the  bottom  line  of  the 
display.  The function of these keys is displayed on the bottom line when they 
are available for use.  

2.2.3


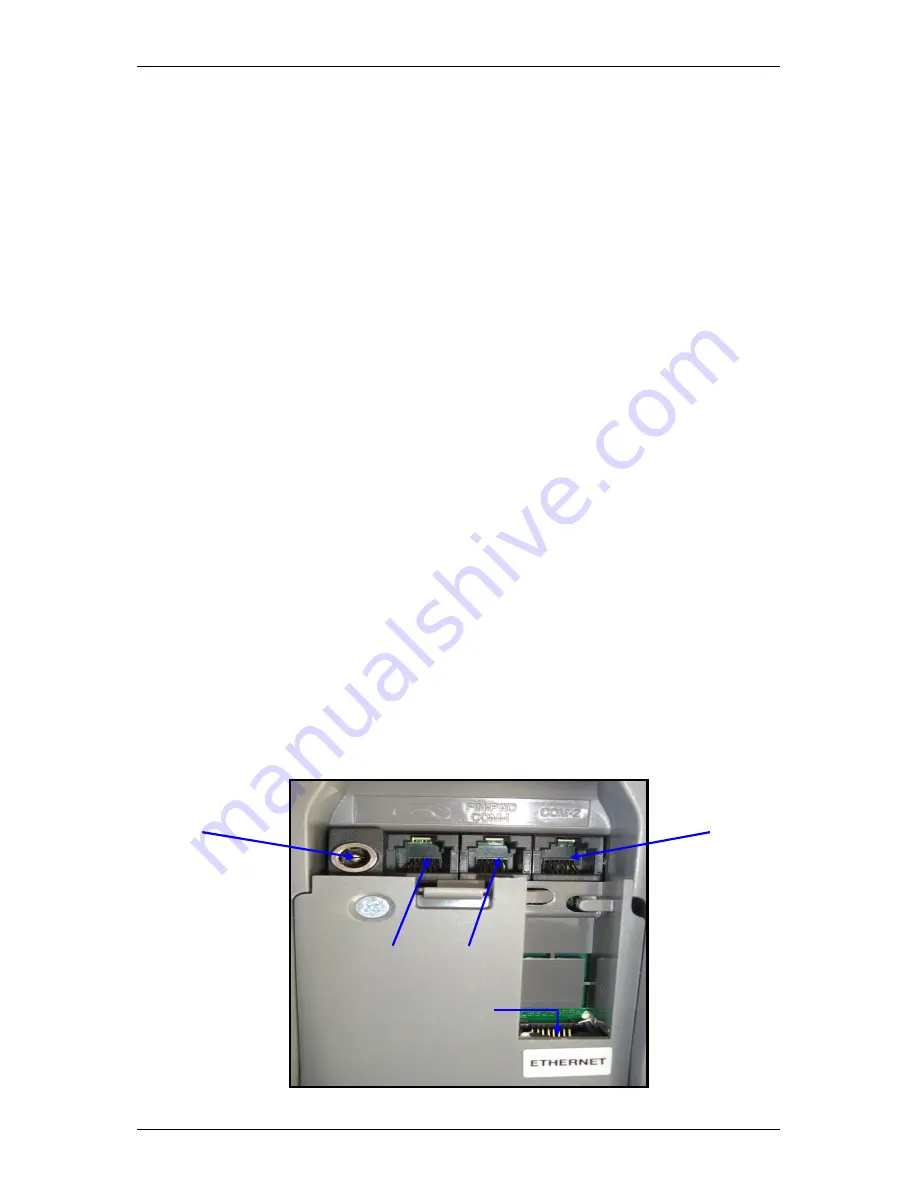
Port Layout 

The following ports are as defined at the rear of the i5100 terminal.  


Power Port 

Telephone/
PSTN Port 

Pinpad  Port 
(RS232-1) 

ECR 

Interface 

Port (RS232-2) 


Ethernet Port 

Содержание Ingenico 5100

Страница 1: ...Ingenico 5100 ANZ Version 4 8 Operating Guide VERSION 1 1 Document ID 0072...

Страница 2: ...2 3 Port Layout 14 2 2 4 Installation of an i3010 Pinpad 15 3 PASSWORDS 17 4 SETUP 18 4 1 FLOWCHART CONFIGURATION 18 4 1 1 Overview Procedure to Activate ANZ Terminal 18 4 1 2 Dial Up Configuration Fl...

Страница 3: ...tality Top Up Authorisation 63 5 10 3 2 Hospitality Extra Charges Transaction 64 5 11 CHEQUE VERIFICATION AUTHORISATION 65 5 12 MERCHANT ADMINISTRATION FUNCTIONS 66 5 12 1 Terminal Totals 66 5 12 2 Se...

Страница 4: ...E Version 1 1 TABLE OF FIGURES Figure 1 Features of the Ingenico 5100 7 Figure 2 i5100 Keyboard 8 Figure 3 Features of Ingenico i3010 12 Figure 4 i3010 Keyboard 13 Figure 5 Cable Port Locations 79 Fig...

Страница 5: ...New Zealand Ingenico 5100 ANZ Operating Manual Dealers ANZ Operating Guide Ingenico 5100 ANZ Version 4 8 Operating Guide doc DOCUMENT OWNER All changes to this document must be approved and signed off...

Страница 6: ...on of Skyzer s Ingenico 5100 EFTPOS terminal in New Zealand 2 HARDWARE OVERVIEW 2 1 The INGENICO 5100 Terminal The Ingenico 5100 Terminal consists of the following elements The Terminal Handset The ca...

Страница 7: ...RSION 4 8 OPERATING GUIDE Version 1 1 Easy loading printer 2 1 1 Features of the i5100 Figure 1 Features of the Ingenico 5100 Smart card reader Large graphic backlit display Connection Ports SAM compa...

Страница 8: ...aracter The Red CANCEL key cancels the procedure in progress goes to idle state The Green ENTER key validates the input selections and information 2 1 2 The i5100 Keyboard These are the 0 to 9 keys Th...

Страница 9: ...EED Key The FEED key is used to feed the paper on the receipt printer 2 1 2 6 Soft Function Keys These are the three keys located just below the display screen also referred to as CHQ SAV CR They are...

Страница 10: ...n be read either from bottom to top or from top to bottom with the stripe facing the terminal Use a regular movement in order to ensure a reliable card read 2 1 3 2 Smart Card IC Card Insert the card...

Страница 11: ...ERSION 4 8 OPERATING GUIDE Version 1 1 2 2 The INGENICO i3010 Pinpad The Ingenico i3010 pinpad consists of the following elements The pinpad handset The pinpad cable that connects the pinpad to the i5...

Страница 12: ...R TECHNOLOGIES PAGE 12 OF 81 INGENICO 5100 ANZ VERSION 4 8 OPERATING GUIDE Version 1 1 2 2 1 Features of the i3010 Pinpad Figure 3 Features of Ingenico i3010 18 key keyboard Backlit display Connection...

Страница 13: ...oft function Navigation keys located directly under the display CHQ SAV CR to allow the user to select options on the display 2 2 2 1 Keypad These are the 0 to 9 keys They are used for PIN entry Keybo...

Страница 14: ...n to the main display 2 2 2 5 Function Key The FUNCTION key is disabled 2 2 2 6 Feed Key The FEED key is disabled 2 2 2 7 Soft Function Keys These are the three keys located just below the display scr...

Страница 15: ...100 terminal will be displaying Initializing DUKPT Please Wait aprox 20 sec while synchronising with the i3010 pinpad 6 The i3010 pinpad will begin the 2 phase synchronisation process automatically Th...

Страница 16: ...will prompt for the serial number of the i3010 pinpad to be entered Key the 10 digit serial number found on the back of the i3010 pinpad into the i5100 terminal and press ENTER 11 The i5100 terminal w...

Страница 17: ...SSWORD PAGE NUMBER EFTPOS Configuration 3824 24 Multi Merchant Configuration 7418 30 Reset Merchant Configuration Memory Reset 9902 32 Remote Key Injection Initialisation 87 33 Enable Disable Terminal...

Страница 18: ...INIT REQUIRED appears at attempted logon then refer to page 33 for instructions to perform RKI then proceed to logon terminal TERMINAL CONFIGURATION FUNC 3824 Configure the Terminal ID and select pre...

Страница 19: ...The Ingenico 5100 can be configured to operate via Dynamic Host Configuration Protocol DHCP or Static IP address depending on the router connectivity configuration Dynamic Host Configuration Protocol...

Страница 20: ...uired and press ENTER To put in a pause or wait put in the character A by pressing 2 and then FUNC The HOST PHONE NO is set by default as 08796 Press ENTER Save Config Y N Press ENTER to save or CLEAR...

Страница 21: ...RT YES ena NO Enable DHCP Y N 1 YES is selected by default Press ENTER If the site requires static IP address press 2 NO Press ENTER COMPLETED START TCP IP Y N Press ENTER to start TCP IP or CLEAR to...

Страница 22: ...dary Host IP address is set as default 156 13 216 220 press ENTER Manually key in the Static IP address Subnet Mask Gateway IP address followed by ENTER START YES NO Enable DHCP Y N 1 YES is selected...

Страница 23: ...merchants START Press ENTER at the CONFIG PARAMS Terminal will display activated merchants 1 Merchant 1 2 Merchant 2 3 Merchant 3 Press the corresponding number key followed by the ENTER to select fo...

Страница 24: ...ID XXXXXXXXXXXXX XXXXXXXXXXXXX XXXXXXXXXXXXX XXXXXXXXXXXXX This parameter specifies the Terminal ID that ENZ assigns to the terminal Press ENTER 5 0 NII NII NII NII 030 030 030 030 This parameter spe...

Страница 25: ...this is the same as Tone dial however the modem ignores the health of the dial tone on the line and simply dials the configured phone number to call the host This is used where the quality of the dial...

Страница 26: ...6001 6001 6001 This parameter specifies the TCP IP Port Number of the ENZ IP Host Press ENTER 5 0 ENABLE DHCP Y N ENABLE DHCP Y N ENABLE DHCP Y N ENABLE DHCP Y N 1 1 1 1 YES 2 YES 2 YES 2 YES 2 NO NO...

Страница 27: ...o call the host This is used where the quality of the dial tone is low 10 0 PABX PABX PABX PABX 1A 1A 1A 1A Press ENTER to bypass if no PABX prefix is required This parameter specifies the PABX number...

Страница 28: ...6001 This parameter specifies the TCP IP Port Number of the ENZ IP Host Press ENTER 5 0 ENABLE DHCP Y N ENABLE DHCP Y N ENABLE DHCP Y N ENABLE DHCP Y N 1 1 1 1 YES 2 YES 2 YES 2 YES 2 NO NO NO NO Pres...

Страница 29: ...inal prompts to save configuration Press ENTER to save configuration on the terminal or press CLEAR to exit and return to idle screen 10 0 START TCP IP Y N START TCP IP Y N START TCP IP Y N START TCP...

Страница 30: ...ter 30 seconds of inactivity 4 0 ACTIVE MERCHANTS ACTIVE MERCHANTS ACTIVE MERCHANTS ACTIVE MERCHANTS 12345678 12345678 12345678 12345678 Press 3 to Set Active Merchants Incrementally enter the number...

Страница 31: ...tivating selected merchants If there are Tipping or Hospitality transactions stored on the terminal they ll require be uploading or completing prior to deactivating selected merchants Step Terminal Di...

Страница 32: ...r SAV or press the corresponding number on the terminal to select the required Merchant followed by ENTER 4 0 RESET RESET RESET RESET MERCHANT CONFIG MERCHANT CONFIG MERCHANT CONFIG MERCHANT CONFIG EN...

Страница 33: ...escription 1 0 EFTPOS NZ LTD Press FUNC 2 0 FUNCTION FUNCTION FUNCTION FUNCTION Key in 87 and press ENTER 3 0 REMOTE INIT REMOTE INIT REMOTE INIT REMOTE INIT IN PROGRESS IN PROGRESS IN PROGRESS IN PRO...

Страница 34: ...CHEQUE AUTH CHEQUE AUTH CHEQUE AUTH OFF OFF OFF OFF Press CHQ to enable or disable the CHEQUE AUTHORISATION function followed by ENTER key 7 0 CC TIPPING CC TIPPING CC TIPPING CC TIPPING OFF OFF OFF...

Страница 35: ...or press CANCEL to disable the INTERFACED function and press ENTER 12 1 LICENSE KEY LICENSE KEY LICENSE KEY LICENSE KEY XXXXXXX XXXXXXX XXXXXXX XXXXXXX Key in the License Key and press ENTER NOTE The...

Страница 36: ...er When complete press ENTER to go to next line 4 0 MERCHANT NAME MERCHANT NAME MERCHANT NAME MERCHANT NAME XXXXXXXXXXXXXXXX XXXXXXXXXXXXXXXX XXXXXXXXXXXXXXXX XXXXXXXXXXXXXXXX This parameter specifies...

Страница 37: ...d number of spaces before keying in text To insert a space press 1 followed by the function key 5 times for a single space Repeat until required number of spaces has appeared Alphanumeric Key Entry Th...

Страница 38: ...chant to restart the terminal by following the steps below Step Terminal Display Description 1 0 EFTPOS NZ LTD Press FUNC 2 0 FUNCTION FUNCTION FUNCTION FUNCTION Key in 86 and press ENTER 3 0 RESTART...

Страница 39: ...merchant will need to be logged on individually 3 0 P P P PROCESSING NOW ROCESSING NOW ROCESSING NOW ROCESSING NOW PROCESSING NOW will be displayed 4 0 ACCEPTED ACCEPTED ACCEPTED ACCEPTED ACCEPTED wil...

Страница 40: ...t the cardholder s card 3 0 PURCHASE AMOUNT PURCHASE AMOUNT PURCHASE AMOUNT PURCHASE AMOUNT XX XX XX XX XX XX XX XX Key in the purchase amount and press ENTER 4 0 CASH OUT AMOUNT CASH OUT AMOUNT CASH...

Страница 41: ...RATING GUIDE Version 1 1 10 0 ACCEPTED ACCEPTED ACCEPTED ACCEPTED Transaction has been ACCEPTED with PIN entry and prints the transaction receipt 11 0 DECLINED DECLINED DECLINED DECLINED Transaction h...

Страница 42: ...rawal amount followed by the ENTER key NOTE Cash amounts must be multiples of the minimum currency increment 10 cents 4 0 A A A AWAITING ACCOUNT WAITING ACCOUNT WAITING ACCOUNT WAITING ACCOUNT The ter...

Страница 43: ...tion as each terminal ID will be unique 3 0 AWAITING MER PIN AWAITING MER PIN AWAITING MER PIN AWAITING MER PIN Terminal waits on the Merchant Pin 4 0 MERCHANT PIN MERCHANT PIN MERCHANT PIN MERCHANT P...

Страница 44: ...count type on the pinpad 16 0 ACCOUNT XX XX ACCOUNT XX XX ACCOUNT XX XX ACCOUNT XX XX CHQ SAV CR CHQ SAV CR CHQ SAV CR CHQ SAV CR The pinpad will prompt for account selection Ask the cardholder to sel...

Страница 45: ...both terminal and pinpad screen The merchant presses the ENTER key to accept the cardholder s signature after signature matches with the card 23 0 SIG DECLINED SIG DECLINED SIG DECLINED SIG DECLINED S...

Страница 46: ...he card number and press ENTER 4 0 EXP EXP EXP EXPIRY MMYY IRY MMYY IRY MMYY IRY MMYY XXXX XXXX XXXX XXXX Enter the expiry date as shown on card Ensure that numbers are in month year format Key in exp...

Страница 47: ...a refund transaction 6 0 SWIPE OR SWIPE OR SWIPE OR SWIPE OR INSERT CARD INSERT CARD INSERT CARD INSERT CARD Press FUNC at SWIPE OR INSERT CARD prompt 7 0 CARD NUMBER CARD NUMBER CARD NUMBER CARD NUMB...

Страница 48: ...VERSION 4 8 OPERATING GUIDE Version 1 1 13 0 ACCEPTED ACCEPTED ACCEPTED ACCEPTED Transaction has been ACCEPTED and prints the transaction receipt 14 0 DECLINED DECLINED DECLINED DECLINED Transaction h...

Страница 49: ...ntil the REMOVE CARD prompt is displayed If the card is removed to early the transaction will be cancelled 3 0 PURCHASE AMOUNT PURCHASE AMOUNT PURCHASE AMOUNT PURCHASE AMOUNT 0 00 0 00 0 00 0 00 Key i...

Страница 50: ...nsaction 15 0 PROCESSING NOW PROCESSING NOW PROCESSING NOW PROCESSING NOW PROCESSING NOW will be displayed on the terminal and pinpad 16 0 REMOVE CARD REMOVE CARD REMOVE CARD REMOVE CARD Remove card f...

Страница 51: ...ansaction is enabled the merchant has the ability to swipe or insert the card to begin the Authorisation transaction Only applicable when manually selecting Auth transaction Press ENTER to scroll thro...

Страница 52: ...rieving the selected transaction from the terminal 5 0 TRAN XXXXXX TRAN XXXXXX TRAN XXXXXX TRAN XXXXXX AUTH AUTH AUTH AUTH CARD XXXXXX XXXX CARD XXXXXX XXXX CARD XXXXXX XXXX CARD XXXXXX XXXX TOTAL AMT...

Страница 53: ...NUMBER TRANS NUMBER TRANS NUMBER TRANS NUMBER 2 CARD NUMBER 2 CARD NUMBER 2 CARD NUMBER 2 CARD NUMBER 3 AUTH NUMBER 3 AUTH NUMBER 3 AUTH NUMBER 3 AUTH NUMBER 4 PURCHASE AMOUNT 4 PURCHASE AMOUNT 4 PUR...

Страница 54: ...SE AMOUNT 5 TIP AMOUNT 5 TIP AMOUNT 5 TIP AMOUNT 5 TIP AMOUNT 6 TOTAL AMOUNT 6 TOTAL AMOUNT 6 TOTAL AMOUNT 6 TOTAL AMOUNT Select the desired search criteria by pressing the corresponding number on the...

Страница 55: ...actions that are currently stored on the terminal NOTE Check to see if the Total Amount matches with the Total Amount of your tip transaction receipts If the TOTAL is correct press ENTER to upload the...

Страница 56: ...P AMOUNT 5 TIP AMOUNT 5 TIP AMOUNT 6 TOTAL AMOUNT 6 TOTAL AMOUNT 6 TOTAL AMOUNT 6 TOTAL AMOUNT Select the desired search criteria by pressing the corresponding number to retrieve and print the pending...

Страница 57: ...R to exit and proceed with step 8 0 6 0 PLS ADVISE STAFF PLS ADVISE STAFF PLS ADVISE STAFF PLS ADVISE STAFF OF TIP AMOUNT OF TIP AMOUNT OF TIP AMOUNT OF TIP AMOUNT Please advise the staff member of yo...

Страница 58: ...ERATING GUIDE Version 1 1 14 0 ACCEPTED ACCEPTED ACCEPTED ACCEPTED Transaction has been ACCEPTED for PIN entry and prints the transaction receipt 15 0 DECLINED DECLINED DECLINED DECLINED Transaction h...

Страница 59: ...minal waits for the cardholder to input the pin on the pinpad 5 0 CRD X XX CRD X XX CRD X XX CRD X XX PIN OR ENTER PIN OR ENTER PIN OR ENTER PIN OR ENTER The pinpad will now prompt for PIN entry or SI...

Страница 60: ...ENTER YES CLR NO ENTER YES CLR NO ENTER YES CLR NO Verify the cardholder s signature with the signature on the back of the card If the signature matches Press ENTER to accept and proceed with step 14...

Страница 61: ...rresponding number on the terminal to retrieve stored hospitality transaction Example Press 1 for TRANS NUMBER NOTE The details must be obtained from the original Hospitality Authorisation transaction...

Страница 62: ...X XX FINAL AMOUNT FINAL AMOUNT FINAL AMOUNT FINAL AMOUNT 0 00 0 00 0 00 0 00 To void the transaction press ENTER without keying in the final amount 10 0 VOID CANCEL VOID CANCEL VOID CANCEL VOID CANCEL...

Страница 63: ...Authorisation 3 0 RETRIEVE BY RETRIEVE BY RETRIEVE BY RETRIEVE BY 1 1 1 1 TRANS NUMBER TRANS NUMBER TRANS NUMBER TRANS NUMBER 2 CARD NUMBER 2 CARD NUMBER 2 CARD NUMBER 2 CARD NUMBER 3 AUTH NUMBER 3 AU...

Страница 64: ...TAL AMOU 6 TOTAL AMOU 6 TOTAL AMOUNT NT NT NT Select the desired search criteria by pressing the corresponding number on the terminal to retrieve stored hospitality transaction Example Press 1 for TRA...

Страница 65: ...0 00 0 00 Enter the purchase amount and press ENTER 6 0 PR PR PR PROCESSING NOW OCESSING NOW OCESSING NOW OCESSING NOW PROCESSING NOW will be displayed on the terminal and pinpad while communicating...

Страница 66: ...n on the display Press CHQ key to select TOTL 2 0 1 MERCHANT 1 1 MERCHANT 1 1 MERCHANT 1 1 MERCHANT 1 2 MERCHANT 2 2 MERCHANT 2 2 MERCHANT 2 2 MERCHANT 2 3 MERCHANT 3 3 MERCHANT 3 3 MERCHANT 3 3 MERCH...

Страница 67: ...OPTION SELECT OPTION SELECT OPTION XX XX OTHER XX XX OTHER XX XX OTHER XX XX OTHER Press CHQ to initiate a settlement inquiry for the current settlement period date will be shown Proceed with step 4...

Страница 68: ...CHANT 2 3 MERCHANT 3 3 MERCHANT 3 3 MERCHANT 3 3 MERCHANT 3 Only applicable with Multi Merchant setup Use the scroll key CHQ or SAV or press the corresponding number on the terminal to select the Merc...

Страница 69: ...acquirer transaction Step Terminal Display Description 1 0 SUPERVISOR SUPERVISOR SUPERVISOR SUPERVISOR XTRA INIT DUPL XTRA INIT DUPL XTRA INIT DUPL XTRA INIT DUPL Press ENTER until SUPERVISOR menu is...

Страница 70: ...bank approval to accept EOV transactions The following notes relate to the operation to the terminal s EOV operation Both debit and credit cards can be used for purchase and refund transactions in EO...

Страница 71: ...actions stored on the terminal NOTE A merchant must have bank approval to be able to accept EOV transactions Step Terminal Display Description 1 0 EFTPOS NZ LTD Press FUNC 2 0 FUNCTION FUNCTION FUNCTI...

Страница 72: ...keyboard test 4 2 GOOD CARD READ GOOD CARD READ GOOD CARD READ GOOD CARD READ Displays if the terminal was successfully able to read the magnetic stripe data 4 3 BAD CARD READ BAD CARD READ BAD CARD R...

Страница 73: ...rd test CLEAR to bypass the Keyboard test or CANCEL to cancel the function and go to COMMS test 8 4 LOOK AT LOOK AT LOOK AT LOOK AT PINPAD DISPLAY PINPAD DISPLAY PINPAD DISPLAY PINPAD DISPLAY Displays...

Страница 74: ...IONS FUNCTIONS Select desired function from option table listed below by pressing the corresponding number key to activate chosen option Example Press 0 key to print of Stored Transaction Totals NOTE...

Страница 75: ...hile printing all pending transactions If the terminal has no pending transactions it will display NO PENDING TRANSACTIONS Press 6 Print EMV Transactions PRINTING PRINTING PRINTING PRINTING PRINTING d...

Страница 76: ...R CLEAR ENTER OR CLEAR Press ENTER to enter Training Mode or CLEAR to exit Training Mode 4 0 PLEASE WAIT PLEASE WAIT PLEASE WAIT PLEASE WAIT The terminal briefly displays PLEASE WAIT and then returns...

Страница 77: ...ed pinpad re boot the terminal and continue processing transactions until the pinpad can be replaced 6 3 3 FULL MESSAGE ENCRYPTION Merchants and cardholders can have confidence in the benefits of incr...

Страница 78: ...NOT expose this apparatus to rain or moisture This product is approved for indoor use only Where necessary use a protection cover that prevents ingress of water DO NOT remove any screws or non operato...

Страница 79: ...te only from a power source as specified on the Power Supply Unit 7 5 CONNECTIONS Take due care when attaching cables Under no circumstances must the PSTN i e telephone cable be inserted into the RS23...

Страница 80: ...ift up the printer lid Figure 6 Opening Printer Lid Direction 7 7 PAPER SIZE The paper roll size is 57mm width and 50mm diameter Please take note of the direction of the paper roll Figure 7 Paper Roll...

Страница 81: ...AUS 61 2 9998 7555 Fax NZ 64 9 259 0323 AUS 61 2 9998 7544 Address Skyzer Limited Unit A4 1066 Great South Road Mt Wellington Auckland New Zealand Internet Access http www skyzer co nz Technical Ques...

Отзывы: