


2. CHOOSING A SUITABLE LOCATION FOR AN AUTOMATIC WEATHER
STATION
The ideal location for installing an automatic weather station would be a flat area of short kept grassland,
minimum 10m x 10m in size, fenced and surrounded by a larger flat area with no height obstructions in the
near vicinity.
Very few locations meet these ideal conditions, so the following guidelines should be used when choosing a
suitable installation site.
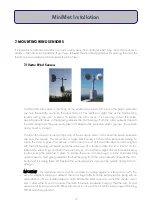
2.1 Ground Based Installations
The weather station mast can be fixed into a grassy surface using guylines and pegs, or can be
bolted or concreted in place for a more permanent fixture, using the guylines as steadying structures.
The area required for a concrete base can be seen in Appendix 2.
The standard mast height is 2m, although other heights, either higher or lower may be more suitable
to your own application. If there are any tall obstructions nearby, such as trees or buildings, make
sure that the mast is placed at least twice the distance away of the height of the tallest obstruction.
See Appendix 3.
Most sensors will be mounted on a central pole, but a raingauge is fixed at a distance of 3-4m from
the base of the pole. Usually the raingauge is pegged or bolted to the ground so that the
collecting rim is at a height of 50-60 cm above the ground. However, if a solid fence is to surround
the weather station in a small area, this may interfere with rain collection, and in this case the
raingauge should be raised so that its top rim should be at least as high as the top of the fence.
It is not always essential to enclose the weather station with a fence, but it is advisable in many
cases, to prevent physical interference and damage to cables laying on the ground. A minimum
area to be considered should be around 5 x 5 m.
If theft or vandalism may be a problem, a surrounding fence is advised. A large notice saying
'Danger - High Voltage' or such similar message should deter most intruders, even though there
actually is no danger at all!
2.2 Roof Top Installations
In applications where there is no suitable open space, or it is more convenient for mains power or
permanent linking to the PC, the weather station can be installed on the roof of building. The highest
point of the tallest building should be chosen if at all possible.
2
MiniMet Installation
Содержание MiniMet
Страница 1: ...MiniMet Installation Manual Iss 2 0...
Страница 45: ...APPENDIX 2 CONCRETE BASE FOR A 2M MAST 44 MiniMet Installation...
Страница 46: ...APPENDIX 3 SITE LOCATION 45 MiniMet Installation...
Страница 47: ...APPENDIX 4 ASSEMBLY OF MAST SUPPLIED IN MORE THAN ONE SECTION 46 MiniMet Installation...
Страница 49: ...APPENDIX 6 RAINGAUGE BASEPLATE 48 MiniMet Installation...
Страница 50: ...APPENDIX 7 MOUNTING OF GSM GPRS ENCLOSURE TO BRACKET 49 MiniMet Installation...
Страница 51: ...APPENDIX 8 MOUNTING THE GSM GPRS MODULE ON THE MAST NO SOLAR PANEL 50 MiniMet Installation...
Страница 52: ...APPENDIX 9 MOUNTING OF THE GSM GPRS UNIT ON THE MAST WITH A SOLAR PANEL STEP 1 51 MiniMet Installation...
Страница 53: ...APPENDIX 10 MOUNTING OF THE GSM GPRS UNIT ON THE MAST WITH A SOLAR PANEL STEP 2 52 MiniMet Installation...
Страница 54: ...APPENDIX 11 MOUNTING OF GSM GPRS UNIT ON THE MAST WITH A SOLAR PANEL STEP 3 53 MiniMet Installation...
Страница 55: ...APPENDIX 12 TYPICAL MINIMET INSTALLATION WITH GSM GPRS 54 MiniMet Installation...
Страница 56: ...APPENDIX 13 TYPICAL MINIMET INSTALLATION WITHOUT GSM GPRS 55 MiniMet Installation...
Страница 57: ...APPENDIX 14 56 MiniMet Installation...
Страница 58: ...APPENDIX 15 FITTING THE BATTERY COVER 57 MiniMet Installation...