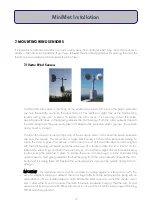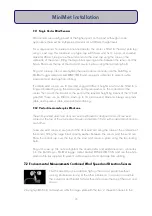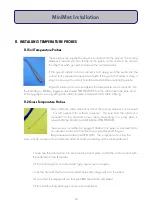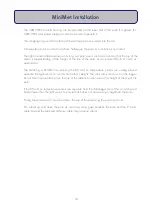
8. RAINGAUGES
It is essential to the accurate collection of rainfall that the tipping bucket gauge should be mounted level. An
aluminium base plate is provided for this purpose, which can be pegged into soft ground, or bolted to a
permanent surface.
8.1 Environmental Measurements Raingauge ARG100
Firstly, remove the raingauge funnel collecting top by unscrewing the 3 plastic
screws on its sides. Screw the 3 threaded pillars into the aluminium base plate
so that the ends are flush with the underside of the plate, and secure with the
locking nuts. Screw a white plastic knurled adjusting nut onto each of the
pillars, about halfway down its length. Feed the raingauge base over the 3
pillars, feed on the white spacers and the final adjusting nut on top. See
Figure 5.
Use the 6 adjusting nuts to level the raingauge base using the built-in level
bubble as a guide and replace the raingauge funnel top.
The raingauge is fitted with 6m cable, so that it can be installed about 4m away from a 2m high
mast. Plug and screw up (do not overtighten) the raingauge connector into the socket labelled
RAINGAUGE on the DataHog or MiniMet logger. Run the cable down the pole and / or the guy
ropes, securing with plastic cables to prevent movement and cable rubbing.
8.2 Rainwise Raingauge
1. It is essential to the accurate collection of rainfall that the tipping
bucket gauge should be mounted level.
2. The raingauge is fitted with a 6m cable, so that it can be installed
about 4m away from a 2m high mast.
3. Loosen the four screws on the outside of the raingauge and twist to
separate the two halves of the instrument. Put the top to one side.
4. Screw the four threaded pillars into the aluminium base plate so that the ends are flush with the
underside of the plate and secure with the four locking nuts.
5. Screw a white plastic knurled adjusting nut onto each of the pillars, about halfway down its length.
6. Feed the raingauge base over the four pillars.
19
MiniMet Installation
Содержание MiniMet
Страница 1: ...MiniMet Installation Manual Iss 2 0...
Страница 45: ...APPENDIX 2 CONCRETE BASE FOR A 2M MAST 44 MiniMet Installation...
Страница 46: ...APPENDIX 3 SITE LOCATION 45 MiniMet Installation...
Страница 47: ...APPENDIX 4 ASSEMBLY OF MAST SUPPLIED IN MORE THAN ONE SECTION 46 MiniMet Installation...
Страница 49: ...APPENDIX 6 RAINGAUGE BASEPLATE 48 MiniMet Installation...
Страница 50: ...APPENDIX 7 MOUNTING OF GSM GPRS ENCLOSURE TO BRACKET 49 MiniMet Installation...
Страница 51: ...APPENDIX 8 MOUNTING THE GSM GPRS MODULE ON THE MAST NO SOLAR PANEL 50 MiniMet Installation...
Страница 52: ...APPENDIX 9 MOUNTING OF THE GSM GPRS UNIT ON THE MAST WITH A SOLAR PANEL STEP 1 51 MiniMet Installation...
Страница 53: ...APPENDIX 10 MOUNTING OF THE GSM GPRS UNIT ON THE MAST WITH A SOLAR PANEL STEP 2 52 MiniMet Installation...
Страница 54: ...APPENDIX 11 MOUNTING OF GSM GPRS UNIT ON THE MAST WITH A SOLAR PANEL STEP 3 53 MiniMet Installation...
Страница 55: ...APPENDIX 12 TYPICAL MINIMET INSTALLATION WITH GSM GPRS 54 MiniMet Installation...
Страница 56: ...APPENDIX 13 TYPICAL MINIMET INSTALLATION WITHOUT GSM GPRS 55 MiniMet Installation...
Страница 57: ...APPENDIX 14 56 MiniMet Installation...
Страница 58: ...APPENDIX 15 FITTING THE BATTERY COVER 57 MiniMet Installation...


