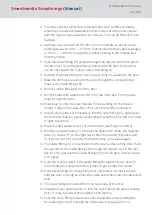
4. Position handle fastener piece (5) on the side which will later face the
door, as in the diagram below, and fasten with a spanner in a clockwise
direction (about 75º until you feel resistance).
75°
1
2
4
-45°
3
9
The outer handle is now firmly attached to the outer fitting and
cannot be removed from the outside when in use.
5. Check the handle mechanism to ensure it opens easily.
9
The outer handle must return to its home position of its own accord.
Repeat the procedure described in this section if the outer handle
should catch and not open correctly.
NOTE
For easier installation, the cover can also be pushed over the inlay later in
chapter "
Step 6: Fastening the covers [
".
8.2.4.5 Step 4: Installation of fittings
1. Position installation tool through the profile cylinder opening in the door
lock, so that the plug remains on the outer side.
2. Push the inside fitting spindle through the retainer slot in the door's
mortise lock, so that the fitting is flush with the door.
3. Cables for fastening screw and bolt buttons and the installation tool
must be fed through the snap-in mechanism to the inner side.
9
The inside fitting is now firmly placed flat against the door. The
cables and installation tool run downwards on the inside of the door.
If a two-wire cable should be too short, a extension/adapter cable
can be used.
4. Use the installation tool to connect four-wire cables from the outer fit-
ting.
SmartHandle
SmartIntego
(Manual)
8. Installation (manual)
51 / 160
Содержание SI:SmartHandle Series
Страница 1: ...SmartHandle SmartIntego Manual 28 10 2020...
Страница 25: ...6 5 Distances and door thicknesses SmartHandle SmartIntego Manual 6 Designs 25 160...
Страница 131: ...SmartHandle SmartIntego Manual 8 Installation manual 131 160...
Страница 132: ...9 Outer fitting is mounted SmartHandle SmartIntego Manual 8 Installation manual 132 160...
Страница 136: ...2 Remove the uppermost battery SmartHandle SmartIntego Manual 8 Installation manual 136 160...
Страница 137: ...3 Screw on the inside fitting SmartHandle SmartIntego Manual 8 Installation manual 137 160...
Страница 141: ...3 Press the inside of the cover firmly SmartHandle SmartIntego Manual 8 Installation manual 141 160...
Страница 145: ...10 Configuration See TechGuide WO SVCN SmartHandle SmartIntego Manual 10 Configuration 145 160...
Страница 146: ...11 Status messages See TechGuide WO SVCN SmartHandle SmartIntego Manual 11 Status messages 146 160...
Страница 147: ...12 Signal See TechGuide WO SVCN SmartHandle SmartIntego Manual 12 Signal 147 160...


