


37. Push the cover (2) onto the outer fitting (2), so that it is flush with the
door. The cover is not symmetrical; look carefully at the marking to en-
sure correct positioning (Diagram 7).
38.Click the inlay (1) carefully into the cover (2).
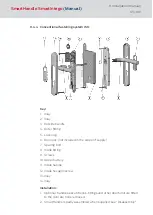
8.4.6 Diagrams for conventional fastening system
Figure 2:
Handle fastener piece
Figure 3:
Handle fastener piece open
Figure 4:
Handle fastener piece closed
Figure 5:
Fastener piece - correct position for
the handle fastener piece when
closed
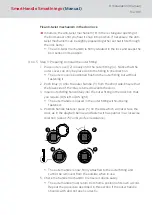
Figure 6:
Figure 7:
Tab. 3:
Diagrams showing installation
SmartHandle
SmartIntego
(Manual)
8. Installation (manual)
69 / 160
Содержание SI:SmartHandle Series
Страница 1: ...SmartHandle SmartIntego Manual 28 10 2020...
Страница 25: ...6 5 Distances and door thicknesses SmartHandle SmartIntego Manual 6 Designs 25 160...
Страница 131: ...SmartHandle SmartIntego Manual 8 Installation manual 131 160...
Страница 132: ...9 Outer fitting is mounted SmartHandle SmartIntego Manual 8 Installation manual 132 160...
Страница 136: ...2 Remove the uppermost battery SmartHandle SmartIntego Manual 8 Installation manual 136 160...
Страница 137: ...3 Screw on the inside fitting SmartHandle SmartIntego Manual 8 Installation manual 137 160...
Страница 141: ...3 Press the inside of the cover firmly SmartHandle SmartIntego Manual 8 Installation manual 141 160...
Страница 145: ...10 Configuration See TechGuide WO SVCN SmartHandle SmartIntego Manual 10 Configuration 145 160...
Страница 146: ...11 Status messages See TechGuide WO SVCN SmartHandle SmartIntego Manual 11 Status messages 146 160...
Страница 147: ...12 Signal See TechGuide WO SVCN SmartHandle SmartIntego Manual 12 Signal 147 160...