


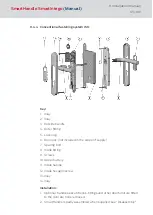


5. Push plug out horizontally, directly beneath the snap-in mechanism,
and to the inner side. The outer fitting must be joined together with the
inside fitting at the same time by inserting the outer fitting bolt into the
inner fitting's snap-in shaft.
NOTE
Ensure that no cabling gets caught or broken.
6. Screw inside fitting together with the outer fitting from the inside. Ensure
that the fitting is positioned in parallel to the door.
9
Inside and outer fitting are now firmly joined together flat against the
door.
7. Connect cables. The two two-pole cables and the four-pole cable are
to be properly connected to one another.
The two-pole cables can be
connected to one another as desired.
8. Lay cables in such a way that the cover can be easily fitted. Make sure
that you do not crush the cables.
8.2.4.6 Step 5: Installing the inside handle
1. Position the internal cover (10) on the internal fitting without fastening
it. Notice that the cover can only be placed onto the fitting in one direc-
tion.
9
The cover is positioned flush on the internal fitting but without
fastening it.
2. Push inlay (11) onto the internal handle retainer. Ensure that the black
side of the inlay is turned towards the door.
3. Insert inside handle horizontally into the outer fitting in the desired direc-
tion (DIN left or DIN right).
9
The internal handle is placed in the internal fitting without being
fastened.
4. Tighten the headless screw to fasten internal handle.
9
The inner door handle is now firmly linked to the SmartHandle.
5. Check the handle mechanism to ensure it opens easily.
9
Repeat the procedure described in this section if the outer should
catch or jam.
NOTE
For easier installation, the cover can usually also be slid over the inlay later
in chapter "
Step 6: Fastening the covers [
SmartHandle
SmartIntego
(Manual)
8. Installation (manual)
52 / 160
Содержание SI:SmartHandle Series
Страница 1: ...SmartHandle SmartIntego Manual 28 10 2020...
Страница 25: ...6 5 Distances and door thicknesses SmartHandle SmartIntego Manual 6 Designs 25 160...
Страница 131: ...SmartHandle SmartIntego Manual 8 Installation manual 131 160...
Страница 132: ...9 Outer fitting is mounted SmartHandle SmartIntego Manual 8 Installation manual 132 160...
Страница 136: ...2 Remove the uppermost battery SmartHandle SmartIntego Manual 8 Installation manual 136 160...
Страница 137: ...3 Screw on the inside fitting SmartHandle SmartIntego Manual 8 Installation manual 137 160...
Страница 141: ...3 Press the inside of the cover firmly SmartHandle SmartIntego Manual 8 Installation manual 141 160...
Страница 145: ...10 Configuration See TechGuide WO SVCN SmartHandle SmartIntego Manual 10 Configuration 145 160...
Страница 146: ...11 Status messages See TechGuide WO SVCN SmartHandle SmartIntego Manual 11 Status messages 146 160...
Страница 147: ...12 Signal See TechGuide WO SVCN SmartHandle SmartIntego Manual 12 Signal 147 160...