background image

8.8 Swiss Round MO

8.8.1 Contents of packaging

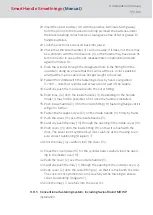
2 x inlays

2 x inlay

1 x outer fitting

1 x inside fitting

1 x handle for outer fitting, including lock ring

1 x handle for inside fitting (including hexagon screw)

2 x fastening screws

2 x spacing bolts

1 x cover plate

1 x quick start guide

1 x installation tool for inlay

8.8.2 Tools required

The following tools are required for installing SI:SmartHandle and are not
included in the supplied package:

Allen key (3 mm) to fit handle

Spanner (19 mm)

Cross-tip screwdriver type PH2 (battery screwdriver recommended)

Drill

Drill bits (8 mm and 13 mm)

8.8.3 Installation instructions MO

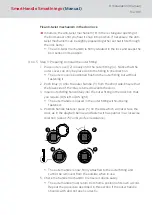
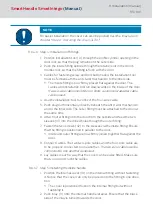
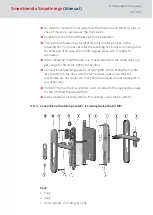
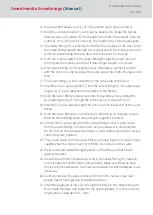
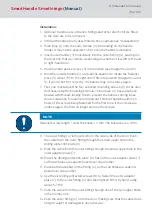
Batteries are already installed when the product is delivered!

When installing the digital SI:SmartHandle, ensure that there are no
sources of (low-frequency) interference in the surrounding area.

The SI:SmartHandle must be fitted, so that it is flush with the door. You
must install the product as specified to ensure that it is structurally
stable and will have a long service life.

You must not strike parts of the SI:SmartHandle during installation.

The two inlays in the cover are locked into position with a clip
mechanism. These may only be removed using the SimonsVoss
installation tool.

SmartHandle


SmartIntego

 (Manual)

8. Installation (manual)

89 / 160

Содержание SI:SmartHandle Series

Страница 1: ...SmartHandle SmartIntego Manual 28 10 2020...

Страница 2: ...8 6 5 3 Scandinavian oval SO 29 6 6 ES1 SKG PAS24 30 6 7 SmartHandle without electronics 30 6 8 Spindle 31 6 9 Backplate width wide 32 6 10 DoorMonitoring DM 32 6 11 Handle variants 33 6 12 Surface fi...

Страница 3: ...m WO 63 8 4 5 Conventional fastening system MO WP 66 8 4 6 Diagrams for conventional fastening system 69 8 4 7 Restore storage mode for conventional fastening system MO 70 8 5 Conventional fastening E...

Страница 4: ...8 11 2 Tools required 109 8 11 3 Installation instructions MO 109 8 11 4 Installation 110 8 12 Escutcheon fixing with without MO RMO 121 8 12 1 Contents of packaging 122 8 12 2 Tools required 123 8 1...

Страница 5: ...RMO 155 16 9 Restore storage mode for RMO 155 17 Accessories 156 17 1 Battery set 156 17 2 Sleeves 156 17 3 Handles 156 17 4 Covers 156 18 Technical specifications 157 19 Declaration of conformity 158...

Страница 6: ...your own malfunctions can occur and access through a door can be blocked Modify the product only when needed and only in the manner described in the documentation CAUTION Fire hazard posed by batteri...

Страница 7: ...age source batteries or mains adapters Failure of operation due to different discharged batteries This product uses one or more batteries for power supply The batteries are discharged at ap proximatel...

Страница 8: ...G2 locks has a technical tolerance of up to 15 minutes per year Qualifications required The installation and commissioning requires specialized knowledge Only trained personnel may install and commis...

Страница 9: ...ugh drilling error When you drill you can cause damage to the door or the product if unsuitable tools are used The SimonsVoss Technologies GmbH accepts no responsibility for material damage due to dri...

Страница 10: ...use a suitable door stopper Mechanical damage to the handle through misuse as door opener Some doors are very heavy and solidly constructed The handle is not suitable for opening such doors Make suita...

Страница 11: ...be stiff Check that the mortice lock is free moving Fitting error or incorrect order If you make a mistake in measuring the door and order a SmartHandle the SmartHandle will not fit Check the dimensi...

Страница 12: ...xample Name of a displayed window Example Upper programme bar Example Entry in the expanded upper pro gramme bar Example Context menu entry Example Name of a drop down menu Example Selection option in...

Страница 13: ...nents can be set up using the SimonsVoss configuration software and connected to an integrator system via the SmartIntego interface The integrator is usually a manufacturer of building management soft...

Страница 14: ...avian Oval The outer side can only be operated with identification medium The inner side always engaged With mechanical override MO Like the version without mechanical over riding but with recess for...

Страница 15: ...cal override MO Like the version without mechanical over riding but with recess for installation of a locking cylinder for overriding In addition fittings belonging to the SI SmartHandle series can ha...

Страница 16: ...can lead to combinations that are not available or to incorrect orders Always use the order placement guide from the partner area of the SmartIntego website www smartintego com The SI SmartHandle has...

Страница 17: ...6 1 Prerequisites These distances depend on the design of the door door specific SmartHandle SmartIntego Manual 6 Designs 17 160...

Страница 18: ...inder SnapIn fastening for mortise locks with Euro profile cylinder or Swiss Round cylinder see Fastening 22 min 4 mm min 4 mm min 4 mm Escutcheon fastening with without mechanical override Metal fram...

Страница 19: ...ng distances depending on the fastening Fastening Door thick ness S Door thick ness M Door thick ness L conventional fastening for mortise locks with Euro profile cylinder or Swiss Round cylinder Snap...

Страница 20: ...ning 22 min 2 mm min 2 mm min 2 mm Distance lock fol lower face out side to the inside door leaf Interior side Exterior side The SI SmartHandle is suitable for the following distances depending on the...

Страница 21: ...cylinder with without mechanical override see Fastening 22 max 38 mm max 58 mm max 78 mm 6 2 Mechanical Override MO You can also install a mechanical locking cylinder see Profiles 21 This enables you...

Страница 22: ...Oval 99 Conventional fastening system for Scandinavian Oval DP 103 Conventional with mechanical override blank and cut out Conventional fastening system WO 61 Swiss Round MO 89 Conventional fastening...

Страница 23: ...3062 on a metal frame door with a lock with a large distance Two adapter plates for mounting on metal frame doors RR are included The recesses allow mechanical override MO If you do not want mechanic...

Страница 24: ...e SmartHandles 3062 if mechanical override MO with Euro profile PC or Swiss Round profile SR is desired and four escutcheon holes for fixing the RMO version in the door DIN 18251 are already present a...

Страница 25: ...6 5 Distances and door thicknesses SmartHandle SmartIntego Manual 6 Designs 25 160...

Страница 26: ...nce 70 mm 72 mm 75 mm 78 mm 85 mm 88 mm 90 mm 92 mm 6 5 1 2 Conventional fastening Standard MO ES1 SKG PAS24 MO and ES1 SKG PAS24 Door thickness S 39 60 mm S Like standard S 32 50 mm MO cannot be com...

Страница 27: ...res distance Limited by mortise lock 72 mm 75 mm 78 mm 85 mm 88 mm 90 mm 92 mm 6 5 1 4 Metal frame mounting Standard MO ES1 SKG PAS24 MO and ES1 SKG PAS24 Door thickness S 40 53 mm S Like standard Can...

Страница 28: ...nnot be com bined withSwiss Round Cannot be com bined withSwiss Round M 59 80 mm M Like standard L 79 100 mm L Like standard Centres distance Limited by mortise lock 78 mm 94 mm 6 5 2 3 Escutcheon ins...

Страница 29: ...1 SnapIn fastening SI SmartHandle are not available for SnapIn mounting on Scandinavian Oval mortise locks 6 5 3 2 Conventional fastening Standard MO ES1 SKG PAS24 MO and ES1 SKG PAS24 Door thickness...

Страница 30: ...meet the highest security requirements guarantee sustainable functionality even in extreme situations and provide optimum protection against break in or attempted manipulation 6 7 SmartHandle without...

Страница 31: ...table for fire protection doors 8 5 mm with sleeve attached to 8 mm not included in delivery available separately see Sleeves 156 9 mm suitable for fire doors 10 mm with sleeve attached to 8 mm includ...

Страница 32: ...oorMonitoring DM The SI SmartHandle with door monitoring function DM is an electronic door fitting with integrated door monitoring The integrated door monitoring system in the DM Cylinder is fitted wi...

Страница 33: ...are logged in the access list including the transponder ID date and time which the locking system operator or a security officer can then upload and evaluate if necessary 6 11 Handle variants Select y...

Страница 34: ...n be controlled both with active transponders and MIFARE cards SI SmartHandle SC is only available in connection with the G2 protocols The following MIFARE products can be used MIFARE Classic MIFARE D...

Страница 35: ...nsor in the SmartHandle detects that the inside handle has been operated The SmartHandle then engages for an adjustable time and signals this visually and acoustically Disengagement takes place after...

Страница 36: ...de SmartHandle is screwed together in its box when delivered The two housing halves are firmly joined together You can programme SmartHandle directly as it is in the box After initial programming Leav...

Страница 37: ...ncluding hexagon screw 1 x mounting screw 1 x profile cylinder inlay in versions for fire retardant doors only 1 x quick start guide 1 x installation tool for inlay 8 1 2 Tools required The following...

Страница 38: ...isture must penetrate the door or reach the inner side Always use the WP version for moisture Programme SI SmartHandle before installing SI SmartHandle may be difficult to fit in mortise locks with a...

Страница 39: ...it in the direction that you require depending on whether it is a DIN left hand or right hand door 7 Place handle fastener piece 5 into position see Diagrams 2 and 3 8 Hold the outside handle 3 and us...

Страница 40: ...o not pull on the cable 20 Press outer and inside fittings together so that they are both flush against the door 21 Push mounting screw 9 through the snap in mechanism 7 from the inner side of the doo...

Страница 41: ...stener piece 5 about 75 to the right until it fits into position Diagrams 4 and 5 If you do not fit it correctly the handle may come loose again 9 Optional In a lock with an 8 5 mm or 10 mm spindle pu...

Страница 42: ...ble from the inside fitting 19 Push inlay 13 onto the inside handle 10 Depending on the handle model it may not be possible to fit it once the handle is installed 20 Push inside handle 10 onto the inn...

Страница 43: ...ner piece Figure 3 Handle fastener piece open Figure 4 Handle fastener piece closed Figure 5 Fastener piece correct position for the handle fastener piece when closed Figure 6 Figure 7 SmartHandle Sma...

Страница 44: ...e tension in the snap in mechanism 7 4 Undo mounting screw 9 fully 5 Hold the inside and outer fittings firmly while carefully pulling them away from one another horizontally Fitted to the door NOTE G...

Страница 45: ...e required for installation are not included in the delivery Allen key 3 mm to fit handle Cross tip screwdriver type PH2 to fit mounting screw battery operated screwdriver recommended 19 mm spanner fo...

Страница 46: ...for example otherwise the handle s guide piece will no longer fit accurately When installing SmartHandle you must ensure that the cable does not get caught or fitted too tightly to the door 8 2 4 Asse...

Страница 47: ...r piece 6 Lock not included 7 Inside fitting 8 Inside handle 9 Headless screw for inside handle 10 Inside cover 11 Inlay Door Monitoring components SnapIn A Installation tool for cable B Fastening scr...

Страница 48: ...itable tool e g tweezers to guide the plug out of the profile cylinder opening on the inner side 3 Insert fastening screw sensor into the sensor screw hole until it will go no further 9 A spring mecha...

Страница 49: ...position The image shows the cone at Position 1 5 Turn the ring segment back to its original position until you hear it snap back into position Determining the direction of installation The door lock...

Страница 50: ...ate bolt sensor 90 so that the bolt sensor opening points down wards 3 Pull the installation tool to remove 9 The bolt sensor remains in the lock The rectangular opening in the bolt sensor faces downw...

Страница 51: ...n chapter Step 6 Fastening the covers 53 8 2 4 5 Step 4 Installation of fittings 1 Position installation tool through the profile cylinder opening in the door lock so that the plug remains on the oute...

Страница 52: ...talling the inside handle 1 Position the internal cover 10 on the internal fitting without fastening it Notice that the cover can only be placed onto the fitting in one direc tion 9 The cover is posit...

Страница 53: ...x quick start guide 1 x installation tool for inlay 8 3 2 Tools required The following tools are required for installing SI SmartHandle and are not included in the supplied package Allen key 3 mm to...

Страница 54: ...s with a retaining nut You must not alter the retaining nut in any way using a file for example otherwise the handle s guide piece will no longer fit accurately When installing SmartHandle you must en...

Страница 55: ...pening in the mortise lock from the inside 5 Push the inside fitting spindle through the retainer slot in the door s mortise lock 6 so that the fitting is flush with the door Ensure that you do not sq...

Страница 56: ...pole cable from the outer fitting This cable can only be inserted in one direction Do not pull on the cables while doing so just carefully secure the plug in connection into position 21 The 2 pole cab...

Страница 57: ...opening in the outside cover 2 38 Push the cover 2 onto the outer fitting 4 so that it is flush with the door The cover is not symmetrical look carefully at the marking to en sure correct positioning...

Страница 58: ...cable for the outer fitting through the profile cylinder Swiss Round British Oval opening in the mortise lock 6 and ensure that it doesn t get caught or buckled 17 Push the outer fitting retainer slot...

Страница 59: ...ossible to fit it once the handle is installed 28 Push inside handle 11 onto the inner fitting 8 fastening flange until it will go no further 29 Tighten the hexagon screw 12 on the inside handle 11 fi...

Страница 60: ...ure 6 Figure 7 Tab 2 Diagrams showing installation 8 3 7 Restore storage mode for conventional fastening system 1 Disconnect the 3 pole cable from the inside fitting with the 3 pole cable from the out...

Страница 61: ...luding lock ring 1 x handle for inside fitting including hexagon screw 2 x fastening screws 2 x spacing bolts 1 x quick start guide 1 x installation tool for inlay 8 4 2 Tools required The following t...

Страница 62: ...rtHandle may be difficult to fit in mortise locks with a retaining nut You must not alter the retaining nut in any way using a file for example otherwise the handle s guide piece will no longer fit ac...

Страница 63: ...Spacing bolt 8 Inside fitting 9 Screws 10 Upper battery 11 Inside handle 12 Inside hexagon screw 13 Inlay 14 Inlay Installation 1 Optional handles escutcheons fittings and other door furniture fitted...

Страница 64: ...er fitting 4 placing it in the direction that you require depending on whether it is a DIN left hand or right hand door 12 Place handle fastener piece 5 into position see Figures 2 and 3 13 Hold the o...

Страница 65: ...fasten to the spacing bolts 7 on the outer fit ting by hand using about 5 7 Nm 28 Insert the upper battery 10 with the positive terminals facing away from the door into the brackets in doing so insert...

Страница 66: ...o the outer fitting 4 so that it is flush with the door The cover is not symmetrical look carefully at the marking to en sure correct positioning Diagram 7 43 Click the inlay 1 carefully into the cove...

Страница 67: ...through the retainer slot in the mortise lock 6 and push the inside fitting 8 onto the door until it is about 5 cm away 14 Insert the lower spacing bolt 7 into the outer fitting 4 the upper spa cing b...

Страница 68: ...doubt disassemble components and start again from Step 10 26 Push inside handle 11 onto the inner fitting 8 fastening flange until it will go no further 27 Tighten the hexagon screw 12 on the inside h...

Страница 69: ...he inlay 1 carefully into the cover 2 8 4 6 Diagrams for conventional fastening system Figure 2 Handle fastener piece Figure 3 Handle fastener piece open Figure 4 Handle fastener piece closed Figure 5...

Страница 70: ...and remove the cover The inlay remains on the handle and cannot be removed until the handle is dismounted Follow the same steps as for installation but in reverse order 8 5 Conventional fastening ES1...

Страница 71: ...e You must not strike parts of SI SmartHandle during installation The two inlays in the cover are locked into position with a clip mechanism These may only be removed using the SimonsVoss installation...

Страница 72: ...To ensure full functionality SmartHandle must always be used in combin ation with an SLP lock All steps must be completed in order after one another to ensure correct installation 8 5 4 1 Components...

Страница 73: ...ise lock has been fitted according to instructions 1 Align drilling template precisely 9 The cut for the spindle must be positioned exactly over the retainer opening in the door lock 9 The template mu...

Страница 74: ...ou require DIN left or DIN right 9 The outer handle is placed in the outer fitting without being fastened 4 Position handle fastener piece 5 on the side which will later face the door as in the diagra...

Страница 75: ...ning drill holes are flush 3 Install the outer fitting 4 flush onto the spacer plate 9 The six threaded holes of the outer fitting are flush with the drillholes of the adapter plate and spacer plate 4...

Страница 76: ...tion tool 5 Push the inner fitting 7 spindle through the lock s retainer slot and push the inner fitting so that it is flush on the door At the same time by pulling on the installation tool from the o...

Страница 77: ...to the SmartHandle 5 Check the handle mechanism to ensure it opens easily 9 Repeat the procedure described in this section if the outer should catch or jam NOTE For easier installation the cover can...

Страница 78: ...screwdriver recommended 19 mm spanner for installing the handle fastener piece Drill 8 mm drill bit Sharp object for example pin needle 8 6 3 Installation instructions Batteries are already installed...

Страница 79: ...n the door with the two screws make sure that the electronics are not subject to mechanical load and are not damaged in any other way 8 6 4 Installation conventional fastening door monitoring These in...

Страница 80: ...5 Handle fastener piece 6 Lock not included 7 Inside fitting 8 Inside handle including hexagon socket screw 9 Headless screw for inside handle 10 Inside cover 11 Inlay X1 Sleeves X2 Screws DoorMonito...

Страница 81: ...k on again to check the marks are correct 4 Drill top hole with a suitable 8 mm drill bit 5 Drill lower hole with a suitable 13 mm drill bit It is recommended to pre drill the hole with a 8 mm bit fir...

Страница 82: ...For preparation the bolt sensor C has to be mounted onto the installation tool according to the following illustration The bolt sensor cone may need to be moved depending on the door lock used In most...

Страница 83: ...or Fitting the bolt sensor from the inner side 1 Carefully release cable from the bolt sensor cable duct C to guide the plug out onto the inner side 2 Push the bolt sensor into the profile cylinder op...

Страница 84: ...e 3 from the short side Ensure that the black side of the inlay is turned towards the door 3 Insert outer fitting horizontally into the outer fitting in the direction that you require DIN left or DIN...

Страница 85: ...er fitting must be attached to the door at the same time 6 Attach outer fitting onto the door from the outside and feed the two sleeves X1 into the drilled holes through the outer fitting 7 Fasten the...

Страница 86: ...oor without a gap and no cables are outside the cover 2 Click inlay carefully into the outer cover which is still pressed against the door 8 6 5 Disassembling DoorMonitoring components The SmartHandle...

Страница 87: ...ck will help you with initial operation We recommend checking this pin assignment with a multimeter since the lock manufacturer may have made changes 1 Download the latest pin assignment configuration...

Страница 88: ...it the sensor lock with a connected sensor lock adapter varies depending on the door We recommend tucking the sensor lock adapter away in the lock recess between the sensor lock and the door Both the...

Страница 89: ...wdriver recommended Drill Drill bits 8 mm and 13 mm 8 8 3 Installation instructions MO Batteries are already installed when the product is delivered When installing the digital SI SmartHandle ensure t...

Страница 90: ...at the cable does not get caught or fitted too tightly to the door Conventional fastening system including MO When fitting the handle into position on the door with the two screws make sure that the e...

Страница 91: ...8 mm 10 mm through the retainer opening in the mortise lock from the inside 5 Push the inside fitting 8 spindle through the retainer slot in the door s mortise lock 6 so that the fitting is flush with...

Страница 92: ...holes up to a gap of 2 cm 20 Insert the 3 pole cable through the cut out in the lower end of the outer fitting 21 Push the outer fitting 4 onto the door completely In doing so ensure that the inside...

Страница 93: ...dle model it may not be possible to fit it once the handle is installed 35 Push inside handle 11 onto the inside fitting 8 fastening flange until it will go no further 36 Fasten the hexagon screw 12 o...

Страница 94: ...hat you require depending on whether it is a DIN left hand or right hand door 11 Place handle fastener piece 5 into position see Figures 2 and 3 12 Hold the outside handle 3 and use the spanner to rot...

Страница 95: ...the 2 pole cable when doing so 24 Insert the upper battery 10 with the positive terminals facing away from the door into the brackets in doing so insert the batteries under the black retaining collar...

Страница 96: ...2 over the outside handle 3 38 Carefully push the inlay 1 through the opening in the outside cover 2 39 Push cover 2 onto the outer fitting 4 so that it is flush with the door The cover is not symmetr...

Страница 97: ...rew a little so that the screw remains in the handle 4 Remove the inside handle from the inside fitting Fitted to the door NOTE General instructions Depending on the handle model it may not be pos sib...

Страница 98: ...n the surrounding area SI SmartHandle must be fitted so that it is flush with the door You must install the product as specified to ensure that it is structurally stable and will have a long service l...

Страница 99: ...ng system Scandinavian Oval Keys 1 Inlay 2 Inlay 3 Outer handle including handle fastener piece 4 Outer fitting 5 Lock ring 6 Adapter plate for outer side 7 Screws 8 Door lock not included in the scop...

Страница 100: ...s into position Figures 4 and 5 If you do not fit it correctly the handle may come loose again 8 First you must adjust the four supplied mounting screws 10 to the door thickness using the following fo...

Страница 101: ...ntally Make sure that the electronics are not exposed to mechanical load and are not damaged in any other way 21 Carefully remove the lower battery 13 from the holder Use clean gloves free of fat or g...

Страница 102: ...r the inside handle 14 32 Carefully push the inlay 17 through the opening in the inside cover 16 33 Push the cover 16 onto the inside fitting 11 so that it is flush with the door The cover is not symm...

Страница 103: ...r piece 6 Drilling protection plate 7 Adapter plate for outer side 8 Screws 9 Door lock not included in the scope of supply 10 Adapter plate for inner side 11 Screws 12 Inside fitting 13 Screws 14 Low...

Страница 104: ...o vibrations for example Important this fluid hardens within 24 hours of the screws being fastened for the first time If the screws are undone again the fluid no longer secures the screws NOTE Require...

Страница 105: ...subject to mechanical load and are not damaged in any other way 22 Carefully remove the lower battery 14 from the holder Use clean gloves free of fat or grease to handle batteries 23 Use the two scre...

Страница 106: ...na for the LockNode 37 Carefully push the inlay 1 through the opening in the outside cover 2 38 Push the cover 2 onto the outer fitting 4 so that it is flush with the door The cover is not symmetrical...

Страница 107: ...n the inside door handle but ensure that you only unscrew a little so that the screw remains in the handle 4 Remove the inside handle from the inside fitting Fitted to the door NOTE General instructio...

Страница 108: ...s 2x cover shield 1 x outer fitting 1x adapter plate external fitting packed separately 1x special sleeve nut with square head for adapter plate external fitting 2x sleeve nut for adapter plate extern...

Страница 109: ...nsure that there are no sources of low frequency interference in the surrounding area The SI SmartHandle must be fitted so that it is flush with the door You must install the product as specified to e...

Страница 110: ...inder is not included in the supplied package for the SI SmartHandle with MO Always install a locking cylinder If necessary use a blank cylinder 8 11 4 Installation 8 11 4 1 Step 0 Preparing drill hol...

Страница 111: ...ning 8 Reinsert the door lock 9 Drill holes are prepared 8 11 4 2 Step 1 Preparing the fittings Separate the halves SmartHandle programmed 1 Disconnect the three pin cable that connects the inside fit...

Страница 112: ...ide 2 Guide the cable past the foam insert and down out of the fitting without kinking it 9 The cable is prepared Attaching damper foams Glue the damper foams to the fittings as shown 9 Damper foams a...

Страница 113: ...handle 1 Make sure that the slide of the cover is in the position shown 2 Clip the cover into the inlay 3 Push the inlay with the cover onto the fitting 4 Insert the handle 9 Outside handle is attache...

Страница 114: ...9 The outside handle is secured 8 11 4 4 Step 3 Mounting the outside fitting adapter plate 1 Insert the special sleeve nut through the adapter plate 2 Turn the adapter plate over 3 Screw the adapter p...

Страница 115: ...ter plate is mounted 8 11 4 5 Step 4 Mounting the outside fitting Insert the prepared outer fitting with the adapter plate into the prepared door and run the cables through the door without bending th...

Страница 116: ...nal fitting from the inside of the door to the in ternal fitting adapter plate 2 Connect the extension cables only for M and L version 3 Lead the cables of the outside fitting to the inside 4 Connect...

Страница 117: ...6 Screw on the blank cylinder 9 The inside fitting is mounted 8 11 4 7 Step 6 Screw on the inside fitting 1 Open the battery compartment SmartHandle SmartIntego Manual 8 Installation manual 117 160...

Страница 118: ...2 Remove the uppermost battery 3 Screw on the inside fitting SmartHandle SmartIntego Manual 8 Installation manual 118 160...

Страница 119: ...4 Insert the battery back into the compartment 5 Close the battery compartment again 9 The inside fitting is screwed on SmartHandle SmartIntego Manual 8 Installation manual 119 160...

Страница 120: ...handle 1 Make sure that the slide of the cover is in the position shown 2 Clip the cover into the inlay 3 Push the inlay with the cover onto the fitting 4 Attach the handle 9 Inside handle is attached...

Страница 121: ...ew of the inside handle 9 The inside handle is secured 9 SmartHandle is mounted 8 12 Escutcheon fixing with without MO RMO The cable connector is located on the inside for all variants SmartHandle Sma...

Страница 122: ...xternal fitting 1 x outer handle including handle fastener piece 1 x internal fitting 1 x internal fitting adapter plate 4x middle screw for adapter plate Internal fitting 1 x internal handle includin...

Страница 123: ...clip mechanism These may only be removed using the SimonsVoss installation tool No water or moisture must penetrate the door or reach the inner side In case of moisture always use the WP version Prog...

Страница 124: ...the locking cylinder opening is very small the cables are more difficult to install In this case slightly enlarge the locking cylinder opening 8 12 4 1 Step 1 Preparing the fittings Separate the halv...

Страница 125: ...martHandle programmed 1 Loosen the screw connection that connects the inside and outer fittings 2 Dispose of the screw and the plastic sleeve SmartHandle SmartIntego Manual 8 Installation manual 125 1...

Страница 126: ...uter fitting 4 If necessary also disconnect the cable of the LockNode of the inside fit ting 9 Halves are separated Attaching damper foams Glue the damper foams to the fittings as shown 9 Damper foams...

Страница 127: ...outside handle 1 Make sure that the slide of the cover is in the position shown 2 Push the cover shield together with the cover onto the fitting 3 Insert the handle 9 Outside handle is attached SmartH...

Страница 128: ...side handle 1 Put the retaining ring on the inside of the outside handle 2 Turn the retaining ring clockwise by about 75 9 The outside handle is secured SmartHandle SmartIntego Manual 8 Installation m...

Страница 129: ...4 3 Step 3 Mounting the outside fitting adapter plate 1 Insert the special sleeve nut through the adapter plate 2 Turn the adapter plate over SmartHandle SmartIntego Manual 8 Installation manual 129...

Страница 130: ...necessary connect the extension cables M and L version 9 Outside fitting adapter plate is mounted 8 12 4 4 Step 4 Mounting the outside fitting Insert the prepared outer fitting with the adapter plate...

Страница 131: ...SmartHandle SmartIntego Manual 8 Installation manual 131 160...

Страница 132: ...9 Outer fitting is mounted SmartHandle SmartIntego Manual 8 Installation manual 132 160...

Страница 133: ...8 12 4 5 Step 5 Mounting the inside fitting 1 If necessary insert your locking cylinder without bending the cables SmartHandle SmartIntego Manual 8 Installation manual 133 160...

Страница 134: ...e inserted external fitting from the inside of the door to the in ternal fitting adapter plate 3 Lead the cables of the outside fitting to the inside SmartHandle SmartIntego Manual 8 Installation manu...

Страница 135: ...ace the inside fitting on the plate 9 The inside fitting is in place 8 12 4 6 Step 6 Screw on the inside fitting 1 Open the battery compartment SmartHandle SmartIntego Manual 8 Installation manual 135...

Страница 136: ...2 Remove the uppermost battery SmartHandle SmartIntego Manual 8 Installation manual 136 160...

Страница 137: ...3 Screw on the inside fitting SmartHandle SmartIntego Manual 8 Installation manual 137 160...

Страница 138: ...4 Reinsert the battery and screw the cylinder tight 5 Close the battery compartment again SmartHandle SmartIntego Manual 8 Installation manual 138 160...

Страница 139: ...e inside fitting is screwed on 8 12 4 7 Step 7 Mounting the inside handle Attach the inside handle 1 Make sure that the slide of the cover is in the position shown SmartHandle SmartIntego Manual 8 Ins...

Страница 140: ...2 Push the cover shield together with the cover onto the fitting SmartHandle SmartIntego Manual 8 Installation manual 140 160...

Страница 141: ...3 Press the inside of the cover firmly SmartHandle SmartIntego Manual 8 Installation manual 141 160...

Страница 142: ...4 Press the cover on the outside firmly 5 Attach the handle 9 Inside handle is attached SmartHandle SmartIntego Manual 8 Installation manual 142 160...

Страница 143: ...in the set screw of the inside handle 9 The inside handle is secured 2 If you have a Swiss Round version clip the plastic cover onto the MO cut out 9 SmartHandle is mounted SmartHandle SmartIntego Man...

Страница 144: ...labelling is legible SmartIntego Virtual Card Network SVCN The SI SmartHandle do not have to be removed from the packaging for programming Open the packaging and hold the SI SmartCD against the card...

Страница 145: ...10 Configuration See TechGuide WO SVCN SmartHandle SmartIntego Manual 10 Configuration 145 160...

Страница 146: ...11 Status messages See TechGuide WO SVCN SmartHandle SmartIntego Manual 11 Status messages 146 160...

Страница 147: ...12 Signal See TechGuide WO SVCN SmartHandle SmartIntego Manual 12 Signal 147 160...

Страница 148: ...mergency battery warning batteries are almost completely empty Replace the batteries in the SmartHandle IMMEDIATELY SI SmartHandle Once Warning Level 2 has been emitted for the first time the door can...

Страница 149: ...arefully pull both batteries out of the holder 8 Insert the new batteries into the holder quickly with the positive poles facing outwards 9 Fold the electronics back in 10 Carefully snap the electroni...

Страница 150: ...in front of the lock 9 A battery measurement is performed to detect the new batteries 9 No further false battery warnings are sent to the integrator system SmartHandle SmartIntego Manual 14 Battery r...

Страница 151: ...a soft and if necessary damp cloth When disinfecting the SI SmartHandle AX only use agents that are expressly intended for disinfecting sensitive metal or plastic surfaces If necessary change the bat...

Страница 152: ...and remove the cover The inlay remains on the handle and cannot be removed until the handle is dismounted Follow the same steps as for installation but in reverse order 16 2 Restore storage mode for...

Страница 153: ...r fitting If necessary also disconnect the cable of the LockNode from the inside fitting 2 Hold the inside and outer fittings firmly while pulling them away from one another horizontally 3 If necessar...

Страница 154: ...e programmed while still in the packaging To disassemble carefully take hold of the cable at the plugs and pull the two fitting components outside and inside fitting apart 16 7 Disassembling DoorMonit...

Страница 155: ...dismounted Follow the same steps as for installation but in reverse order 16 9 Restore storage mode for RMO 1 Disconnect the internal fitting 3 pole cable from the outer fitting 3 pole cable If necess...

Страница 156: ...Installation Slide the sleeves from the inside of the door into the mortise lock before installing the SI SmartHandle 7 mm to 8 mm You can also use the 7mm version of the SI SmartHandle for mortise lo...

Страница 157: ...list Max 1 000 WO 250 Protection rating IP 40 WP version IP 45 for outside Online network Card technology MIFARE Classic MIFARE Plus MIFARE DESFire EV1 UID according to 14443 from MIFARE LEGIC advant...

Страница 158: ...ng guidelines 2014 53 EU Radio equipment 2014 30 EU EMC 2011 65 EU RoHS 2012 19 EU WEEE and regulation EG 1907 2006 REACH The full text of the EU Declaration of conformity is available at the followin...

Страница 159: ...batteries in line with European Directive 2006 66 EC Observe local regulations on separate disposal of batteries Take the packaging to an environmentally responsible recycling point Hotline If you ha...

Страница 160: ...inable thinking and action and heartfelt appreciation of employees and partners With its headquar ters in Unterf hring near Munich and its production site in Osterfeld eastern Germany the company empl...

Отзывы: