Fix anti-twist mechanism in the door lock
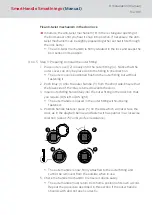
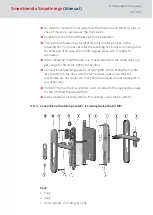
Introduce the anti-twist mechanism (E) in the rectangular opening of
the bolt sensor until you hear it snap into position. If necessary, the anti-
twist mechanism can be slightly pressed together so that it fits through
the lock better.
9
The anti-twist mechanism is firmly situated in the lock and keeps the
bolt sensor in its position.
8.6.4.5 Step 3: Preparing to install the outer fitting
1. Place outer cover (2) loosely onto the outer fitting (4). Notice that the
outer cover can only be placed onto the fitting in one direction.
9
The outer cover is positioned flush on the outer fitting but without
fastening it.
2. Push inlay (1) onto the outer handle (3) from the short side. Ensure that
the black side of the inlay is turned towards the door.
3. Insert outer fitting horizontally into the outer fitting in the direction that
you require (DIN left or DIN right).
9
The outer handle is placed in the outer fitting without being
fastened.
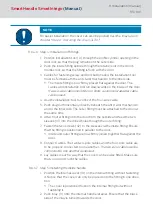
4. Position handle fastener piece (5) on the side which will later face the
door, as in the diagram below, and fasten with a spanner in a clockwise
direction (about 75º until you feel resistance).
75°
1
2
4
-45°
3
9
The outer handle is now firmly attached to the outer fitting and
cannot be removed from the outside when in use.
5. Check the handle mechanism to ensure it opens easily.
9
The outer handle must return to its home position of its own accord.
Repeat the procedure described in this section if the outer handle
should catch and not open correctly.
SmartHandle
SmartIntego
(Manual)
8. Installation (manual)
84 / 160
Содержание SI:SmartHandle Series
Страница 1: ...SmartHandle SmartIntego Manual 28 10 2020...
Страница 25: ...6 5 Distances and door thicknesses SmartHandle SmartIntego Manual 6 Designs 25 160...
Страница 131: ...SmartHandle SmartIntego Manual 8 Installation manual 131 160...
Страница 132: ...9 Outer fitting is mounted SmartHandle SmartIntego Manual 8 Installation manual 132 160...
Страница 136: ...2 Remove the uppermost battery SmartHandle SmartIntego Manual 8 Installation manual 136 160...
Страница 137: ...3 Screw on the inside fitting SmartHandle SmartIntego Manual 8 Installation manual 137 160...
Страница 141: ...3 Press the inside of the cover firmly SmartHandle SmartIntego Manual 8 Installation manual 141 160...
Страница 145: ...10 Configuration See TechGuide WO SVCN SmartHandle SmartIntego Manual 10 Configuration 145 160...
Страница 146: ...11 Status messages See TechGuide WO SVCN SmartHandle SmartIntego Manual 11 Status messages 146 160...
Страница 147: ...12 Signal See TechGuide WO SVCN SmartHandle SmartIntego Manual 12 Signal 147 160...


