


Chapter 6
Operating Instructions
ICR845-2 Image Code Reader
86
©
SICK AG · Division Auto Ident · Germany · All rights reserved
8012377/ 0000/ 2008-01-30
Startup and configuration
5.
Proceed in a similar manner for the terminator.
6.
The constants or placeholders for reading diagnosis data can be placed freely before
or after the code contents in the R
EADING DATA
field. The selected arrangement is the
same for all output code contents.
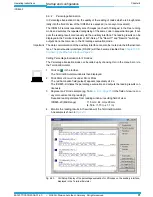
7.
Perform a download to the ICR845-2. This is done by clicking
in the toolbar.
The D
OWNLOAD
P
ARAMETER
dialog box is displayed.
8.
Confirm the dialog box by selecting the P
ERMANENT
save option.
The ICR845-2 outputs the selected elements in the data output string of the host inter-
face with the next reading result.
6.9.6
Auxiliary input
Function of the auxiliary interface. In this mode, the ICR845-2 accepts a code input to the
auxiliary interface (via keyboard or hand scanner with decoder). It sends the code to the
host in a separate data string via its host interface. No Reads can, therefore, be corrected
by transmitting missing codes subsequently.
Chapter 10.7.5 Auxiliary input via the auxiliary interface, Page 160
describes this function
and the associated procedure in greater detail.
6.9.7
Self-test
After the ICR845-2 has been switched on, it performs a self-test before it is initialized with
the parameter set. The test can be called up explicitly at any time via CLV-Setup. During the
self-test, the ICR845-2 checks that its hardware components are functioning correctly. A fi-
nal message via the auxiliary interface provides information on the test result. The ICR845-
2 does not output a reading result during the test routine.
1.
Click on
in the toolbar.
The Terminal Emulator window is then displayed.
The ICR845-2 is in Reading mode.
2.
Click S
ELF
T
EST
under D
EVICE
M
ODE
.
The ICR845-2 cancels the Reading mode and starts the test routine.
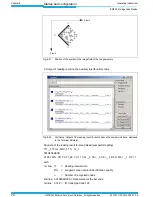
After a few seconds, the ICR845-2 outputs the encoded test result in the form of a code
number (
Fig. 6-26
).