background image

10-12

10

Music Player

C

AAC Music Player

Music files are saved in folders within 

ミュージック

ミュージック

ミュージック

ミュージック

 (Music) folder 

(see 

P.10-3

). In each folder, all files within appear in 

List All 

Music Files

. Use three Play Lists (

プレイリスト1

プレイリスト1

プレイリスト1

プレイリスト1

 - 

プレイリス

プレイリス

プレイリス

プレイリス

ト3

ト3

ト3

ト3

) to organize them. To organize files in List All Music Files, 

see 

P.10-19

 "Add to Play List."

C

MP3 Music Player

Music files are saved in a single Play List (

Default Playlist

).

New Play Lists cannot be created.

Incoming Communications during Playback

C

When calls arrive, beeps sound and playback continues. Mail Notice appears for mail 
messages and indicator (

C

 or 

D

) flashes for Web/Station information (except Urgent 

Information).

^

To stop playback automatically for incoming calls, set Exit Player in Incoming 
Settings (see 

P.10-18

).

C

Playback stops in the following cases. (To resume, press 

b

.)

^

Alarm starts at Alarm Time, Auto Power On Time, etc.

^

Urgent Information arrives

^

Message Recorder activates and outgoing message plays

^

Calls with no Caller ID or Payphone calls arrive when Reject Call is set for those 
calls and outgoing message plays

,

Handset returns to Standby after five minutes of inactivity in Playback window.

+

^

To activate/cancel Manner Mode, press 

j

 for 1+ seconds in Playback window.

^

To answer calls during playback with Headphones, press Call Button for 1+ 
seconds.

^

Turn down the volume if distortion is noticeable in speaker sound.

Play Lists

J

c


E

Q

n

AAC Music Player

アルバム1
List All Music Files
プレイリスト1
プレイリスト2
プレイリスト3

Select

J

c


E

Q

n

Menu

Play

Play List

u

Default Playlist

**

1.

*

5‑12‑15̲16‑1

*

**

2.

*

5‑12‑15̲17‑14

**

3.

*

5‑12‑15̲18‑19

10-13

Music Player

10

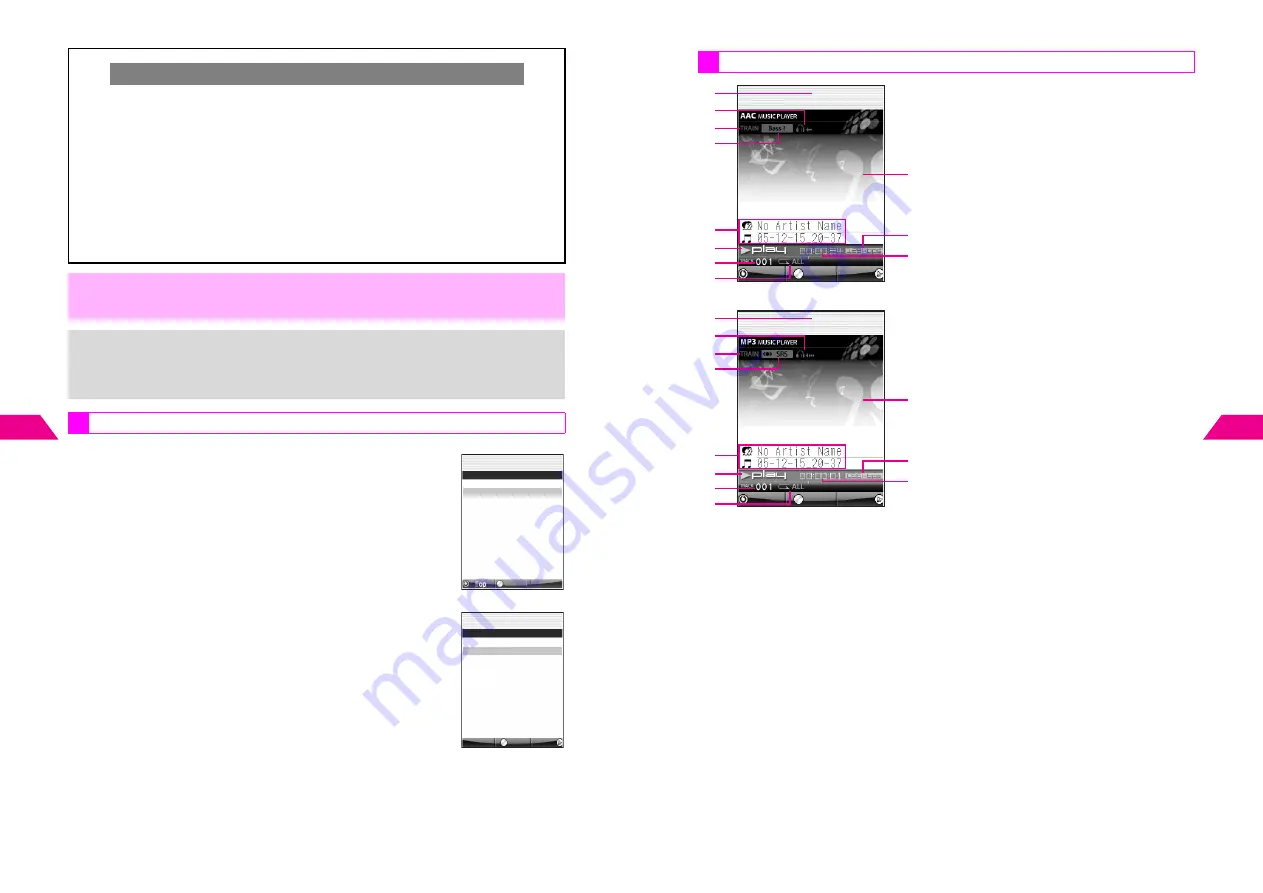
1

Playback in Progress

2

Incoming Settings (see P.10-18)

I

: Exit Player, 

J

: Show Message

3

Volume Control (Train: see P.10-17)

H

: Volume Control On

^

Indicator does not appear for Volume 
Control Off.

4

Sound Effect (see P.10-17)

D

: BASS 1 (MP3)

E

: BASS 2 (MP3)

n

: BASS 1 (AAC)

o

: BASS 2 (AAC)

G

: Surround (MP3)

F

: Surround Bass (MP3)

^

Indicator does not appear for Normal (no 
sound effect).

5

Title/Artist Name

6

Status

J

 / 

O

E

 / 

A

7

Track Number

8

Play Setting (see P.10-17)

G

: Repeat 1,

H

: Repeat All,

F

: Random Play

^

Indicator does not appear for Repeat Off.

9

Background (see P.10-18)

Image set in Display Settings appears.

A

Bit Rate (see P.10-11)

B

Elapsed Time

Playback Window Indicators

J

P

c

Q

n

Back

Menu

Stop

1
2

4

8

3

6

7

A
B

5

AAC Music Player

9

J

P

c

Q

n

Back

Menu

Stop

1
2

4

8

3

6

7

A

9

B

5

MP3 Music Player

Содержание GC40K

Страница 1: ...manual Please contact Customer Service General Information see P 18 21 concerning unclear or missing information i Symbols Use Multi Selector to select menu items move cursor scroll etc In this manual Multi Selector operations are indicated as shown to the right Basic Multi Selector Operations B E Press C or D B F Press B or A B G Press C D B or A Use Side Keys when Display is in Viewer position s...

Страница 2: ...s the corresponding key in parentheses iii Accessories CAnalog Conversion Cable ZTPH02 CIn Car Charger SHJH01 COptical Conversion Cable ZTPH01 CDesktop Holder SHEAF1 Designed exclusively for V604SH CBattery SHBAF1 Type 1 lithium ion battery CHeadphones SHLV01 with Built in TV Antenna CRapid Charger SHCV01 CminiSD Memory Card 32 MB card preloaded with Custom Screens CVideo Cable SHPU01 CminiSD Memo...

Страница 3: ...ations 1 34 C Keypad Shortcuts 1 35 C Guide 1 35 Handset Codes 1 36 C Security Code 1 36 C Center Access Code 1 36 v 2 Basic Handset Operations Initiating a Call 2 2 Viewer Position 2 3 C Redial 2 4 C International Call Send With Code 2 5 Setup Preset 2 5 International Call Send With Code 2 5 C Emergency Calls 2 5 Incoming Call 2 6 Viewer Position 2 6 C Call History 2 8 Handling Incoming Calls 2 9...

Страница 4: ...ctionaries Japanese Only 4 15 C User Dictionary 4 15 New Entry 4 15 Edit 4 15 C V501SH Download Dictionary 4 15 Acquire Dictionary 4 15 Cancel 4 16 Editing Characters 4 16 C Deleting 4 16 C Replacing 4 16 C Copy Cut Paste 4 17 C Deleting Text Before or After Cursor 4 17 vii Text Memo 4 18 C Entering Text 4 18 C Text Memo Functions 4 20 Edit Delete 4 20 To Data Folder 4 20 Change to Vnote 4 20 5 Ph...

Страница 5: ...27 C Opening Still Images 6 27 C Playing Video 6 29 Memory Status 6 30 ix Editing Video 6 30 C Clipping Video 6 31 C Saving Images from Video 6 32 C Clipping Portions between Two Points 6 32 C Cropping Video Clips 6 33 C Editing Telops 6 33 Text Effects 6 35 Telop Scroll 6 35 Sending Images Video 6 36 C Sha mail Mode Images 6 36 C Camera Mode Images 6 38 C Video Clips 6 38 Digital Print Order Form...

Страница 6: ...sic Functions 9 2 C Music Key Music Player 9 3 Recording Music 9 4 C Basic Functions 9 4 C Connecting to Audio Sources 9 6 C Recording 9 8 xi C Recording Settings 9 9 Monitor Level 9 9 Synchro Recording 9 9 Bit Rate 9 10 Track Break Level 9 10 Playing Music 9 10 C Basic Functions 9 10 C Playback 9 12 C Playback Settings 9 14 Play Setting 9 14 Sound Effect 9 14 Train Volume Control 9 14 Incoming Se...

Страница 7: ...12 28 File Format Size 12 28 Moving Photo Frame 12 29 Combining Images 12 29 C Split Screen 12 30 C Panorama Images 12 31 C Combining Split Mail Images 12 33 xiii Melody Files 12 33 C Playback Volume 12 33 C Using for Incoming Tone Sound Effects 12 34 Chaku Uta 12 34 C Playback 12 34 C Playback Settings 12 35 Play Setting 12 35 C Using as Ring Tone 12 35 Incoming Tone 12 35 vFiles 12 36 C Basics 1...

Страница 8: ...5 20 C Deleting Entries 15 20 Delete Item 15 20 One Day Schedules 15 21 Delete All 15 21 xv C Other Schedule Settings 15 21 Auto Delete 15 21 Set Color 15 21 View 15 21 Even List 15 21 Motion Control Sensor Settings 15 22 C MC Sensor 15 22 C Motion Control Settings 15 22 M key Settings 15 22 b Key Settings 15 22 Viewer Setting 15 23 Compass 15 23 Shake Counter 15 24 Shake Sound 15 25 User Shortcut...

Страница 9: ...lling 16 7 Open Another Line 16 7 Switch Line 16 7 Break Away while Switching Lines 16 7 3 Way Calling 16 7 Break Away from 2 Open Lines 16 8 17 Appendix Function List 17 2 Troubleshooting 17 6 Character Code List 17 9 Specifications 17 13 Index 17 15 Warranty After Sales Services 17 20 Customer Service 17 21 xvii Safety Precautions Read safety precautions before using handset Observe precautions ...

Страница 10: ...ners Keep handset Charger and Holder away from chemicals liquids Fire or electric shock may result Avoid sources of fire Prevent fire or explosion Do not use handset in the presence of gas or fine particles coal dust metal etc Do not use Mobile Light near people s faces Eyesight may be temporarily affected leading to accidents Keep handset Charger or Holder away from microwave ovens Battery or han...

Страница 11: ...er terminals Keep metal away from terminals May cause overheating fire or electric shock Do not use Desktop Holder inside vehicles Extreme temperature or vibration may cause fire or damage handset etc Preventing accidents Secure In Car Charger to avoid injury or accidents If Rapid In Car Charger cord is damaged May cause fire or electric shock contact Vodafone Customer Center Customer Assistance t...

Страница 12: ...vehicles Handset use may cause electronic equipment to malfunction Should skin irritation occur discontinue handset use and consult a doctor See below for handset materials Some materials may cause skin irritation rashes or itchiness depending on your physical condition Handset Parts Materials Finishing Housing Display side Magnesium alloy Acrylic baking finish sealer epoxy baking finish Housing D...

Страница 13: ...talling In Car Charger Properly position the cable for safe driving to avoid injury or accidents Charger xxv CAUTION Do not throw or abuse battery Battery may overheat burst or ignite Do not leave battery in direct sunlight or inside vehicles Overheating fire may occur may reduce performance Do not expose battery to liquids Performance may deteriorate If battery fluid contacts skin or clothes rins...

Страница 14: ... dry soft cloth Using alcohol thinner etc may damage it Do not expose handset to rain snow or high humidity Never disassemble or modify handset Avoid scratching handset Display When closing handset keep straps etc outside to avoid damaging the Display When using headphones moderate volume to avoid sound bleed Handset is not water proof Avoid exposure to liquids and high humidity B Keep handset awa...

Страница 15: ...ealth Organization WHO The highest SAR value for V501SH is 0 27 W kg Tests for SAR are conducted with handset transmitting at its highest certified power level and follow the testing methods set by the government While there may be differences between the SAR levels for various handsets they all meet the governmental requirements for safe exposure The actual SAR level of the handset while operatin...

Страница 16: ...1 1 Getting Started ...

Страница 17: ...y Images 3Power On Message 4Font Settings 5Letter Pad F My Number Sounds Privacy Settings 1 Settings 2 J S d P J S z P b 1 3 Getting Started 1 Optional Services Memory Card Save files to Memory Card to expand handset memory or back up your handset files P 11 2 Data Folder Access handset image and sound files from here files are organized by file type P 12 3 Chaku Uta Download Chaku Uta MP4 audio f...

Страница 18: ...cursor scroll etc or use for the following a Redial Notepad Memory Key Select dialed numbers or return to the previous window Press for 1 seconds to open Notepad Memory b Shortcut Key In Standby open Shortcuts menu Press for 1 seconds to open V Appli Library default c Phone Book Key Open entries to make calls send messages or open selected menu items Press for 1 seconds to save new entries d Funct...

Страница 19: ...nu items or execute functions In Standby press for 1 seconds to activate mobile camera R Zoom Select Key Select menu items move cursor etc a Move cursor up b Move cursor down S C Key In Viewer position press to open Mail menu cancel current operation return to previous window when camera is active press for 1 seconds to cancel T Camera lens cover Capture still and video images U Portrait Macro Sel...

Страница 20: ...M 1 DE G F 2 3 4 567 89A B C PQ RS T U V W I H J K L MN O 1 9 Getting Started 1 D k Voice Mail New Voice Mail E D Mail Unread mail except Super Mail F k Super Mail Unread Super Mail G b Handset c Memory Card Accessing handset or Memory Card H Entry Mode Current character entry mode I h Original g Enlarged Mail Web or Data Folder image display size J 9 Web Unread Web information K H red Station Unr...

Страница 21: ... 4 uideux When handset is closed clamshell closed press h for 1 seconds or press r to illuminate Sub Display Backlight Backlight stays off if Sub Display Backlight Settings see P 7 13 is set to Off 1 11 Getting Started 1 Display Positions Key Ops V501SH features a rotating Display Select from four positions In this manual most operations are described with handset open clamshell open However mobil...

Страница 22: ...in Viewer position use h c M L or r to operate handset 1 Key arrow directions appear reversed when handset is held Side Keys down 2 Not available when Calendar see P 7 4 appears in Standby Use Side Keys to execute corresponding keypad functions indicated below except during calls incoming calls or while mobile camera or V Application is active 1 Key arrow directions appear reversed when handset is...

Страница 23: ...o shocks C Motion Control may not work correctly when Aboard trains or in vehicles Near metal objects such as desks and shelves In steel framed buildings Near or inside elevators Near magnetized objects C Motion Control may not work correctly after handset is placed near magnetized objects see below for examples In this case adjust MC Sensor see P 15 22 Magnets for whiteboards furniture bags etc A...

Страница 24: ...C Replace battery if operating time is noticeably shorter than normal Do not use Charger for other purposes Battery may short circuit overheat or burst from contact with metal objects Small Light illuminates red while charging It may take a while for the light to illuminate when handset power is off Charging takes approximately 115 minutes with handset power off B Charging time may vary by ambient...

Страница 25: ...Pen Light B Continuous Keypad use Backlight stays on for long periods B Use of Music Player Voice Recorder B Frequent infrared transfers B Frequent opening closing of handset B Frequent use of Motion Control Setting B Backlight Keypad Light time is set longer B Wallpaper is animated B Screen Animation is used B Panel Saving is Off B Backlight is set brighter Estimated Hours of Use fully charged ba...

Страница 26: ...f Off Ambient temperature is outside the range of 5 C 35 C Flashes red Off Battery life has ended or battery defect Illuminates red Off Charging Off Off Charging completed Approx 70 Approx 20 Approx 10 Remaining Strength at 25 C Hours of Use Battery Voltage Recharge Battery appears Charge or replace battery immediately M L K J Level 3 Level 2 Level 1 Level 0 Minimum Operating Voltage 1 21 Getting ...

Страница 27: ...he symbol shown to the right To avoid fire or electric shock do not B Short circuit batteries B Disassemble batteries 1 23 Getting Started 1 Use specified Charger only 1 Open Terminal Cover and insert Charger connector until it clicks 2 Plug in Charger Extend Charger blades Fold back when not in use Charging starts and Small Light illuminates red see P 1 20 3 Charging is complete when light goes o...

Страница 28: ...s active See P 3 3 3 2 1 4 5 Make sure that Battery Cover and Texture Panel are set on handset For more information see Desktop Holder manual 1 25 Getting Started 1 Use specified In Car Charger only 1 Open Terminal Cover and insert Charger connector until it clicks 2 Plug in Charger 3 Start car engine Charging starts and Small Light illuminates red see P 1 20 4 Charging is complete when light goes...

Страница 29: ... continue choose 1Yes A Press b See IP 1 4 for more about Network Setup Handset receives incoming mail or Web Station information while closed Display shuts down after a period of inactivity see P 15 41 Panel Saving 1 1 1 1 2 2 2 2 3 3 3 3 J N 1 27 Getting Started 1 Use Key Guard to lock handset keys and prevent accidental activation of functions or operations Key Guard Activating 1 Press b for 1 ...

Страница 30: ...Clock can be set during calls 5 5 5 5 1 1 1 1 2 2 2 2 3 3 3 3 4 4 4 4 J N F59 Clock Settings 2005Y ーーMーーD ー ーー ーー OK OK 1 29 Getting Started 1 Handset Menus Access functions operations from Index Menu CIndex Menu Items Index Menu 1 Press b Index Menu opens To customize Index Menu appearance see P 7 6 2 Use G to select an item C To open Handy Features menu press e C To open V Appli Library press d ...

Страница 31: ...ens Return to Standby C Press g to return to Standby see P 1 26 from function windows menus etc When confirmation appears choose 1Yes and press b Standby returns Activate MC Sensor in Viewer Setting see P 15 23 to return to Standby quickly in Viewer position by shaking handset Hot Switching Mail C During an operation press d for 1 seconds A Use mail related functions open message reply etc Press i...

Страница 32: ... 1 Tilt handset to move cursor Activate MC Cursor in M key Settings beforehand see P 15 22 MC Cursor is not available with clamshell closed Tilt handset forward backward left right or diagonally to navigate menus Read the precautions on P 1 14 before using MC Cursor CSelect Item Press r N or O appears and tilt handset forward or backward to move cursor Press r again to cancel MC Cursor MC Cursor i...

Страница 33: ... to activate MC Cursor while b is pressed MC Cursor is canceled when b is released Quick Operations 1 2 3 4 5 6 7 12 13 24 Speed Dial see P 5 14 Spending Memo see P 15 43 Add to Phone Book see P 5 4 Entry Search1 see P 5 13 Calculator see P 15 42 Send 2 Touch Mail see IP 3 15 Set Alarm2 see P 15 7 Schedule3 see P 15 19 J P N J Speed Dial X Spending Memo W To Phone Book Entry Search 1 Super Sky Cal...

Страница 34: ...Code Change Security Code as needed see P 14 2 The 4 digit number in the contract required to access Optional Services via landlines and to subscribe to fee based information Do not attempt to change Center Access Code Contact Vodafone Customer Center General Information see P 17 21 for details Security Code Center Access Code Write down Center Access Code If lost contact Vodafone Customer Center ...

Страница 35: ...2 1 Basic Handset Operations ...

Страница 36: ...ress h In Viewer position hold handset with Viewer in and Earpiece up Side Key Assignments during Calls Viewer Position Place calls with Display in Viewer position h Open Call in Progress menu c Long Press End call M Increase volume L Decrease volume Close to End Call C Select whether or not to end calls by closing handset clamshell closed Press b A Select Functions A Press b A Select 1Sounds A Pr...

Страница 37: ...86 Send Caller ID or 184 Block Caller ID KInternational Call 0046010 Send With Code None Select 1International Call or 2Send With Code A Press b A Enter a prefix A Press b C To change the prefix select 1International Call or 2Send With Code A Press b A Press i Long Press A Enter a new prefix A Press b Enter up to seven digits for International Call and up to six digits for Send With Code Select In...

Страница 38: ...ic Handset Operations 2 Caller ID C Phone numbers appear only when Caller ID is sent C Picture Call Mail see P 5 7 and Personal Ring Tone see P 5 10 are disabled and Caller s name does not appear for Phone Book entries on Memory Card Ring Tone Volume C Press C up or D down to adjust volume Ring Tone Level setting see P 8 2 changes accordingly Cancel Manner Mode to adjust the level Quick Silent C P...

Страница 39: ...allers placed on hold hear a message explaining that you cannot answer their call right away and asking them to hold or call back later When a call arrives press c Long Press A To answer the call press h Long Press Placing Callers on Hold 1 When a call arrives open handset 2 Press g Hold tone sounds for five seconds No tone sounds when Ring Tone Level is set to Silent 3 Press f to answer the call ...

Страница 40: ...igned function Message Recorder is assigned to c by default To use other Side Keys during incoming calls assign functions to them first see P 15 3 Available Functions Clamshell Closed Hold Place callers on hold See P 2 9 Quick Silent Mute ringer for incoming calls See P 2 7 Reject Call Reject and end the call See P 2 9 Message Recorder Record caller messages on handset See P 15 4 Forward Voice Mai...

Страница 41: ...nctions A Sounds A Call Functions A Incoming Call A Delayed Ringer 1 Choose 1On and press b 1 1 1 1 2 13 Basic Handset Operations 2 Engaged Call Operations Adjust Earpiece volume 5 levels Earpiece volume is Level 5 by default Earpiece Volume 1 During a call press C or D 2 Press C up or D down to adjust volume level Each press changes volume by one level Wait five seconds or press b to save the lev...

Страница 42: ...Memory to Phone Book Select 6Notepad Memory A Press b Up to 3 sets of numbers appear most recent first Press f to dial the number If there is no entry Notepad Memory Not Found appears Alternatively press Be to open Notepad Memory C Press g to exit C To save to Phone Book select an entry A Press d I A Select Add to Phone Book A Press b A See P 5 4 5 5 for more C To delete select an entry A Press d ...

Страница 43: ... Mail Center Reject Rejected call Payphone Call from payphone No Caller ID Call without Caller ID 1 1 1 1 1 1 1 1 2 17 Basic Handset Operations 2 Information Menu Information Menu opens for missed incoming communications 1 A call arrives then ends Date and time of the call and Missed Call notice or Message Recorder notice appears 2 After approximately five seconds Information Menu opens 3 Use E to...

Страница 44: ...ect an item A Press b A Select 1Mobile Light A Press b A Select a color A Press b Small Light Select an item A Press b A Select 2Small Light A Press b Small Light color is fixed Off Select an item A Press b A Select 3Off A Press b Set Incoming Light for each type of information When Delayed Ringer is active Mobile Small Light does not flash for missed calls from numbers not saved in Phone Book or ...

Страница 45: ...nted On hold time is counted 1 1 1 1 2 2 2 2 2 21 Basic Handset Operations 2 Call Charge Check estimated Call Charge of the most recent call or Total Charges Press b A Enter Security Code A Choose 1Yes A Press b KOff Choose 1On or 2Off A Press b Call Charge will not appear after leaving a 3 Way Call Break Away Call Time appears at the same time Index Menu H Functions A Charges 1 Select 1Call Charg...

Страница 46: ...A Select Delete A Press b A Choose 1Yes A Press b C To copy an item in Owner Profile enter security code and press b A Use F to select an item A Press b A Select Copy A Press b A For more see Step 5 and onward in Copy Cut Paste on P 4 17 B Image for Photo cannot be copied Index Menu H Functions 1 Select 0My Number and press b C To open Owner Profile press d w A Enter Security Code Owner Profile co...

Страница 47: ...3 1 Manner Mode ...

Страница 48: ...Off Line Mode to suspend all handset transmissions In Off Line Mode incoming outgoing calls and Vodafone live transmissions are blocked C Message Recorder see P 15 4 Use Message Recorder to handle incoming calls when it is inappropriate or unsafe to answer 3 3 Manner Mode 3 Manner Mode Activate or cancel Manner Mode in Standby Web information mail windows List View message window etc or while usin...

Страница 49: ...Volume Alarm Vibration Handset vibrates when Alarm Time arrives Index Menu H Functions A Settings 2 A Manner Settings A Alarm Vibration 3 5 Manner Mode 3 Select from 1Normal to 3Off A Press b Choose 1On or 2Off A Press b Use Whisper Mode to increase microphone sensitivity allowing you to lower your voice and speak softly when you must use handset in public places i flashes Select 6Sound Volume A P...

Страница 50: ...Mode Index Menu H Functions A Settings 1 A Off Line Mode 1 Choose 2Off and press b S disappears and Off Line Mode is canceled When Off Line Mode is set while a Network V Application see IP 10 4 is paused V Appli Paused Cannot Connect to Network in Off line Mode Off line Mode On appears Choose 1Yes and press b to enter Off Line Mode Network connection is disabled until Off Line Mode is canceled Whi...

Страница 51: ...4 1 Entering Characters ...

Страница 52: ...ingle byte for single byte katakana alphanumeric entry 6 Press f once for each character to recover immediately after deleting Not available after deleting text with i Long Press 7 List is not available for Character Codes Key Assignments Key Kanji Hiragana Double byte Katakana Double Single byte Alphanumerics Double Single byte Numbers Single byte Pictograph Code 1 6 Character Codes 1 あいうえお あいうえお...

Страница 53: ...鈴木田 2鈴切 kanji InputMethod 変換 Convert 4 5 Entering Characters 4 5 Press D k and use E to select a word C To see other suggestions press d J or e W C To exit the list press i C To change segment see Segmenting Phrases below 6 Press b CSegmenting Phrases If the word is not in the list press i after Step 5 to exit Then use F to segment hiragana to convert separately Example Segment みち みち みち みち into み ...

Страница 54: ...ress p or q to open Log List Log List is available in some entry modes Recently used Symbols Pictographs appear appears by default or when Log List is deleted see below 2 Use G to select one and press b Repeat Step 2 to enter more C To see more lists press e or p The list toggles as follows Log List Symbol List 1 3 Pictograph List 6 1 B Press q to toggle the list in reverse order B Press D to scro...

Страница 55: ...be selected Space Line Break Mail Web Extensions Ueda A Ueda Contact me at D Contact me ate JF E P N 1 co jp 2 ne jp 3 ac jp 4 or jp 5http 6www 7 com 8 9 選択 Select 4 9 Entering Characters 4 Insert Phone Book entry items into text entry windows Select from names phone numbers mail addresses or Personal Data 1 In a text entry window press d I 2 Press e 4 3 Open a Phone Book entry C To search Phone B...

Страница 56: ... せ そ そ そ そ K K K K L L L L M M M M N N N N O O O O 3 k k k k l l l l m m m m n n n n o o o o 4 た た た た ち ち ち ち つ つ つ つ て て て て と と と と P P P P Q Q Q Q R R R R S S S S T T T T 4 っ っ っ っ p p p p q q q q r r r r s s s s t t t t 5 な な な な に に に に ぬ ぬ ぬ ぬ ね ね ね ね の の の の U U U U V V V V W W W W X X X X Y Y Y Y 5 u u u u v v v v w w w w x x x x y y y y 6 は は は は ひ ひ ひ ひ ふ ふ ふ ふ へ へ へ へ ほ ほ ほ ほ Z Z Z Z 6...

Страница 57: ...9 B わをんー わをんー わをんー わをんー Long Sound Line Break 0 Quick Conversion helps reduce keystrokes needed to enter frequently used words A list of word suggestions appears based on the key pressed Use Quick Conversion in kanji hiragana mode only Example To enter 微妙 微妙 微妙 微妙 1 Enter hiragana and press C Cursor turns green While cursor is green use F to segment entered hiragana and then convert one segment at...

Страница 58: ... in kanji conversion Predictive etc お父さん あ C 4 15 Entering Characters 4 Save up to 100 frequently used words phrases and assign Title Words in hiragana to entries In text entry windows enter Title Word and convert Entries appear among word suggestions Save up to five entries per Title Word Enter a word phrase A Press b A Enter Title Word A Press b Enter up to 15 characters per word phrase and eigh...

Страница 59: ...to delete an entire entry Characters deleted in this manner cannot be recovered Replacing i Kinoshita Kioshita i Mikako Mikko Mikiko 4 17 Entering Characters 4 When Menu N appears copy or cut and paste text up to 15 000 single byte characters into the same window or another 1 In a text entry window press d I 2 Select 1Copy or 2Cut and press b 3 Move cursor to the first character of text and press ...

Страница 60: ...dset press e s 6 Choose 1Yes and press b Text is saved To save more text repeat Steps 2 6 Text Memo Entering Text Memo Format Index Menu H Briefcase Saving from Message or Phone Book C In a text entry window press d I A Select 4Save Text Memo A Press b A Move cursor to the first character of text A Press b A Move cursor to the end of text A Press b A Choose 1Yes A Press b 4 19 Entering Characters ...

Страница 61: ...xt A Press d I A Select To Data Folder A Press b A Enter title A Press b A Select a folder A Press b Memo format text is saved in text format Create sub folders if necessary Select text A Press d I A Select Change to Vnote A Press b Text Memo contents may change when converting formats Note cannot be converted to Memo Text Memo Functions Edit Delete Edit or delete Text Memo Index Menu H Briefcase ...

Страница 62: ...5 1 Phone Book ...

Страница 63: ...ing Call Aoki Itirou 03123XXXX1 Menu J P N Menu 5 3 Phone Book 5 Save up to 500 entries 000 499 in Phone Book handset Save up to 10 000 entries 0000 9999 in Phone Book Memory Card Saving to Phone Book Phone Book Entry Items Item Description c Name Enter up to 18 single byte characters Use kanji hiragana katakana double or single byte alphanumerics double or single byte and Pictographs d Reading Ka...

Страница 64: ...ies see P 5 7 New Phone Book Entries Index Menu H Tel Ops A Add to Phone Book J d E P N cUeda Mikio dUeda Mikio eUnsaved iUnsaved k0Untitled lUnsaved bOff mUnsaved Option settings Cancel Save 選択 Select Phone Book Details 5 5 Phone Book 5 11 Press d q Memory Number entry window opens Assign a Memory Number to each Phone Book entry 12 Saving to Handset 1Enter Memory No 000 499 Entry is saved to Phon...

Страница 65: ...re Call Mail is activated automatically and the image appears for incoming calls mail To hide image follow these steps to cancel Picture Call Mail 1 In Phone Book Details see P 5 4 select Option settings and press b 2 Select 3Picture Call Mail and press b 3 Choose 2Off and press b C To activate Picture Call Mail choose 1On A Press b 4 Press e j Phone Book Details see P 5 4 returns Complete other f...

Страница 66: ...XX Menu 選択 Select F31 5 9 Phone Book 5 Set Personal Ring Tone Incoming Notice Picture Call Mail see P 5 7 Mail Folder and Auto Reply see IP 6 2 Select Set All or One Number Address 1 In Phone Book Details see P 5 4 select Option settings and press b Option Settings menu appears 2 Select an item and press b 3 Apply Same Setting to All 1Select 1Set All and press b Settings by Number Address 1Select ...

Страница 67: ...ress b A Press e j A Press e j A For One Number Address press e j again Setting Options Personal Ring Tone Incoming Notice Select Ring Tone vibration etc for incoming calls mail from numbers addresses saved in Phone Book When source file in Data Folder is deleted renamed or moved Ring Tone is set to Pattern 1 for Personal Ring Tone and Mail for Incoming Notice To apply Personal Ring Tone or Incomi...

Страница 68: ...ess A l The method used last appears 2 Press d I 3 Select a method and press b Selected method appears To search and open an entry see below Follow these steps in Standby Skip the step of pressing A l when continuing from Step 3 above CSet search method to Memory No Search see P 5 12 Press A l A Enter Memory No 000 499 A Select a name A Press b C Press f to dial CSet search method to Katakana Sear...

Страница 69: ...o 9 H 5 Ueda Mikio 3123XXXX3 aaa xxx yyy 6 Aoki Itirou 3123XXXX1 bbb xxx yyy 7 Okada Noriko 3123XXXX2 ddd xxx yyy 8 Hamada Shingo 3123XXXX4 eee xxx yyy Switch Menu 選択 Select Entry List Memory No Search Entry List with Images Memory No Search 5 15 Phone Book 5 1 Press A l then open an entry 2 Press b 3 Select Edit and press b 4 Select an item and press b Edit contents Procedure is the same as when ...

Страница 70: ...il and press b 3 Select 1Call Functions and press b 4 Choose 1On and press b C To cancel choose 2Off A Press b 5 Select from 2Ring Tone to 6Ring Time and press b 6Ring Time is available for incoming mail only C For Ring Tone settings see P 8 3 C For vibration and Mobile Small Light patterns see P 8 4 8 5 C For Ring Time setting see P 8 5 6 Press g to exit Group Settings Changing Group Name Index M...

Страница 71: ...6 1 TV FM Radio ...

Страница 72: ...handset to an external antenna using optional TV Antenna Connection Cable Extend Antenna fully Adjust length for better TV reception when transmission source is near When using Headphones straighten cord for better reception Active antenna varies by media For details refer to the table on P 6 4 Getting Started Precautions 6 3 TV FM Radio 6 Use TV and FM while charging Auto Off Timer remains active...

Страница 73: ...Scan Reception Devices Device TV FM VHF UHF CATV None Antenna Antenna Antenna Headphones Headphones Antenna Headphones TV Antenna Connection Cable TV Antenna Connection Cable TV Antenna Connection Cable TV Antenna Connection Cable TV Antenna Connection Cable To watch CATV use TV Antenna Connection Cable J Q kln Listing FM Menu J Q n Link TV Menu 1 3 4 5 6 7 FM 2 1 5 TV 6 5 TV FM Radio 6 1 Open Hea...

Страница 74: ... TV or FM whichever used last default TV 6 7 TV FM Radio 6 Use Auto Scan below to search for channels or use the TVnano program guide Japanese only to find programs To access TVnano handset must connect to the Network connection fees apply 1 Select 1Activate TV and press b By default channel 1 set in channel group 設定 設定 設定 設定1 appears To switch the active channel group see P 6 17 C Key Assignments...

Страница 75: ...dset or 2bMemory Card A Press b KReceive Calls Select 1Receive Calls or 2Block Calls A Press b For Receive Calls handset responds as set in Incoming Settings see P 6 20 Handset Responses while Recording C Recording stops automatically at Auto Power Off Time and Auto Power Off Time Editing Turn Power Off appears When saving to handset B Handset shuts down after a minute of inactivity Alternatively ...

Страница 76: ...ve Press d I A Select Memory Card A Press b A Select a file A Press d I A Select Delete A Press b A Choose 1Yes A Press b Capturing Screenshots Index Menu H TV FM A Activate TV J q F Q kmnP Function Save 6 11 TV FM Radio 6 KOne Frame Select a number A Press b Setting returns to default when TV ends KStandard Select a speed A Press b Setting returns to default when TV ends Opening Captured Screensh...

Страница 77: ...Direct Frequency Entry C Activate FM and press k Enter a frequency and press b see P 6 16 for frequency range J Q n Link TV Menu 6 13 TV FM Radio 6 Set a reception area automatically Auto Update or manually Manual Update to access information music title artist name etc on the current broadcast Set a reception area for each channel group 設定 設定 設定 設定1 設定 設定 設定 設定5 Activate the target channel group ...

Страница 78: ...OW ON AIR Recording FM Radio Index Menu H TV FM A Activate FM J Q nP Stop 6 15 TV FM Radio 6 KHandset Select 1PHandset or 2bMemory Card A Press b KReceive Calls Select 1Receive Calls or 2Block Calls A Press b For Receive Calls handset responds as set in Incoming Settings see P 6 20 1 Select 7Voice Folder and press b C To switch to Memory Card press d I A Select Memory Card A Press b 2 Select FM an...

Страница 79: ...ama 9 q V10 VHF channel 10 U FM U q 84 8 NHK Fukuoka U 0 V11 VHF channel 11 0 FM 0 0 85 1 FM Osaka 0 p V12 VHF channel 12 FM p 88 1 NHK Osaka Channel Group Setup Setting by Reception Area TV Index Menu H TV FM A Activate TV A Menu b A Set Channels 6 17 TV FM Radio 6 According to the area and reception 12 channels are saved automatically 1 Select from 設定 設定 設定 設定1 to 設定 設定 設定 設定5 and press d I 2 Se...

Страница 80: ... to other keys by swapping positions between two channels Index Menu H TV FM A Activate TV or FM A Menu b A Set Channels Reset TV FM Reset channel group settings Index Menu H TV FM A Activate TV or FM A Menu b A Set Channels All channels return to their default states NOW ON AIR reception area setting is not affected 6 19 TV FM Radio 6 Some functions are available only for TV or FM K30 Minutes Sel...

Страница 81: ...h for 1 seconds in Viewer position To reactivate Display press a key other than E m and n KOrientation 1 standard view for clamshell open position TV Select 5Display Direction A Press b A Select 1Viewer Display A Press b A Select 1Orientation 1 2Orientation 2 or 3Full Auto A Press b Viewer Display can be selected only when Full Auto in Display Direction is inactive see P 6 23 FM Select 4Viewer Dis...

Страница 82: ...l Display A Press b Alternatively press k to switch the view see P 6 6 KOrientation 1 Select 1Orientation 1 2Orientation 2 or 3Full Auto A Press b Orientation for vertical view remains unchanged even after setting Select 3Full Auto A Press b C To cancel activate TV and press k View rotates automatically by 90 degrees in any of the following Display positions clamshell open Self Portrait position a...

Страница 83: ...7 1 Mobile Camera ...

Страница 84: ... mode images and Video Camera mode video appear rotated 90 degrees when captured with clamshell open held vertically and viewed on PCs To compensate for this hold handset horizontally in Viewer position for image capture Exporting Images C View images and video on PCs TVs or other display devices via Video Cable see P 16 48 7 3 Mobile Camera 7 Below are descriptions of icons that may appear on Dis...

Страница 85: ...d last default Sha mail 3 Digital Zoom n zoom in m zoom out Select menu items 4 Menu Cancel End Before saving press to start over or press for 1 seconds to open menu Key Assignments Viewer Position 4 1 2 3 7 5 Mobile Camera 7 View a summary of key assignments on the handset see P 7 29 Key Ops Guide 1 Brightness see P 7 27 C brighter D darker 2 Optical Zoom On Off see P 7 24 Camera Startup Press to...

Страница 86: ...o Focus is set to Macro see P 7 24 When using Optical Zoom maintain enough distance from subject to focus Camera motor may be audible when Optical Zoom or Auto Focus is in use or when mobile camera shuts down Even if microphone is active during video recording sound is temporarily paused when lens moves 7 7 Mobile Camera 7 Mobile camera Auto Focus AF measures the distance between subject and lens ...

Страница 87: ...ts or images saved to Data Folder 3 Values are approximate for handset Data Folder with default image size and quality If file name already exists XX 00 99 or aa zz is automatically added to it Sha mail image files can be renamed see P 13 44 Mode Comparison Sha mail Camera1 Image Size W 240 x H 320 dots QVGA W 120 x H 160 dots QQVGA W 120 x H 128 dots W 2048 x H 1536 dots QXGA W 1600 x H 1200 dots...

Страница 88: ... Camera 7 1 Select 1Sha mail or 2Camera and press b C To view a brief description of each mode select a mode and press e 2 Frame image on Display C Key Assignments see P 7 5 C Shooting Options see P 7 24 C Manual Focus Control see P 7 24 C Focus Lock see P 7 7 3 Press b After focus adjustment see P 7 7 shutter clicks and the captured image appears on Display C To start over press i A Choose 1Yes A...

Страница 89: ...ch Viewfinder size see P 7 25 Special Features Self Timer Set Self Timer see P 7 19 Set Burst Mode Select mode and speed see P 7 22 Frame Add frames see P 7 20 Lens Effects Capture images with special effects see P 7 21 7 13 Mobile Camera 7 Press r for 1 seconds or d Z to use the following functions CSha mail CCamera Option Settings Shutter Click Change Shutter Click sound see P 7 26 Save to Selec...

Страница 90: ...Shoot video and attach files or casual video recording Use handset as a video camera Record higher quality video 7 15 Mobile Camera 7 1 Select handset or Memory Card when saving 2 When recorded to Data Folder with no files or recordings 3 When recorded to handset Data Folder with no files or recordings with default Image Quality Motion Camera mode Image Size and Mic Settings If file name already e...

Страница 91: ...a tone To record Mic Settings On hold handset no more than 50 cm from source 6 Movie Sha mail Mode 1To stop press h or b Recording stops with a tone Recording automatically ends when limit is reached CTo play back select 2Check Image A Press h or b CTo start over select 3Cancel A Press h or b A Choose 1Yes A Press h or b CTo add telops select 6Telop Edit A Press h or b A Perform from Step 4 on P 7...

Страница 92: ...it Set telops to appear while playing video see P 7 36 7 19 Mobile Camera 7 Delay shutter release by 2 5 or 10 seconds after shutter release key is pressed to capture still images or record video To capture an image using Self Timer complete Steps 1 4 on P 7 10 or Steps 1 2 on P 7 11 then execute steps below To record video using Self Timer complete Steps 1 4 on P 7 16 then execute steps below Sel...

Страница 93: ...er with Sha mail Camera or Movie Sha mail incoming calls and Alarm times interrupt countdown however Self Timer remains active B When using Self Timer with Motion Camera or Video Camera Alarm times are announced after mobile camera operations are concluded During countdown the following settings are not available B Brightness Mobile Light and Select Mode Adding Frames Sha mail Camera Movie Sha mai...

Страница 94: ...le Light color vary slightly for each shot Available N A Overlap On Capture five images to create a composite image Available N A 7 23 Mobile Camera 7 6 Frame image on Display and press h or b The first frame is captured with subsequent frames captured at selected speed For manual shutter control 4 Burst and 9 Burst Modes repeat Step 6 for each frame C To stop press r or d C B Press h or b to save...

Страница 95: ...bled during focus adjustment Optical Zoom Activate or deactivate 2x Optical Zoom Sha mail Camera Movie Sha mail Motion Camera Video Camera Use Optical Zoom with Digital Zoom For more see P 7 9 P 7 15 7 25 Mobile Camera 7 Full Auto is not available KOff 1 Minute Lychee Mode Press r or d Z A Select Mobile Light A Press h or b A Select from Portrait Mode to Off A Press h or b Lighting Time Press r or...

Страница 96: ...llows Standard Fine High Quality Saving higher quality images video requires more space in memory 7 27 Mobile Camera 7 KSha mail 120x160 Camera 480x640 Movie Sha mail Motion Camera 128x96 Press r or d Z A Select Image Size A Press h or b A Select a size A Press h or b KFull Auto Press r or d Z A Select Shoot by Scene A Press h or b A Select a mode A Press h or b K0 standard Press r or d Z A Select...

Страница 97: ...ional Settings Save to Select handset or Memory Card to save image video files Sha mail Camera Movie Sha mail Motion Camera Video Camera Auto Save Set handset to save captured images automatically Sha mail Camera Movie Sha mail Motion Camera Video Camera 7 29 Mobile Camera 7 KOff Settings are retained Press r or d Z A Select Option Settings A Press h or b A Select Auto Reset A Press h or b A Choos...

Страница 98: ...g Still Images 1 Press r for 1 seconds or d I 2 Select Save As Wallpaper or To Data Folder and press h or b C For Save As Wallpaper press h or b C For To Data Folder select a folder A Press h or b To open files from Data Folder see P 13 8 View images on PCs TVs or other display devices see P 16 48 1 Select 3MovieSha mail Data 4Motion Camera Data or 5Video Camera Data and press h or b C For Video C...

Страница 99: ...A Memory When Memory is Full 7 33 Mobile Camera 7 1 Available for Motion Camera files 2 Available for Motion Camera and Video Camera files 3 Available for Movie Sha mail files Select a portion of video then reduce image size Reduce or crop edges Clipping If video was captured with Mic On Fine sound is disabled in clipped portions Clip up to 10 seconds when Image Size see Step 4 below is 80x60 and ...

Страница 100: ...lder Images and Viewfinder returns Saving Images from Video Index Menu H Camera A Camera Files A Motion Camera Data Back Stop Q 7 35 Mobile Camera 7 1 Select 4Motion Camera Data or 5Video Camera Data and press b C For Video Camera Data select a folder A Press b 2 Select a file and press b Video plays 3 Press b at approximate start point Video pauses Use F to adjust start point 4 Press d Z 5 Select...

Страница 101: ...porarily saved End the call to resume Entering Text Index Menu H Camera A Camera Files A MovieSha mail Data 7 37 Mobile Camera 7 4 Select a number and press b C To edit saved telops press d I A Select 2Change A Press b C To delete saved telops one by one press d I A Select 3Delete A Press b A Choose 1Yes A Press b C To delete all saved telops press d I A Select 4Delete All A Press b A Choose 1Yes ...

Страница 102: ...omes in from an end then disappears in the center Frame Out Telop appears in the center and scrolls out Rolling Telop scrolls from end to end 7 39 Mobile Camera 7 Capture and send images as Super Mail attachments To attach Burst Shot images use F to select a frame or Index Image To attach images in Data Folder see P 13 9 1 Capture an image in Sha mail mode C In Viewer position perform Steps 1 5 on...

Страница 103: ... Left Upper Right Lower Left and Lower Right 7 41 Mobile Camera 7 Send thumbnails or reduced images W 240 x H 320 dots Some Super Mail compatible Vodafone handsets may not be able to handle W 240 x H 320 images 1 Capture an image in Camera mode C In Viewer position perform Steps 1 5 on P 7 10 C With clamshell open or in Self Portrait position perform Steps 1 3 on P 7 11 2 Press d Z 3 Select 3Attac...

Страница 104: ...e Customer Center General Information see P 18 21 Digital Print Order Format DPOF Selecting Images Prints Index Menu H Memory Card A SpecifyDPOF Prints 7 43 Mobile Camera 7 K00 Copy Select 1Number of Copies A Press b A Enter a number 01 99 A Press b C To cancel all print settings select 2Cancel All A Press b A Select 1Ok A Press b KOff Choose 1On or 2Off A Press b KOff Choose 1On or 2Off A Press b...

Страница 105: ... Frame Will Not Appear Select OK 7 45 Mobile Camera 7 Calendar 1Select 2Calendar and press b 2Select 1Month Small or 22 Month and press b Current month appears 3Enter month and press b A rectangle appears indicating calendar mask location Frame 1Select 3Frame and press b 2Select a frame and press b Frame appears on the image If frame size and location are fine press b and skip ahead to Step 6 CTo ...

Страница 106: ...8 1 Display ...

Страница 107: ...ttings A Wallpaper Centered Image appears at the center in its original size Tile Duplicates of the image are arranged like tiles over Display Full Screen Image is enlarged to cover the full display area Enlarge Display Image is enlarged until the width or height reaches the edges of Display F40 8 3 Display 8 Choose a Clock type and layout or use Calendar for Standby Clock Display is Large 1 by de...

Страница 108: ...J n Schedule Stamps 8 5 Display 8 Select images to use them for Power On Off incoming calls and Alarm windows Use images captured with mobile camera or received via Web or Super Mail Display Images is Off for all items by default 1 Select an item and press b 2 Select 1Fixed Graphic 1 2Fixed Graphic 2 or 3Original and press b For 1Fixed Graphic 1 or 2Fixed Graphic 2 skip ahead to Step 5 C To cancel...

Страница 109: ... at Once Index Menu H Functions A Settings 2 A Display Settings A Index Menu Display F40 8 7 Display 8 Menu Item Icons 1Select 2Menu Item Icons and press b 2Select 1Style 1 Icons or 2Style 2 Icons and press b CTo hide menu item icons choose 3Off A Press b A Skip ahead to Step 4 For other settings repeat Steps 2 3 Menu Item Names 1Select 3Menu Item Names and press b 2Choose 1On or 2Off and press b ...

Страница 110: ...menus and lists text entry mail messages and Web They share the same font weight and style Kanji fonts are not affected by this setting Standard is set for size weight and style by default 1 Font Size 1Select 1Font Size and press b 2Select 1Menus Lists to 4Web Menus Text and press b 3Select a size and press b Font Weight 1Select 2Font Weight and press b 2Select 1Thin to 4Bold and press b Font Styl...

Страница 111: ...ng Tones and more all at the same time Download Custom Screens via カスタモ カスタモ カスタモ カスタモ http www custamo com using a PC or from カスタムスクリーンギャラリー カスタムスクリーンギャラリー カスタムスクリーンギャラリー カスタムスクリーンギャラリー Custom Screen Gallery V Application via Web using the handset From カスタムスクリーンギャラリー カスタムスクリーンギャラリー カスタムスクリーンギャラリー カスタムスクリーンギャラリー Custom Screen Gallery Custom Screens of 256 KB or less can be downloaded Supplied Memo...

Страница 112: ...quire Japanese Purchasing Custom Screen Keys Index Menu H Handy e Fee based Custom Screens K1 Key Download Complete L2 Key Download Incomplete Free Custom Screens J 8 13 Display 8 2 Select a Custom Screen for which to download the Key and press b Select one with L 3 Press D twice to open Key DL 3 3 4 Press e i Handset connects to the Network and Custom Screen Key download page opens Custom Screen ...

Страница 113: ...Battery Level or Signal Strength indicators press d 9 B Press e W to return C To set Original Battery Level or Signal Strength indicators select a folder A Press b A Select an image A Press b twice B To replace the current image press d X A Select a folder A Press b A Select an image A Press b twice Display Patterns Item Description Default Standby Indicators Show or hide indicators in Standby whi...

Страница 114: ...cklight Keypad Light to illuminate while using In Car Charger Index Menu H Functions A Settings 1 A Light Settings A In Car Backlight F34 8 17 Display 8 KOn Choose 1On or 2Off A Press b CAvailable when Sub Display is active KActive Time 15 seconds Active Hours 17 00 6 00 Active Time Choose 1On A Press b A Enter Active Time 01 99 seconds A Press b C To disable Backlight choose 2Off A Press b After ...

Страница 115: ...ls When set to Full Auto Viewer Setting see P 16 25 returns to default F35 F40 8 19 Display 8 K2D Select 13D numbers animate or 22D A Press b KOff Preset Animation Choose 1On A Press b A Select 1Animation A Press b A Select 1Goldfish or 2Box Man Walking A Press b twice Original Animation Choose 1On A Press b A Select 1Animation A Press b A Select 3Original A Press b A Select an image A Press b twi...

Страница 116: ...9 1 Sounds Related Functions ...

Страница 117: ... Ring Tone and Vibration Pattern set in Call Functions Ring Tone Level Index Menu H Functions A Sounds A Call Functions A Select an item A Ring Tone Level F10 9 3 Sounds Related Functions 9 Select from preset patterns preset melodies Original Ring Tones Chaku Uta Voice files etc Check preset melodies on handset 1 Preset Patterns Melodies 1Select 1Preset Tones or 2Preset Melodies and press b Melodi...

Страница 118: ...Vibrate 1 Sec Stop 2 Sec Vibration 5 Vibrate 0 5 Sec Stop 0 5 Sec Vibrate 0 5 Sec Stop 1 Sec 9 5 Sounds Related Functions 9 1 Mobile Light 1Select 1Mobile Light and press b 2Select a color pattern and press b Small Light 1Select 2Small Light and press b Small Light color green cannot be changed Disable Both 1Choose 3Off and press b Omit the next steps 2 Select a blink pattern C To check patterns p...

Страница 119: ...are not supported Files cannot be selected if the file name exceeds 24 single byte characters Some files may not be usable F13 9 7 Sounds Related Functions 9 5 Select a tone or melody C To play preset tones or melodies press e B Press e C to stop C To play files in Data Folder press d I A Select Play A Press b B Press e C to stop 6 Press b C To adjust Sound Effect volume select 2Volume A Press b A...

Страница 120: ...ived Complete F17 9 9 Sounds Related Functions 9 Create melodies to use as Ring Tones or to send via Super Mail Use up to 95 sounds x 32 chords 190 sounds x 16 chords or 380 sounds x 8 chords Original Ring Tones are saved to Data Folder Melodies See P 13 3 Use the following scales range approximately 4 octaves including semitones Original Ring Tones Basics Original Ring Tones are saved in SJM form...

Страница 121: ... Whole note rest Dotted half note rest Sixteenth note rest Whole note triplet rest Eighth note rest Sixteenth triplet rest Dotted eighth note rest Eighth triplet rest Quarter note rest Quarter triplet rest Dotted quarter note rest Half note triplet rest Half note rest Tones Procedure 1Fast X 150 3Slightly Slow X 107 2Standard X 125 4Slow X 94 9 11 Sounds Related Functions 9 6Select tone Piano is s...

Страница 122: ...enough free memory When Data Folder is full delete files and try again see P 13 45 1 Enter title and press b Enter up to 24 single byte characters Title is mandatory Original Ring Tones are saved by title by default 2 Select tempo see P 9 10 and press b 3 Select number of chords and press b 4 Enter pitch or rest see P 9 11 5 Specify note or rest type see P 9 12 6 Press A to set Cursor moves right ...

Страница 123: ...or reduce triplets 9 15 Sounds Related Functions 9 Make sure there is enough free memory When Data Folder is full delete files and try again see P 13 45 1 Select a file and press d I Original Ring Tones are marked with f C To switch to Memory Card press d I A Select Memory Card A Press b 2 Select Other Edit Functions and press b 3 Select Edit and press b C To change tone perform Steps 9 13 on P 9 ...

Страница 124: ...ect a save location and press b The original melody remains and the edited melody is saved as a new file XX 00 99 or aa zz is automatically added 9 17 Sounds Related Functions 9 1 Select a file and press d I C To switch to Memory Card press d I A Select Memory Card A Press b 2 Select Delete and press b 3 Choose 1Yes and press b Create original tones for Original Ring Tones and other melodies Save ...

Страница 125: ... KEYOFF Nullify Off Wave Select Wave 9 Modulator Operator 1 Carrier Modulate Operator 2 Various Tones Feed Back 9 19 Sounds Related Functions 9 Select a combination of Operators from six types 8 16 Chords or two types 32 Chords Available Operators vary depending on the combination Algorithm setting is not available for WT Original Tone See the table for details Available parameters may vary by the...

Страница 126: ...layback Additional Settings Parameter Description Effect Level four levels Effect Level affects cycle time of wavering quality in pitch or loudness Select high level to shorten the cycle Basic Octave four levels Adjust octave of tones Panpot 31 levels Panpot measures the position of sounds which varies by combination of L left and R right Sound bias is emphasized as the value difference increases ...

Страница 127: ...lated Functions Speaker Phone Speaker Select whether to activate Speaker Phone for handsfree conversations or Speaker to listen only Index Menu H Functions A Sounds A Speaker Talk with Speaker C Before or during calls press f for 1 seconds y Speaker Phone is active S Speaker is active When Speaker is 3Off use Earpiece and Microphone for phone conversations To cancel manually during a call press f ...

Страница 128: ...10 1 Music Player ...

Страница 129: ... see the provider s website etc AAC files may not play properly depending on the software used for saving CSave music to the specified directory Save music to folders within the following directory created when a Memory Card is inserted to handset PRIVATE SDJPHONE SH_フォルダ フォルダ フォルダ フォルダ ミュージック ミュージック ミュージック ミュージック B アルバム アルバム アルバム アルバム1 folder is set by default Save music to this folder Us...

Страница 130: ...Play I 2Record 3Play List MP3 Music Player Menu Select 10 5 Music Player 10 CCharge handset while recording Recording stops when battery runs low Always use Rapid Charger when recording to ensure a stable power supply When battery is low L Music Player does not record If battery runs low while recording Low Battery appears and recording stops CMusic is recorded onto Memory Card To start Music Play...

Страница 131: ...eo Mini Cable etc to record onto Memory Card from audio sources with analog outputs Sampling Frequency Recording Sampling Frequency Digital Input 32 kHz 44 1 kHz or 48 kHz is set according to the audio source status When recording from DVD players cancel DTS Analog Input 44 1 kHz fixed Digital recording results may not be satisfactory depending on the signal format Track Bookmarks Digital Input A ...

Страница 132: ...al Line In Connector Stereo Mini Plug 3 5 mm AC 100V 10 9 Music Player 10 Most operations are described with Synchro Recording active see P 10 10 Read the precautions on P 10 5 before recording To listen to music while recording adjust Monitor Level before recording see P 10 10 Prepare an audio source and pause playback at the beginning of music 1 Select 2MP3 Music Player and press b 2 Select 2Rec...

Страница 133: ...ic files see Step 2 on P 10 15 Recording Settings Monitor Level Set volume level to listen to music while recording Synchro Recording Start recording automatically when playback starts on audio sources 10 11 Music Player 10 K96 kbps Press d I A Select Bit Rate A Press b A Select 196 kbps or 2128 kbps A Press b Sound quality is better at 128 kbps However recording time shortens as more space is req...

Страница 134: ...ng message plays Handset returns to Standby after five minutes of inactivity in Playback window To activate cancel Manner Mode press j for 1 seconds in Playback window To answer calls during playback with Headphones press Call Button for 1 seconds Turn down the volume if distortion is noticeable in speaker sound Play Lists J c E Q n AAC Music Player アルバム1 List All Music Files プレイリスト1 プレイリスト2 プレイリス...

Страница 135: ...olume B When Train mode see P 10 17 is active maximum level is 13 C To add the file to a Play List during playback press k for 1 seconds A Select a Play List A Press b C Playback Settings see P 10 17 Playback Playing AAC Files Index Menu H Music During playback on AAC Music Player Index Menu appears in 2D even if 3D 1 or 3D 2 is set see P 8 6 10 15 Music Player 10 1 Select 2MP3 Music Player and pr...

Страница 136: ...el Select 10 17 Music Player 10 Follow these steps after Step 4 on P 10 14 or Step 3 on P 10 15 CRepeat 1 one file repeat applies to file on Playback window KRepeat Off Press d I A Select Settings A Press b A Select 1Play Setting A Press b A Select a mode A Press b KNormal Press d I A Select Settings A Press b A Select 2Sound Effect A Press b A Select an effect A Press b KOff Press d I A Select Se...

Страница 137: ...ic Player shuts down automatically Do not remove Memory Card or battery while editing Play Lists Doing so may damage the card or result in lost information To rename files folders or Play Lists on AAC Music Player see P 10 14 To rename files Play Lists or edit artist names on MP3 Music Player see P 10 15 Follow these steps after Step 3 on P 10 14 or Step 2 on P 10 15 CAvailable for AAC Music Playe...

Страница 138: ...11 1 Voice Recorder ...

Страница 139: ...Off Line Mode If Off Line Mode see P 3 6 is already active skip ahead to Step 3 2 Choose 2No and press b Recording window opens C To change the folder press d I A Select Select Folder A Press b A Select a folder A Press b C To create folders press d I A Select Select Folder A Press b A Press d I A Select New Folder A Press b A Enter name A Press b C To switch storage media handset or Memory Card p...

Страница 140: ...Standard for interviews etc Recording Mode Use Long or Fine mode Delete Delete files one at a time 11 5 Voice Recorder 11 1 Playback in Progress green 2 Volume Control Train see P 11 7 H Volume Control On Indicator does not appear for Volume Control Off 3 Folder Name 4 Status J O E A 5 Volume see Step 2 on P 11 6 6 Storage Media P Handset b Memory Card 7 Background see P 11 7 Image set in Display ...

Страница 141: ...r Move A Press b A Select 1PHandset or 2bMemory Card A Press b A Select a folder A Press b twice 11 7 Voice Recorder 11 Follow these steps after Step 1 on P 11 5 KPlay One Data Press d I A Select Settings A Press b A Select 1Play Setting A Press b A Select 1Play One Data or 2Play All A Press b KOff Press d I A Select Settings A Press b A Select 2Train A Press b A Choose 1On A Press b KPattern 1 Pr...

Страница 142: ... the limit is reached C To play back the cropped portion select 2Preview A Press b B Press b to stop C To start over select 3Cancel A Press b 5 Select 1Save and press b Cropped portion is saved to handset Voice Folder フォルダ1 フォルダ1 フォルダ1 フォルダ1 as a new file 1 Select a Voice file and press d I 2 Select Incoming Tone and press b Incoming Tone appears only for compatible Voice files 3 Select an item an...

Страница 143: ...12 1 Memory Card miniSD is a trademark of the SD Association Portions of this product are protected under copyright law and are provided under license by ARIS SOLANA 4C ...

Страница 144: ...nlight or excessive heat e g inside vehicles etc Keep a Memory Card away from dust or high humidity Do not use in the presence of corrosive gases Avoid heat sources and do not dispose of in fire A Memory Card is a consumable item Card performance deteriorates with usage Before Use The manufacturer recommends the use of 32 64 128 256 or 512 MB cards Precautions Vodafone is not liable for any damage...

Страница 145: ...Memory Card Adapter Damage to devices or Memory Card Adapter may result When removing remove both miniSD Memory Card and Memory Card Adapter together Removing card alone may cause malfunctions Some devices may not be compatible with miniSD Memory Cards used with Memory Card Adapter 12 5 Memory Card 12 Memory Card has two storage areas Data is automatically sorted into Memory by function and into F...

Страница 146: ...ory Card is reserved for storing copyright information etc For example approximately 60 6 MB is available for use on a 64 MB Memory Card Opening Memory Card Files From Function Windows 12 7 Memory Card 12 2 Select Memory Card and press b C To switch back to handset select Handset A Press b C For Phone Book select Handset or Memory Card A Press b 1 Press d I e G Memory Card Data Folder opens b appe...

Страница 147: ... Voice files V Appli Library Message Folder Web and Saved Information Station File Transfer Precautions C File transfers are not available when battery is low C Copy protected files cannot be copied Copy protected files are removed from handset once transferred to Memory Card and vice versa Copy protected files cannot be transferred to Vodafone handsets of other parties Only your handset can open ...

Страница 148: ... 2No to activate Off Line Mode to prevent disruptions from incoming calls etc If Off Line Mode see P 3 6 is already active skip ahead to Step 3 2 Choose 2No and press b C To accept incoming calls etc during transfer choose 1Yes A Press b 3 Enter Security Code 4 Select an item and press b Some items may not be selected For items other than Phone Book Schedule Text Memo Mail Inbox Sent and Outbox an...

Страница 149: ...pen HTML files on Memory Card to access linked Memory Card files or Mobile Internet sites Index Menu H Memory Card A Local Contents Local Contents are saved in PRIVATE SDJPHONE SDコンテンツ コンテンツ コンテンツ コンテンツ folder when viewed on PCs If Autorun file is deleted open HTML files via Local Contents Synchronize Synchronize Memory Card data between handsets and other devices Index Menu H Memory Card A Memory...

Страница 150: ...13 1 Managing Files Data Folder ...

Страница 151: ...are sorted as follows Mobile Camera Data Shortcut to still video images captured in Sha mail Camera Movie Sha mail Motion Camera or Video Camera mode Image Files including Still Images Melody Files such as Original Ring Tones Animation Files Video Images etc Downloaded Chaku Uta Files All of the above as well as vFiles HTML Files MML Files EML Files SVG Files Dictionary Files etc Created Additiona...

Страница 152: ...g A 5 12 22 15 24 jpg A 5 12 23 8 11 jpg A 5 12 23 14 56 jpg A 5 12 23 23 17 jpg 13 5 Managing Files Data Folder 13 1 Blue icon forwardable red icon unforwardable 2 Extensions do not appear for JPEG PNG and PNG JPEG Animations 1 Blue icon forwardable red icon unforwardable 2 Extensions do not appear Icons Still Image Animation Files Icon Format Extension Description A1 JPEG jpg JPEG image B1 PNG p...

Страница 153: ...s Third Layer Files My Pictures 13 7 Managing Files Data Folder 13 Toggle between handset and Memory Card Data Folder Check the display indicator P handset b Memory Card Select Handset to switch back to handset Data Folder Select a folder to save Original Ring Tones animation files obtained via Web or Super Mail vFiles etc Enter a file name if needed Appropriate folders may open automatically when...

Страница 154: ... to return to Data Folder Attach files to Super Mail from Data Folder 1 Select a file and press d I 2 Select Attachment and press b C For JPEG images select 1Attach Full Image or 3Attach 1 4 Size A Press b C For Original Ring Tones select a file format see IP 3 10 A Press b 3 Complete other fields and send Super Mail from Step 2 on IP 3 3 Opening Burst Shot Files Index Image appears Use F to view ...

Страница 155: ...e can be copied to Camera folder Horizontal7 Width in dots Vertical7 Length in dots 13 11 Managing Files Data Folder 13 Select up to four images to create Simple Animation Images appear one after another at the selected tempo Use PNG or JPEG images captured with mobile camera or obtained via Web Super Mail Simple Animation files are saved to Animation folder When memory is full delete files to fre...

Страница 156: ... I A Select 2Change A Press b A Select an image A Press b A Select quality and size A Press b twice C To delete images select a number A Press d I A Select 4Delete A Press b A Choose 1Yes A Press b If file name already exists XX 00 99 or aa zz is automatically added to it Editing Animation Index Menu H Functions A Settings 2 A Animation A Animation Tool A Simple Animation A Data Folder J E Q n Sel...

Страница 157: ... Tama Our cat Tama Our cat Tama E Q n Add Stamp Text K1Character Entry I 2Stamps Select J Q n Play Menu Save Our cat Tama 13 15 Managing Files Data Folder 13 2Change text position Use G to move text to target location and press b C To adjust shift amount press d I A Select LRange Setting A Press b A Enter a value 01 20 A Press b B Change in shift amount for text affects the shift amount for stamps...

Страница 158: ...ome stamps do not support all the features J Q n Play Menu Save Our cat Tama J Q n Play Menu Save Our cat Tama J Q n Play Menu Save Our cat Tama J E Q n Add Stamp Text 2 3KB qOur cat Tama KgPuppet Show I 3 4 5 6 Select 13 17 Managing Files Data Folder 13 When memory is full delete files to free some space see P 13 45 1 Select 2E Animation and press b If there is temporarily saved E Animation see P...

Страница 159: ...lready exists XX 00 99 or aa zz is automatically added to it Editing Temporarily Saved E Animation Index Menu H Functions A Settings 2 A Animation A Animation Tool To create new animation choose 2No and press b See Step 2 and onward on P 13 17 for more J E Q n E Animation gLazy K1Save I 2Temporary Save 3Edit Select 13 19 Managing Files Data Folder 13 3 Edit title and press b 4 Set background and p...

Страница 160: ...Image Animation as Display Images Index Menu H My Files A Data Folder A Open a folder A Open a file A Menu d 13 21 Managing Files Data Folder 13 Save all frames and Index Image of a Burst Shot file F as individual images at one time or select a single image to save Individual Burst Shot images are saved to Data Folder Images in JPEG format Source file remains 1 Saving All Images Individually 1Pres...

Страница 161: ... being edited Description of Selected Item Picture Effect Items Save edited image View image being edited full screen Select Select 13 23 Managing Files Data Folder 13 1 Select from 1Wallpaper to 7Index Menu Icon and press b A rectangle appears on the image except for Wallpaper C To start over from selecting preset size press i 2 Selecting Display Area 1Use G to specify display area Display area m...

Страница 162: ... file A Menu d A Picture Effect A Stamps 13 25 Managing Files Data Folder 13 1 Select 8Original and press b 2 Select an image from Data Folder see P 13 8 and press b C To change the stamp press e W A Start over from Step 1 3 Use G to move stamp to target location and press b To save edited image see P 13 22 C To cancel the effect press 0 Restore Dress up images with preloaded visual effects Apply ...

Страница 163: ...kens skin tone Mad Pulls eyes up mouth down Fair Brightens skin tone Sad Pulls eyes mouth down Angry Mark Adds a stress mark to face When using Face Arrange take care not to create images that may embarrass or offend others Always obtain permission before photographing others 13 27 Managing Files Data Folder 13 After Face Arrange Step 1 on P 13 26 change the positions and sizes of targets to fit y...

Страница 164: ...ex Menu H My Files A Data Folder A Open a folder A Select a file A Menu d A Picture Effect A Change Format 13 29 Managing Files Data Folder 13 Select a frame A Press b twice C To view file animation alone select one A Press e L B Press e W to return to Moving Photo Frame list C To save edited image see P 13 22 C To cancel the effect press 0 Restore Animations are saved as E Animation files with a ...

Страница 165: ...friend jpg 3tama nap jpg 4ta da jpg Menu 13 31 Managing Files Data Folder 13 10 Enter title and press b To proceed without changing the title press b C To change the save location press i A Select another folder A Press b C To switch to Memory Card press A Press b I A Select Memory Card A Press b 11 Press b Image is saved as a new entry Combine two images into one Panorama Image Effects Use JPEG i...

Страница 166: ...Select another folder A Press b C To switch to Memory Card press d I A Select Memory Card A Press b 13 Press b Image is saved as a new entry J E Q n Merge Panorama 1 5 3 21 11 48 jpg 2 5 3 21 11 48 jpg Effect Standard Menu 13 33 Managing Files Data Folder 13 Use one of four Split Mail images to combine them all into one Images may not be combined properly if file names of Split Mail images are cha...

Страница 167: ... select Tone A Press b A Perform Steps 10 13 on P 9 13 9 14 B To adjust loudness select Adjust Loudness A Press b A Perform Steps 15 18 on P 9 14 Melody files with a smd extension are saved as Original Ring Tones extension sjm after Edit Tone or Adjust Loudness Chaku Uta Playback Index Menu H My Files A Data Folder A Audio If sound is distorted reduce volume level J Q n Menu Stop Back 13 35 Managi...

Страница 168: ...ains active To restore Custom Screen background select 6Custom Screens and press b twice in Display Settings above vFiles Basics Function Icon Format Function Icon Format Phone Book Owner Profile P vcf vCard Text Memo o vnt vNote Text Mail Message x vmg vMessage Schedule p vcs vCalendar Bookmark2 w vbm vBookmark 13 37 Managing Files Data Folder 13 V604SH Phone Book and Schedule entries etc are aut...

Страница 169: ...ta Folder Personal Ring Tone Incoming Notice and Mail Folder settings are lost Images set for Picture Call Mail may be deleted depending on size 13 39 Managing Files Data Folder 13 Mail Message 1Open Inbox Sent or Outbox see Steps 1 2 on IP 4 2 2Select a message and press d I Sky Melody message cannot be converted to vFile 2 Select To Data Folder and press b 3 Enter title and press b Handset Data ...

Страница 170: ...Reduce Slightly 0 Original Size 5 Key Action Some features may not be available depending on the SVG file E Books Reading Content Index Menu H Memory Card 13 41 Managing Files Data Folder 13 3 Press i or g to close Press i to return to E Book list Alternatively when List is on Display press e a to return to E Book list When you press g to close Reading window the same page will open next time Save...

Страница 171: ...okmarks can be stored per E Book and will be deleted older first when another is added Opening Bookmarked Page C In Reading window press d I A Select Move to Bookmark A Press b A Select Bookmark 1 Bookmark 2 Auto Bookmark 1 or Auto Bookmark 2 A Press b 13 43 Managing Files Data Folder 13 Select Save As Wallpaper A Press b C For more see Step 4 and onward in Original Images on P 8 2 Some images may...

Страница 172: ...ing File Folder Name Index Menu H My Files A Data Folder 13 45 Managing Files Data Folder 13 When a folder is deleted all items in the folder are also deleted Default folders cannot be deleted Disable protection before deleting folders see below V Applications may not operate properly if related folders FURUGOLFM_DATA etc or files within are renamed or deleted 1 Select a file or folder and press d...

Страница 173: ...r Incoming Tone Sound Effects or Group Ring Tone Execute and Cancel Tone Setting appears B To cancel the setting and move the file choose 1Yes A Press b B To cancel moving choose 2No A Press b 4 Select a target folder and press b 5 Press b The following folders cannot be protected B Folders on Memory Card B Shortcut folder Transferring all Memory Card data to handset at once cancels protection V A...

Страница 174: ...14 1 Infrared ...

Страница 175: ...udes Owner Profile except handset phone number Schedule Available Available In One File transfers Secret Mode settings are lost Text Memo Available Available Note format only Mail Available Available Data Folder Available Available In All File transfers transfer the entire Data Folder or a selected folder Copy protected files cannot be transferred Camera Mode Images Available N A Transfer a DCF fo...

Страница 176: ...hange the password If incorrect Infrared menu returns J E Q nP K No 9 I 5Ueda Mikio 6Aoki Itirou 7Okada Noriko 8Hamada Shingo Phone Book Entry List Select 14 5 Infrared 14 Security Code and IR Password are required to transfer all files B Security Code see P 1 34 B IR Password is required for infrared transfers Transfers are possible when the passwords of both handsets match To set recipient hands...

Страница 177: ... and press b 5 Prepare recipient handset 6 Within 15 seconds choose 1Yes and press b Transfer starts When finished Data Folder window returns 1 Enter Security Code Standing by appears and handset receives files if sent within 30 seconds When finished Infrared menu returns Folders Sending Index Menu H My Files A Data Folder Receiving Index Menu H Handy e A Infrared A Acquire If a folder with the sa...

Страница 178: ...15 1 Handset Security ...

Страница 179: ...3Reject Call WMessage Recorder or KForward Voice Mail Emergency calls 110 etc are possible even when Keypad Lock is active For more see P 2 5 Emergency Calls F28 F20 15 3 Handset Security 15 1 Enter Security Code Q disappears and Keypad Lock is canceled Keypad Lock can be canceled during calls Keypad Lock remains active even if handset power is deactivated then reactivated 1 Enter Security Code 2 ...

Страница 180: ...mbers are rejected and caller hears a busy tone Reject Call Reject calls from designated numbers Caller hears a busy tone Saving Entries Index Menu H Functions A Privacy F24 F25 F26 15 5 Handset Security 15 3 Select a number and press b Select for new entry 4 Enter a phone number C To select from Phone Book see Steps 1 3 on P 5 11 5 Press b Name appears if selected from Phone Book Number appears i...

Страница 181: ... Secret Mode Entries J z E Q nP Ueda Mikio 5 1Friends eeii m nPattern 1 oPattern 2 pMail Folder 1 qMail Folder 2 Z 3123XXX3 Menu F22 15 7 Handset Security 15 Cancel custom settings and return handset functions to their default settings Phone Book entries are unaffected For settings affected by Reset see P 18 2 18 5 1 Enter Security Code 2 Select 1OK and press b C To cancel select 2Cancel A Press b...

Страница 182: ...16 1 Additional Functions ...

Страница 183: ...o separate each sequence To send following sequences press d g for each Direct Entry F38 16 3 Additional Functions 16 Press a Side Key for 1 seconds to activate the assigned function while ringing vibrating Available Functions The same function can be assigned to multiple keys Message Recorder is assigned to r by default No function is assigned to other keys 1 Select from 1x to 5w and press b 2 Se...

Страница 184: ...lect 7Message Recorder A Press b A Select 5In Car Recorder A Press b A Choose 2Off A Press b F文字 F44 16 5 Additional Functions 16 1 Select 1Recorder Settings and press b Message Recorder is deactivated and menu returns j disappears 1 Select 2Play and press b Number of recordings appears and playback starts from the most recent message After all messages have played playback ends and handset return...

Страница 185: ...ll The recorded message is saved Recordings remain even after handset power is turned off To play delete Voice Memo My Voice Memo see P 16 5 16 6 Playing Messages 16 7 Additional Functions 16 Set Alarm to sound at a specific time each day or on specific days of the week Save up to 5 Alarm settings Save a message or phone number to appear with Alarm Customize Ring Time Tone Volume Alarm Tone LED In...

Страница 186: ...ess b Alarm Tones Set a tone to sound at Alarm Time Select 5Sound A Press b A Select 1Alarm Tones A Press b A Select a type A Press b A Select a tone A Press b A Press e W To select a tone see procedures for Ring Tone see P 9 3 Tone Volume Set volume for Alarm Tone Select 5Sound A Press b A Select 2Tone Volume A Press b A Select a level with E A Press b A Press e W Ring Time Set ring time Select 5...

Страница 187: ... Reactivate Alarm with the same settings or change current settings Index Menu H Functions A Clock A Alarm 16 11 Additional Functions 16 Use Auto Power On to activate handset power automatically at a specific time each day Once set Auto Power On remains active until canceled Alarm can be set to sound for Auto Power On Auto Power On is Off by default 1 Choose 1On and press b C To cancel Auto Power ...

Страница 188: ...t a blink pattern A Press b Small Light Select 7LED Indicator A Press b A Select 2Small Light A Press b A Select a blink pattern A Press b Cancel Select 7LED Indicator A Press b A Choose 3Off A Press b Ring Time Set ring time Select 8Ring Time A Press b A Enter time 02 99 seconds A Press b Auto Power Off Index Menu H Functions A Clock A Auto Power Off F52 16 13 Additional Functions 16 Handset powe...

Страница 189: ...Mon 13 Stamp None Contents For carrying out our n Alarm Off Option Settings Select 16 15 Additional Functions 16 1 Press k 2 Press j 3 Enter title and press b Enter up to 16 single byte characters Title is mandatory 4 Select Limit and press b Enter 4 digits for year 2 digits for month and day each and apply 24 hour clock format for time Limit is mandatory 5 Enter date and time 6 One Time Action It...

Страница 190: ...ay Images is set However SMAF file images take priority over Display Images For stopping Alarm Tone dialing numbers sending Advance Mail and canceling Snooze see P 16 8 Tone Volume Set volume for Alarm Tone Select 3Sound A Press b A Select 2Tone Volume A Press b A Select a level with E A Press b A Press e W Ring Time Set ring time Select 3Sound A Press b A Select 3Ring Time A Press b A Enter time ...

Страница 191: ...uto Protect Protect entries from Auto Delete Select Option Settings A Press b A Select Auto Protect A Press b A Choose 1On protect or 2Off cancel A Press b A Press e W When Auto Delete is Off entries are protected automatically regardless of this setting 16 19 Additional Functions 16 1 Press k 2 Select a date and press b Daily Schedule window opens 3 Select an entry and press b C To save to Data F...

Страница 192: ... Press k A Press d I A Select Standby Display A Press b A Select an item A Press b Setting Holidays Removing Restoring Preset Holidays 16 21 Additional Functions 16 1 Press k 2 Press e to open Schedule window in Day Detail Stamps 1 Week or 1 Month view Press e repeatedly to toggle the view Skip this step if the view is already Day Detail Stamps 1 Week or 1 Month 3 Select a date to set as a holiday...

Страница 193: ... or 8All Entries A Press b A Select 1Select All or 2Unprotected A Press b A Enter Security Code A Choose 1Yes A Press b Editing Entries Deleting Entries Delete Item Delete one entry One Day Schedules Delete the day s Schedule Action Item entries Delete All Delete all past Schedule entries or all entries 16 23 Additional Functions 16 KOff Press k A Press d I A Select Auto Delete A Press b A Select ...

Страница 194: ... MC Sensor or 2Cancel MC Sensor A Press b Activate MC Sensor cancels Full Auto in Viewer Display see P 8 18 Activate MC Sensor is disabled during incoming calls Find magnetic north and calculate other directions from your current position Read the precautions on P 1 14 before using Compass Compass indicator points towards magnetic north Use either 2D or 3D Compass 3D Compass opens by default 1 Sel...

Страница 195: ... to stop manually B In Manner Mode handset vibrates Vibration Pattern is Vibration 1 Volume and LED Indicator depend on Manner Settings B Alarm Tone and Vibration Pattern cannot be changed No tone sounds while counting 16 27 Additional Functions 16 Shake handset to produce sound effects Read the precautions on P 1 14 before using Shake Sound Use preset files or compatible files in Data Folder for ...

Страница 196: ...al Functions 16 Create shortcuts to functions and files Press a key for 1 seconds to activate corresponding functions in User Shortcut see below Alternatively open User Shortcut list and shake handset in two directions sequentially CExample When Motion Pattern is Set to Right and Up Default Shortcuts To change default shortcuts or assign functions to 9 or p see P 16 31 Assigning User Shortcuts 1 P...

Страница 197: ... Do not drop or subject handset to shocks Recognition accuracy varies by user Set patterns that are easily recognized When MC Shortcut does not work correctly adjust MC Sensor see P 16 24 16 31 Additional Functions 16 Assign shortcut keys to functions or files when m appears Another function cannot be assigned to 0 1 Select a file or function from a list 2 Press k for 1 seconds 3 Select an entry a...

Страница 198: ... Index Menu H Functions A Clock A Stopwatch F55 16 33 Additional Functions 16 3 Press g or i to exit C When Stopwatch is running or paused choose 1Yes A Press b Set Kitchen Timer up to 60 minutes in 1 second increments Tone sounds when set time elapses 1 Enter time 00 01 60 00 Use F to move cursor and correct the number 2 Press b When times over 60 minutes 60 00 are entered the last set time retur...

Страница 199: ...ces Bars and spaces together are elements combinations of which represent different numbers Handset cannot read other one dimensional barcodes ITF Code Code39 Codabar NW 7 etc QR Quick Response Code is a matrix symbology consisting of an array of nominally square cells It allows omni directional reading of up to 7 366 characters numeric alphanumeric byte data as well as kanji and kana QR Code is a...

Страница 200: ...EL 2 or a mail address including A Press b A Select Add to Phone Book A Press b A Perform Step 4 on P 5 8 Access Mobile Internet Sites4 Select a URL starting with http A Press b A Select Open Link A Press b A Perform Step 2 in URLs on IP 4 10 Save to Data Folder Images Melodies Select an image or melody file A Press b A Select To Data Folder A Press b A Enter title A Press b A Select a folder A Pr...

Страница 201: ...unctions 16 Create QR Codes from Owner Profile Phone Book Mail Text Melodies or Images Save created QR Codes to Data Folder or attach to Super Mail Barcodes cannot be created from windows opened with Hot Switching see P 1 29 Create QR Codes by selecting an item in Create QR Code menu Use saved contents or enter new contents for a QR Code Save up to the equivalent of 513 digits or 131 kanji per QR ...

Страница 202: ...le A Press b A Choose 1Yes A Press b Incoming Calls while Creating C Contents are temporarily saved End the call to return 16 41 Additional Functions 16 Open Owner Profile Phone Book entry mail message Text Memo entry melody file or image file to create QR Code 1 Open a file or entry and press b I or d I For mail select a message in Mail Box C For image files in Data Folder select a file A Press d...

Страница 203: ...or enter correction directly from Keypad A Press b C To start over press e 9 A Choose 1Yes A Press b A Repeat from Step 2 Index Menu H Camera For Focus Lock see P 7 7 For Manual Focus see P 7 24 If Text Exceeds Limit Exceeds Limit Edit Text appears and overage is truncated J U Q u n Text Scanner eFrame Text in fPress F When Bar is Bluest Focus Adjustment Bar Better focus in darker blue OK 16 43 Ad...

Страница 204: ...9 6 rings Open handset to cancel Panel Saving mode Set shorter time to extend Battery Time Flash Small Light Orange Index Menu H Functions A Settings 1 A Battery Saving A Panel Saving A LED Indicator 16 45 Additional Functions 16 Use Calculator for basic arithmetic percentage and tax calculation Key Assignments Tax rate is 5 by default 1 Select 9Calculator and press b Use Keypad to enter digits an...

Страница 205: ...ions A Settings 2 A Spending Memo A New Item F42 16 47 Additional Functions 16 Use handset as a flashlight In Standby double press s C To turn off press r g i h m or n KLighting Time 1 Minute Color Lychee white Lighting Time Select 1Lighting Time A Press b A Select time A Press b Color Select 2Color A Press b A Select a color A Press b C Select a color and press e x to check the color Pen Light Il...

Страница 206: ...ggle between the device and handset Display Video Out is canceled when handset is closed or in Panel Saving mode Sound continues to play Observe the following when connecting TV VCR etc and handset B Turn off the device before connecting disconnecting Video Cable B Connect Video Cable only to the video audio inputs of the device and Video Out Connector of V604SH Video Cable is designed exclusively...

Страница 207: ... not wrap cord around handset or Internal Antenna locations see P 1 7 W This may cause malfunction Noise interference occurs if cord is close to Internal Antenna locations Plug in Headphones firmly If not sounds may not be heard Answering Calls 16 51 Additional Functions 16 When Headphones are connected to handset Ring Tone sounds from Headphones and handset speaker Disable speaker as shown below ...

Страница 208: ...17 1 Optional Services ...

Страница 209: ...g Call Forwarding cancels Voice Mail Enter a phone number A Press b Saved number appears following Connecting to Network Include the area code for landline phone numbers CSave a forwarding number beforehand Select 1Call handset rings vibrates before forwarding calls or 2No Call calls are forwarded immediately A Press b テンソウサービス テンソウサービス テンソウサービス テンソウサービスON Call Forwarding On appears following Conn...

Страница 210: ...ing Cancel Secretary Cancel Voice Mail Index Menu H Functions A Services A Cancel Secretary Check Secretary Check Voice Mail status Index Menu H Functions A Services A Check Secretary F72 F73 F74 17 5 Optional Services 17 Choose 1Yes A Press b A Press e D Follow the voice guidance for further operations after handset connects to Voice Mail Center C Press g when finished C To change Voice Mail Cent...

Страница 211: ...aiting is disabled if No Call is selected then all calls are transferred directly Ending a Call while Someone is on Hold C When g is pressed a beep sounds and Caller on Hold appears Press f or g to talk with the party on hold Line 1 Ends while Line 2 is on Hold C A beep sounds and Caller on Hold appears Press f or g to talk with party on hold F75 F76 17 7 Optional Services 17 Enter a phone number ...

Страница 212: ...ss b Break Away appears You are disconnected but Line 1 and 2 remain connected If you made the call you are charged for the remaining call Press g to return to Standby Break Away from 2 Open Lines Original call ends Line 1 and Line 2 remain connected Ending a Call during 3 Way Calls C Both lines are disconnected Line 1 Ends during 3 Way Calls C Line 2 remains connected ...

Страница 213: ...18 1 Appendix ...

Страница 214: ...fer to the table in Sound Effects P 9 6 5 Ringer Out Earphone Speaker P 16 51 6 Speaker1 Off P 9 22 7 Original Tones P 9 9 8 Instrument Effects P 9 17 9 Tone Octave P 9 22 18 3 Appendix 18 C2 Privacy C3 Settings 1 C4 Settings 2 Function Default Refer to 0 Keypad Lock Off P 15 2 1 Auto Key Lock Off P 15 3 2 Secret Mode1 Off P 15 6 3 Phone Book Lock Off P 15 3 4 Restrict Dial Off P 15 4 5 Accept Cal...

Страница 215: ...tes 0 seconds P 2 20 4 Instant Display Off P 2 20 P 2 21 18 5 Appendix 18 C7 Services C8 Vodafone live COther Settings Affected by Reset All TV FM and camera settings also return to their defaults Function Default Refer to 0 Ring Time2 20 Seconds P 17 5 1 Call Forwarding P 17 3 2 Voice Mail Call P 17 4 3 Cancel Secretary P 17 3 P 17 4 4 Check Secretary P 17 3 P 17 4 5 Call Waiting2 3 P 17 6 6 Conf...

Страница 216: ...orescent lights Display is dark when Backlight is off Panel construction characteristic not a malfunction Sound does not come from handset speaker Is Manner Mode set E appears Is Video Out set to On Cancel Manner Mode see P 3 3 Set Video Out to Off 18 7 Appendix 18 Problem Possible Cause Solution Cannot charge battery Is Rapid Charger connected correctly to handset or Desktop Holder Is Rapid Charg...

Страница 217: ... 観 観 諌 諌 諌 諌 貫 貫 貫 貫 還 還 還 還 鑑 鑑 鑑 鑑 間 間 間 間 閑 閑 閑 閑 関 関 関 関 陥 陥 陥 陥 韓 韓 韓 韓 館 館 館 館 舘 舘 舘 舘 丸 丸 丸 丸 含 含 含 含 岸 岸 岸 岸 巌 巌 巌 巌 玩 玩 玩 玩 癌 癌 癌 癌 眼 眼 眼 眼 岩 岩 岩 岩 翫 翫 翫 翫 贋 贋 贋 贋 雁 雁 雁 雁 頑 頑 頑 頑 顔 顔 顔 顔 願 願 願 願 企 企 企 企 伎 伎 伎 伎 危 危 危 危 喜 喜 喜 喜 器 器 器 器 基 基 基 基 奇 奇 奇 奇 嬉 嬉 嬉 嬉 寄 寄 寄 寄 岐 岐 岐 岐 希 希 希 希 幾 幾 幾 幾 忌 忌 忌 忌 揮 揮 揮 揮 机 机 机 机 旗 旗 旗 旗 既 既 既 既 期 期 期 期 棋 棋 棋 棋 棄 棄 棄 棄 機 機 機 機 帰 帰 帰 帰 毅 毅 毅 毅 気 気 気 気 汽 汽...

Страница 218: ... 魅 魅 巳 巳 巳 巳 箕 箕 箕 箕 岬 岬 岬 岬 密 密 密 密 蜜 蜜 蜜 蜜 湊 湊 湊 湊 蓑 蓑 蓑 蓑 稔 稔 稔 稔 脈 脈 脈 脈 妙 妙 妙 妙 粍 粍 粍 粍 民 民 民 民 眠 眠 眠 眠 務 務 務 務 夢 夢 夢 夢 無 無 無 無 牟 牟 牟 牟 矛 矛 矛 矛 霧 霧 霧 霧 鵡 鵡 鵡 鵡 椋 椋 椋 椋 婿 婿 婿 婿 娘 娘 娘 娘 冥 冥 冥 冥 名 名 名 名 命 命 命 命 明 明 明 明 盟 盟 盟 盟 迷 迷 迷 迷 銘 銘 銘 銘 鳴 鳴 鳴 鳴 姪 姪 姪 姪 牝 牝 牝 牝 滅 滅 滅 滅 免 免 免 免 棉 棉 棉 棉 綿 綿 綿 綿 緬 緬 緬 緬 面 面 面 面 麺 麺 麺 麺 摸 摸 摸 摸 模 模 模 模 茂 茂 茂 茂 妄 妄 妄 妄 孟 孟 孟 孟 毛 毛 毛 毛 猛 猛 猛 猛 盲 盲 盲 盲 網 網 網 網 耗 耗...

Страница 219: ... 贔 贔 贔 贔 贖 贖 贖 贖 赧 赧 赧 赧 赭 赭 赭 赭 赱 赱 赱 赱 赳 赳 赳 赳 趁 趁 趁 趁 趙 趙 趙 趙 跂 跂 跂 跂 趾 趾 趾 趾 趺 趺 趺 趺 跏 跏 跏 跏 跚 跚 跚 跚 跖 跖 跖 跖 跌 跌 跌 跌 跛 跛 跛 跛 跋 跋 跋 跋 跪 跪 跪 跪 跫 跫 跫 跫 跟 跟 跟 跟 跣 跣 跣 跣 跼 跼 跼 跼 踈 踈 踈 踈 踉 踉 踉 踉 跿 跿 跿 跿 踝 踝 踝 踝 踞 踞 踞 踞 踐 踐 踐 踐 踟 踟 踟 踟 蹂 蹂 蹂 蹂 踵 踵 踵 踵 踰 踰 踰 踰 踴 踴 踴 踴 蹊 蹊 蹊 蹊 蹇 蹇 蹇 蹇 蹉 蹉 蹉 蹉 蹌 蹌 蹌 蹌 蹐 蹐 蹐 蹐 蹈 蹈 蹈 蹈 蹙 蹙 蹙 蹙 蹤 蹤 蹤 蹤 蹠 蹠 蹠 蹠 踪 踪 踪 踪 蹣 蹣 蹣 蹣 蹕 蹕 蹕 蹕 蹶 蹶 蹶 蹶 蹲 蹲 蹲 蹲 蹼 蹼 蹼 蹼 躁 躁 躁 躁 躇 躇 躇 躇...

Страница 220: ...Camera mode image 7 41 Auto Bracket 7 22 Auto Focus 7 7 7 24 Auto Key Lock 15 3 Auto Off Timer 6 19 Auto Power Off 16 12 Auto Power On 16 11 Auto Protect Schedule 16 18 Auto Reply 5 11 Auto Reset 7 29 Auto Save 7 28 Autorun 12 12 Backlight 8 16 battery 1 15 Battery Level Display Patterns 8 15 Battery Saving 16 43 Battery Strength 1 17 1 18 Bit Rate 10 11 Bookmark E Book 13 42 Break Away 17 7 Brigh...

Страница 221: ... calls answering 2 6 incoming calls Call Waiting 17 6 D E F G H I 18 17 Appendix 18 Incoming Calls FM 6 15 incoming calls rejecting 2 9 Incoming Calls TV 6 9 Incoming Notice 5 10 Incoming Settings Music Player 10 18 Incoming Settings TV FM 6 20 Incoming Tone 11 8 13 34 13 35 Index Menu 1 27 Index Menu Display 8 6 Index Print 7 43 Information Menu 2 17 Infrared 14 2 Input Method 4 10 Instrument Eff...

Страница 222: ...Area 6 13 Set Burst Mode 7 22 Set Channels 6 16 Set Holiday 16 20 Set IR Password 14 3 Set LED to Sound 9 7 Shake Counter 16 26 Shake Sound 16 27 Sha mail mode 7 8 7 10 Shoot by Scene 7 27 Q R S 18 19 Appendix 18 Show Thumbnails Camera mode image 7 30 Show Hide Indicators Video Camera 7 26 Shutter Click 7 26 Side Key Settings 16 3 Side Keys i Signal Alert 16 2 Signal Strength Display Patterns 8 15...

Страница 223: ... Phone Book entries etc in a separate place Disassembling or modifying handset may violate the Radio Law Modified handset will not be repaired 18 21 Appendix 18 If you have questions about Vodafone handsets or services please call General Information For repairs please call Customer Assistance CCall these numbers toll free from landlines Customer Service Vodafone Customer Centers From a Vodafone h...

Страница 224: ...elp the mobile industry maintain high environmental standards Recycle your old handsets batteries and charger units all manufacturers and brands Before you recycle please remember these important points Handsets batteries and chargers submitted for recycling cannot be returned Always be sure to erase all data recorded on old handsets Phone Book entries call records mail etc before recycling ...

Страница 225: ...ease contact Customer Service General Information see P 16 16 concerning unclear or missing information i Symbols Use Multi Selector to select menu items move cursor scroll etc In this manual Multi Selector operations are indicated as shown to the right Basic Multi Selector Operations B E Press C or D B F Press B or A B G Press C D B or A Use Side Keys when Display is in Viewer position see 6P 1 1...

Страница 226: ...ps Handset operations starting from Index Menu are abbreviated as follows Page References Press b Press e to open Handy Features menu Perform the operation such as opening a window Index Menu H Menu Item A Handy e A Selection A Operation A Menu A Select the menu item and press b Select the folder or file and press b Press the corresponding key in parentheses iii MEMO ...

Страница 227: ...ting 3 18 v 4 Mail Box Checking Messages 4 2 Using Received Messages 4 7 C Replying to Messages 4 7 C Forwarding Messages 4 8 C Resending Messages 4 8 C Linked Info 4 9 C Protecting Messages 4 11 C Deleting Messages 4 12 Chat Mail Log 4 14 C Saving Members 4 14 C Opening Chat Mail Log 4 15 Mail Folders 4 16 C Mail Box Layout 4 16 C Folder Name 4 16 C Secret Mode 4 17 C Letter Pad 4 18 C Moving Mes...

Страница 228: ...nter Address 6 14 Reset 6 14 Delete All 6 14 Center Address 6 14 vii Web 7 Web Basics Getting Started 7 4 C Web Content 7 4 C Saving Information 7 5 Using Web 7 6 C Opening Vodafone Web Menu 7 6 C Entering URLs Directly 7 7 Basic Operations 7 8 Home 7 10 C Designating 7 10 C Accessing 7 10 Auto Delivery Service 7 11 C Received Information 7 11 8 Advanced Features Favorites Message Folder Bookmarks...

Страница 229: ...t Key 12 4 Resetting V Appli Center Address 12 4 Reset 12 4 Clear Memory 12 4 Server Address 12 4 ix Station Japanese Only 13 Station Basics Getting Started 13 4 C Station Content 13 4 C Subscription Status 13 4 Opening Main List 13 5 My List 13 6 C Saving to My List 13 6 C Editing My List 13 7 C Received Information 13 7 14 Advanced Features Saving Information 14 2 C Saved Information 14 2 C Chec...

Страница 230: ...ail Settings 16 2 C Web Settings 16 3 C V Application Settings 16 3 C Station Settings 16 3 Display Messages 16 4 C Mail 16 4 C Web 16 5 C V Applications 16 6 C Station 16 7 Pictograph List 16 8 Memory List 16 11 Index 16 12 Customer Service 16 16 ...

Страница 231: ...1 1 Vodafone live Overview ...

Страница 232: ...se on handset Mobile Internet Enter Mobile Internet site URL to view a specific site page directly use Log List to access previously viewed sites pages while online Auto Delivery Service Use this Vodafone live service when available to request auto matic informational updates from compatible Mobile Internet sites Service Center Text Service Center Images Sounds vFiles Text Service Center Specify D...

Страница 233: ...dling Incoming Calls Index Menu H Vodafone live A Network Settings A Call Waiting 1 5 Vodafone live Overview 1 Change alphanumerics before of the default handset mail address Handset must connect to the Network to customize handset address Perform Network Setup see P 1 4 before customizing handset address Customizing handset mail address helps reduce spam Web must be activated before handset addre...

Страница 234: ...nction to restrict access to or prevent unauthorized use of Vodafone live services on your handset All services are active by default 1 Press bqp 2 Enter Security Code 3 Select a service and press b 4 Choose 2Off and press b C To activate choose 1On A Press b Disabling Vodafone live ...

Страница 235: ...2 1 Mail ...

Страница 236: ...2 2 MEMO 2 3 New Mail ...

Страница 237: ...d Calls 2Voice Messages K3New Mail I Select J q Q A n Inbox 27 Lv1 12 17 14 55 DSky Mail Kitayama Kaoru 9 392XXXX1 Please bring a camera an d a tripod to Mr Yamamo to and Miss Kawahashi s wedding next Sunday I w ill bring a camcorder Menu Message Window Sky Mail 2 5 New Mail 2 When mail arrives while using handset functions a notification such as New Mail from Sender s Name appears See P 6 4 Mail ...

Страница 238: ...tripod to Mr Ya mamoto and Miss Kawahash i s wedding next Sunday I will bring a camcorde r 2 7 New Mail 2 CMessage Type CAdditional Indicators Only the indicator for the latest action appears Select a message and press b to open it Sending Priority see P 6 10 C Low D Normal E High F By Express B Super Mail or Super Mail Notice Image Display Size 100 q 200 p Received Date Time Message Number Privac...

Страница 239: ...mit Cannot Receive All OK appears Choose 1Yes or 2No A Press b Choose 1Yes to receive up to 30 KB To retrieve selected items choose 2No see Step 2 3 and onward below Unretrieved items are deleted from the Server To use Unretrieved List to retrieve Super Mail messages see P 5 3 To retrieve complete Super Mail automatically see P 6 6 Auto Retrieve Retrieving a Selected Super Mail Message J q c Q B n...

Страница 240: ...t the message and press b Melody plays as set in Sound Volume see 6P 9 7 4 Press d I 5 Select To Data Folder and press b Melody is saved to Data Folder and message is automatically deleted When memory is full delete files see 6P 13 45 and try again C To use as Ring Tone see 6P 9 3 Sky Melody Requesting Melody Files Changing Sky Melody Center Number C Do not change this number unless instructed to ...

Страница 241: ...3 1 Sending Text Messages ...

Страница 242: ...eate Super Mail Groups beforehand to send the same message to multiple recipients at one time see P 6 11 Save frequently used addresses to 2 Touch Mail see P 3 16 To open Inbox and reply to or forward other messages while creating a message see 6P 1 29 Hot Switching Mail 1 Press d select 1Super Mail 2Sky Mail or 3Greeting and press b Mail Composition window opens 2 Select Y and press b Select Addr...

Страница 243: ... 9 C Option Settings see P 3 13 C Saving to Outbox see P 3 12 C Using Save Auto Send see P 3 15 10 Press d N Check approximate mail size in Mail Memory in Mail Composition Window Using both single and double byte characters may reduce character entry limit When Mail Address is Entered C Mail addresses count toward the message text character limit C Single byte katakana and Pictographs are invalid ...

Страница 244: ... or Delete All A Press b A Choose 1Yes A Press b Sending to Server Sky Mail C Intranet integration is required to send messages to the Server After Step 2 on P 3 3 select 6Server A Press b A Enter Server Address within 20 digits A Press b A Enter Sub Address within five digits A Press b Address List J E Q n Address UUKimura Tetuya 2 3 4 5 Select 3 7 Sending Text Messages 3 Set 言語選択 言語選択 言語選択 言語選択 ...

Страница 245: ...ight to dark yellow active Use E to scroll the active Inbox Mail message Jn Q n New Message Wedding Please bring a camer a and a tripod to Mr Ya mamoto and Miss Kawahash i s wedding next Sunday OK O 3 9 Sending Text Messages 3 Attach images sound files vFiles or SVG files to Super Mail Attach up to 20 files totaling no more than 30 KB including message text Split to four smaller images or reduce i...

Страница 246: ...ect 2Delete A Press b A Choose 1Yes A Press b B Press e j to return to Mail Composition window Select Select Attachment List J E Q n Attachment A 5 12 16 11 54 02 03 04 05 06 07 08 09 10 11 12 3 11 Sending Text Messages 3 1 Select an image or sound file in mail or Web info and press b Selected image is outlined 2 Select X Copy image or W Copy sound and press b Copied files are saved to Clipboard t...

Страница 247: ...e when set during message composition Option Settings are not available when resending messages Follow these steps after Step 9 on P 3 5 CAvailable for Sky Mail and Greeting Select Option Settings A Press b A Select 1PIN A Press b A Enter recipient s 4 digit PIN A Press b C To return to Mail Composition window press e W CAvailable when sending to Vodafone handsets KOff Select Option Settings A Pre...

Страница 248: ... Messages 3 CAvailable for Super Mail KOff Activating Select Option Settings A Press b A Select 3Reply Address A Press b A Choose 1On A Press b A Enter address A Press b C To open Phone Book press A M in address entry window Canceling Select Option Settings A Press b A Select 3Reply Address A Press b A Choose 2Off A Press b Auto Send messages created while handset is out of range are saved to Outb...

Страница 249: ...entries Auto Send initiates message send up to three times including initial attempt When Auto Send messages are sent Super Mail takes priority over Sky Mail Failed Auto Send messages are saved to Sent and Outbox 2 Touch Mail Add Address 3 17 Sending Text Messages 3 7 Press g to exit Use 2 Touch Mail to create and send messages from Standby Save addresses in 2 Touch Mail Mail Settings beforehand s...

Страница 250: ...see Steps 3 4 on P 3 4 Skip ahead to Step 6 when sender name is not required 4 Select I and press b When Sender is set in Mail Settings see P 6 10 entered name appears automatically 5 Enter name and press b Enter up to 12 single byte alphanumerics 10 single byte katakana or 3 double byte characters 6 Select G and press b 7 Enter message text and press b 8 Select J and press b The current date and ...

Страница 251: ...4 1 Mail Box ...

Страница 252: ...y not appear For Sky Melody messages the title appears and melody plays C To edit Sent messages press d I A Select Edit A Press b A Select an item A Press b A Edit the message C Use E to scroll C To open messages with Privacy Level 3 or 4 enter Security Code 4 Press g to exit Checking Messages 4 3 Mail Box 4 Using Save Auto Send for Outbox Messages C For one message press d A Select 0Mail Box A Pr...

Страница 253: ...cipient or sender color indicates Priority Level High red Normal black Low blue Additional indicator may appear before sender or recipient see P 4 5 Mail Box Contents Incoming Mail and received text appear for incoming linked messages J E Q A n Select Select Inbox List R 12 17 11 37 27 AQUKitayama Kaoru BVUKimura Tetuya ARccc xxx yyy AQUKatou Reiko AQUKimura GPlease bring a camer a and a tripod to...

Страница 254: ... not saved at the Center Message status unknown J q Q A n Inbox 27 Lv1 12 17 11 37 DSky Mail Kitayama Kaoru 9 392XXXX1 Please bring a camera an d a tripod to Mr Yamamo to and Miss Kawahashi s wedding next Sunday I w ill bring a camcorder Menu 4 7 Mail Box 4 1 Press d select 0Mail Box and press b 2 Select 1Inbox and press b C When Mail Box Layout is set to Folder select appropriate folder A Press b...

Страница 255: ...one number mail address or URL from within message text or sender s address to Phone Book use Linked Info within a message as indicated below 1 Press d select 0Mail Box and press b 2 Select 1Inbox and press b C When Mail Box Layout is set to Folder select appropriate folder A Press b 3 Select a message and press b 4 Saving Sender Address 1Press d I Saving Linked Info 1Select a phone number or mail...

Страница 256: ...onal deletion Unretrieved List Super Mail unread Super Mail Notices and incoming linked messages are protected and will not be deleted automatically Protect up to 980 KB in Sent All messages in Inbox and Outbox can be protected Protected messages are not deleted from Outbox even after they are sent 1 Press d select 0Mail Box and press b 2 Select 1Inbox 2Sent or 3Outbox and press b C When Mail Box ...

Страница 257: ... 6P 16 10 messages must be deleted one by one 4 13 Mail Box 4 1 Press d select 0Mail Box and press b 2 Select 1Inbox 2Sent or 3Outbox and press d I 3 Select 3Delete All and press b 4 Select 1Select All or 2Read Unprotected 2Unprotected for Sent and Outbox and press b 5 Enter Security Code 6 Choose 1Yes and press b 7 Press g to exit When Inbox memory is full handset cannot receive new messages Acti...

Страница 258: ...elect a Group If one or more members are already saved remaining entries are saved from the top of the Super Mail Group Chat Mail Log Saving Members 4 15 Mail Box 4 7 Press b Repeat Steps 5 7 to add more members C To change group members select a number A Press b A Enter number or address A Press b C To delete a member select a number A Press d I A Select Delete A Press b A Choose 1Yes A Press b C...

Страница 259: ...ssage and press b Deleting a message from Inbox or Sent automatically deletes the same message in Chat Mail Log Each group holds up to 100 messages When full oldest messages are automatically deleted to make room for new ones Mail Folders Mail Box Layout Folder Name 4 17 Mail Box 4 2 Select 7Mail Box Settings and press b 3 Select 3Set Folders and press b 4 Select 1Inbox 2Sent or 3Outbox and press ...

Страница 260: ...nly for message contents Moving Messages F40 4 19 Mail Box 4 4 Moving a Message 1Select a message and press d I Auto Send A and failed Auto Send B messages are not selectable Moving Selected Messages 1Select a message and press e R appears Auto Send A and failed Auto Send B messages are not selectable CTo uncheck select a message with R A Press e 2Repeat Step 1 to select all the messages to move S...

Страница 261: ... text select a number A Press d A Choose 1Yes A Press b Sent messages are sorted by the first recipient address Individual settings are replaced when Set All is selected and vice versa Sorting by Text String 4 21 Mail Box 4 6 Select 1Show Message or 2Hide Message and press b Handset does not respond to messages sorted with Hide Message C To cancel choose 3Off A Press b Skip ahead to Step 9 7 Sort ...

Страница 262: ...livery Cancel Delivery Sending from Outbox Sending a Message 4 23 Mail Box 4 3 Select a message and press b Mail Composition window opens C For Auto Send A messages Cancel Auto Send appears Choose 1Yes A Press b C For failed Auto Send B messages Re save As Auto Send appears Select 1Save As Auto Send or 2Cancel A Press b C To edit Outbox messages select an item A Press b A Edit the message B To sav...

Страница 263: ...ess b C When Mail Box Layout is set to Folder select appropriate folder A Press b 3 Select a message and press b 4 Select an image and press b Images can only be used when X Save As Wallpaper or X To Display Images appears 5 Wallpaper 1Select X Save As Wallpaper and press b Display options appear If not skip ahead to Step 3 CTo open properties select X Property A Press b B Press i to return CFor E...

Страница 264: ...e is opened E Animation NEVA file sound may play automatically even if Sound Auto Play is Off 4 27 Mail Box 4 Follow these steps after opening a Mail Box see P 4 4 CShow Address is not available for Outbox Select a message A Press d I A Select Show Address A Press b A Select address A Press b KDate Press d I A Select Auto Sort A Press b A Select an item A Press b Set for Inbox Sent and Outbox inde...

Страница 265: ...entered into message text B Sender s number or address B Received Date Time B Original message text Attachments are deleted To change the destination mail address see P 6 5 Report Setting Message Menu Copy Copy message text 4 29 Mail Box 4 KFont Size Standard Image Size 100 Press d I A Select Set Display Size A Press b A Select 1Font Size or 2Image Size A Press b A Select a size A Press b Alternat...

Страница 266: ...5 1 Server Mail ...

Страница 267: ...Server Mail Select Server Message and press A to see notice from the Server To see the rest retrieve or delete messages on the list and refresh Unretrieved List 5 3 Server Mail 5 When more than one message is selected some may not be retrieved 1 Open Unretrieved List C To retrieve all messages press d I A Select Retrieve all Mail A Press b Omit the next steps 2 Select a message and press b The box...

Страница 268: ...r Mail 5 Forward Server Mail directly to PCs etc Message text is forwarded as an attachment 1 Press d select 0Mail Box and press b 2 Select 1Inbox and press b C When Mail Box Layout is set to Folder select appropriate folder A Press b 3 Select a message Super Mail Notice and press b Select a Super Mail message with X 4 Press d I 5 Transfer Server Mail and press b Subject is automatically entered p...

Страница 269: ...elect a message Super Mail Notice and press d I Select a Super Mail message with B red and X 4 Select Delete Server Mail and press b 5 Select 1Server Mail Only or 2Notice and Mail and press b 6 Choose 1Yes and press b 7 Press e W Deleting Server Mail To delete Super Mail Notice only select Delete and press b Server Mail Only Super Mail Notices remain Notice and Mail Both Super Mail Notices and Ser...

Страница 270: ...6 1 Additional Functions ...

Страница 271: ... and press b 2Enter title and press b Enter up to 18 single byte characters Editing Reply Text 1Select 2Reply Text and press b 2Enter text and press b Enter up to 51 single byte alphanumerics 22 double byte characters B Using both single and double byte characters may reduce character entry limit Pictographs and single byte katakana cannot be used Changing Reply Time 1Select 3Reply Time and press ...

Страница 272: ... as Auto Send when handset is out of range are sent automatically when signal is detected Save Auto Send does not appear in Mail Composition window when Auto Send is Off Custom Fixed Text Japanese Only Save phrases to Custom Fixed Text No 118 to 127 When sending Sky Mail or Greeting messages using Custom Fixed Text to other Vodafone handsets the recipient must have the same Custom Fixed Text saved...

Страница 273: ...lect 5Mail Settings A Press b A Select 42 Touch Mail A Press b A Select 2Save Send Image A Press b A Choose 1On save image or 2Off A Press b KOff Activating Press d A Select 5Mail Settings A Press b A Select 2Super Mail A Press b A Select 3Sender Name A Press b A Choose 1On A Press b A Enter name A Press b Save one entry only Use up to 16 single byte alphanumerics Canceling Press d A Select 5Mail ...

Страница 274: ... Filter is Off by default 1 Press d select 5Mail Settings and press b 2 Select 3Sky Mail and press b Reply Address Designate a different mail address for receiving replies Replies are sent to the designated address only when Reply function is used This function may not work depending on the recipient s mail software Signature Save a name etc and set it to appear at the end of sent messages Sky Mai...

Страница 275: ...ter entry limit Activating Address Filter Additional Settings Set Priority Set priority when sending mail By Express messages are delivered faster for additional fees Other levels indicate the importance of the message and do not affect delivery speed Sender Save sender name for Greeting 6 11 Additional Functions 6 Create up to 10 Mail Groups to send Super Mail to multiple recipients at one time S...

Страница 276: ...ocation Info or 3Link to Auto Reply A Press b C Enter Code appears for 2Location Info Enter Security Code A Choose 1Yes A Press b Select 3Link to Auto Reply to share Auto Reply message see P 6 2 Canceling BBS Press d A Select 0Mail Box A Press b A Select 6BBS A Press b A Select 1Settings A Press b A Choose 2Off A Press b Saved messages remain even after BBS is canceled Reactivate BBS to use Set PI...

Страница 277: ...Enter Security Code A Select from 1Short Message to 3Super Mail Line A Press b A Enter Center Address A Press b Polling C When BBS is accessed handset receives a Polling message Press d A Select 0Mail Box A Press b A Select 1Inbox A Press b A Select a message with Z or Q A Press b P Sky Mail appears when messages with Q are opened Resetting Mail Center Address Reset Reset Mail settings See P 16 2 ...

Страница 278: ...7 1 Web Browser software copyright 2004 Openwave Systems Inc All rights reserved ...

Страница 279: ...7 2 MEMO 7 3 Web Basics ...

Страница 280: ...e terms of usage Vodafone VeriSign Japan Baltimore Technologies Japan and Entrust Japan cannot be held liable for any damages associated with the use of SSL J q Q n ニュース 総合 トピック1 アメリカで行われた世界腕 相撲大会で 日本の石橋さ んが見事に優勝 日本人の優勝は 一昨年の 木村さんに次いで二人目の 快挙 石橋さんは 取材陣に対し て 来年も優勝したい と 話し 早くも連覇に意欲を 燃やしている Back Menu Content 7 5 Web Basics 7 Web information is saved in Cache Memory and Message Folder contents remain e...

Страница 281: ...ppears press j for 1 seconds to activate cancel Manner Mode 7 7 Web Basics 7 Enter URLs directly to access Mobile Internet sites 1 Press e select 5Internet and press b 2 Select 1New and press b 3 Enter URL C To copy from Phone Book press d I A Press e 4 A Open a Phone Book entry see Steps 2 3 on 6P 5 11 A Select an item A Press b twice C To read from barcode press d I A Press d 5 A Select 1Scan Co...

Страница 282: ...日本人の優勝は 一昨年の 木村さんに次いで二人目の 快挙 石橋さんは 取材陣に対し て 来年も優勝したい と 話し 早くも連覇に意欲を 燃やしている Back Menu Scroll Bars 7 9 Web Basics 7 Enter text or select items to send information Text Entry Field Highlight and press b Text entry window opens Enter text and press b Check box Highlight Q check box and press b The box changes to R indicating that the item is selected may also appear as selection indicators Menu List H...

Страница 283: ...o access the information provider or Mobile Internet sites to download more information Register from Mobile Internet sites that support Auto Delivery Service Delivered information is automatically saved to Message Folder 1 When new information arrives animation plays and Information Menu opens C appears 2 Select Web Info and press b 3 Select a title and press b Information appears and is deleted ...

Страница 284: ...8 1 Advanced Features ...

Страница 285: ...formation URLs Data may be partially altered when B Bookmarks are transferred between handset and Memory Card B Bookmarks vFile in Data Folder are transferred to handset or Memory Card 8 3 Advanced Features 8 1 Press e 2 Favorites Message Folder 1Select 3Favorites or 7Message Folder and press b CTo rearrange the Favorites list select a title A Press d I A Select Move A Press b A Use E to move the ...

Страница 286: ...with https select 1OK A Press b A Choose 1Yes A Press b Deleting Entries Using Linked Info 8 5 Advanced Features 8 Download and save image sound Dictionary files vFiles etc from Mobile Internet sites to Data Folder Some files may not be saved to Data Folder 1 Open information 2 Select a file and press b Files can only be saved when To Data Folder appears 3 Select To Data Folder and press b Title e...

Страница 287: ...d Image appears at the center in its original size Tile Duplicates of the image are arranged like tiles over Display Full Screen Image is enlarged to cover the full display area Enlarge Display Image is enlarged until the width or height reaches the edges of Display Power On W 240 x H 260 dots Incoming Call W 240 x H 80 dots Power Off W 240 x H 260 dots Alarm W 240 x H 100 dots Back Menu J q I Q n...

Страница 288: ...k of Sony Music Entertainment Japan Inc 1 Open information 2 Select a Chaku Uta file and press b Confirmation appears C When a V Application is paused F choose 1Yes A Press b C When playing music choose 1Yes A Press b 3 Press e i When download is complete Audio Menu opens C To cancel download press d c 4 Select 2Handset or 3Memory Card and press b C To play the song select 1Play A Press b B To sto...

Страница 289: ...9 1 Additional Functions ...

Страница 290: ... information providers you cannot increase the volume above the specified level In Manner Mode volume set in Manner Settings see 6P 3 4 applies KAuto Recognition Press d I A Select Character Encoding A Press b A Select from 1Auto Recognition to 5UTF 8 A Press b Use Auto Recognition whenever possible Character encoding cannot be changed for information opened from Message Folder or Favorites The se...

Страница 291: ...r to download images and sounds on Mobile Internet sites automatically or to open text information only Location Info Choose whether or not to send your Location Info upon request 9 5 Additional Functions 9 KOff Link Limiter Code 9999 Activating Canceling Press e A Select 8Web Settings A Press b A Select 6Link Limiter A Press b A Enter Link Limiter Code 4 digits A Choose 1On or 2Off A Press b When...

Страница 292: ...b KU7223000 Press e A Select 8Web Settings A Press b A Select 3Center Address A Press b A Enter Security Code A Enter Center Address A Press b Resetting Web Center Address Web Reset Reset Web settings See P 16 3 for the settings affected by Reset Clear Memory Delete all information acquired from Mobile Internet sites All files in the following locations will be deleted B Cache B Favorites B Messag...

Страница 293: ... by JBlend Copyright 1997 2005 Aplix Corporation All rights reserved JBlend and JBlend related brands are trademarks or registered trademarks of Aplix Corporation in Japan and other countries Java and Java related brands are trademarks or registered trademarks of Sun Microsystems Inc in the United States and other countries ...

Страница 294: ...10 2 MEMO 10 3 V Application Basics ...

Страница 295: ...Q nP V Appli 1 1 カスタムスクリーン キ ャラリー ケータイ少女 体験版 イラ玉 体験版 ハ ーニンク F 体験版 エアロハ ティック体験版 ヒ ホ サルハ ナナ体験版 Start License T 0500099 10 5 V Applications Basics 10 Use handset to control a TV VCR etc A compatible V Application is required Z appears for compatible V Applications Align Infrared Port right with infrared port of target device Maximum usage distance is approximately 3 meters with a fully charged batter...

Страница 296: ...d NW connection required Application Yes No Name Download Size Save Size Network Information Start Download Press ei Cancel Download Press dc 10 7 V Applications Basics 10 Synchronize Memory Cards used on other Vodafone handsets PCs and other devices to update V Appli Library Perform Network Setup beforehand see P 1 4 Update V Appli Library to avoid application malfunction It may take some time to...

Страница 297: ...n resumes from where it was paused 1 While a V Application is paused press b in Standby F appears while a V Application is paused 2 Select 1Resume and press b C To end the V Application select 2End A Press b C To open Index Menu and keep the V Application paused select 3Cancel A Press b Exit Pause Resume Exiting or Pausing V Applications Resuming V Applications Opening V Appli Library while V Appl...

Страница 298: ...11 1 Using V Applications ...

Страница 299: ...t 1 Select 1Standby V Appli and press b C To set start time select 2Set Time A Press b A Select 1Start Time A Press b A Enter time 01 10 Seconds A Press b C To set idle time after which V Application pauses select 2Set Time A Press b A Select 2Transition Time A Press b A Select time A Press b 2 Select 1Set Application and press b C For network connection setting select 2Network Connection A Press ...

Страница 300: ...nd press b Network security related dialogs may appear for some V Applications Follow onscreen prompts to start the V Application may only be available in Japanese 2 Press k The V Application appears on the device C Press k to toggle display as follows device Enlarge handset device Original Size B Alternatively see 6P 16 48 to switch device display size between Enlarge and Original Size Video Out ...

Страница 301: ...12 1 Additional Functions ...

Страница 302: ...ngs A Volume Vibration A Vibration 12 3 Additional Functions 12 KLink to Backlight Select from 1Always Active to 3Link to Backlight A Press b KOn Choose 1On Backlight flashes or 2Off A Press b Select a V Application A Press d I A Select Auto Connect A Press b A Choose 1On or 2Off A Press b On Network V Applications start without a confirmation This setting is also available for V Applications on M...

Страница 303: ...Vodafone live A V Appli A Save Direct Key Resetting V Appli Center Address Reset Reset V Application settings See P 16 3 for the settings affected by Reset Index Menu H Vodafone live A V Appli A V Appli Settings A Other Settings A Reset V Appli Clear Memory Restore V Appli Library to default setting Index Menu H Vodafone live A V Appli A V Appli Settings A Other Settings A Reset V Appli Clear Memo...

Страница 304: ...13 1 Station Japanese Only ...

Страница 305: ...13 2 MEMO 13 3 Station Basics ...

Страница 306: ...eted Alternatively in Station open New Information to see reply see P 13 8 In Standby J q Q n 12 17 12 3 通常 スポーツニュース 速報 腕相撲の世界チャンピオン に輝いた石橋さんが 今度 は指相撲のチャンピオンに 挑戦 来月末からイタリアで行わ れる指相撲大会への参加を 表明 優勝すれば 史上初腕相撲 と指相撲の2冠を達成する ことになる Back Menu Received Date Time Continues Content Info Type 13 5 Station Basics 13 1 Select 2Main List and press b C If Main List is empty choose 1Yes A Press b 2 Select a topic an...

Страница 307: ...13 Urgent Information cannot be moved 1 Select a topic and press d I 2 Select Move and press b 3 Use E to select target location and press b The topic is moved Urgent Information cannot be deleted Deleting a topic automatically deletes all information saved under the topic 1 Select a topic and press d I 2 Select Delete and press b Delete appears Check the number of information items 3 Choose 1Yes ...

Страница 308: ...dafone live A Press b A Select 3Station A Press b A Select 1New Information A Press b A Select a topic A Press b Information may appear automatically without a notice For Urgent Information Urgent Information appears even when it arrives with other information If information is received during an operation Information Menu may not appear Depending on information type Ring Tone may not sound or oth...

Страница 309: ...14 1 Advanced Features ...

Страница 310: ...ites Available only when number address or URL is underlined with a dotted line Words may be substituted for the numbers addresses and URLs 1 Open information containing a phone number mail address or URL 2 Phone Numbers 1Highlight a number and press b 2Select Dial and press b The number is dialed Mail Addresses 1Highlight a phone number or mail address and press b 2Select Send and press b 3Select...

Страница 311: ...ges Save images as Wallpaper or as Display Images Weather Indicator Activating Weather Indicator Index Menu H Vodafone live A Station A Weather Indicator After you subscribe to fee based information Weather Icon Set Now appears Choose 1Yes and press b twice to activate Weather Indicator On is set for 2Standby Display automatically 14 5 Advanced Features 14 Weather Indicator is updated when eWeathe...

Страница 312: ...Need Setting and press b Handset is set to ask for Security Code C To cancel choose 2No A Press b Location Info Checking Location Info Index Menu H Vodafone live A Station Using Location Info Share on BBS see P 6 13 Send via Web see P 9 4 Copy and paste into messages see below Pasting into Messages C In a text entry window move cursor to the paste location and follow these steps Press d I A Select...

Страница 313: ...15 1 Additional Functions ...

Страница 314: ...o change font size from Font Settings menu see 6P 8 9 Scroll Unit Select from three scroll units Text Memo Copy text and save to Text Memo see 6P 4 18 Copy Copy text Property Open information details 15 3 Additional Functions 15 K6 Hours Select from 16 Hours to 3Off A Press b Main List is updated automatically when not updated by other means see P 13 5 within the set interval Enter Info Number A P...

Страница 315: ...Station A Station Settings A Reset Station Clear Memory Delete all information in Station Index Menu H Vodafone live A Station A Station Settings A Reset Station All files in the following locations will be deleted B New Information B Main List B My List B Saved Information B Location Info Urgent Information remains Executing Clear Memory cancels active Main List update see P 13 5 Center Address S...

Страница 316: ...16 1 Appendix ...

Страница 317: ...hat Group e g Members all deleted Auto Open Image Auto Open On Sound Auto Play Off Auto Delete Old Off Sort By Subject Off text all deleted Sort By Addresses Off text all deleted Set Display Size Font Size Standard Image Size 100 Auto Sort Date List Pattern 1 16 3 Appendix 16 See P 9 6 for resetting Web settings See P 12 4 for resetting V Application settings See P 15 4 for resetting Station setti...

Страница 318: ...ect 16 5 Appendix 16 Causes include the following scenarios For details contact Vodafone Customer Center General Information see P 16 16 Recipient does not subscribe to Super Mail or Long Mail Recipient handset is not Super Mail compatible Long Mail compatible handsets cannot receive messages over 6 KB Recipient handset is not JPEG compatible B Convert JPEG files to PNG files before sending to PNG...

Страница 319: ...tion Yes No 16 7 Appendix 16 Library memory is full APress e i to continue downloading or press d c to cancel 100 V Applications are already saved ADelete applications see P 11 2 and try again You are downloading a new version of the saved application APress e i to continue downloading or press d c to cancel You tried to update Main List or Location Info out of range ATry again where signal is sta...

Страница 320: ... Pictograph Code Pictograph 16 9 Appendix 16 CPictograph Code 3 CPictograph Code 4 Pictographs do not appear in e mail or on incompatible Vodafone handsets Pictographs in 2 are animated Pictographs with appear with background animation in received messages when Standby Animation see 6P 8 19 is On When more than one is included in a message animation for first entered Pictograph appears 1 19 37 55 ...

Страница 321: ... 39 57 4 22 40 5 23 41 6 24 42 7 25 43 8 26 44 9 27 45 10 28 46 11 29 47 12 30 48 13 31 49 14 32 50 15 33 51 16 34 52 17 35 53 18 36 54 Code Pictograph Code Pictograph Code Pictograph Code Pictograph Code Pictograph 16 11 Appendix 16 Shared with Favorites or Message Folder Web and Saved Information Station Shared with Inbox Mail and Saved Information Station Shared with Inbox Mail and Favorites or...

Страница 322: ...ening information 8 3 Index Numbers A B C D E F 16 13 Appendix 16 Favorites saving to 8 2 Fixed Text 3 7 Folder Name 4 17 Font Size 4 29 9 2 15 2 Forward 4 8 Go to 4 29 Greeting 1 2 3 18 Hide Spam 4 21 Home Reset 7 10 Home Setting 7 10 Image Auto Open 4 26 Image Link 15 3 Image Size 4 29 9 2 15 2 images saving 8 5 14 4 Inbox 4 2 Inbox Auto Sort 4 19 Incoming Call 1 4 Incoming Mail 4 4 Incoming Set...

Страница 323: ...2 4 Server Mail deleting 5 6 Server Mail forwarding 5 5 Server Mail Volume 5 2 Set Display Size 4 29 9 2 15 2 Set Info Number 14 5 Set Priority 3 14 6 10 Sha mail Shoot 3 12 Short Message 6 14 Show Address 4 27 Show as Unread Read 4 28 Show Certification 9 4 Show Inbox Mail 3 8 Show Message 12 2 Show User ID 9 5 Side Keys i Signature 6 8 O P R S 16 15 Appendix 16 Sky Mail 1 2 3 3 Sky Melody 1 2 2 ...

Страница 324: ...ga Wakayama Customer Assistance G 0088 242 113 General Information G 0088 259 157 Hiroshima Okayama Yamaguchi Tottori Customer Assistance G 0088 259 113 General Information G 0088 247 157 Tokushima Kagawa Ehime Kochi Customer Assistance G 0088 247 113 General Information G 0088 250 157 Fukuoka Saga Nagasaki Oita Kumamoto Miyazaki Kagoshima Okinawa Customer Assistance G 0088 250 113 V604SH Instruct...

Отзывы: