Scott SKA-PAK AT Скачать руководство пользователя страница 20

Page 20 of 44

P/N 595189-01  Rev A  4/10

WArning

Air  floW  from  The  Airline  connec-

Tion hoSe Will conSume Air from The 

Self-conTAined  Air  SuPPly  And  cAn 

SignificAnTly  ShorTen  The  durATion 

of  The  reSPirATor.  fAilure  To  Pro-

vide A full cylinder WiTh The SKA-PAK 

AT  mAy  leAd  To  circumSTAnceS  ThAT 

could  reSulT  in  SeriouS  inJury  or 

deATh. 

WArning

never  PlAce  A  SKA-PAK  AT  reSPirA-

Tor in Service if The cylinder gAuge 

indicATeS  leSS  ThAn  "full."  Air  loSS 

from  The  Self-conTAined  Air  SuPPly 

cylinder due To inSPecTion And TeST-

ing cAn SignificAnTly ShorTen The du-

rATion of The reSPirATor. fAilure To 

Provide A full cylinder WiTh The SKA-

PAK  AT  mAy  leAd  To  circumSTAnceS 

ThAT  could  reSulT  in  SeriouS  inJury 

or deATh. 

WArning

if The vibrAlerT end of Service Time 

indicATor  doeS  noT  AcTuATe  AS  de-

Scribed,  do  noT  uSe  The  reSPirATor. 

remove The reSPirATor from Service 

And  TAg  for  rePAir  by  AuThoriZed 

PerSonnel. uSe of A reSPirATor WiTh-

ouT A ProPerly oPerATing vibrAlerT 

end  of  Service  Time  indicATor  mAy 

reSulT in SeriouS inJury or deATh. 

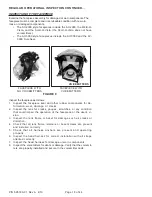
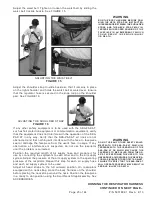
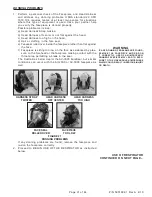
1.   Don the facepiece properly (see donning procedures under USE 

OF THE  RESPIRATOR)  or  hold  the  facepiece  tightly  to  the  face 

to effect a good seal. Inhale slightly and hold breath. A negative 

pressure (suction) shall be created, pulling the facepiece toward 

the  face.  Hold  breath  for  5  to  10  seconds.  If  leakage  is  noted, 

remove the respirator from service and tag for repair by authorized 

personnel. 

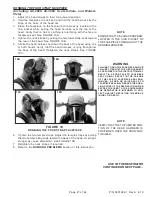
2.   Briefly remove the facepiece (see doffing procedures under TERMI-

NATION OF USE) to take a breath if necessary. Don the facepiece 

or  hold  the  facepiece  tightly  to  the  face.  Depress  the  air-saver/

donning switch fully and release. Open the cylinder valve by turn-

ing  the  valve  knob  counterclockwise  fully.  The  VIBRALERT  will 

actuate and the ELECTRONIC alarm will flash for approximately 

five seconds to initialize. No air flow shall be detected at this time. 

Inhale  sharply  to  start  the  flow  of  air,  then  take  one  breath  and 

hold. 

noTe

IF  THE  PURGE  VALVE  IS  ADJUSTED  TO  PRODUCE  A  FLOW,  IT 

MAY  NOT  BE  POSSIBLE  TO  RESET  THE  AIR-SAVER/DONNING 

SWITCH BY INHALING; CLOSE THE PURGE VALVE AND REPEAT 

THE TEST. 


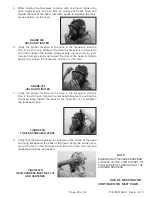
Air shall flow freely into the facepiece during inhalation and stop 

when inhalation ceases. VIBRALERT shall actuate. Hold breath for 

5 to 10 seconds. If airflow continues after inhalation has ceased, 

recheck the fit of the facepiece (see Step 1). If airflow continues 

after checking the fit, remove the respirator from service and tag 

for repair by authorized personnel. Exhale into the facepiece and 

take  a  second  breath. Air  shall  leave  the  facepiece  through  the 

exhalation valve during exhalation and fresh air shall flow into the 

facepiece on inhalation. Depress the air saver switch fully and re-

lease. Doff the facepiece. No air shall flow from the facepiece. 

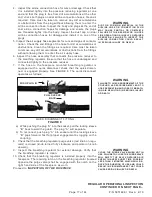
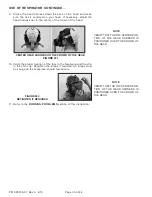
3.   With  the  cylinder  valve  open  and  the  air-saver/donning  switch 

depressed,  check  the  open  end  of  the  fitting  on  the  airline  con-

nection hose for any sign of leakage. If leakage or if airflow from 

the airline connection hose can be detected from the fitting, DO 

NOT USE THE Respirator; remove the respirator from service and 

tag for repair by authorized personnel.


On respirators equipped with a dual airline connection hose, check 

both plugs for leakage. If leakage or airflow can be detected from 

the fitting, DO NOT USE THE RESPIRATOR; remove the respira-

tor from service and tag for repair by authorized personnel. 


Close the cylinder valve by pushing in on the cylinder valve knob 

while turning it fully clockwise. Vent any trapped air in the respi-

rator  by  opening  the  purge  valve  momentarily.  Close  the  purge 

valve  when  air  flow  and  VIBRALERT  stop.  The  ELECTRONIC 

alarm  shall  flash  until  air  is  purged  from  the  system.  Check  the 

gauge on the air cylinder to be certain the cylinder still indicates 

“FULL.”

OPERATIONAL TESTING OF THE RESPIRATOR

regulAr oPerATionAl inSPecTion conTinued...

Содержание SKA-PAK AT

Страница 1: ...H ELECTRONIC ALARM WARNING IMPROPER USE OF THIS RESPIRATOR MAY RESULT IN PERSONAL INJURY OR DEATH IMPROPER USE INCLUDES BUT IS NOT LIMITED TO USE WITHOUT ADEQUATE TRAINING DISREGARD OF THE WARNINGS AN...

Страница 2: ...This respirator is not to be used under water for interior structural fire fighting or for any other purpose not authorized by the organized respiratory protection program that applies specifi cally t...

Страница 3: ...ration have one of five types of quick connect plugs and come in single or dual plug versions Dual plug versions provide a facil ity for transition between redundant air supply hoses On both the singl...

Страница 4: ...h a multipurpose Full Body Harness P N 805061 04 This harness is intended to be used only in accordance with both the user s respira tory protection program and fall protection program For additional...

Страница 5: ...this or similar equipment 5 Whether or not the cylinder is fully charged at the start of the use period 6 The possible presence in the compressed air of carbon dioxide concentrations greater than 04 n...

Страница 6: ...er After passing the NEGATIVE PRESSURE LEAK TEST the facepiece size selected must be verified by successfully passing a respirator Quantitative Fit Test When fit testing for Open Circuit Pressure Dema...

Страница 7: ...TEST and the Quantitative Fit Test If leakage is still detected either per these user instructions or the OSHA fit testing process the use of Mask Seal Kit P N 805655 01 may be required to attain a p...

Страница 8: ...eratures at or below freezing 32 F 0 C the condensation may freeze inside the air supply lines or inside the respirator possibly causing the flow of breathing air to be reduced or to stop completely N...

Страница 9: ...03904 01 air supply hoses may be interchanged to supply a single SKA PAK AT respirator and except for these different types of supply hose may NOT be mixed The 30010 series hose utilize a Hansen7 bras...

Страница 10: ...with the body of socket A as described in step 1 Slide sleeve B away from the body toward the supply hose to release the plug fitting from the socket IF IT IS NOT PRACTICAL TO SEE THE ALIGNMENT NOTCH...

Страница 11: ...e reducer using moderate force NOTES 11 SCOTT Part Number stamped into end of hose See FIGURE 2 12 SCOTT Part Number stamped into hose within 6 inches of either end 13 Specify silicone seals if orderi...

Страница 12: ...one of the following 9 volt batteries Energizer Alkaline No 522 or EN22 Duracell Alkaline No PC1604 or MN1604 or for increased service life use Ultralife Lithium Bat tery No U9VL Be sure battery is p...

Страница 13: ...Any trapped air will flow from the regulator Close the purge valve by rotating the knob to the full clockwise position when air flow stops CYLINDER INSPECTION NOTE IT IS THE RESPONSIBILITY OF THE USER...

Страница 14: ...on Page 4 and referenced in the DBI SALA full body harness user instructions SCOTT P N 89497 01 pro vided with the harness If any damage is found do not use the harness NOTE IF THE FULL BODY HARNESS H...

Страница 15: ...er and valve assembly is properly fitted to the harness Inspect the cylinder clamps Both clamps must be tight and hold the cylinder to the harness securely Tighten as necessary See FIGURE 6B FIGURE 6B...

Страница 16: ...ted on the nipple coupling that connects the pressure reducer to the cylinder valve To expose the threads and the gasket for inspection grasp the hand wheel coupling on the pressure reducer and turn t...

Страница 17: ...re must be taken to remove any dirt accumulations or obstructions from the fittings without allowing them to enter the air supply hose 6 Inspect the hose assembly that connects the pressure reducer to...

Страница 18: ...the facepiece as follows 1 Inspect the facepiece seal and other rubber components for de formation wear damage or cracks 2 Inspect the lens for cracks gouges scratches or any condition that could impa...

Страница 19: ...Cup is standard on the SCOTT AV 2000 Weld O Vista and AV 3000 full facepieces and optional on the SCOTT O VISTA full facepiece a SCOTT AV 3000 and AV 3000 SureSeal Facepieces are avail able with two d...

Страница 20: ...ize No air flow shall be detected at this time Inhale sharply to start the flow of air then take one breath and hold NOTE If the purge valve is adjusted to produce a flow it may not be possible to res...

Страница 21: ...OVIDE ADEQUATE PROTECTION FROM THE HAZARDOUS ATMOSPHERE WHICH MAY RESULT IN SERIOUS INJURY OR DEATH WARNING USE ONLY BREATHING AIR WHICH MEETS THE REQUIREMENTS AS DESCRIBED IN THE AIR SUPPLY REQUIREME...

Страница 22: ...such that the facepiece is toward the front of the wearer and the air supply cylinder is next to the left foot Pass the shoulder strap over the left shoulder and head onto the right shoulder Draw the...

Страница 23: ...ction or interference is suspected do not use the respirator until the problem is corrected Position the required length of air supply hose and prepare it for use by connecting the segments to each ot...

Страница 24: ...o the operating pressure of the respirator Repeat this step for each air supply hose and each air supply system to be used FIGURE 17 CONNECTING SUPPLY HOSE AND STANDBY CONDITION SHOWN WITH OPTIONAL NE...

Страница 25: ...ssure reducer is tight and that the breathing regulator purge valve red knob on regulator is closed knob turned fully clockwise Depress the air saver donning switch and release Connect the sup ply hos...

Страница 26: ...head harness to the head Periodically repeating the fit testing is required to identify any physical changes of the user such as those listed above which could affect the fit of the facepiece NOTE IF...

Страница 27: ...h chin properly located in the chin pocket while pulling the head harness over the top of the head Verify that no hair or clothing is interfering with the face to facepiece seal See FIGURE 19A 4 Tight...

Страница 28: ...n place with the chin properly located in the chin cup throughout the donning process 4 Stroke the head harness over the head and ensure that straps are lying smooth and flat against the head and neck...

Страница 29: ...temple strap end toward the rear of the head Alternate hands to maintain the facepiece position on the face 7 Verify the proper location of the face in the facepiece and the chin in the chin cup Tigh...

Страница 30: ...your head If necessary adjust the head harness net to the center of the crown of the head 10 Verify the proper location of the face in the facepiece and the chin in the chin cup Retighten the straps i...

Страница 31: ...o low on the face as evidenced by pres sure on the forehead or the facepiece making contact with the throat area permitting a break in the seal The illustrations below depict the AV 3000 SureSeal but...

Страница 32: ...ted as described under PREPARATION FOR USE 3 FULLY OPEN THE CYLINDER VALVE by turning the valve knob to the full counterclockwise position This will require approxi mately 2 1 2 complete rotations of...

Страница 33: ...on hose and transfer to another air supply hose is an ticipated during use of the respirator the user shall check the operation of the respirator as described above with each air supply hose and each...

Страница 34: ...knob The ELECTRONIC alarm shall flash both lights for approximately five seconds to ini tialize and stop The cylinder pressure gauge on the ELECTRONIC alarm shall read FULL The VIBRALERT shall NOT act...

Страница 35: ...xit from the area requiring respiratory protection is normally made by retracing the path used during entry so that exit can be made while air is supplied by the air supply system through the air supp...

Страница 36: ...upply hose for egress for instance if the hose is entangled or if it is necessary to exit by a different route the user shall disconnect the hose and immediately leave the area requiring respiratory p...

Страница 37: ...C Where it is expected that the respirator will be used in ambient temperatures near or below freezing the respirator shall be equipped with a Nose cup Assembly to reduce the formation of vision impa...

Страница 38: ...FAILURE TO THOROUGHLY RINSE AND COMPLETELY DRY THE ENTIRE FACEPIECE ASSEMBLY MAY ALLOW A BUILDUP OF DE TERGENTS AND OR DISINFECTING AGENTS WHICH COULD DAMAGE FACEPIECE COM PONENTS CLEANING THE FACEPI...

Страница 39: ...ening See FIGURE 22 Be sure to cover internal components completely 5 Follow the user instructions for the SCOTT recommended cleaner A specific contact time may be required for sanitizing or disinfect...

Страница 40: ...ORAGE WITH OUT THOROUGHLY DRYING THEM MAY RE SULT IN CORROSION OR OTHER DAMAGE WHICH COULD CAUSE A MALFUNCTION OF THE RESPIRATOR SUCH A MALFUNC TION MAY RESULT IN SERIOUS INJURY OR DEATH WARNING PLACI...

Страница 41: ...ed Test Equipment at least every two years16 However heavy use may require more frequent testing This recommendation is in addition to all other cleaning and maintenance procedures A manual covering t...

Страница 42: ...atter paint spray and abrasion 5 Dual airline connection hose assembly for redundant air sup ply hoses or to facilitate transfer between hoses H Type P N 804319 01 with standard Hansen fittings S Type...

Страница 43: ...D AIR SUPPLY APPROVED FOR USE AT TEMPERATURES ABOVE 25 F 32 C APPROVED ONLY WHEN THE COMPRESSED AIR CYLINDER IS FULLY CHARGED WITH AIR MEETING THE RE QUIREMENTS OF THE COMPRESSED GAS ASSOCIATION SPECI...

Страница 44: ...Page 44 of 44 P N 595189 01 Rev A 4 10 Health Safety Products Monroe Corporate Center PO Box 569 Monroe NC 28111 Telephone 1 800 247 7257 FAX 704 291 8330 www scotthealthsafety com Printed in USA...

Отзывы: