


63
1. Enable Virtual Servers:
Check “
Enable
” applies all those rules in Virtual Server List
into the WE-1110.
2. Description:
Input the description of the virtual server, this filed allows you to record
what this rule is used for.
3. Private IP:
Specify the private IP address of the internal host offering the service.
4. Protocol Type:
Specify the transport layer protocol (TCP or UDP).
5. Private Port:
Specify the private port number of the service offered by the internal host.
6. Public Port:
Specify the public port number of the service in Internet.
7. Schedule:
Setup the schedule for server.
8. Add:
Click on “
Add
” button to record this setting.
9. Apply & Cancel
Click on
Apply
button to add the settings into the list table. Click on
Cancel
button to
clean the setting on this page.
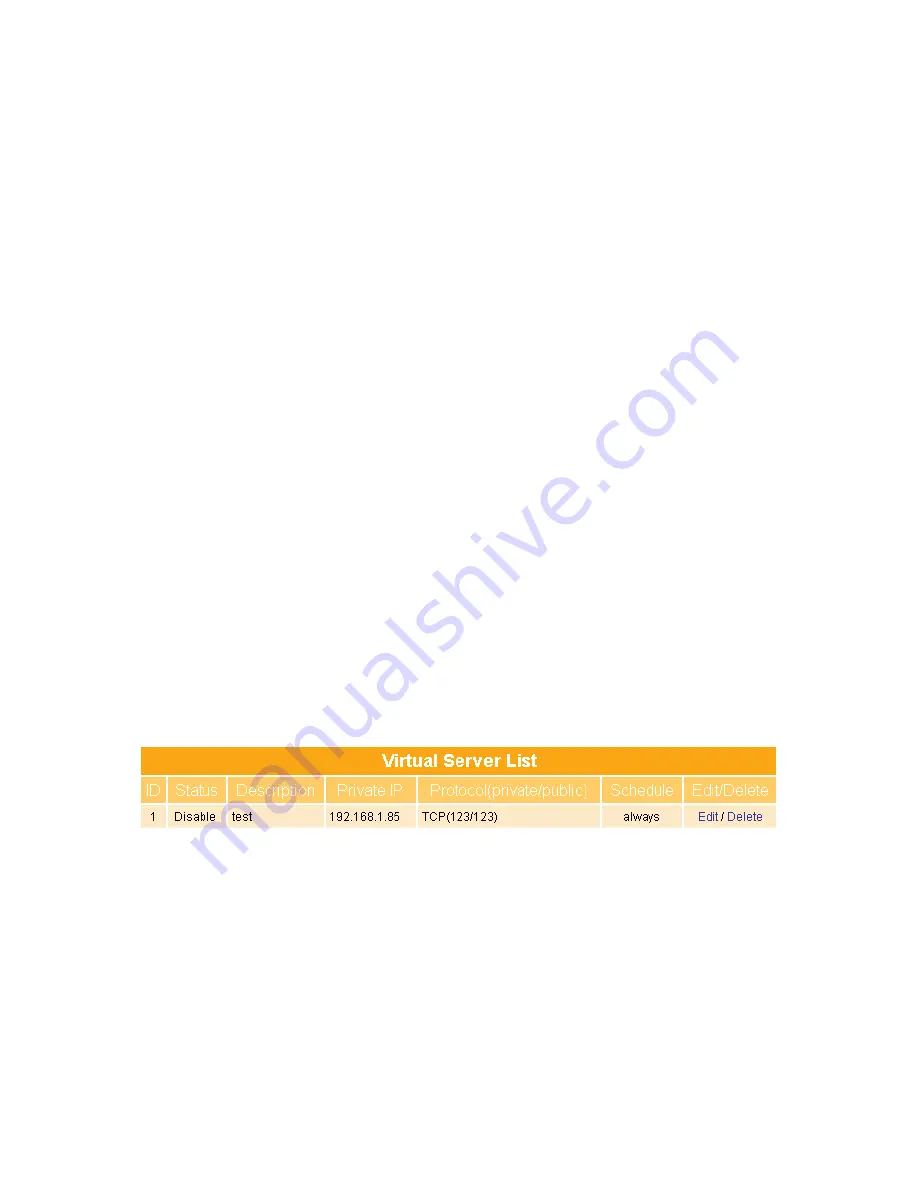
10. Virtual Server List
Showing all Virtual Server information, and can process Edit or Cancel feature. Is
shown as diagram below
3.4.1.2 Virtual DMZ
Virtual DMZ (De-Militarized Zone
)
allows you to expose one computer to Internet, so that
all inbound packets will be redirected to the computer you set. It is useful while you run
some applications that use uncertain incoming ports. Please use it carefully.
Содержание we 1110
Страница 1: ...1 ...
Страница 18: ...18 Step2 Click on Properties button Step3 Double click on Internet Protocol TCP IP ...
Страница 23: ...23 If it can t work it will show Request timed out ...
Страница 89: ...89 Step 2 Click Add a printer Step 3 Click Next ...
Страница 91: ...91 Step 6 Click Next Step 7 Input the IP address of WE 1110 192 168 1 1 Router Mode and then click Next ...
Страница 152: ...152 Step 6 Input Username and Password of your own You will see like as below monitor screen ...
Страница 158: ...158 Step 3 Click Next Step 4 Click the Local printer attached to this computer and then click Next ...
Страница 159: ...159 Step 5 Click the Create a new port and select the Standard TCP IP Port and then click Next Step 6 Click Next ...
Страница 224: ...224 Step 3 Click Next Step 4 Click the Local printer attached to this computer and then click Next ...
Страница 225: ...225 Step 5 Click the Create a new port and select the Standard TCP IP Port and then click Next Step 6 Click Next ...
Страница 258: ...258 Step3 Please finish these blank fields Then click on Create Account button ...
Страница 260: ...260 Step5 1 Click on the mail 2 Click on the address https www dyndns org account confirm xxx Step6 Click on login 2 ...
Страница 261: ...261 Step7 Click on the My Services under Account Step8 And then click on Add Host Services ...


