background image

Using a Battery

21

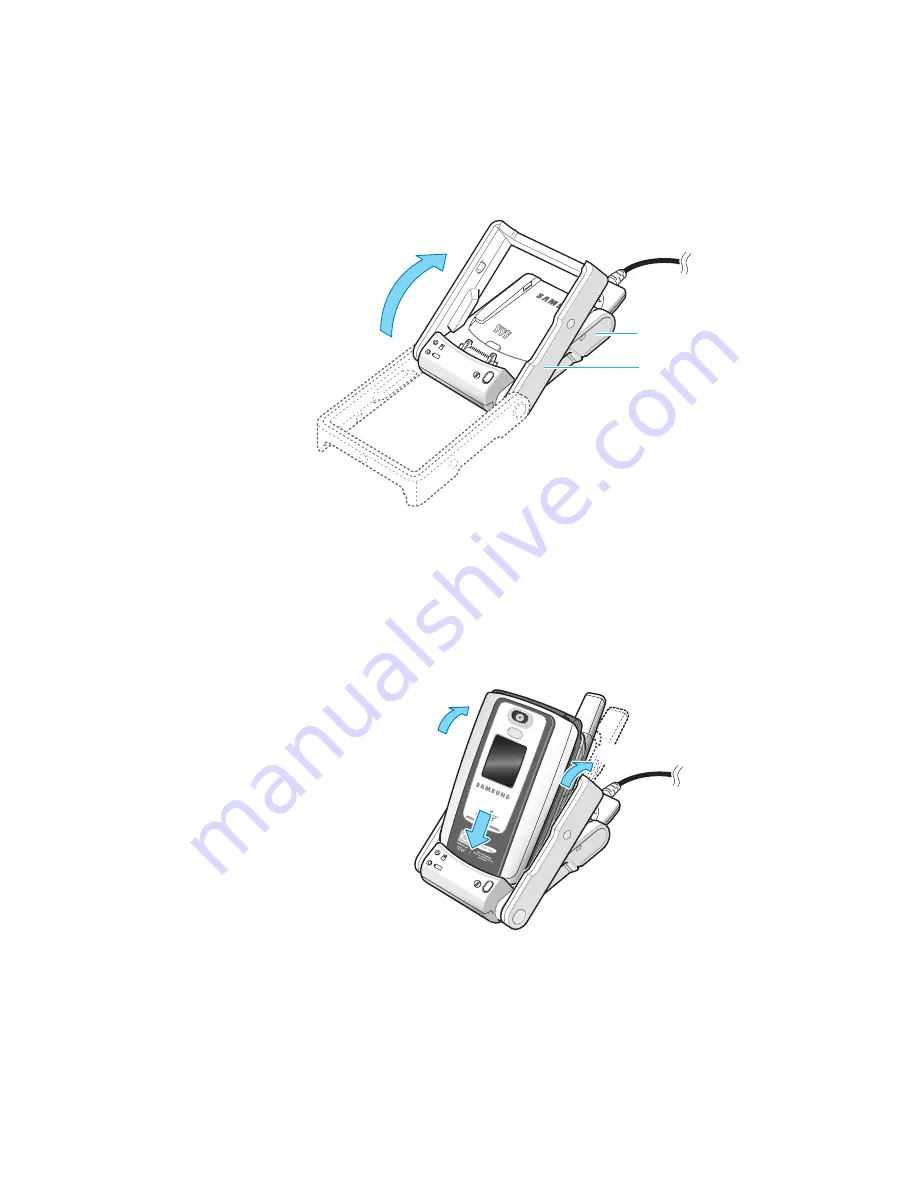
3. Lift the frame towards the base so that it is at a 45

angle and cannot move back any further.

4. Select one of the following:

• Place the entire phone with the battery attached into 

the desktop holder, bottom first, so the data connector 
is inserted. Then push the PDA phone backwards into 
the frame until you hear a click.

• Slide a single battery, not attached to the PDA phone, 

into the compartment of the desktop holder first, 
insert the bottom of the battery under the tab of the 

Base

Frame

2

2

1

Содержание SGH-I530

Страница 1: ...Mobile Power Tool and Communicator SGH i530 ...

Страница 2: ...Battery 20 Using a SIM Card 25 Inserting the SIM Card 25 Removing the SIM Card 26 Performing the First Setup 27 Adding an Expansion Card 28 Inserting a Card 28 Removing a Card 29 Using Palm Desktop Software 30 Installing Palm Desktop Software 30 Removing Palm Desktop Software 31 Using the Straight Headset 32 Chapter 2 The Basics Knowing Your PDA Phone s Buttons and Icons 34 Buttons 34 Tool Icons 3...

Страница 3: ...Chapter 3 Entering Text Using the Keypad 68 T9 Mode 69 ABC Mode 71 Symbolic Mode 72 Number Mode 72 Using the Onscreen Keyboard 73 Using Graffiti 2 75 Chapter 4 Phone Functions Switching on or off the Phone 88 Opening the Phone Application 88 Making a Call 89 Redialling the Last Number 90 Making a Call from Phonebook 90 Making a Call Using Speed Dial 91 Making an International Call 91 Making an Eme...

Страница 4: ...ook 103 Deleting Call Records 104 Viewing the Call Time 105 Using the Call Cost 106 Chapter 5 Messaging Internet Using Messaging 108 Writing and Sending Messages 109 Using the Message Boxes 112 Using the Media Boxes 116 Checking Voice Mails 120 Reading Broadcast Messages 120 Changing an MMS Profile 122 Setting SMS Message Preferences 124 Backing up Message data 125 Using Browser 127 Connecting to ...

Страница 5: ...g the Date Book view 161 Beaming Events 165 Deleting Events 166 Setting Date Book Preferences 167 Using To Do List 168 Creating a To Do List Item 168 Checking off a To Do List Item 171 Beaming To Do List Items 172 Deleting To Do List Items 172 Setting To Do List Preferences 173 Using Memo Pad 175 Creating a Memo 175 Reviewing Memos 176 Beaming Memos 177 Deleting Memos 178 Using Voice Memo 179 Reco...

Страница 6: ...to 196 Using Photos 197 Beaming Photos 197 Sending a Photo via MMS 197 Setting a Photo as Wallpaper 198 Deleting Photos 199 Chapter 8 Extras Using Calculator 201 Performing Calculations 201 Viewing Recent Calculations 203 Using Unit Converter 204 Converting a Value 204 Using Alarm 205 Setting an Alarm 205 Setting a Wake up Call 206 Cancelling Alarm Settings 207 Using World Clock 208 Viewing World ...

Страница 7: ...tions 225 Conducting IR HotSync Operations 227 Preparing Your Computer for Infrared Communication 227 Performing an IR HotSync operation 229 Conducting Modem HotSync Operations 231 Preparing Your Computer for a Modem HotSync Operation 231 Preparing Your PDA Phone for a Modem HotSync Operation 233 Selecting the Conduits for a Modem HotSync Operation 235 Performing a Modem HotSync Operation 236 Cond...

Страница 8: ...nces 252 Phone Lock 252 SIM PIN Lock 254 Privacy 255 Network Service Preferences 257 Call Forwarding 257 Call Barring 258 Call Waiting 259 Caller ID 260 Active Line 260 Network Selection 261 Connectivity Preferences 262 Network 262 Connection 274 Beam 276 General Preferences 277 Button 277 Date Time 278 Digitizer 279 Owner 279 Formats 280 Graffiti 2 281 Graffiti AnyWhere 281 Shortcuts 282 ...

Страница 9: ...3 Tapping and Writing Problems 294 Application Problems 295 Appendix B Other Information Access Codes 298 Phone Password 298 PIN 298 PUK 299 PIN2 299 PUK2 300 Barring Password 300 Health and Safety Information 301 SAR Certification Information 301 Precautions When Using Batteries 302 Road Safety 304 Operating Environment 304 Electronic Devices 305 Potentially Explosive Environments 307 Emergency C...

Страница 10: ...e Using them in an aircraft is both illegal and dangerous Switching Off in Hospitals Switch off your PDA phone near medical equipment Follow any regulations or rules in force Interference All wireless phones may be subject to interference which could affect their performance Special Regulations Meet any special regulations in force in any area and always switch off your PDA phone whenever it is fo...

Страница 11: ...Your PDA phone is not water resistant Keep it dry Accessories and Batteries Use only Samsung approved accessories and batteries Use of any unauthorised accessories could damage your PDA phone and may be dangerous Qualified Service Only qualified service personnel may install or repair your PDA phone Failure to do so may invalidate the warranty For more detailed safety information see Health and Sa...

Страница 12: ...ge technologies giving you the convenience of a digital phone and an electronic organiser in a single handset This chapter includes What s in the Box Getting to Know Your PDA Phone Using a Battery Using a SIM Card Performing the First Setup Adding an Expansion Card Using Palm Desktop Software Using the Straight Headset ...

Страница 13: ...ountry In addition you can obtain the following accessories for your PDA phone from your local Samsung dealer Handset Batteries Travel Charger Desktop Holder USB Cable Straight Headset PC Install CD Quick Reference Guide Stylus Pens Finger Strap Travel charger Desktop holder Standard battery Extended battery Straight headset Car charger ...

Страница 14: ...folder open Microphone Home Left soft button DDM Drop Down Menu Right soft button Talk button Clear button Scroll buttons Number keypad End button Reset button Application buttons Earpiece OK button Charging communication port Tool icons panel Main display ...

Страница 15: ...hone 16 With the folder closed Side View Front display Camera Service light Camera flash Volume buttons Infrared port Headset jack Right Left Camera button Home Phone switch Camere flash On Off button Expansion card slot Stylus ...

Страница 16: ... Phone 17 Rear View Desktop Holder Battery Antenna Battery lock Speaker Stylus Travel Charger jack Data connector Battery compartment USB cable jack Phone charge indicator Battery charge indicator HotSync button Phone support ...

Страница 17: ...l Samsung dealer for further details Installing the Battery 1 Place the battery on the back of your PDA phone 2 Slide the battery upwards until it clicks into place The PDA phone automatically turns on Note If your built in backup battery is charged the PDA phone does not turn on automatically Press the key to turn your PDA phone on ...

Страница 18: ...rge the main battery for the first time the backup battery will also charge It takes about 48 hours to fully charge the backup battery When fully charged it will maintain stored data for 1 hour If the main battery is removed from the PDA phone for more than 1 hour you ll lose any data stored in the PDA phone s memory Make sure that you perform a backing up your data referring to page 211 or HotSyn...

Страница 19: ...o charge the battery and synchronise your PDA phone to your computer For additional information about synchronising the PDA phone see page 216 1 Plug the connector of the travel charger into the jack at the rear end of the desktop holder 2 Plug the travel charger into the AC wall outlet The indicators on the desktop holder blink Battery charge indicator Phone charge indicator ...

Страница 20: ... entire phone with the battery attached into the desktop holder bottom first so the data connector is inserted Then push the PDA phone backwards into the frame until you hear a click Slide a single battery not attached to the PDA phone into the compartment of the desktop holder first insert the bottom of the battery under the tab of the Base Frame 2 2 1 ...

Страница 21: ...f the battery being charged Red the battery is charging Green the battery is fully charged Orange the battery or phone is not seated correctly on the desktop holder or the travel charger is not plugged in correctly Check the battery or phone and the charger 6 When the indicator turns to green remove the PDA phone or battery from the holder To remove the PDA Phone charge indicator Battery charge in...

Страница 22: ...ift it up 7 Unplug the travel charger from the power outlet and disconnect it from the desktop holder by pressing the PUSH button on the connector and pulling the connector out Using the Travel Charger 1 Plug the connector of the travel charger into the bottom of the PDA phone 1 1 2 ...

Страница 23: ...n the PDA phone is completely charged Orange the PDA phone is not seated correctly in the connector of the travel charger or the travel charger is not plugged in correctly Check the PDA phone and the charger 3 When charging is finished and the indicator on the charger changes to green unplug the charger from the power outlet and disconnect it from the PDA phone by pressing the PUSH button on the c...

Страница 24: ...ture SIM cards out of the reach of small children The SIM card and its contacts can be easily damaged by scratches or bending so be careful when handling inserting or removing the card Inserting the SIM Card 1 If necessary remove the battery by referring to page 19 2 Insert and slide the SIM card under the two tabs as shown ensuring that the gold coloured metal contacts of the card face down into ...

Страница 25: ...Using a SIM Card 26 Removing the SIM Card To remove the SIM card slide the card out of the holder as shown ...

Страница 26: ...tylus by pulling the handle 3 Hold the stylus as you would a pen or pencil and follow the onscreen instructions to set up the screen Note For your phone data safety charge your battery at least 48 hours when you charge the battery for the first time For more detailed information see page 19 When the PDA phone is reset the first setup screen appears If you want to perform the first setup while usin...

Страница 27: ...e first time on your SGH i530 you need to format this expansion card on the SGH i530 For formating information refer to page 214 Formatting the expansion card will create a recognisable folder at SGH i530 titled PALM Launcher If you insert an expansion card formated on a PC you will see the message of asking reformat on the SGH i530 This is because the current expansion card does not have recognis...

Страница 28: ...em sound provided that the system sound is turned on See page 249 for information about turning the system sound on and off 2 Slide the card out of the expansion card slot For complete information about working with the expansion card see page 41 IMPORTANT You can damage the expansion card slot if you pull the card out of the slot before you hear the system sound ...

Страница 29: ...ling Palm Desktop Software System Requirements To install and operate Palm Desktop software your computer system must meet the following requirements Windows 98 NT 4 0 2000 Pro Me XP Home or Pro 50 MB or more hard disk space Internet Explorer 4 01 with SP2 or later Available USB port To install Palm Desktop software 1 Insert the Desktop software CD ROM supplied in your package into your computer s...

Страница 30: ...trol Panel 2 Double click the Add or Remove Programs icon 3 Click Change or Remove Programs on the left pane of the window 4 Select Palm Desktop and then click Remove 5 Click Yes in the Confirm File Deletion dialogue box 6 Click Close IMPORTANT When you remove Palm Desktop software you also remove the HotSync Manager synchronisation software and can no longer synchronise with your computer If you ...

Страница 31: ...dset jack cover and connect the straight headset to the jack at the left side of the PDA phone When you connect the straight headset to the jack the button on the straight headset works as listed below To redial the last call press the button twice in the Phone s idle screen To answer a call press and hold the button when you receive the call To end a call press and hold the button when you finish...

Страница 32: ...pter provides you with basic information for using your PDA phone the various buttons and how to work with the applications This chapter includes Knowing Your PDA Phone s Buttons and Icons Tapping and Typing Working with Applications ...

Страница 33: ... the buttons Phonebook Date Book Browser and Messaging See page 277 for reassigning these buttons to activate any application Home button Left soft button Switch to the Application Launcher in an application Allow you to view the applications by category in the Application Launcher Performs the functions indicated by the text above it on the bottom line of the display in the Phone application Drop...

Страница 34: ... Talk button Makes or answers a call Retrieves the last numbers dialled or received in the Phone s Standby mode Clear button Deletes the character to the left from the display Deletes all of the characters when held down End button Switches to the Phone application in any application Ends the call in the Phone application Turns the phone on or off when held down Alphanumeric buttons Enter numbers ...

Страница 35: ...ra application and switches to Preview mode when held down Works as a camera shutter in Preview mode Icon Description Home icon Opens the Application Launcher Allows you to view the applications by category when tapped repeatedly Menu icon Opens closes the drop down menu list in an application Find icon Allows you to find specific text in records or notes Graffiti icon Allows you to use the Graffi...

Страница 36: ... when a new message has been received The following indicators are available depending on the message type MMS message Voice mail or may appear if your SIM card supports Alternate Line Service SMS message Appears when you set incoming calls to be diverted to another destination When your SIM card supports ALS Alternate Line Service it may appear with the number of the current line such as and Appe...

Страница 37: ...Appears when you are in the Home zone if your service provider supports it Appears when you are in the Office zone if your service provider supports it Appears to tell you the current text input mode The following indicators are available depending on the input mode T9 mode ABC mode Number mode Appears when you set the phone to vibrate at an incoming call Appears when Quiet mode is active Shows th...

Страница 38: ...want to perform For details about calibration see page 209 You can tap the PDA phone screen to perform many operations such as the following Open applications Select menu commands Select options in dialogue boxes Enter text on the onscreen keyboards Scroll on list screens Move the cursor in text input fields Just as you can drag the mouse to select text or move objects on your computer you can dra...

Страница 39: ...cher Using the Application Launcher you can view and open all of the applications installed on your PDA phone Note Each time you press the left soft button or tap the Menu icon in the Application Launcher you can display applications by category Tap to view the applications in a specific category Scroll bar Current time Tap to open the drop down menu list ...

Страница 40: ...ou can assign your favorite applications to the buttons See page 277 Running Expansion Card Applications When an expansion card is properly seated in the expansion card slot your PDA phone responds based on the contents of the card and the application that is active when you insert the card In some cases the application on the card opens automatically upon insertion or if you insert a card contain...

Страница 41: ...he Home icon press the left soft button or press the application buttons on your PDA phone to switch to another application your PDA phone automatically saves your work in the current application and displays it when you return to that application Elements of the Applications Screen Previous next arrows Check box Scroll bar Pick list Menu bar Command button Menu bar Use the menu bar to access a se...

Страница 42: ...nactive Command buttons Tap a button to perform the corresponding command Command buttons appear at the bottom of dialogue boxes and application screens Previous next arrows Tap the left and right arrows to display the previous record or the next record tap the up and down arrows to display the previous page of information or the next page of information Pick list Tap the arrow to display a list o...

Страница 43: ...can assign applications to the expansion card but you cannot further categorise applications that reside on an expansion card To categorise an application 1 In the Application Launcher tap the Menu icon to open the drop down menu list 2 Tap Category on the App menu 3 Tap the pick list next to each application to select a category Note To create a new category tap Edit Categories from the pick list...

Страница 44: ...her To change the Applications Launcher display to List View 1 In the Application Launcher tap the Menu icon to open the drop down menu list 2 Tap Options and then tap Preferences 3 Tap the View By pick list and select List 4 Tap OK To open the Applications Launcher to the last opened category 1 In the Application Launcher tap the Menu icon to open the drop down menu list 2 Tap Options and then ta...

Страница 45: ...d or from an expansion card to your PDA phone To copy an application to an expansion card 1 In the Application Launcher tap the Menu icon to open the drop down menu list 2 Tap Copy on the App menu 3 Tap the Copy To pick list and select the card name 4 Tap the From pick list and select Handheld 5 Tap an application to copy 6 Tap Copy 7 Tap Done ...

Страница 46: ...ay differ from those displayed in the Applications Launcher To copy an application from an expansion card 1 In the Application Launcher tap the Menu icon to open the drop down menu list 2 Tap Copy on the App menu 3 Tap the Copy To pick list and select Handheld 4 Tap the From pick list and select the card name 5 Tap the application you want to copy 6 Tap Copy 7 Tap Done You can also beam applicatio...

Страница 47: ...r that discusses that application To open a menu bar 1 Open an application such as Memo Pad 2 Tap a record to access it 3 Do one of the following Tap the Menu icon on the Tool Icons Panel Press the Menu button Tap the blue title area at the top of the screen In this example three menus are available Record Edit and Options The selected Record menu contains the commands New Memo Delete Memo and Bea...

Страница 48: ...n 2 Tap the menu that contains the command you want to use 3 Tap the command you want to use Graffiti 2 Menu Commands Most menu commands have an equivalent Graffiti 2 Command stroke which is similar to the keyboard shortcuts used to execute commands on computers The command letters appear to the right of the command names For details about enabling Graffiti 2 see page 76 When you tap the Graffiti ...

Страница 49: ...r an appropriate command in the Graffiti 2 area For example to select Paste from the Edit menu draw the Command stroke followed by the letter p Command mode is active only for a short time so you must tap an icon or write the command letter immediately to select the menu command Performing Common Tasks The tasks described in this section use the term records to refer to an individual item in any o...

Страница 50: ...u is available on any screen where you enter or edit text In general commands available in the Edit menu apply to text that you select in an application To select text in an application 1 Tap the beginning of the text that you want to select 2 Drag the stylus pen over the text to highlight it in yellow 3 Tap the Menu icon to open the drop down menu list 4 Tap Edit The following commands may appear...

Страница 51: ... not previously cut or copy text Paste does nothing Select All Selects all of the text in the current record or screen This enables you to cut or copy all of the text and paste it elsewhere Keyboard Opens the onscreen keyboard After you finish with the onscreen keyboard tap Done For details see page 73 Graffiti Help Opens screens that show all the Graffiti 2 character strokes Use this command anyt...

Страница 52: ...cord menu 4 A confirmation dialogue box appears Date Book Tap the pick list and select how old a record must be to be purged Purge deletes repeating events if the last of the series ends before the date that you purge records Date Book To Do List If you want to save a copy of the purged records to an archive file on your computer be sure that the Save archive copy on PC check box is selected If yo...

Страница 53: ... name of the expansion card You cannot further categorise records that reside on an expansion card The expansion card serves as its own category To further categorise records the records must reside on your PDA phone By default your PDA phone includes system defined categories such as All and Unfiled and user defined categories such as Business and Personal You cannot modify the system defined cat...

Страница 54: ...lect the category for the record 6 Tap OK Note In Phonebook and Memo Pad you can select the category name in the upper right corner of the record view screen to assign the item to a different category To display a category of records 1 On the record list tap the category pick list in the upper right corner of the list screen Note In the Date Book Agenda view the pick list is in the upper right cor...

Страница 55: ... only the records assigned to that category To define a new category 1 Tap the category pick list in the upper right corner of the screen or list 2 Select Edit Categories 3 Tap New 4 Enter the name of the new category and then tap OK 5 Tap OK You can assign any of your records to the new category ...

Страница 56: ... locate any text that you specify in Phonebook DateBook Memo Pad and To Do List To find text 1 Tap the Find icon on the front side of your PDA phone Tip If you select text in an application before tapping the icon the selected text automatically appears in the Find dialogue box 2 Enter the text that you want to find The Find feature is not case sensitive For example searching for the name davidson...

Страница 57: ...want to review Sorting Lists of Records You can sort lists of records in various ways depending on the application Sorting is available in applications that have list screens Phonebook To Do List Memo Pad and Camera Note You can also assign records to categories See Categorising Records on page 54 To sort records in To Do List 1 Open the application to display the list screen 2 Tap Show 3 Tap the ...

Страница 58: ...ap the Sort by pick list and select the option you want Camera Tap the option you want 6 Tap OK To sort the Memo list manually tap and drag a note or memo to a new location on the list Choosing Fonts In many applications you can change the font style to make the text easier to read You can choose from small small bold large or large bold fonts in each application To change the font style 1 Open an...

Страница 59: ...ad you can change the font size To change the font size 1 Open an application 2 In Memo Pad tap New 3 Tap the Menu icon to open the drop down menu list 4 Select Options and then Magnifier 5 Tap the font size you want to use from the pick list 6 Tap OK Receiving Reminders When you use certain application settings your PDA phone can alert you to an appointment set in Date Book ...

Страница 60: ...se the reminder list and return to the current screen An attention indicator will blink in the upper left corner of the screen tap it to view the alert list again Tap Snooze to see the list again in five minutes If you tap Done or Snooze and view the reminder list later the current time appears in the Reminder bar and the original alert time appears with each list item Tap Clear All to dismiss all...

Страница 61: ...h an IR Infrared port that is located at the left side of the PDA phone behind the small dark shield The IR port supports the IrCOMM implementation of the standards for infrared communication established by the Infrared Data Association IrDA This means that you can beam data to any nearby device that supports the IrCOMM implementation of the IrDA standards and that can read the type of data you re...

Страница 62: ...xchange with business contacts An application installed in the RAM memory An application installed on an expansion card that is seated in the card slot Beaming Tips You can draw the Graffiti 2 command stroke to activate the Command toolbar and then tap the Beam icon You can use the Graffiti 2 command stroke B to beam the current entry Sending Data This section explains how to send an application i...

Страница 63: ...e Beam dialogue box appears point the IR port directly at the IR port of the receiving device For best results the Palm PDA phone should be between 10 centimeters approximately 4 inches and 1 meter approximately 39 inches apart and the path between the two PDA phones must be clear of obstacles The beaming distance to other devices may be different 8 Wait for the Beam dialogue box to indicate that ...

Страница 64: ...formation You can also create a new category or leave the information unfiled 3 Tap OK or Yes Using HotSync HotSync Technology enables you to install add on applications and to synchronise data between one or more Palm OS PDA phones and PalmTM Desktop software To synchronise data you must connect your PDA phone and your computer either directly or indirectly Direct methods include placing your PDA...

Страница 65: ...nd extensions that have been installed you cannot remove the applications that reside in the ROM portion of your PDA phone To remove an add on application 1 On the Application Launcher tap the Menu icon to open the drop down menu list 2 Select Delete from the App menu 3 Tap the Delete From pick list and select either Handheld or Card If you want to delete applications from a card the card must be ...

Страница 66: ...67 Chapter 3 Entering Text This chapter explains several ways to enter data on your PDA phone and it covers the following topics Using the Keypad Using the Onscreen Keyboard Using Graffiti 2 ...

Страница 67: ...modes T9 mode ABC mode Symbolic mode Number mode To change the text input mode 1 On the text input field press and hold the button 2 Select a mode from the Input mode pick list 3 Tap Done The text input mode indicator appears on the top line of the display Mode Indicator See T9 mode page 69 ABC mode page 71 Symbolic mode no indicator page 72 Number mode page 72 ...

Страница 68: ...nter Hello in T9 mode press the 4 3 5 5 and 6 buttons The word that you are typing appears on the display It may change with each key that you press 2 Enter the whole word before editing or deleting the keystrokes 3 When the word displays correctly go to step 4 If not press the 0 button repeatedly to display alternative word choices for the keys that you have pressed Example Both Of and Me use the...

Страница 69: ...To include a number Press and hold the corresponding number button You can also quickly switch to Number mode by pressing and holding the button Adding Words for T9 Mode You can add a new word to the T9 dictionary Once you have added a word it becomes the first choice for the corresponding keypress To add a word into the T9 dictionary 1 Press and hold the button 2 Tap Add word 3 Enter a word using...

Страница 70: ...ect the other letters in the same way The cursor moves to the right when you press a different button When entering the same letter twice or a different letter on the same button just wait for more than two seconds or press the right scroll button and then select the next letter 3 Press the button to insert a space between words To change the letter case Press the button Three cases are available ...

Страница 71: ...When you select Symbolic mode a Symbol list displays To enter a symbol 1 Press the number button corresponding to the symbol you want to enter You can display more symbols by tapping the up and down arrows on the right side of the symbol list 2 To exit press the OK button or tap Done Number Mode This mode allows you to enter numbers Press the corresponding number button ...

Страница 72: ... makes it easy to switch between these two methods of entering data To use the onscreen keyboard 1 Open any application such as Memo Pad 2 Tap New 3 When the cursor is in the text input field choose one of the following options Tap the Keyboard icon from the Tool Icons Panel Tap the Menu icon to open the drop down menu Tap Edit and then tap Keyboard 4 Tap the characters to enter text ...

Страница 73: ... other keyboards including the international keyboard 5 After you finish tap Done to close the onscreen keyboard and place the text in the record Caps shift Tap to display the alphabetic keyboard Tap to display the numeric keyboard Tap to display the international keyboard Backspace Carriage return Tab Caps lock ...

Страница 74: ...nes For example some characters are formed using a single stroke while others are formed with more than one stroke When Graffiti 2 is enabled the LCD screen of your PDA phone works as the Graffiti 2 area There are four basic concepts for success with Graffiti 2 If you draw the character shape exactly as shown in the tables later in this chapter like the shapes shown in the following diagram you ca...

Страница 75: ... an i or a k or until a limited time window expires Similarly recognition of a space symbol a horizontal stroke from left to right or a period symbol after a down stroke is dependent upon where the down stroke was drawn The Graffiti 2 area is divided into two parts the left side for writing lowercase letters and the right side for writing numbers Capital letters are formed across the imaginary lin...

Страница 76: ...the text 2 Use the tables on the following pages to find the strokes for the letter you want to create For example the stroke shown below creates the letter n 3 Position the stylus on the Graffiti 2 area 4 Start your stroke at the heavy dot and draw the stroke shape as it appears in the tables 5 Lift the stylus from the screen at the end of the stroke shape When you lift the stylus from the screen...

Страница 77: ...at nearly fill the Graffiti 2 area Write at natural speed Writing too slowly can generate recognition errors Press firmly and do not write on a slant Vertical strokes should be parallel to the sides of the Graffiti 2 area Alternate strokes are available for some characters You can use the Graffiti 2 Preferences screen to choose the one that s easiest for you See Graffiti 2 on page 281 for details ...

Страница 78: ...i 2 79 Graffiti 2 Alphabet The Graffiti 2 alphabet consists of the following letters Draw letters on the LEFT side of Graffiti 2 area Letter Strokes Letter Strokes a b c d e f g h i j k l m n o p q r s t u v w x y z ...

Страница 79: ...division line in the middle of the Graffiti 2 area Graffiti 2 Numbers Writing numbers with Graffiti 2 is similar to writing letters of the alphabet except that you make the character strokes on the right side numbers side of the Graffiti 2 area Draw numbers on the RIGHT side of Graffiti 2 area Number Strokes Number Strokes 0 1 2 3 4 5 6 7 8 9 ...

Страница 80: ...the Graffiti 2 area You must write other punctuation marks on the designated side of the Graffiti 2 area Punctuation marks that appear in the following table must be written on the left letter side of the Graffiti 2 area Draw these marks on the LEFT side of Graffiti 2 area Mark Stroke Mark Stroke Period Ampersand Comma Carriage return Apostrophe At Space Straight quotes Question Tab Exclamation ...

Страница 81: ...tters with accent marks first write the letter stroke on the left side or in the centre for upper case letters of the Graffiti 2 area Then quickly write the accent stroke on the right side of the Graffiti 2 area Draw these marks on the RIGHT side of Graffiti 2 area Mark Stroke Mark Stroke Period Backslash Comma Slash Tilde Left Paren Dash Right Paren Plus Equal Asterisk ...

Страница 82: ...es you can write the following accented letters à á â ã ä å è é ê ë ì í î ï ò ó ô õ ö ù ú û ü ÿ ý ñ Symbols and Other Special Characters You can write symbols and other special characters using the Shift stroke Note You can also use the Shift stroke to write punctuation marks Draw accents on the RIGHT side of Graffiti 2 area Accent Stroke Accent Stroke Acute á Dieresis ä Grave à Circumflex â Tilde...

Страница 83: ...identally activate Shift a backspace will cancel it 2 Write the symbol or other special character shown in the table that follows You can make a symbol stroke anywhere in the Graffiti 2 area 3 If necessary enter an additional Shift stroke to finish writing the character and to make the character appear more quickly After the arrow disappears the symbol appears Shift Shift indicator ...

Страница 84: ...fiti 2 area Graffiti 2 Gestures Gestures enable you to use editing commands To use gestures draw the following strokes on the left side letter of the Graffiti 2 area Draw gestures on LEFT side of Graffiti 2 area Gesture Stroke Gesture Stroke Cut Paste Copy Undo ...

Страница 85: ...5 characters For example you might create a ShortCut for your name or for the header of a memo See Shortcuts on page 282 to learn about creating ShortCuts To use a ShortCut draw the ShortCut stroke followed by the ShortCut characters The ShortCut symbol appears at the insertion point to show that you are in ShortCut mode Your PDA phone includes the predefined Graffiti 2 ShortCuts shown in the foll...

Страница 86: ...speed dialling and using the call records list This chapter explains how to use your PDA as an integrated phone Switching on or off the Phone Opening the Phone Application Making a Call Answering a Call Quickly Switching to Quiet Mode Options During a Call Speed Dialling Using Call Records ...

Страница 87: ... the phone on Press and hold the button until the power on image displays The phone locates a signal and then enters Standby mode the phone s idle state Now you re ready to begin making and receiving calls Opening the Phone Application When you turn the phone on the display shows the Phone s idle screen by default To open the Phone s idle screen from any other screen You can choose from the follow...

Страница 88: ...ote To adjust the volume level during a call press the Volume button on the left side of your PDA phone 3 When you want to end your call press the button or close the phone Correcting the Number When you make a mistake while entering a number you can correct the number by using the C button To clear Press the the last digit displayed C button any other digit in the number left or right scroll butt...

Страница 89: ...mber For further details see page 109 Redialling the Last Number Your PDA phone stores the most recent numbers you have dialled received or missed if the caller is identified To view the list of the most recent calls press the button in Standby mode For details see page 102 Making a Call from Phonebook You can store phone numbers that you use regularly in a SIM card or the phone s memory using the...

Страница 90: ...s see page 99 Making an International Call To make an international call 1 Press and hold the 0 button The sign appears 2 Enter the country code area code and phone number and press the button Making an Emergency Call You can make an emergency call even if your PDA phone is locked or has no SIM card To make an emergency call 1 Press the SOS soft button 2 Tap Yes when a confirmation message appears...

Страница 91: ... 1 Enter the phone number you want to dial such as a bank s teleservice phone number 2 Press and hold the button to insert a pause The display shows a P indicating a pause 3 Enter a number to be sent after the pause such as your account number PIN and etc 4 Repeat steps 2 and 3 to add more pauses and numbers if necessary 5 Press the button to make a call 6 After connecting wait for a prompt from t...

Страница 92: ... or Accept soft button to answer the call When the Anykey Answer option in the Call Setting Preferences is set to Any Key you can press any button except for the button or the Reject soft button When the option is set to Flip Open you can answer a call by opening the phone See page 251 3 To end the call press the button or close the phone To reject the call Press one of the button the Reject soft ...

Страница 93: ...a call is missed To see the last caller s number press the button to move to the call log list you will see the last caller s number and name if stored in your Phonebook If you want to dial the displayed number immediately press the button To view the list of the missed calls press the Missed soft button If you press any other button the missed call notification screen disappears You can view the ...

Страница 94: ...vated appears The Quiet mode indicator no longer displays Note wake up call alarm sound and camere shutter sound are not eliminated by selecting Quiet mode You can change how Quiet mode works either to vibrate the phone or to mute all phone sounds See page 249 Options During a Call Your PDA phone provides a number of control functions that you can use during a call Putting a Call on Hold You can p...

Страница 95: ...t call on hold by pressing the Hold soft button 2 Make the second call in the normal way Or just press the number you want to dial on the current call and press the button Your current call turns to hold automatically and you can make the second call To answer a waiting call When you hear a call waiting tone press the button The first call is automatically put on hold When you have an active call ...

Страница 96: ...ake part in a conference call For more information about this service contact your service provider Drop active call shown when you have an active call and a call on hold ends the active call Drop held call shown when you have an active call and a call on hold ends the call on hold Drop shown when you have a multi party call allows you to drop the participant s you select during a multi party call...

Страница 97: ...ws you to press keys without hearing annoying key tones during a call The Key Mute mode indicator appears on the top of the screen Key unmute turns the key tones on To communicate with answering machines or computerised telephone systems this option must be selected Phonebook search for a number in Phonebook during a call For details about using the Phonebook application see page 137 Send message ...

Страница 98: ... entries or entering new names and numbers Note Speed Dial location 1 is reserved for your voice mail server number Assigning Speed Dial Numbers 1 On the Phone s idle screen tap PhoneMenu and then Calls Tap Speed Dial from the Calls screen On the Application Launcher you can tap the Speed Dial icon The Speed Dial screen appears showing the currently registered speed dial entries if any ...

Страница 99: ...e icon next to the default number and select the number you want to assign from the pick list Tap the name under which the number you want is stored 5 When the confirmation message appears tap OK The number is now stored in the Speed Dial list Note To change a name or phone number which is assigned to a Speed Dial number tap the entry and then tap Add Then change the name or phone number See steps...

Страница 100: ...ress and hold the corresponding number button The display confirms that the number is being dialled when it shows Dialing Deleting the Speed Dial List You can delete entries from the Speed Dial list 1 On the Speed Dial screen tap the entry you want to delete 2 Tap Delete 3 Tap OK to confirm the deletion ...

Страница 101: ...ich contains call records in all of the three call types On the Phone s Standby mode tap PhoneMenu and then tap Calls Select a call record type Dialled Received or Missed On the Application Launcher tap the CallRecord icon The screen shows the calls you have dialled received or missed including the time and date when the call was made or received The last call is saved in the first position 2 If n...

Страница 102: ...e information about a specific entry in the selected call record list 1 On the Call Record list tap the entry you want to view 2 Tap Details from the pick list Detailed information about the selected entry displays such as the name if stored in Phonebook phone number time and date when the call was received or made and call duration 3 Tap Done Saving a Number in Phonebook You can save a number fro...

Страница 103: ...all Record list tap the entry you want to save 2 Tap Save in Phone from the pick list 3 Enter any other information that you want to include in this entry 4 See page 138 to complete saving the number Deleting Call Records The phone automatically deletes the oldest calls from the list to make room for newer calls However you may want to delete a number from the call records list immediately To dele...

Страница 104: ...me On the Call Record list tap the Menu icon to open the drop down menu list and then tap Call time Tap the option you want You can also tap PhoneMenu from the Phone s Standby mode Tap Calls and then Calls Time The following options are available Total sent shows the total duration of the dialled calls Total received shows the total duration of the received calls Last call time shows the call time...

Страница 105: ...xceeds the maximum cost set in the Set max cost option you can no longer make any calls until you reset the counter Max call cost maximum cost set in the Set max cost option See page 106 Reset counters option used to reset the cost counter You must first enter your PIN2 and then press the OK soft key Set max cost option used to enter the maximum cost that you authorise for your calls You must firs...

Страница 106: ...lows you to send instant messages to your friends family or business associates Your PDA phone also makes connecting to the Internet fast and easy You can connect to your favorite websites any time you want by using the Browser application This chapter includes Using Messaging Using Browser ...

Страница 107: ...ssages Create image files by drawing them yourself Manage the images or sounds from received messages Access the Voice mail server Read cell broadcast messages from the network To open Messaging On the Application Launcher tap the Messaging icon The startup screen of the Messaging application opens and displays the available menus Allows you to write a new message Allows you to access media boxes ...

Страница 108: ...up to 1500 characters You can create MMS messages of up to 8 pages 1 Tap Write from the startup screen of the Messaging application An empty message screen opens 2 Enter the message text 3 When you are finished tap 4 When the message box confirming if you want to send it as an SMS message appears tap Yes Goes back to the previous screen Continues the next step to send the message Adds a new page D...

Страница 109: ... additional information about creating an image see page 119 4 Tap the image you want to add and select Accept from the pick list The image is added to the message and the display returns to the message screen 5 To add a sound tap The Tunes box opens and displays the list of audio files Goes back to the previous screen Continues the next step to send the message Adds a new page Deletes the current...

Страница 110: ...er the destination phone number or e mail address in the To field You can add numbers or addresses in the CC and BCC fields 9 Enter a subject for your message 10 When you are finished tap The message is sent Allows you to change the message settings Saves the message in the Draft box Allows you to change the MMS profile settings Shows the message as displayed on the recipient s phone Sends the mes...

Страница 111: ...messages To access a message box Tap Message Box from the startup screen of the Messaging application The Inbox opens by default Moves a message to another message box Deletes all of the messages in the current message box Changes the sorting order of the message list Selects Unselects a message Selects Unselects all of the messages Allows you to select the message type you want to view ...

Страница 112: ...cating the MMS message with the normal priority has been read indicating the SMS message stored in the phone has been read indicating the SMS message stored in the SIM card has been read indicating the SMS message stored in the SIM card has not been read indicating the SMS message stored in the phone has not been read indicating the SMS message is incomplete Outbox message status indicating the MM...

Страница 113: ... the Draft box for sending later To read a message 1 Select the message box you want to access from the pick list 2 Tap the message you want to read from the message list The message screen displays If you are viewing a message from the Draft box the message screen in Edit mode appears so that you can change the message contents and then send it Tap to send a reply to the sender Tap to call the se...

Страница 114: ...es The message moves to the MyFolder box Deleting Messages You can delete messages at any time to free up memory space To delete a message 1 Tap the check box on the left of the message you want to delete 2 Tap the Menu icon to open the drop down menu list 3 Tap Delete from the Message menu 4 When a confirmation message appears tap Yes To delete all of the messages in a message box 1 Select a mess...

Страница 115: ... Media Box from the startup screen of the Messaging application The Image box opens by default Reviewing Images When you open the Image box thumbnails of existing images appear Selects the current image and allows you to write a new message Opens ImageMaker See page 119 Displays the current image on the full screen Displays the properties of the current image Deletes the current image Allows you t...

Страница 116: ...s the image on the full screen You can also tap It will be replaced by to let you return to Thumbnail mode Set as wallpaper uses the image as the wallpaper Delete deletes the image Properties displays the properties of the image Note You can take a new photo or import a photo from the Camera application to send it in a new message Tap the Menu icon and tap Tools and then Capture New or Photo ...

Страница 117: ...u write a new message Play plays the sound Set as ringtone uses the sound as the ring tone Delete deletes the sound Properties displays the properties of the sound Note You can record a new voice memo or import a voice memo from the Voice Memo application to send it in a new message Tap the Menu icon and tap Tool and then Record New or Voice Selects the current sound and allows you to write a new ...

Страница 118: ...ols by tapping on the top right of the screen Opens the Image box Saves the image you drew Opens the drawing tools pick list Opens the drop down menu list Undoes your previous action Cancels your undo Allows you to select the line width Opens the drawing tools pick list Draws an object rectangle Draws a solid oval Opens the colour picker Draws a solid rectangle Draws a straight line Draws a freeha...

Страница 119: ...m the Messaging application 1 Tap Voice Mail from the startup screen of the Messaging application 2 Tap Connect 3 Follow instructions from the server to check your voice mails To access the voice mail server from the Phone application Press and hold the 1 button and follow the instructions from the server Reading Broadcast Messages Your PDA phone can receive text messages on various topics such as...

Страница 120: ...ing application 2 Tap the Menu icon to open the drop down menu list 3 Tap Option and then Channel 4 Select ON from the Receive pick list 5 To add a new channel tap New Enter a channel ID and number and tap OK Repeat this step to add more channels 6 Tap the check box next to the channel you want in order to place or remove a check mark 7 When you finish tap Done Note To move to langage setting menu...

Страница 121: ... later retrieval by tapping Save or delete it from the Temporary box by tapping Delete If you are reading a message from the Archive box Save does not appear 3 Tap Done Changing an MMS Profile Your PDA phone provides you with four preset MMS profiles which are the sets of MMS network parameters required to send or receive MMS messages You can change the active profile to another one or edit the pa...

Страница 122: ...les screen select a profile and tap Edit 2 Change the following options Profile Enter the profile name MMSC URL Enter the URL address of the MMS centre Connect To Select a intermediate to connect to the MMS centre Gateway or Proxy The None option means direct connection IP Address Enter the IP address of the gateway or proxy server Port Enter the port number of the gateway or proxy server Binary E...

Страница 123: ...ows you to enter the number of the SMS centre Validity Period Allows you to select how long your outgoing messages are to be saved in your SMS centre while attempts are made to deliver them Message Type Allows you to select the default message type The network can convert your messages into the selected format Reply Path Allows the recipient of your message to send you a reply message using your S...

Страница 124: ... message data to an expansion card 1 Turn off your phone by press and hold the key 2 From the startup screen of the Messaging application tap the Menu icon to open the drop down menu list 3 Tap Backup and then E Card Backup Note If you do not turn off your phone before performing this backup operation you will see the message asking to turn off your phone 4 Tap Yes to confirm the backup operation ...

Страница 125: ... The restore operation will start If the restore operation is completed you will see the message that this operation is completed and you may turn on your phone To back up your message data to your PC 1 From the startup screen of the Messaging application tap the Menu icon to open the drop down menu list 2 Tap Backup and then Hot Sync Backup 3 Tap Backup button to start the backup setup operation ...

Страница 126: ... contents Quickly access the predefined sites using the icons on the startup screen of the browser Use the URL Wizard to easily enter the URL address of a web page or file and access it Save and use the URL addresses of your favorite web sites Read web messages sent by the web server To open Browser You can choose the following options Press the Browser application button On the Application Launch...

Страница 127: ...eb site display 2 While you are navigating through WAP pages you can use the following options by tapping Tool icons on the bottom of the screen Tap to access the web site after entering a URL Enter a URL address Tap to select a preset URL prefix suffix To Tap go to the previously visited site display the list of your favorites go to the homepage stop loading the current page refresh the current p...

Страница 128: ...t using the URL Wizard This provides you with preset URL address components such as the protocol http domain name prefix www or suffix com and the file name index wml To open the URL Wizard 1 Tap the arrow on the left side of the address input field 2 From the prefix pick up list tap the down arrow 3 Tap More The URL Wizard dialogue box opens 4 Tap the items from the list and complete the URL addr...

Страница 129: ...Tap View and then Properties The Properties dialogue box appears 3 You can view the source code for the current page by tapping Source Using favorites You can store your favorite web sites and then access them easily Categorising them enables you to find them more quickly To add a URL as a favorite 1 Tap the Menu icon 2 Tap Add To Favorites from the Go menu ...

Страница 130: ...e through favorites 1 Tap on the bottom The favorites under the selected category are displayed in the box 2 Select a category from the pick list if necessary and select the site you want 3 Tap Go To delete a favorite 1 In the Favorites screen select a category from the pick list 2 Select the item you want to delete and then tap Delete 3 Tap Yes to confirm the deletion Tap to add a new category Ta...

Страница 131: ...s are displayed by page title or page URL according to your choice 3 To open a page in the history select the URL from the list and tap Go To clear the history tap Clear This clears all entries on the history list Viewing Push Messages You can access your Inbox in the Browser and view messages pushed by the WAP server To view WAP push messages 1 Tap the Menu icon 2 Tap Push Inbox from the View men...

Страница 132: ...cess the URL specified in the message tap Go 6 When you finish tap Done To delete a push message 1 In the Push Inbox tap the message you want to delete 2 Tap Delete 3 Tap Yes to confirm the deletion Viewing Statistics Browser provides statistical information about the data transferred over the web server To view these statistics Tap the Menu icon and select Statistics from the View menu The inform...

Страница 133: ...s To open the Profile dialogue box 1 Tap the Menu icon 2 Tap Settings from the Tools menu 3 Select a setting option either Connect or Cache from the pick list on the bottom right of the screen 4 Change the settings 5 When you finish tap Apply or OK to save the changes Connect Load on Startup Loads the default homepage of the current profile when you open Browser Network Allows you to select a netw...

Страница 134: ...rameters such as homepage URL gateway IP address port connection mode and security Active Profile Shows the profile currently selected Cache Cache Enabled Select to enable the cache which stores information about the web pages accessed for faster downloads You can also set the memory size for the cache Tap Clear to clear the cache ...

Страница 135: ...on Manager This chapter explains how to manage your personal information such as Phonebook schedule tasks you need to do and memos This chapter includes Using Phonebook Using Date Book Using To Do List Using Memo Pad Using Voice Memo ...

Страница 136: ...rs in the Phonebook list for each Phonebook entry Assign Phonebook entries to categories so that you can beam to other devices using the infrared IR port and an application that can read the data To open Phonebook You can choose the following options Press the Phonebook application button Note Press the Phonebook application button repeatedly to cycle through the categories in which you have recor...

Страница 137: ... your next HotSync operation PalmTM Desktop software also has data import capabilities so that you can load database files into Phonebook on your PDA phone See the PalmTM Desktop online help for more information To create a new Phonebook entry in the PDA phone s memory 1 Tap New 2 Tap Phone 3 Enter the last name of the person you want to add to your Phonebook 4 Tap the First Name field and enter t...

Страница 138: ...you finish entering the information tap Done To create a new Phonebook entry in the SIM card 1 Tap New from the Phonebook list screen 2 Tap SIM The screen shows the first available index number You can change the number if necessary 3 Enter a name for the entry 4 Enter the phone number in the Number field 5 Tap Done Note For an entry in the SIM card you cannot use additional features such as Beam ...

Страница 139: ...y Any changes you make apply only to the current entry To select other types of phone numbers in an entry 1 Tap the name of the entry that you want to change 2 Tap Edit 3 Tap the pick list next to the label you want to change 4 Select a new label 5 When you finish tap Done Note You can duplicate a Phonebook entry using Duplicate Address in the Record menu ...

Страница 140: ...ther information appears on the Phonebook list Your options are Mobile Home Work Other and Fax The identifying icons or appear next to the record on the Phonebook list depending on the information displayed You can also select which type of phone number or other information appears by tapping the identifying icon on the Phonebook list Category Allows you to assign the entry to a category Special r...

Страница 141: ...k list tap the name of the entry you want 2 Tap Edit on the Phonebook View screen 3 Tap Note 4 Enter the information and tap Done 5 Tap Done A Note icon appears to the right of the number on the Phonebook list To delete a note 1 On the Phonebook list tap the name of the entry you want 2 Tap Edit on the Phonebook View screen 3 Tap Note 4 Tap Delete 5 Tap Yes to confirm the deletion ...

Страница 142: ... Phonebook View screen 3 Tap any field you want to change 4 When you finish tap Done Making a Call from Phonebook After creating a Phonebook entry you can easily dial a number from the Phonebook list You can choose the following options Tap an entry name and then tap the Phone icon at the far right of the number you want to dial on the Phonebook View screen Tap an entry number select the number yo...

Страница 143: ...irst name matching your input Copying a Phonebook Entry to the SIM Card You can copy Phonebook entries from the PDA phone s memory to the SIM card To copy an entry from Phone to SIM 1 On the Phonebook list tap the number you want to copy 2 If necessary select a number from the list 3 Tap To SIM The screen shows the first available index number and the number to be copied 4 If necessary change the ...

Страница 144: ...pecially designated entry containing information you want to exchange with business contacts You can beam your business card with just one touch A Phonebook entry You can select and beam any entry in your Phonebook For more information about the IR port see page 62 To create your business card 1 On the Phonebook list tap New Create a Phonebook entry containing information you want on your business...

Страница 145: ...rd as your business card on the Phonebook Edit screen 5 Tap Done To beam your business card 1 On the Phonebook list tap the name of your business card entry 2 Tap the Menu icon to open the drop down menu list 3 Tap Beam Business Card from the Record menu ...

Страница 146: ...ebook list tap the name of the entry you want to delete 2 Tap Edit 3 Tap Details 4 Tap Delete from the Contact Entry Details screen 5 Tap OK to confirm the deletion To delete a Phonebook entry in the SIM card 1 On the Phonebook list tap the name of the entry you want to delete 2 Tap the Menu icon to open the drop down menu list 3 Tap Delete Phonebook from the Record menu 4 Tap OK to confirm the de...

Страница 147: ...ields appear in all entries You can use these custom fields to add additional information to your Phonebook records such as names of spouses children or any other details 1 On the Phonebook list tap the Menu icon to open the drop down menu list 2 Tap Rename Custom Fields from the Options menu 3 Tap a field and change the name If necessary repeat this step for the other fields 4 When you finish tap...

Страница 148: ...he drop down menu list 2 Tap Preferences from the Options menu 3 Set the following options Remember Last Category Determines how Phonebook appears when you return from another application If you select this check box Phonebook shows the last category you selected If you deselect it Phonebook displays the All category List By Determines how Phonebook lists the entries 4 When you finish tap OK ...

Страница 149: ... List items for the day Set an alarm to notify you of a scheduled activity Create reminders for events that are based on a particular date rather than on time of day Birthdays and anniversaries are easy to keep track of with your PDA phone Attach notes to individual events to describe or to clarify the entry in your Date Book To open Date Book You can choose the following options Press the Date Bo...

Страница 150: ...easy to find such conflicts You can also schedule events in your Date Book that occur on a particular date but have no specific starting or ending times such as birthdays holidays and anniversaries These are referred to as untimed events Untimed events appear at the top of the list marked with a diamond You can have more than one untimed event on a particular date You can also schedule a repeating...

Страница 151: ...tap the End Time box Choose an ending time from the column Tap All Day to automatically insert the starting and ending time of the event as defined in your Date Book preferences To schedule an untimed event tap No Time so that no starting or ending time is defined for the new event 5 Tap OK 6 Tap a blank area of the screen to deselect the event A vertical line appears next to the time indicating t...

Страница 152: ...ll arrows to move to another week Tap Go To at the bottom of the screen to open the Go to Date dialogue box Today s date is indicated in parentheses Select a date by tapping a year month and day on the calendar 2 After you locate the date follow the steps for scheduling an event for the current day Tap to select a day of the current week Next week Previous week Previous year Next year Tap to selec...

Страница 153: ...ge the time tap the Time box and select a new time 4 To change the date tap the Date box and select a new date 5 Tap OK Setting an Alarm for an Event The Alarm setting enables you to set an alarm for events in your Date Book You can set an alarm to notify you minutes hours or days before an event The default Alarm setting is 5 minutes before the time of the event but you can change this to any num...

Страница 154: ... 99 inclusive as the number of time units 6 Tap OK 7 When the reminder message appears onscreen do one of the following Tap OK to permanently dismiss the reminder and return to the current screen Tap Snooze to dismiss the reminder and return to the current screen An attention indicator blinks on the upper left corner of the screen to remind you of the pending alarm and the reminder message appears...

Страница 155: ...s triggered the reminder list displays the alarm message until you clear it See Receiving Reminders on page 60 for details For example you set an alarm for an untimed event that occurs on February 4 If the alarm is set for 5 minutes the reminder message appears at 11 55PM on February 3 The reminder remains on the reminder list until you turn on your PDA phone and dismiss it Scheduling Repeating or...

Страница 156: ... event To schedule a repeating or continuous event 1 Select the event 2 Tap Details 3 Tap None in the Repeat line to open the Change Repeat dialogue box 4 Tap Day Week Month or Year to set how often the event repeats For a continuous event tap Day 5 On the Every line enter a number that corresponds to how often you want the event to repeat For example if you select Month and enter the number 2 the...

Страница 157: ... OK After you schedule a repeating or continuous event the Repeat icon appears on the far right of the event Changing Repeating or Continuous Events When you make changes to a repeating or continuous event such as deleting adding notes or changing the time of an event you can decide which of the events you want to change all events in the series just the current event or the current and future eve...

Страница 158: ...vent If you change the repeat interval of a repeating event i e from daily to weekly previous occurrences of that event are not changed and your PDA phone creates a new repeating event If you change the occurrence date of a repeating event i e from January 14 to January 15 and apply the change to all occurrences the new date becomes the starting date of the repeating event Your PDA phone adjusts t...

Страница 159: ... a note containing additional information about the event To attach a note 1 On the Day View tap the event you want 2 Tap Details 3 Tap Note on the Event Details dialogue box 4 Enter the information 5 Tap Done A Note icon appears on the far right of the event To delete a note 1 Tap the Note icon on the Day View The note details screen appears 2 Tap Delete 3 Tap Yes to confirm the deletion ...

Страница 160: ...ate view icon at the bottom left corner of Date Book Working in Week View Week View shows the calendar of your events for an entire week You can use this view to quickly review your appointments and available time slots In addition the graphical display helps you spot overlaps and conflicts in your schedule To display the Week View 1 Tap the Week View icon 2 Tap the navigation controls to move for...

Страница 161: ...g the event to a different time or day Tap a blank time on any day to move to that day and select that time for a new event The screen changes to the Day View Tap any day or date that appears at the top of the Week view to move directly to that day without selecting an event Next week Tap for that day Bar indicates earlier event Bar indicates later event A point indicates untimed events Previous w...

Страница 162: ...e Month View screen shows which days have events scheduled You can control the types of events that appear in the Month View See Changing Display Options on page 165 Keep the following points in mind Tap a day in the Month View to display that day in the Day View Tap the scroll arrows in the upper right corner to move one month forward or one month backward Next month Dashes on the bottom indicate...

Страница 163: ... box next to a To Do List item to mark it as completed When you tap a To Do List item your To Do list appears Note Which To Do List items appear and how you can change them depend on the settings in your To Do List preferences See Setting To Do List Preferences on page 173 for more information Tap the navigation controls to move forward or backward one day at a time or to display more events and T...

Страница 164: ...conflicts Compress Day View Controls how times appear in the Day View When this option is deselected all time slots appear When it is on starting and ending times appear for each event but blank time slots toward the bottom of the screen disappear to minimise scrolling Show Timed Events Show Untimed Events Show Daily Repeating Events Applies to the Month View of Date Book You can deselect any or a...

Страница 165: ...ete the text of the event If you used this method to delete one instance of a recurring event all instances of the event are removed Use the Delete command in the Record menu You can choose to delete only one occurrence or all occurrences of the event See page 158 Use the Event Details dialogue box You can choose to delete only one occurrence or all occurrences of the event To delete an event with...

Страница 166: ...fines the start and end times for Date Book screens If the time slots you select do not fit on one screen you can tap the scroll arrows to scroll up and down Alarm Preset Automatically sets an alarm for each new event The silent alarm for untimed events is defined by minutes days or hours before midnight at the beginning of the date of the event Alarm Sound Sets the tone of the alarm Remind Me Def...

Страница 167: ...em in logical groups Sort your To Do List items by due date priority level or category Attach a note to an individual To Do List item to describe or to clarify the task To open To Do List On the Application Launcher tap the To Do List icon Creating a To Do List Item A To Do List item is a reminder of a task that you must complete A record in To Do List is called an item To create a To Do List item...

Страница 168: ... item s priority setting may move its position on the list When you create a new To Do List item its priority is automatically set to level 1 the highest most important level If you select another item first however the item you create appears beneath the selected item and is given the same priority as the selected item To set the priority of a To Do List item 1 Tap the priority number on the left...

Страница 169: ... date that you want to assign to the item Today Assigns the current date Tomorrow Assigns the due date to tomorrow One week later Assigns the due date exactly one week from the current date No Date Removes the due date from the item Choose Date Opens the date selector where you can choose any date you want for the item Private Hides the item when Privacy is enabled 4 When you are finished tap OK A...

Страница 170: ...ogue box 3 Tap Yes to confirm the deletion Checking off a To Do List Item You can check off a To Do List item to indicate that you ve completed it You can set the To Do List to record the date when the To Do List item was completed and you can show or hide the completed items See Setting To Do List Preferences on page 173 To check off a To Do List item Tap the check box on the left side of the ite...

Страница 171: ...the drop down menu list 3 Tap Beam Item from the Record menu To beam all of the items in a specific category 1 On the To Do list tap the pick list in the upper right corner of the display and select the category you want to beam 2 Tap the Menu icon to open the drop down menu list 3 Tap Beam Category from the Record menu Deleting To Do List Items You can delete any To Do List items There are three ...

Страница 172: ...ol the appearance of To Do List and To Do List items in Date Book Agenda view To Change the Preferences settings 1 On the To Do list tap Show 2 Select any of the following settings Sort by Sorts the To Do List items in the specified order Show Completed Items Displays your completed items on the To Do list If you turn off this setting your To Do List items disappear from the list when you complete...

Страница 173: ...s the due date with the actual date of a completed checked item If you do not assign a due date to an item the completion date still records when the item was completed Show Due Dates Displays the due dates associated with items on the To Do list and displays an exclamation mark next to items that remain incomplete after the due date passes Show Priorities Shows the priority setting for each item ...

Страница 174: ...esktop software and HotSync technology Assign memos to categories so that you can organise and view them in logical groups Write down phone numbers and other types of information that you can later copy and paste into other applications To open Memo Pad On the Application Launcher tap the Memo Pad icon Creating a Memo A record in Memo Pad is called a memo After creating memos you can assign them t...

Страница 175: ...Assigns a category to the memo Private Hides the memo when Privacy is enabled 4 Tap OK Reviewing Memos The first line of a memo appears on the Memo list This makes it easy to locate and review your memos To review a memo 1 From the Memo list tap the text of the memo you want to review 2 Review or edit the text in the memo 3 Tap Done ...

Страница 176: ...mo list tap the memo you want to beam 2 Tap the Menu icon to open the drop down menu list 3 Tap Beam Memo from the Record menu 4 Tap Done To beam all of the items in a specific category 1 On the Memo list tap the pick list in the upper right corner of the display and select the category you want to beam 2 Tap the Menu icon to open the drop down menu list 3 Tap Beam Category from the Record menu ...

Страница 177: ...emo from the Memo Pad application Simply delete the text of the memo Use the Delete Memo command in the Record menu Use the Memo Details dialogue box To delete a memo with the Memo Details dialogue box 1 On the Memo list tap the memo you want to delete 2 Tap Details 3 Tap Delete 4 Tap OK to confirm the deletion ...

Страница 178: ...rd a voice memo of up to one minute To record a memo 1 Tap New 2 Tap the Record button to begin recording 3 Make a voice memo by speaking into the microphone The bar above the buttons shows the recording progress The numbers on the right of the bar indicate the elapsed time and the total duration you can record Stops recording Begins recording Shows the recording progress ...

Страница 179: ...creen Viewing or Changing Voice Memos Details Using the Details dialog box you can view details about the memo and change the title You can also hide the memo when Security is enabled To display the Voice Memos Details dialog box 1 On the Voice Memo list tap the voice memo you want 2 Tap Details 3 View or change details 4 When you finish tap OK Tap to change the title Tap to hide the memo when Sec...

Страница 180: ... of the bar indicate the elapsed time and the total recording duration of the memo Beaming Voice Memos Using the infrared IR port you can beam voice memos to other PDA phones or Pam organizers For more information about the IR port see page 62 To beam a voice memo 1 On the Voice Memo list select the memo you want to beam by pressing the Up or Down scroll key Pauses and resumes playing Stops playin...

Страница 181: ...2 Tap Beam V Memos all from the Voice Memo menu Sending a Voice Memo via MMS You can send a voice memo using MMS Multimedia Message Service communication To send a voice memo 1 On the Voice Memo list select the memo you want to beam by pressing the Up or Down scroll key 2 Tap the Menu icon to open the drop down menu list 3 Tap Send Message from the Voice Memo menu 4 Write and send an MMS message r...

Страница 182: ...e voice memos in a category 1 On the Voice Memo list select a category you want to empty from the pick list on the top right of the screen 2 Tap Delete All 3 Tap Ok to confirm the deletion Setting Voice Memos Preferences Using the Preferences dialog box you can choose options related to managing voice memos To display the Preferences dialog box 1 On the Voice Memo list tap the Menu icon to open th...

Страница 183: ...memo within 1 minute by default If you save your voice memo in SD card you can record your voice memo as long as SD card has remaining capacity 4 Tap OK Setting Voice Memos Security Using the security dialog box you can choose options related to securing your voice memos To display the Preferences dialog box 1 On the Voice Memo list tap the Menu icon to open the drop down menu list 2 Tap Security ...

Страница 184: ...185 Chapter 7 Camera This chapter includes Using Camera Taking a Photo Viewing Photos Using Photos Deleting Photos ...

Страница 185: ...ck of your thoughts about a photo by entering memos Exchange photos with other devices that use infrared and MMS communications Use PalmTM Desktop software and HotSync technology to transfer photos to your PDA phone to copy and paste photos into popular computer applications and to send photos as e mail attachments or to other applications To open Camera You can choose the following options Press ...

Страница 186: ...olume button on the lift side of your PDA phone or the navigation Up Down key You can also turn the flash on or off by pressing the Home Phone Switch button on the right side of the PDA phone 3 Press the OK button or Camera button on the right side of the PDA phone 4 Enter a name for the photo and tap Save The photo is saved in the image database on your PDA phone Preview icon Tap to turn the flas...

Страница 187: ...the flash on or off press the Home Phone Switch button on the right side of your PDA phone 3 Press the Camera button to take the photo The photo is saved in the image database on your PDA phone Using the Self Timer You can set the camera to take a picture automatically after a predefined time To set the Self timer 1 In Preview mode tap 2 Tap the Setting up check box and specify the delay time 3 Ta...

Страница 188: ...p the Setting up check and select the number of photos and the tempo 4 Tap Done 5 Press the Camera button or OK button The camera takes shots successively Changing the Camera Settings You can change the picture quality resolution and lighting condition for the current shot These settings will be applied to all subsequent photos that you take 1 In Preview mode tap The Camera Setting dialogue box op...

Страница 189: ...e memory each photo will require WhiteBalance Changes the white balance setting based on the lighting conditions Sound Enables or disables a tone sound when you press the camera shutter Camera button or OK button Quality Specifies the quality of photos Flash Allows you to use the service light on the front of the PDA phone as a flash Frequency Allows you to adjust the frequency of photos by select...

Страница 190: ...he photo name and attach a note to any selected photo Viewing Photos in Review Mode Review mode displays a photo on the full screen To view a photo in Review mode 1 Tap the Review icon at the bottom of the screen The last photo saved in the database displays 2 To scroll through the photos tap the arrows at the bottom left or right corner of the screen Review icon Tap to scroll through the photos M...

Страница 191: ...dit and then tap Rotate 4 Set the following options Rotate Rotate the photo 90 degrees clockwise Select the direction to be rotated Symmetry Flip the photo horizontally or vertically 5 When you finish tap Done Viewing Photos in Thumbnails Mode Thumbnails mode displays miniature versions of your photos so that you can see several photos on the screen at the same time ...

Страница 192: ...ugh the photos tap the arrows at the right scroll bar Viewing a Slide Show A slide show is a sequential presentation of each of the photos in the current album You can change the length of time each photo remains on the screen in the Show Preferences dialogue box Thumbnails icon Memo icon if you attached Tap to view the memo ...

Страница 193: ...ls mode tap the Menu icon to open the drop down menu list 2 Tap Options and then tap Show preference 3 Set the following options Order Select the order of the slide show Forward displays from the first photo to the last Backward displays from the last photo to the first Random displays the photos at random Interval Change the delay interval between photos Auto repetition Select to repeat the slide...

Страница 194: ...ialogue box enables you to view information about a photo and change the photo name assign it to an album and add a note To display the Picture Detail dialogue box 1 In Review or Thumbnails mode select a photo 2 Tap at the bottom of the screen 3 View or change details 4 When you finish tap Done Tap to change the photo name Tap to hide the photo when Privacy is enabled ...

Страница 195: ...een 3 Tap Memo on the Picture Detail dialogue box 4 Enter the information and tap Done 5 Tap Done to close the Picture Detail dialougue box A Memo icon appears on the photo in the view mode Tap the memo icon to view the memo To delete a memo 1 In Review or Thumbnails mode select a photo with a Memo icon 2 Tap 3 Tap Memo 4 Delete the text in the memo and tap Done 5 Tap Done The Memo icon on the pho...

Страница 196: ...logy For more information about the infrared communication see page 62 To beam photos 1 In Review or Thumbnails mode select the photo s you want to beam 2 Tap the Menu icon to open the drop down menu list 3 Tap Send IrDA from the Send to menu Sending a Photo via MMS You can send a photo using MMS Multimedia Message Service communication To send a photo 1 In Review or Thumbnails mode select the pho...

Страница 197: ... Setting a Photo as Wallpaper You can use your photos as the wallpaper background image for the idle screen of the Phone application To set a photo as the wallpaper 1 In Review or Thumbnails mode select a photo 2 Tap the Menu icon to open the drop down menu list 3 Tap Send as wallpaper from the Send to menu 4 Tap OK The photo displays in the Phone s Standby mode ...

Страница 198: ...delete 2 Press at the bottom of the screen 3 Tap OK to confirm the deletion To delete more than one photo 1 In Thumbnails mode tap the photos you want to delete 2 Tap the Menu icon to open the drop down menu list 3 Tap Edit and then Delete 4 Tap OK to confirm the deletion To delete all of the photos 1 In Review or Thumbnails mode tap the Menu icon to open the drop down menu list 2 Tap Edit and the...

Страница 199: ...200 Chapter 8 Extras This chapter includes Using Calculator Using Unit Converter Using Alarm Using World Clock Using Welcome Using Backup Using Card Info ...

Страница 200: ...lues Display the last series of calculations which confirms a series of chain calculations To open Calculator On the Application Launcher tap the Calc icon Performing Calculations The Calculator includes several buttons to help you perform calculations Shows the results of the calculations After inputting the equation tap this button Clears the entire calculation so you can begin a fresh calculati...

Страница 201: ...ber buttons Tapping this button has no effect on the current calculation or series of calculations it merely places the value into memory until it is recalled Recalls the stored value from memory and inserts it into the current calculation Clears any value that is stored in the Calculator memory During a calculation calculates a percentage and allows you to use the resulting value in the equation ...

Страница 202: ...alculations and is particularly useful for confirming chain calculations To display recent calculations 1 On the calculator screen tap the Menu icon to open the drop down menu list 2 Tap Options and then tap Recent Calculations 3 After you finish reviewing the calculations tap OK Divides multiplies subtracts or adds numbers ...

Страница 203: ...cher tap the Unit Conv icon Converting a Value To convert a value into another unit 1 Select a measurement type from the pick list on the top right corner of the screen 2 Select the original unit from the From pick list 3 Tap the Input field and enter the value you want to convert 4 Select the target unit from the To pick list 5 Tap OK to view the result 6 Tap OK ...

Страница 204: ...the Alarm screen tap New 2 Tap Alarm on the top line 3 Enter a name for the alarm setting 4 Select a time for the alarm to ring from the Time field 5 Select On from the Alarm pick list 6 Select a melody for the alarm from the Alarm Type pick list 7 Select a repeating option from the Repeat pick list When you select Custom setting 1 or Custom setting 2 you can select a day of the week 8 Tap Done Th...

Страница 205: ... on the top line 3 Select a time for the wake up call to ring from the Time field 4 Select On from the Alarm pick list 5 Select a melody for the alarm from the Alarm Type pick list 6 Select a repeating option from the Repeat pick list 7 Tap Done The Alarm indicator displays on the top line of the screen and the wake up call setting with the icon is added to the Alarm list When the wake up call rin...

Страница 206: ...2 Select Off from the Alarm pick list 3 Tap Done To delete one alarm setting 1 On the Alarm list tap the alarm setting you want to delete 2 Tap Delete 3 Tap OK to confirm the deletion To delete all of the alarm settings 1 On the Alarm list tap the Menu icon to open the drop down menu list 2 Tap Delete All from the Events menu 3 Tap OK to confirm the deletion This procedure removes the alarm settin...

Страница 207: ...ferent locations in the world To Open World Clock On the Application Launcher tap the World Clock icon Viewing World Clock The world map enables you to check the time and date in 24 cities all over the world To view the clock Tap the arrows at the bottom left of the screen to move the time zone line Tap the arrows Tap to set the time and date For details see page 278 ...

Страница 208: ... PDA phone Use Welcome when you want to ensure accurate stylus entry or change the country time zone time and date settings To open Welcome and perform the first setup 1 On the Application Launcher tap the Welcome icon 2 Perform the first setup by following the onscreen instructions ...

Страница 209: ...your data safety For more detailed information of built in backup battery see page 19 Use Backup to do the following Archive your data in applications as backup files and then store them into your PDA phone s flash memory or SD card Restore the backup files into the original applications Delete all of the backup files Format the PDA phone s flash memory Note If you want to back up your message dat...

Страница 210: ...g up the Data To back up the data in the flash memory 1 On the Backup screen tap Backup 2 Select the file s to be backed up on the list and then tap Backup 3 Tap OK to confirm the backup 4 When the backup is completed tap OK ...

Страница 211: ...le s to be restored on the list and then tap Restore 3 Tap OK to confirm the restoration 4 When the restoration is completed tap OK Deleting the Backup Files If the flash memory is full or you don t need backup files any more you can delete all of backup files at one time To delete all of the backup files 1 On the Backup screen press the Menu icon to open the drop down menu list 2 Tap Delete Backu...

Страница 212: ...card To open Card Info On the Application Launcher tap the Card Info icon Reviewing Card Information You can view the card name type available storage space and summary of its contents To review Card Information 1 On the Card Info screen review the card name type and size 2 Review card contents summarised by directory Review card information Review summarised card contents ...

Страница 213: ...o rename a card 1 On the Card Info screen tap the Menu icon to open the drop down menu list 2 Tap Rename Card from the Card menu 3 Enter a new name for the card 4 Tap Rename Formatting a Card Formatting a card destroys all its data and prepares it to accept new applications and data To format a card 1 On the Card Info screen tap the Menu icon to open the drop down menu list 2 Tap Format Card from ...

Страница 214: ...PDA phone you may want to consider copying the information onto your PDA phone When your PDA phone s battery level becomes very low access to the expansion card may be disabled to protect your data If this occurs recharge your PDA phone as soon as possible Note Expansion cards from different manufacturers demonstrate different data read write access time specifications Expansion cards that require...

Страница 215: ...your computer This chapter includes Introduction Selecting HotSync Setup Options Customizing HotSync Application Settings Creating a User Profile Conducting Cradle Cable HotSync Operations Conducting IR HotSync Operations Conducting Modem HotSync Operations Conducting Network HotSync Operations Using File Link Installing Applications and Files ...

Страница 216: ...include placing your PDA phone in the desktop holder attached to your computer or using infrared communication Indirect methods include using an optional modem accessory or network HotSync technology Note The first time you connect your PDA phone to the computer using the desktop holder or cable the Add New Hardware Wizard dialogue box appears Click Next and follow the onscreen instructions The fo...

Страница 217: ... 1 Click the HotSync icon in the Windows taskbar If you do not see the HotSync icon you need to start HotSync Manager On the Windows desktop click Start and then select Programs Navigate to the PalmTM Desktop software program group and select HotSync Manager Alternatively you can start the PalmTM Desktop software which automatically opens the HotSync Manager 2 Select Setup The Setup dialogue box o...

Страница 218: ...ct HotSync Manager from the Start menu If you re not sure of which option to use keep the default setting Always available 4 Click the Local tab to display the settings for the local connection between your computer and the PDA phone such as a serial or IrDA connection See page 225 If you are using the USB cable you do not need to set the options on this tab for a direct HotSync operation 5 Click ...

Страница 219: ...hone or PalmTM Desktop software or to avoid synchronising a particular type of file because you don t use it In addition to the conduits for Data Book Phonebook Camera To Do List and Memo Pad PalmTM Desktop software includes System and Install conduits The System conduit backs up the system information stored on your PDA phone including Graffiti 2 ShortCuts The Install conduit installs add on appl...

Страница 220: ...ck Do Nothing to skip data transfer for an application Changing the HotSync Setting affects only the next HotSync operation Thereafter the HotSync Actions revert to their default settings To use a new setting on an ongoing basis select the Set as default check box Thereafter whatever is selected as the default setting is used when you click the Default button in the Custom dialogue box 7 Click OK ...

Страница 221: ...ribute two dozen phones that all have a common company phone list a set of memos and several key applications A user profile can be created to install the common data before the PDA phones are distributed to the employees who will use them Then when the employees perform their first HotSync operation the common data becomes part of their individual data file Note The PDA pones that are synchronise...

Страница 222: ...or the profile and click OK 6 Repeat steps 3 through 5 for each profile that you want to create and then click OK to return to PalmTM Desktop software 7 Select the profile from the User list and create the data for the profile such as a company phone list and so on ...

Страница 223: ...ect the USB cable to the desktop holder and the computer and then place your PDA phone in the desktop holder 2 Press the HotSync button on the desktop holder 3 Click Profiles 4 Select the profile you want to load on the PDA phone and click OK 5 Click Yes to transfer all the profile data to the PDA phone IMPORTANT When you perform the HotSync operation You should wait at least 1 minute after turnin...

Страница 224: ...ministrator preparing several PDA phones for a group of users you may want to create a user profile See Creating a User Profile on page 222 before performing the following steps To perform a local HotSync operation on a Windows computer 1 Connect the USB cable to the desktop holder and the computer and then place your PDA phone in the desktop holder IMPORTANT You must perform your first HotSync op...

Страница 225: ... HotSync Progress dialogue box appears and synchronisation begins 4 Wait for a message on your PDA phone indicating that the process is complete After the HotSync process is complete you can remove your PDA phone from the desktop holder Gently tilt your PDA phone forward in the desktop holder and then lift it up to remove it IMPORTANT The first time you perform a HotSync operation you must enter a...

Страница 226: ...and follow the steps in Performing an IR HotSync operation later in this section Preparing Your Computer for Infrared Communication Before you can perform a HotSync operation using the IR port the computer with which you want to synchronise must fulfil these requirements Your computer must support the IrCOMM implementation of the IrDA standards Your computer must have an enabled infrared port that...

Страница 227: ...ared communication on a computer Click the HotSync Manager icon in the Windows toolbar and make sure that Infrared is selected If you have an Infrared option on the HotSync Manager menu and that option is selected skip to Performing an IR HotSync operation If you do not have an Infrared option on the HotSync Manager menu complete the following steps a Make sure that Local Serial is selected on the...

Страница 228: ...rt you can continue using the desktop holder while HotSync Manager is configured for infrared communication Performing an IR HotSync operation After you complete the steps to prepare for performing an IR HotSync operation it s easy to perform the actual operation To perform an IR HotSync operation on your PDA phone 1 On the Application Launcher tap the HotSync icon 2 Tap Local 3 Tap the pick list ...

Страница 229: ...Conducting IR HotSync Operations 230 4 Position the IR port of your PDA phone within a couple of inches of the infrared port of your computer 5 Tap the HotSync icon to start the IR HotSync operation ...

Страница 230: ...he kind of modem connection you want to make See Connection on page 274 for more information Preparing Your Computer for a Modem HotSync Operation There are a few steps you must perform to prepare your computer for a modem HotSync operation Be sure to perform these steps before you leave your office so that your computer is ready to receive a call from your PDA phone IMPORTANT You must perform the...

Страница 231: ... from all online services This helps to avoid conflicts with the COM port 2 Start HotSync Manager if it is not already running and from the HotSync Manager Setup menu select Modem 3 Adjust the following options as needed Serial Port Identifies the port for the modem If you are unsure of the port assignment look at the Modem Properties in the Windows Control Panel Speed Determines the speed at whic...

Страница 232: ...p string Identifies the setup string for your particular modem Not all modems require a setup string Refer to your modem manual and enter the setup string if it is recommended by the manufacturer 4 Click OK Preparing Your PDA Phone for a Modem HotSync Operation There are a few steps you must perform to prepare your PDA phone for a modem HotSync operation To prepare your PDA phone for a modem HotSy...

Страница 233: ...nformation 4 Tap the Enter phone field If you plan to connect to your company s dial in server network modem instead of connecting to a computer modem see Conducting Network HotSync Operations on page 237 5 Enter the telephone number to access the modem connected to your computer 6 If necessary enter a dial prefix such as 9 to access an outside line and then tap the Dial Prefix check box Tip You c...

Страница 234: ...lling card number 9 Tap OK Selecting the Conduits for a Modem HotSync Operation The Conduit Setup dialogue box on your PDA phone enables you to define which files and or applications synchronise during a modem HotSync operation You can use these settings to minimise the time required to synchronise data with a modem To Change the conduit Setup for a modem HotSync operation 1 On the Application Lau...

Страница 235: ...lect the item in the Conduit Setup dialogue box 5 Tap OK Performing a Modem HotSync Operation After you prepare your computer and your PDA phone and select your conduit Setup options you are ready to perform a modem HotSync operation To perform a modem HotSync operation 1 On the Application Launcher tap the HotSync icon 2 Tap the Modem HotSync icon to dial the PalmTM Desktop modem and synchronise ...

Страница 236: ...at the computer connected to the desktop holder cable also has the network HotSync technology installed Your computer must be on and the HotSync Manager must be running Connecting to Your Company s Dial in Server A network HotSync operation requires the following consult your system administrator for assistance Your computer has TCP IP support installed Both your company s network system and its r...

Страница 237: ...our PDA phone To prepare your Windows computer for network HotSync operation 1 Click the HotSync Manager icon in the Windows taskbar 2 From the HotSync Manager menu select Network 3 From the HotSync Manager menu select Setup 4 Click the Network tab and make sure your user name has a check mark next to it If the check mark is not there click the check box next to your user name 5 Click OK Put your ...

Страница 238: ... when you perform a HotSync operation over the network To prepare your PDA phone for a network HotSync operation 1 On the Application Launcher tap the HotSync icon 2 Tap the Menu icon to open the drop down menu list 3 Tap Modem Sync Prefs from the Options menu 4 Tap Network 5 Tap OK 6 Tap Select Service or the service name if you have selected one 7 Tap Service and select a service 8 Tap Done ...

Страница 239: ...e Selecting the Conduits for a Modem HotSync Operation on page 235 Performing a Network HotSync Operation After you prepare your computer and your PDA phone and select your Conduit Setup options you are ready to perform a network HotSync operation To perform a network HotSync operation On the HotSync screen tap the Modem HotSync icon to begin the operation ...

Страница 240: ...ll and remove applications and other files on your PDA phone or on an expansion card Your PDA phone comes with many applications installed and ready to use During a HotSync operation you can also install additional applications such as games and other software on your PDA phone or on a card that is seated in the expansion card slot Applications or games that you install on your PDA phone reside in...

Страница 241: ...cation from the Software Essentials CD ROM Note You may need to download software from the Internet while installing some applications from the Software Essentials CD ROM There are a variety of third party applications available for your PDA phone To learn more about these applications go to the web site www palm com Note Palm works with developers of third party add on applications to ensure the ...

Страница 242: ...a Zip file Depending on the file type Install Tool determines whether to install the files on your PDA phone or on an expansion card To install applications and files 1 Copy or download the application s or file s you want to install onto your computer 2 Double click the Palm Desktop icon on your Windows desktop 3 Click Install on the left pane of the Palm Desktop dialogue box 4 In the User drop d...

Страница 243: ...on list you want handheld or expansion card 7 When you are finished adding files click Done 8 Perform a HotSync operation to install the selected application s See Conducting Cradle Cable HotSync Operations on page 225 for details Note Files that remain on the list after you perform a HotSync operation were not installed This can happen if your PDA phone is too full to install the file or if the f...

Страница 244: ...mation about configuring the various preferences of your PDA phone This chapter includes Setting Preferences Display Preferences Sound Preferences Call Setting Preferences Security Preferences Network Service Preferences Connectivity Preferences General Preferences ...

Страница 245: ... phone You can also restrict the use of your PDA phone by other people and the types of calls made for details about using this feature see page 252 Network SVC Use network services such as call forwarding call waiting call barring and network and line selection Connectivity Configure your PDA phone for use with a network Select your network service provider and enter your account information You ...

Страница 246: ...e for the LCD screen Wallpaper Allows you to set up the Phone idle screen You can select the position and the style of text such as the service provider s name or missed call notifications change the skin pattern and the wallpaper Light You can set up power consumption options the service light and the front LCD The following options are available Main LCD off time Your PDA phone has an automatic ...

Страница 247: ... the service light on the folder of the PDA phone is used You can select in which colour the service light flashes Stay on in Cradle You can choose to leave your PDA phone on when it is in the desktop holder so that you can continue to view your data By default your PDA phone remains on when it is in the desktop holder and is connected to a power source Front LCD You can select the direction in wh...

Страница 248: ...ing Default sets the volume of the sounds to the default mode Type You can assign different types to the alerts for incoming calls SMS messages or MMS messages You can also set how the phone acts when Quiet mode is activated to mute all sounds or to vibrate and turn the alerts on or off to inform you that certain things have happened such as the minute minder connect tone and disconnect tone The a...

Страница 249: ...er SMS tone MMS tone key tone power on off tone folder on off tone and other phone sounds Tapping Default sets the tone settings to the default mode Note If you are using the ALS Alternative Line Service the tone settings may differ depending on the line in use Line 1 or Line 2 ...

Страница 250: ...ny button except for the button or the keys at the left side of the PDA phone Talk Key You can answer incoming calls only by pressing the button Flip Open You can answer incoming calls by opening the PDA phone If the PDA phone is already open press the button Own Number You can store your phone number registered on your SIM card and assign a name to the number Side key You can set the Volume keys ...

Страница 251: ... private records and to lock your PDA phone Assigning a Password 1 Tap the Password box 2 Enter a password 3 If necessary enter a hint to help you remember your password if you forget it 4 Tap OK 5 Enter the same password a second time and tap OK Note Once you have assigned a password you cannot unassign it Changing a Password Once you define a password for your PDA phone you can change it at any ...

Страница 252: ...e Phone Lock pick list 2 Enter your password and tap OK 3 Tap Enable and then tap OK CAUTION Once you have locked your PDA phone you must enter the exact password to reactivate it If you forget the password your PDA phone will present the hint you have entered to help you remember the password If you still cannot remember the password you can not use your phone anymore Please inquire to your servi...

Страница 253: ...tch the PDA phone on Consequently any person who does not have your PIN cannot use your PDA phone without your approval You must enter your PIN1 code before enabling or disabling the PIN1 Change PIN Before you use this option make sure that the PIN Check option is enabled This option allows you to change your current PIN1 to a new one You must enter the current PIN1 before you can specify a new on...

Страница 254: ...which they would appear if they were not masked and are marked with a lock icon Hidden records disappear completely from the screen If you define a password for your PDA phone you must enter it to display private records To mask or hide a private record 1 Tap the Current Privacy pick list 2 Select one of the following options Mask Records private records are marked Hide Records private records do ...

Страница 255: ...ces screen See page 252 To show private record 1 Tap the Current Privacy pick list 2 Tap Show Records from the pick list 3 Enter your password and tap OK To unmask individual records 1 In the application which has masked records select one of them 2 Enter your password and tap OK To make a record private 1 In an application display the record you want to make private 2 Tap Details 3 Tap the Privat...

Страница 256: ...on from the pick list All calls All calls are forwarded If Busy Calls are forwarded when you are already on another call If No Reply Calls are forwarded when you do not answer the phone When you select this option you can select a delay time before forwarding calls If not reachable Calls are forwarded when you are not in an area covered by your service provider 2 Select the type of calls to be for...

Страница 257: ... barring option from the pick list All outgoing Calls cannot be made International International calls cannot be made Except to home When abroad calls can be made only to numbers within the current country and to your home country which is the country where your home network provider is located All Incoming Calls cannot be received Incoming while abroad Calls cannot be received when you are using ...

Страница 258: ...ed normally To change the barring password 1 Tap Password 2 Enter the current password and tap OK 3 Enter a new password and enter it again to confirm 4 Tap OK Call Waiting This network service informs you when someone is trying to reach you during another call To set a call waiting option 1 Select the type of calls to which you want to apply the call waiting option from the Call Type pick list 2 ...

Страница 259: ...er to prevent it from being displayed on the phone of the person being called or send the number When you select Default the default setting provided by the network is used Note Some networks do not allow the user to change this setting Active Line Some SIM cards may by used with two subscriber numbers using the ALS Alternate Line Service feature In this menu you can select a line to be used for m...

Страница 260: ...n The Network Selection feature enables you to automatically or manually select the network used when roaming outside of your home area Note You can select a network other than your home network only if there is a valid roaming agreement between them ...

Страница 261: ...orate remote access account and a mobile phone carrier account that supports dial up connections A mobile phone carrier account with high speed wireless data network services also can be used To use the e mail software included with your PDA phone you must create a configuration in Connection Preferences and then create Network Preferences Settings See Connection on page 274 for a complete explana...

Страница 262: ...or your ISP or for a dial in server You can create save and reuse network service profiles You can create additional network service profiles from scratch or duplicate existing profiles and editing information After you create a new profile or duplicate a profile you can add and edit settings To add a new network service profile 1 Tap the Menu icon to open the drop down menu list 2 Tap New from th...

Страница 263: ...Name Identifies the name you use when you log in to your ISP or your dial in server Although this field can contain multiple lines of text only two lines appear onscreen Note Most dial in servers do not accept spaces in the user name Password Identifies the password you use to log in to your server or ISP Your entry in this field determines whether your PDA phone prompts you to enter a password ea...

Страница 264: ...r your ISP or dial in server Dial prefix Set a prefix which is a number that you dial before the telephone number to access an outside line For example many offices require that you first dial 9 to dial a number outside the building Disable call waiting Disable the Call Waiting feature as it can cause your session to terminate if you receive a call while you are connected If your telephone has cal...

Страница 265: ...ompany s network dial in server is easy Note If you are connecting to an ISP you need a third party application such as a web browser or news reader to take advantage of this connection For information about third party applications that support TCP IP check the web site www palm com To establish a connection 1 Tap Connect to dial the current service and display the Service Connection Progress mes...

Страница 266: ... dial in server You use the Details dialogue box to add more information to a selected network service profile To add connection details 1 Tap the Service pick list and select a profile 2 Tap Details 3 Set the available options 4 When you are finished tap OK The following options are available Connection Type Select a connection type from PPP Point to Point protocol SLIP Serial Line Internet Proto...

Страница 267: ...mber tap the Query DNS check box to remove the check mark Each IP address has four sections separated by periods In the Details dialogue box you enter each section separately Each section of an IP address is made up of a number from 0 to 255 numbers are the only allowable characters in this field Ask your ISP or system administrator for the correct primary or secondary DNS IP address Many systems ...

Страница 268: ...or your ISP A login script is associated with a specific network service profile created in Network Preferences A login script is something that you are likely to receive from your system administrator if your company has a system in which you log in to the corporate servers from your PDA phone using a modem or network connection The script is generally prepared by the system administrator and dis...

Страница 269: ...g commands from the Commands pick list in the Login Script dialogue box Some commands such as Send require you to supply additional information Those commands have a parameter field so that you can add the necessary data To create a login script 1 Tap Script from the service details screen 2 Tap the End pick list 3 Select the command you want from the Command list If the command requires additiona...

Страница 270: ...s a carriage return or line feed LF character to the TCP IP server to which you are connecting Send User ID Transmits the user ID information entered in the User ID field of the Network Preferences screen Send Password Transmits the password entered in the Password field of the Network Preferences screen If you did not enter a password this command prompts you to enter one The Password command is ...

Страница 271: ...ew script commands in a login script Plug in applications have the following characteristics Written in C language Compiled into an executable device Called properly from a login script Able to return control to a login script after it terminates Created using a development environment that supports Palm OS Software such as Metrowerks Code Warrior for PalmTM Platform For additional information abo...

Страница 272: ...y you cannot connect to your ISP or dial in server take a look at the Network Log The Network Log lists all of the communication that occurs between your modem and your dial in server during the login procedure The information in the Network Log can help your ISP or your system administrator pinpoint where and why the login procedure communication fails To View the Network Log 1 From the Network P...

Страница 273: ... 2 Tap the Connect to pick list and select the way you can connect your PDA phone to a computer or modem 3 Tap the Via pick list and select a connection method 4 Only the connection involving modems have Dialing and Volume options Tap the Dialing pick list and select TouchToneTM or Rotary Tap the Volume pick list and select the speaker volume 5 When you finish tap OK Editing Connections You can ed...

Страница 274: ...ization string supplied by the documentation for the modem in your mobile phone if necessary Alternatively select a Flow Ctl Flow Control option 6 Tap OK 7 Tap OK again to save the configuration Deleting Connections You can delete an connection profile when you don t use it any longer To delete a connection profile 1 In the Available Connections list select a connection profile 2 Tap Delete 3 Tap ...

Страница 275: ...erences 276 Beam You can choose to turn off the Beam Receive feature This prohibits anyone from beaming information to your PDA phone It also results in slight savings for your battery By default Beam Receive is enabled ...

Страница 276: ...fferent applications with the HotSync button on the desktop holder and optional Palm modem and change the assignment of the full screen pen stroke If you assign a different application to a button you can still access the original application using the Application Launcher To change the Button preferences 1 Tap the pick list next to the button you want to reassign 2 Tap the application that you wa...

Страница 277: ...re for each button 3 Tap OK Date Time The Date Time Preferences screen enables you to set the date time and time zone You can also indicate whether the time zone observes daylight savings The following options are available Set Date You can set the current date Set Time You can set the current time Set Time Zone You can set your time zone The time and date will change according to this setting Day...

Страница 278: ...mpany name phone number or any other information that you want associated with your PDA phone This information could help someone contact you if you ever lose your PDA phone and there is sufficient battery power to turn it on If you use the Security Preferences screen to lock your PDA phone with a password information that has been entered in the Owner Preferences screen appears the next time you ...

Страница 279: ...essed using a 12 hour clock with an AM or PM suffix All your PDA phone applications use the country default settings You can however customise your own preferences as described in Time Date Week starts Numbers below To select country default tap the current country in the Preset to line and select a country from the Set Country dialogue box Time Select a time format from the pick list Date Select ...

Страница 280: ...ou can write letters anywhere on the left side of the screen write numbers anywhere on the right side of the screen and write capital letters across the imaginary division line in the middle of the screen Note See page 75 for details about using Graffiti 2 to enter data Set up the following preferences Status You can change the status of Graffiti 2 Disabled Graffiti 2 is disabled Enabled Graffiti ...

Страница 281: ...ngs for entering two stroke characters Shortcuts The Shortcuts Preferences screen enables you to define abbreviations for entering text with Graffiti 2 Strokes You can create edit or delete a shortcut for any word letter or number All shortcuts you create appear in the list in the Shortcut Preferences screen All the Shortcuts are available in any of your PDA phone applications and are backed up on...

Страница 282: ...283 Appendix A Maintenance Troubleshooting This chapter includes Caring for Your PDA Phone Prolonging Battery Life Resetting Your PDA Phone Troubleshooting ...

Страница 283: ...t Take care not to drop your PDA phone or subject it to any strong impact Do not carry your PDA phone in your back pocket if you sit on it you may damage it Protect your handheld from temperature extremes For example do not leave your PDA phone on the dashboard of a car on a hot day or on a day when temperatures are below freezing and keep it away from heaters and other heat sources Do not store o...

Страница 284: ... perform a HotSync operation to back up your data then leave your PDA phone in the desktop holder or connect the travel charger to recharge the unit This helps prevent accidental data loss If the battery drains to the point that your PDA phone does not operate it stores your data safely for about a week In this case there is enough residual energy in the battery to store the data but not enough to...

Страница 285: ... screen In this case you need to perform a reset to get your PDA running again Performing a Soft Reset A soft reset tells your PDA phone to stop what it s doing and start over again All record and entries stored in your PDA phone are retained with a soft reset To perform a soft reset Use the stylus pen to gently press the reset button inside the hole on the bottom of the PDA phone ...

Страница 286: ...d release the reset button 3 Wait for the Palm Powered logo to appear then release the C button 4 When a message appears on the PDA phone screen warning that you are about to erase all the data stored on your PDA phone do one of the following Press the Up scroll button to complete the hard reset and display the Digitizer screen Press any other button to perform a soft reset Note With a hard reset ...

Страница 287: ...uld delete unnecessary data from your memory and assure a free memory of at least 200KB external memory of expansion card is not included To delete data from the SGH i530 s memory 1 In the Application Launcher tap the Menu icon to open the drop down menu list 2 Tap Delete on the App menu 3 Select the data that you want to delete 4 Tap the Delete 5 Tap the Yes to confirm your deletion If you get th...

Страница 288: ...essible at www palm com in the Support section If you are still having problems contact Technical Support or go to www samsung com support Note Palm works with developers of third party add on applications to ensure the compatibility of these applications with your new Palm PDA phone Some third party applications however may not have been upgraded to be compatible with your new Palm PDA phone If y...

Страница 289: ...r the first time You must enter the Personal Identification Number PIN supplied with the SIM card The PIN Check feature is enabled Every time the phone is switched on the PIN has to be entered To disable this feature use the PIN Check option See page 254 Enter PUK The PIN code was entered incorrectly three times in succession and the phone is now blocked Enter the PUK supplied by your network oper...

Страница 290: ...rrespondent cannot hear my speaking Have you switched off the microphone Are you holding the phone close enough to your mouth The microphone is located at the bottom of the phone The audio quality of the call is poor Check the signal strength indicator on the display the number of bars indicates the signal strength from strong to weak Try moving the phone slightly or moving closer to a window if y...

Страница 291: ... available 4 Delete all temporary files 5 Run ScanDisk or another disk verification tool on your computer 6 Uninstall and then reinstall Palm Desktop software My files didn t install during a HotSync operation If files do not install after you perform a HotSync operation the file type was not recognised Try launching the associated application from your PDA phone and then performing another HotSyn...

Страница 292: ... PDA phone are erased Never perform a hard reset unless a soft reset does not solve your problem I get a warning message telling me my PDA memory is full Purge record from Date Book and To Do list This deletes To Do List items and past Date Book events from the memory of your PDA phone Delete unused memos and records If necessary you can save these records If you have installed additional applicat...

Страница 293: ...perform a soft reset See page 286 If the camera is open you cannot use any of the other applications or features on your PDA phone So it may appear that your PDA phone has frozen Close the camera to resume using your PDA phone s other applications and feature Problem Solution When I tap the buttons or screen icons my PDA phone activates the wrong feature Calibrate the screen See page 279 When I ta...

Страница 294: ...t Graffiti 2 is not in Shift mode See page 84 See Graffiti 2 Tips on page 78 for increasing your accuracy when you write Graffiti 2 characters Problem solution I tapped the Today button but it does not show the correct date Your PDA phone is not set to the current date Make sure that the Set Date box on the Date and Time Preferences screen displays the current date See page 278 I know entered some...

Страница 295: ...g In other words the sort settings you use with Palm Desktop software are not transferred to your PDA phone I created an event in Date Book but it doesn t appear in the Week View If you have two or more events with the same start time the first event created appears as a grey bar and any subsequent conflicting events appear as single red bar To see the overlapping events select the Day View The cu...

Страница 296: ...297 Appendix B Other Information This chapter includes Access Codes Health and Safety Information ...

Страница 297: ... code The access codes except for the PUK and PUK2 codes can be changed using Security Preferences See page 254 for further details Phone Password The Phone lock feature uses the phone password to protect your PDA phone against unauthorised use The phone password is supplied with the PDA phone and is preset to 0000 at the factory PIN The Personal Identification Number or PIN 4 to 8 digits protects...

Страница 298: ...your service provider To re enable your PIN 1 Enter the PUK and tap OK 2 Enter a new PIN of your choice and tap OK 3 When the confirmation message displays enter the same code again and tap OK If you enter an incorrect PUK ten times in succession the SIM card becomes invalid Contact your service provider for a new card PIN2 The PIN2 4 to 8 digits supplied with some SIM cards is required to access ...

Страница 299: ...ovider To re enable your PIN2 1 Enter the PUK2 and tap OK 2 Enter a new PIN2 of your choice and tap OK 3 When the confirmation message displays enter the same code again and tap OK If you enter an incorrect PUK2 ten times in succession you will not be able to access the functions requiring the PIN2 Contact your service provider for a new card Barring Password A 4 digit barring password is required...

Страница 300: ...eriodic and thorough evaluation of scientific studies The limits include a substantial safety margin designed to ensure the safety of all persons regardless of age and health The exposure standard for mobile phones employs a unit of measurement known as SAR Specific Absorption Rate The SAR limit recommended by the EU Council is 2 0W kg The highest SAR value for this model was 0 654W kg The SAR lim...

Страница 301: ...nce with the European R TTE Directive must be shown This directive includes as one of its essential requirements the protection of the health and safety of the user and any other person Precautions When Using Batteries Never use any charger or battery that is damaged in any way Use the battery only for its intended purpose If you use the PDA phone near the network s base station it uses less power...

Страница 302: ...onditions as you will reduce the capacity and lifetime of the battery Always try to keep the battery at room temperature A phone with a hot or cold battery may temporarily not work even when the battery is fully charged Li ion batteries are particularly affected by temperatures below 0 C 32 F Do not short circuit the battery Accidental short circuiting can occur when a metallic object coin clip or...

Страница 303: ...ing Environment Remember to follow any special regulations in force in any area and always switch off your PDA phone whenever it is forbidden to use it or when it may cause interference or danger When connecting the PDA phone or any accessory to another device read its user s guide for detailed safety instructions Do not connect incompatible products As with other mobile radio transmitting equipme...

Страница 304: ...ed between a wireless phone and a pacemaker to avoid potential interference with the pacemaker These recommendations are consistent with the independent research and recommendations of Wireless Technology Research Persons with pacemakers Should always keep the PDA phone more than 15 cm 6 inches from their pacemaker when the PDA phone is switched on Should not carry the PDA phone in a breast pocket...

Страница 305: ...you in obtaining this information Switch off your PDA phone in health care facilities when any regulations posted in these areas instruct you to do so Hospitals or health care facilities may be using equipment that could be sensitive to external RF energy Vehicles RF signals may affect improperly installed or inadequately shielded electronic systems in motor vehicles Check with the manufacturer or...

Страница 306: ...ed of the need to observe restrictions on the use of radio equipment in fuel depots fuel storage and distribution areas chemical plants or where blasting operations are in progress Areas with a potentially explosive atmosphere are often but not always clearly marked They include the areas below decks on boats chemical transfer or storage facilities vehicles using liquefied petroleum gas such as pr...

Страница 307: ...k services and or phone features are in use Check with local service providers To make an emergency call 1 If the phone is not on switch it on 2 Key in the emergency number for your present location for example 112 or any other official emergency number Emergency numbers vary by location 3 Press the button If certain features are in use call barring for example you may first need to deactivate tho...

Страница 308: ...e phone its parts or accessories For vehicles equipped with an air bag remember that an air bag inflates with great force Do not place objects including both installed or portable wireless equipment in the area over the air bag or in the air bag deployment area If wireless equipment is improperly installed and the air bag inflates serious injury could result Switch off your PDA phone before boardi...

Страница 309: ...shock to you or damage to the PDA phone Do not use or store the PDA phone in dusty dirty areas as its moving parts may be damaged Do not store the PDA phone in hot areas High temperatures can shorten the life of electronic devices damage batteries and warp or melt certain plastics Do not store the PDA phone in cold areas When the PDA phone warms up to its normal operating temperature moisture can ...

Страница 310: ...diator The PDA phone may explode when overheated Use only the supplied or an approved replacement antenna Unauthorised antennas or modified accessories may damage the PDA phone and violate regulations governing radio devices If the PDA phone battery charger or any accessory is not working properly take it to your nearest qualified service facility The personnel there will assist you and if necessa...

Страница 311: ... 129 Buttons 34 C Calculator 201 Call answering 93 call options 95 call record 102 making 89 speed dialling 99 waiting 96 Camera changing settings 189 self timer 188 taking a photo 187 taking multiple photos 189 viewing photos 191 D Date book beaming events 165 changing view 161 creating event 151 deleting events 166 setting preferences 167 Display indicators 37 Display online tips 62 Drop down me...

Страница 312: ...ator icons 113 media boxes 116 message boxes 112 MMS profile 122 MMS 110 reading 114 SMS preference 124 SMS 109 voice mail 120 P Palm installing 30 removing 31 Password 298 Perference Graffiti 2 281 Phone care and maintenance 310 Phonebook beaming 145 copying 144 creating 138 deleting 147 editing 143 finding 144 making a call 143 setting preference 149 Photo beaming 197 deleting 199 sending via MM...

Страница 313: ...ht headset 32 T Text input ABC mode 71 Graffiti 2 75 number mode 72 onscreen keyboard 73 symbolic mode 72 T9 mode 69 To do list beaming items 172 changing detail 170 checking off 171 creating to do list 168 deleting 172 priority 169 setting preference 173 Tool icon 36 U Unit Converter 204 V Voice Memo beaming 181 deleting 183 playing 181 recording 179 sending via MMS 182 setting preference 183 set...

Страница 314: ...315 ...

Страница 315: ...ntents of this manual may differ from your PDA phone depending on your service provider or the software installed on the the PDA phone World Wide Web http www samsungmobile com Printed in Korea English 05 2004 Rev 1 0 ...

Отзывы: