Samsung Electronics
3-15
Setup and Installing
3-4 Setting the Date and Time
The current date and time are shown in the display
when the machine is on and ready for use (Standby
mode). The date and time are printed on all faxes
you send.
1
.
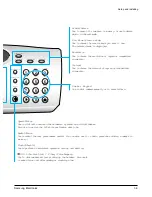
Press
Menu
, then press
Date & Time
on the one-
touch keypad.
The display shows the currently set date and
time.
2
.
Enter the correct date and time using the
number keypad.
DD (Day)
= 01~31
MM (Month)
= 01~12
Y Y (Year)
= four digits (1990~2089)
HH (Hour)
= 00~23 (24 HOURS format)
= 01~12 (12 HOURS format)
MM (Minute)
= 00~59
AM (Ante Meridiem)
PM (Post Meridiem)
3
.
Press
Enter
when the date and time in the
display is correct.
If you enter an invalid number, the machine beeps
and doesn’t proceed to the next step. If this
happens, just reenter the correct number.
The display shows the date and time you have
set, then returns to Standby mode.
3-5 Setting the System ID
(Your Number and Name)
The System ID will be printed at the top of each
page sent from your machine.
1
.
Press
Menu
, then press
System ID
on the
one-touch keypad. The display asks you to enter
the telephone number.
If there is a number previously registered, the
number appears.
2
.
Enter the telephone number (up to 20 digits)
which your machine is connected to. You can
include the space using
Pause
button.
If you make a mistake, press ˆ or ¤ to move the
cursor under the wrong digit, then enter the
correct number to change or press
Delete
to
delete the number.
3
.
Press
Enter
when the number in the display is
correct. The display asks you to enter your ID
name.
4
.
Enter your ID name (up to 20 characters).
You can enter alphanumeric characters using the
number keypad, and include special symbols
such as + by pressing
0
repeatedly.
If you want to enter the same letter or number in
succession (e.g. SS, AA, 777), enter one digit, then
move the cursor by pressing Right, and enter the
next digit.
If you want to insert a space in the name, you can
also use ¤ button to move the cursor to skip the
position.
5
.
Press
Enter
when the name in the display is
correct.
1 1 - 2 7 - 1 9 9 8
0 8 : 3 6 ( P M )
e.g. 12 HOURS format
1 1 - 2 7 - 1 9 9 8
2 0 : 3 6
e.g. 24 HOURS format
Содержание MSYS 5150
Страница 9: ...2 6 Samsung Electronics Specification Memo ...
Страница 16: ...3 26 Samsung Electronics Setup and Installing Memo ...
Страница 37: ...4 2 Samsung Electronics Theory of Operation ...
Страница 41: ...4 6 Samsung Electronics Memo Theory of Operation ...
Страница 116: ...Samsung Electronics 7 9 Maintenance Troubleshooting No Image ...
Страница 117: ...Samsung Electronics Maintenance Troubleshooting 7 10 ...
Страница 118: ...Samsung Electronics 7 11 Maintenance Troubleshooting All Black ...
Страница 119: ...7 12 Samsung Electronics Maintenance Troubleshooting Vertical White Line Band ...
Страница 120: ...Samsung Electronics 7 13 Maintenance Troubleshooting Dark Image ...
Страница 121: ...7 14 Samsung Electronics Maintenance Troubleshooting Background ...
Страница 122: ...Samsung Electronics 7 15 Maintenance Troubleshooting Ghost ...
Страница 123: ...7 16 Samsung Electronics Maintenance Troubleshooting Black Dot ...
Страница 124: ...Samsung Electronics 7 17 Maintenance Troubleshooting Horizontal Band ...
Страница 125: ...7 18 Samsung Electronics Maintenance Troubleshooting Irregular Density ...
Страница 126: ...Samsung Electronics 7 19 Maintenance Troubleshooting White Spot ...
Страница 127: ...7 20 Samsung Electronics Maintenance Troubleshooting Trembling at the End When OHP Printing ...
Страница 128: ...Samsung Electronics 7 21 Maintenance Troubleshooting Poor Fusing Grade ...
Страница 132: ...Samsung Electronics 7 25 Maintenance Troubleshooting No Power LCD NO display LED Off ...
Страница 133: ...Fuser Error 7 26 Samsung Electronics Maintenance Troubleshooting ...
Страница 134: ...Samsung Electronics 7 27 Maintenance Troubleshooting Paper Jam Mis feeding ...
Страница 135: ...7 28 Samsung Electronics Maintenance Troubleshooting Paper Jam Jam1 ...
Страница 136: ...Samsung Electronics Maintenance Troubleshooting 7 29 Engine Error ...
Страница 137: ...7 30 Samsung Electronics Maintenance Troubleshooting Memo ...
Страница 187: ...9 28 Samsung Electronics Electrical Parts List ...
Страница 189: ...11 Connection Diagram Samsung Electronics 11 1 ...
Страница 190: ...12 1 Main Circuit Diagram Samsung Electronics 12 1 12 Schematic Diagrams ...
Страница 191: ...Schematic Diagrams 12 2 Samsung Electronics Main Circuit Diagram ...
Страница 192: ...Main Circuit Diagram Samsung Electronics 12 3 Schematic Diagrams ...
Страница 193: ...Schematic Diagrams 12 4 Samsung Electronics Main Circuit Diagram ...
Страница 194: ...Main Circuit Diagram Samsung Electronics 12 5 Schematic Diagrams ...
Страница 195: ...Schematic Diagrams 12 6 Samsung Electronics Main Circuit Diagram ...
Страница 196: ...Main Circuit Diagram Samsung Electronics 12 7 Schematic Diagrams ...
Страница 200: ...12 3 Sensors Circuit Diagram Samsung Electronics 12 11 Schematic Diagrams ...
Страница 201: ...Schematic Diagrams 12 12 Samsung Electronics 12 4 Switch Circuit Diagram ...
Страница 202: ...Samsung Electronics 12 13 Schematic Diagrams 12 5 Joint Circuit Diagram ...
Страница 203: ...Schematic Diagrams 12 14 Samsung Electronics 12 6 OPE Circuit Diagram IF Active HIGH Logic IF Active LOW Logic ...
Страница 204: ...Samsung Electronics 12 15 Schematic Diagrams 12 7 PTL Circuit Diagram ...
Страница 205: ...Schematic Diagrams 12 16 Samsung Electronics 12 8 SCAN Circuit Diagram ...
Страница 206: ...Samsung Electronics 12 17 Schematic Diagrams 12 9 Engin Circuit Diagram ...
Страница 207: ...Schematic Diagrams 12 18 Samsung Electronics Engin Circuit Diagram ...
Страница 208: ...Samsung Electronics 12 19 Schematic Diagrams 12 10 LIU Circuit Diagram ...
Страница 210: ... Samsung Electronics Co Ltd Mar 1999 Printed in Korea P N JC68 00097A Rev 1 00 ELECTRONICS ...


