138
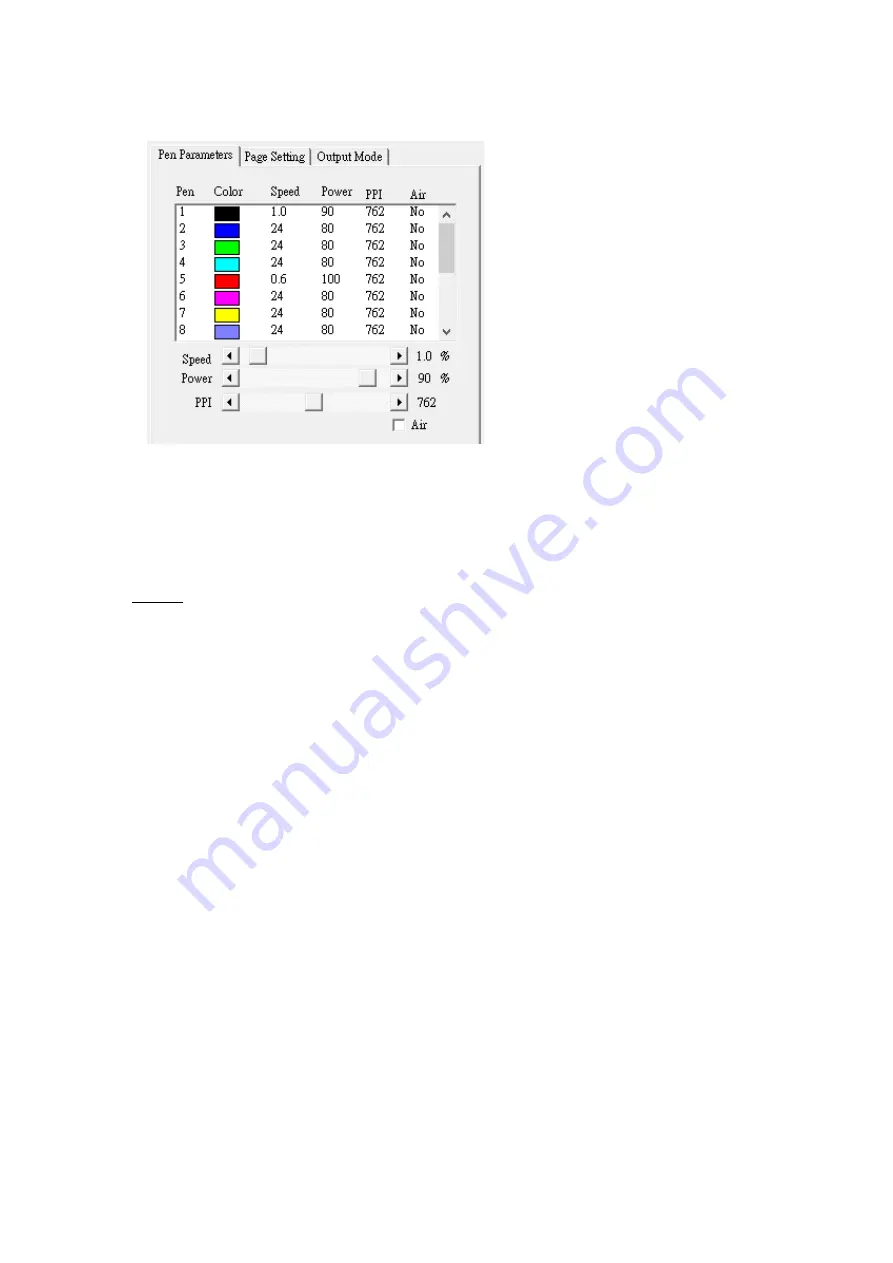
Pen parameters
SmartCONTROL
TM
provides 16 color pens, and each pen presents laser parameter setting, once colors are set,
the pen would refer to the specified parameters when you apply the colors to an output. Pen Parameters
under Processed Condition Setup would enable you to adjust the power, speed of each color pen.
(1)
Choose a color pen
(2)
Adjust the bar next to speed, power and PPI for the chosen color pen
Remark:
1.
Speed
The speed is calculated by percentage, which means some percentage of the max. Speed of the indicated
laser engraver.
2.
Power
The power is calculated by percentage, which means some percentage of the max laser power that the
indicated laser engraver has.
3.
PPI
PPI (pulses-per-inch) represents the number of times the laser pulses (fires) per linear inch, exclusive
for vector cutting. Higher PPI settings will generate deeper, overlapping laser pulses, resulting in
cleaner cuts. Lower PPI settings (lower than 150) will result in the individual laser pulses being
spread apart, resulting in a perforated effect (similar to the perforation in the paper between mailing
stamps).
4.
Air
This checkbox controls the SmartAIR air-assist function (if you have the optional air compressor
installed). By selecting a pen color and checking this box will enable the SmartAIR air-assist function
for that particular pen color. As an example, if you are performing a combination of both surface
raster engraving job and deep vector cutting on a material such as acrylic, you may want to enable
the SmartAIR air-assist for the vector cutting sections to get the cleanest cuts. To do this, you would
simply need to select the pen color that you have assigned to the sections to be cut and select the
Air checkbox for those particular pen colors.
Содержание LV-290
Страница 1: ......
Страница 25: ...23 3 Chapter 3 Mechanical Overview Front View Top View Right View Left View Rear View...
Страница 28: ...26 3 5 Rear View SmartEXTTM Pass Through Door Rear SmartLIDTM Operation Handles Ventilation Openings...
Страница 34: ...32...
Страница 35: ...33...
Страница 36: ...34...
Страница 41: ...39...
Страница 42: ...40...
Страница 50: ...48 3 Click Next 4 The installation would be finished in few seconds...
Страница 74: ...72 5 1 4 Graphic Control Panel Navigation Chart...
Страница 160: ...158 12 Select the converted file and click Open to import the saved file to SmartCONTROLTM 13 File import is completed...
Страница 185: ...183...
Страница 187: ...185...
Страница 193: ...7 Chapter 7 Optional Items Fume Extraction Unit Option Air Compressor Option Items Focus Lens Option...
Страница 199: ...197 Cutting edges achieved with the different lenses...
Страница 211: ...209 9 Chapter 9 Basic Troubleshooting...
Страница 213: ...211 10 Chapter 10 Appendix Glossary Specification Sheet...
Страница 216: ...FA01785 R1 190805...


