130
Halftone (Raster Page) [DEFAULT SETTING: Dithering]
This option controls the way a raster-engraved image is processed. The “digital image to engraved output”
process can be processed via two methods: Dithering or Error Diffusion. Each offer additional output options
yielding different output effects, style, and quality.
•
Dithering
: Interprets and outputs the raster engraving via the dithering method. This mode will allow you to
select the Pattern Type and Dithering Matrix, and Enhanced Dithering.
-
Pattern Type
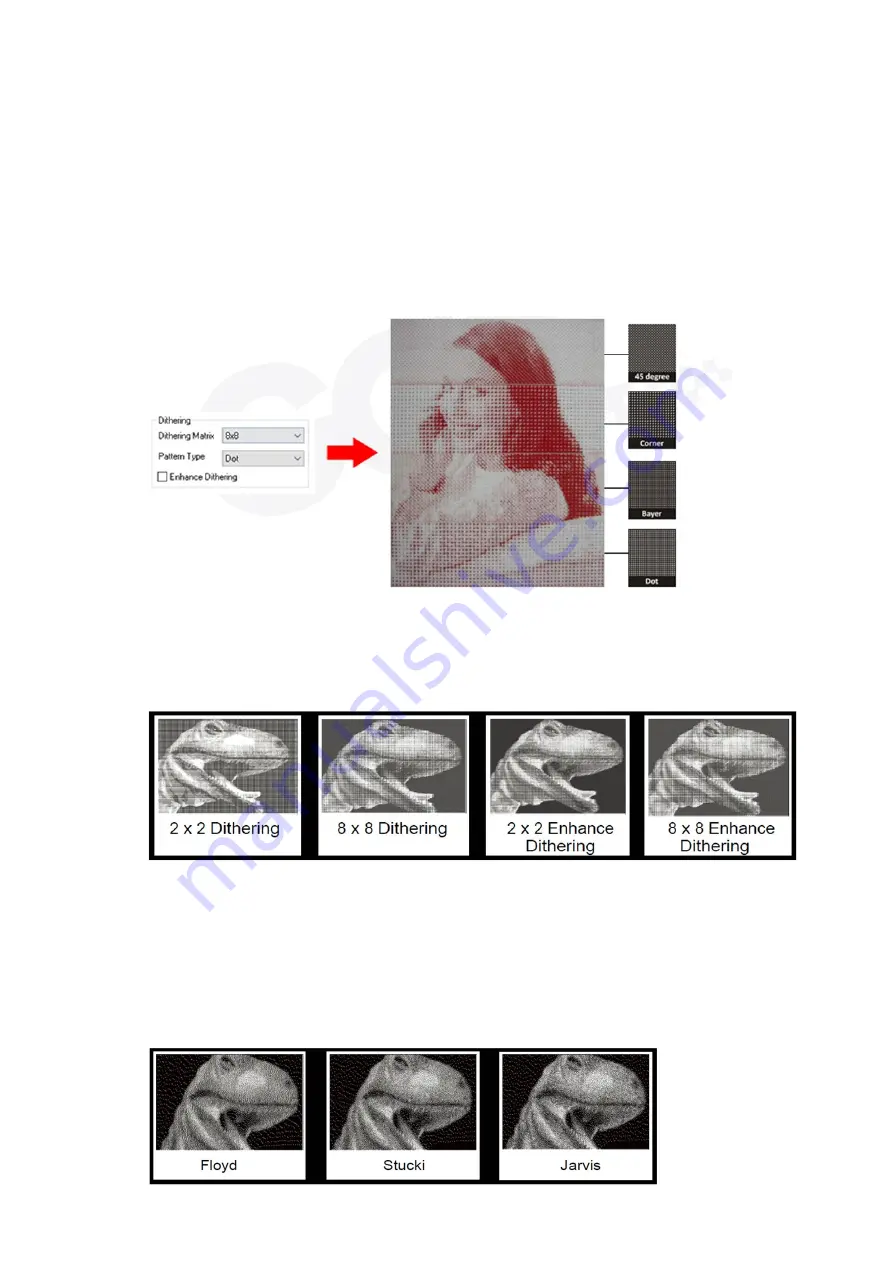
: Dot, Bayer, Corner, 45 Degree [DEFAULT SETTING: Dot]
Each pattern type uses a different shape and arrangement of dots to compose the shading effect of
a raster image.
The following diagram is an example of the raster effects when using the different pattern types.
-
Dithering Matrix
: Variable depending on the Pattern Type selected. [DEFAULT SETTING: 8x8]
This controls the resolution (dot size) and the number of dots the image is broken down into for the
dithering process. As an example, selecting 2 x 2 will shade with a 5-grade halftone, where as an 8 x
8 Dithering Matrix will dither with a 65-grade halftone.
The following diagram is an example of the raster effects when using the different dithering matrices.
-
Enhance Dithering
[DEFAULT SETTING: Unselected]
Selecting this will produce a finer dithering output.
-
Error Diffusion (Raster Page)
: Interprets and outputs the raster engraving via the error diffusion
method. This mode will allow you to select from three diffusion types: Floyd, Stucki, and Jarvis.
-
Diffusion Type
: Floyd, Stucki, Jarvis [DEFAULT SETTING: Floyd]
Each diffusion type presents the shade of image as different spread halftones instead of dots to
compose a raster image.
The following diagram is an example of the raster effects when using the different diffusion types.
Содержание LV-290
Страница 1: ......
Страница 25: ...23 3 Chapter 3 Mechanical Overview Front View Top View Right View Left View Rear View...
Страница 28: ...26 3 5 Rear View SmartEXTTM Pass Through Door Rear SmartLIDTM Operation Handles Ventilation Openings...
Страница 34: ...32...
Страница 35: ...33...
Страница 36: ...34...
Страница 41: ...39...
Страница 42: ...40...
Страница 50: ...48 3 Click Next 4 The installation would be finished in few seconds...
Страница 74: ...72 5 1 4 Graphic Control Panel Navigation Chart...
Страница 160: ...158 12 Select the converted file and click Open to import the saved file to SmartCONTROLTM 13 File import is completed...
Страница 185: ...183...
Страница 187: ...185...
Страница 193: ...7 Chapter 7 Optional Items Fume Extraction Unit Option Air Compressor Option Items Focus Lens Option...
Страница 199: ...197 Cutting edges achieved with the different lenses...
Страница 211: ...209 9 Chapter 9 Basic Troubleshooting...
Страница 213: ...211 10 Chapter 10 Appendix Glossary Specification Sheet...
Страница 216: ...FA01785 R1 190805...


