background image

62

Part 5   Many Kinds of Printing and Settings

[Print Mode]

This selects the print mode, such as standard, high-quality, and so on.

The available items that you can choose may vary depending on the media type you have selected.

- When [Media Type] is set to [Media for Resin]

[Standard Color]

This print mode is suited to resin-use media.

[White Undercoat]

This prints solid white ink at all locations where data is to be printed. This produces a white

undercoat.

You use this at times such as when you're printing on transparent media.

[Back Print]

This reverses the sequence of the ink-ribbon cartridges used when printing. For example, when

[Select Ink Cartridge(s)] is set to YMCK, this uses ink-ribbon cartridges in KCMY order.

You also use this at times such as when you're printing on transparent media and want to view the

printed results from the side opposite to the printed surface.

- When [Media Type] is set to [Media for Wax]

[Standard Color]

This print mode is suited to wax-use media.

[VPhoto Color]

You use this print mode when performing photo-quality printing on wax-use media. It uses finer

gradations than standard printing.

[Finishing]

This uses wax-use ink-ribbon cartridges (finishing) at all locations where data is to be printed, and

performs finishing at the end of printing.

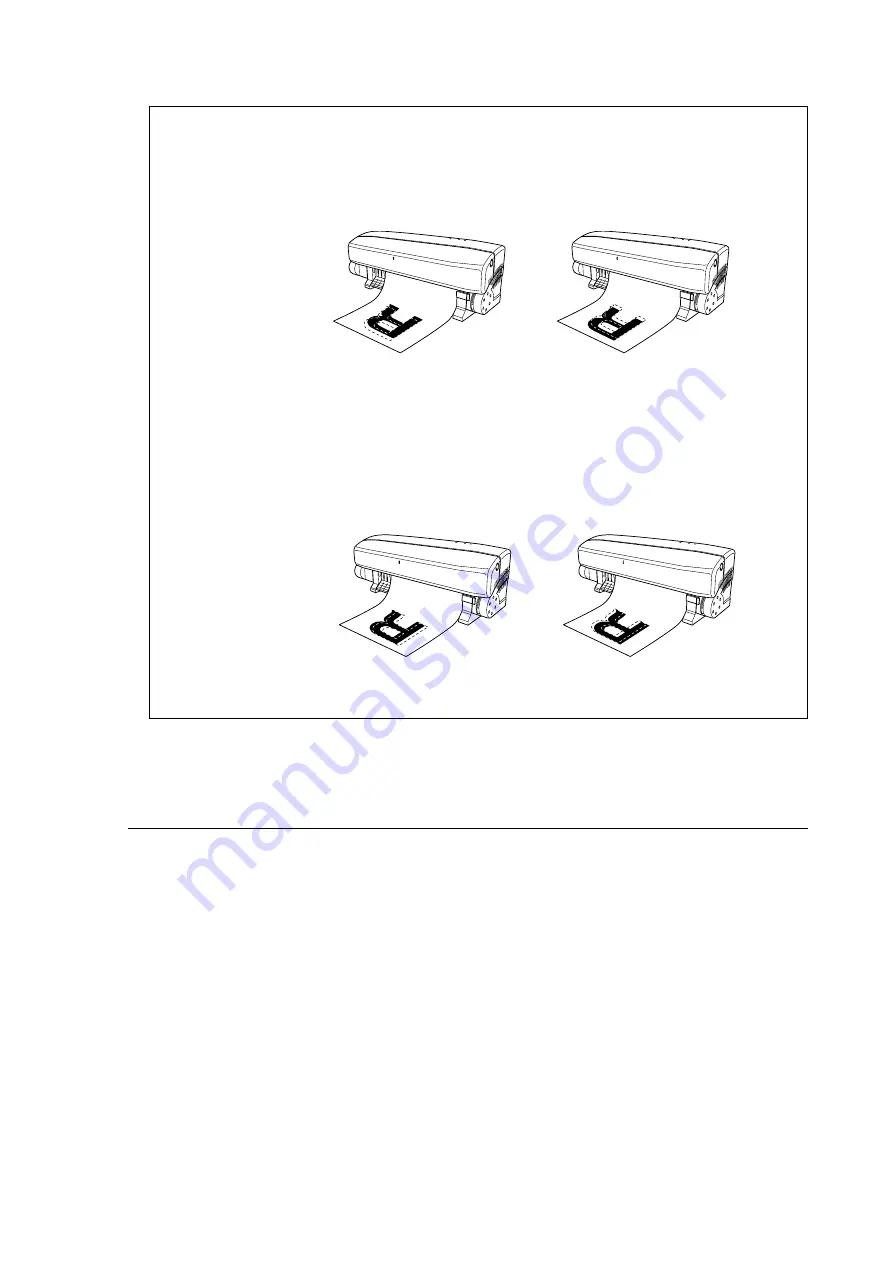
When cutting is at the
front

When cutting is at the
back

Make the value larger.

Make the value smaller.

When cutting is toward
the right

When cutting is toward
the left

Make the value larger.

Make the value smaller.

Cutting X Position

This adjusts the cutting position vertically.

Increasing it shifts the cutting position relative to printing further toward the back when viewed from the

front of the printer, and reducing it shifts the cutting position further toward the front.

The amount of adjustment when set at the maximum value of 50 is approximately 3 mm (1/8 in.).

Cutting Y  Position

This adjusts the cutting position horizontally.

Increasing it shifts the cutting position relative to printing further toward the left when viewed from the

front of the printer, and reducing it shifts the cutting position further toward the right.

The amount of adjustment when set at the maximum value of 50 is approximately 3 mm (1/8 in.).

Содержание ColorCamm PC-12

Страница 1: ...ications of this product are subject to change without notice The operation manual and the product have been prepared and tested as much as possible If you find any misprint or error please inform us...

Страница 2: ...y to cause harmful interference in which case the user will be required to correct the interference at his own expense Unauthorized changes or modification to this system can void the users authority...

Страница 3: ...Delete 19 Part 3 Getting Ready 3 1 Installation and Connection 21 Attaching the Media Base 22 Connecting the Power Cord 23 Connecting to the Computer 23 3 2 Switching the Power On and Off 24 Switching...

Страница 4: ...ble Program 42 Page Settings 42 Specifying the Cutting Line 45 Executing Printing and Cutting 47 Part 5 Many Kinds of Printing and Settings 5 1 Many Kinds of Printing 50 Printing on Resin use Media 51...

Страница 5: ...ever be disassembled The symbol alerts the user to things that must be carried out The specific thing that must be done is indicated by the design contained within the circle The symbol at left means...

Страница 6: ...unplug the power cord from the electrical outlet Failure to do so may result in danger of shock electrocution or fire due to deterioration of the electrical insulation When unplugging the electrical p...

Страница 7: ...on for preventing mechanical breakdown or incorrect operation and for ensuring correct use In addition to the and symbols the symbols shown below are also used NOTICE This indicates a tip or advice fo...

Страница 8: ...doit faire La chose sp cifique faire est indiqu e par le dessin l int rieur du cercle Le symbole gauche signifie que le fil lectrique doit tre d branch de la prise Pour utiliser en toute s curit Util...

Страница 9: ...sus Une n gligence ce niveau pourrait endommager le fil lectrique ce qui risquerait de provoquer une lectrocution ou un incendie Saisir la fiche et non le fil lectrique lorsque vous d branchez D branc...

Страница 10: ...vants indiquent l endroit et le contenu des messages Nom du mod le Etiquette des caract ristiques lectriques Utiliser l alimentation appropri e Ne pas laisser vos cheveux ou vos mains proximit du roul...

Страница 11: ...rton for the machine contain the following included items Before use check to make sure they are all present Ink ribbon cartridges resin User s Manual this document C M Y K Media cover Cleaning pads M...

Страница 12: ...either bitmap data or vector data Operating system Microsoft Windows 95 98 Me Windows NT 4 0 2000 Compatible programs Adobe Illustrator 7 0 8 0 9 0 CorelDRAW 7 8 9 2 Perform output in the same way as...

Страница 13: ...ecial colors Special colors must be purchased separately For printing media use resin use cutting media vinyl chloride media that takes advantage of the characteristics of these inks The test media in...

Страница 14: ...n cartridges during printing In such cases there is not danger of the media being creased NOTICE Latch blue area This secures ink cartridges in the ink cartridge holder Ink ribbon cartridge holder Thi...

Страница 15: ...ress the lever down and pull out the media When you close the front cover the lever returns to its original position Carriage This automatically picks up the required ink ribbon cartridge from the ink...

Страница 16: ...insert button When no data is being received from the host computer and the ready light is illuminated pressing this button supplies or feeds media Holding down the button for one second or longer fe...

Страница 17: ...y Printing of the demo pattern is in progress Dark The power is off A small amount of required power is supplied to internal areas even when the power light is dark To cut the power completely unplug...

Страница 18: ...Connector cable Parallel cable IEEE 1284 compliant or USB cable Keep the PC 12 turned off while installing the printer driver If power to the PC 12 is on the computer s Plug and Play feature runs auto...

Страница 19: ...ction proceed to step 6 3 Click the Install button The Software Product License screen appears 2 Insert the included CD ROM into the CD ROM drive The setup menu appears automatically Click the Readme...

Страница 20: ...connect the computer and the PC 12 then turn on the PC 12 The driver for the PC 12 is automatically registered with the Windows system and the installation operation ends For more information go to Pa...

Страница 21: ...n Windows go into Control Panel and double click the Add Remove Programs icon When the Add Remove Program Properties dialog box appears click Roland PC 12 to select it then click Add Remove When the m...

Страница 22: ...he computer and powered up system information may not be updated correctly Be sure to turn off the PC 12 Click Next The driver is deleted 4 When the driver is deleted the Uninstall Complete screen app...

Страница 23: ...l in a location exposed to severe vibration Do not install in a location exposed to strong light such as direct sunlight Install in an environment having a suitable operating temperature and humidity...

Страница 24: ...e are also two screw holes for securing the media base in place after attaching it Remove the screws that are now in the screw holes 2 With the roller side of the media base facing up insert the tabs...

Страница 25: ...allel Cable IEEE 1284 compliant The parallel cable is sold separately Use a cable suited to the configuration of the printer port on your computer When you connect the machine to an electrical outlet...

Страница 26: ...to the PC 12 and the computer on and off Switching On the Power 1 Shut down the computer 2 Press the power button on the PC 12 All the lights go dark Switching Off the Power When you turn on the PC 1...

Страница 27: ...olor ink ribbon cartridges are sold separately Location of the Holders Where the Ink ribbon Cartridges Are Installed The PC 12 determines the type and color of the ink ribbon cartridges installed in t...

Страница 28: ...be installed Printing cannot be performed if ten are installed Make sure that two ink ribbon cartridges installed in a single ink ribbon cartridge holder are vertically aligned If their positions are...

Страница 29: ...so that side B faces up and grasp the ink cartridge at the center using your thumb and index finger B indication Ink ribbon 3 Switch off the power to the PC 12 and press the front cover eject button...

Страница 30: ...nk ribbon cartridge of the same color is installed in a different ink ribbon cartridge holder the unit picks up the cartridge of the same color and continues printing However the error light remains f...

Страница 31: ...dge holder and take up the slack 2 Grasp the ink ribbon cartridge at the center with your thumb and index finger and push the ink ribbon cartridge to the left so as to press the latch on the left edge...

Страница 32: ...do not press down forcefully on the front cover When closing the front cover do not strike the front cover with force Doing so may cause the ink cartridges to come loose or result in breakdown Instal...

Страница 33: ...eaves clearly visible traces on the carrier paper the blade tip is extended too far Excessive blade extension may damage the blade protector and make attractive cutting impossible so readjust the amou...

Страница 34: ...hand and open it gently Tool carriage Blade holder Front cover eject button Installing the Blade Holder Install a blade holder with blade installed into the tool carriage of the PC 12 1 Switch off th...

Страница 35: ...to loosen it 4 Take the blade holder out of the tool carriage Front cover eject button 5 Turn the tool carriage screw clockwise to secure in place 6 Close the front cover gently while supporting the...

Страница 36: ...ust on the media then before you perform printing wipe the media clean using a cloth moistened with alcohol Do not use media that has been printed or cut within 20 mm 13 16 in of the start of the medi...

Страница 37: ...nto the knife guide groove and letting the groove guide the cutter knife Cutter guide 3 Insert the media in the machine s feed unit Insert the media until it makes contact 4 Press the ready insert but...

Страница 38: ...t receiving data from the computer that is when the ready light is illuminated you can cut off the media by following the steps below Hold down the ready insert button and press the power button for o...

Страница 39: ...the Power at the End of the Day Press the power button on the operation panel to switch off the power In day to day operations you do not need to unplug the power cord 3 Close the front cover gently w...

Страница 40: ...of dust and grime 1 Press the power button on the operation panel to switch off the power 2 Unplug the power cord from the electrical outlet Also do not store material on its side store it vertically...

Страница 41: ...rinting can be performed correctly Also be sure to perform a cutting test when you have loaded media for the first time changed the blade or replaced the media with a different type Demo printing uses...

Страница 42: ...icon to select it 4 From the File menu choose Properties In Windows NT 4 0 select Document Defaults In Windows 2000 select Printing Preferences The Roland PC 12 Properties dialog box appears Output Re...

Страница 43: ...the Media Cuttings tab to display the Media Cuttings page 6 In the Settings to Cut field set values for Cutting Speed and Cutting Pressure that match the media you re using Optimal values are as follo...

Страница 44: ...Adobe Illustrator 8 0 as an example 2 Open the data you want to output Alternatively create new data 3 From the File menu choose Document Setup 4 The Document Setup dialog box appears Click Page Setup...

Страница 45: ...int that is the printing size When you specify the printing size printing width and printing length the required margin is added and the result is displayed as the media size The PC 12 requires the fo...

Страница 46: ...aper and choose Size The list of registered printing size names appears Registering a User defined Size Printing size Name It can be convenient to set and register printing sizes you often use as a Pr...

Страница 47: ...program the name of the command on the File menu may be different The names of the corresponding commands are Print Setup Page Settings Page Setup and so on Make the selection according to the program...

Страница 48: ...1 pt as the width of the line that is to be the cutting line Use the Minimum Value for the Line Width If you re using a different program specify the minimum available value for the width of the line...

Страница 49: ...le standard printing is performed 1 In Illustrator go to the File menu and choose Print 2 When the Print dialog box appears click Bitmap Printing to clear the check box Clear the check box To perform...

Страница 50: ...ore information go to 5 2 Driver Settings and refer to The Image Settings Tab Click OK 5 Click the Media Cuttings tab to display the Media Cuttings page Make sure the settings for Media Size and Setti...

Страница 51: ...en when the media cover is installed Status Monitor The Status Monitor appears when printing starts The Status Monitor displays the status of the PC 12 and the progress of printing When printing ends...

Страница 52: ...et the printing method go to the Roland PC 12 dialog box and use the Print Settings page Output Data Document Type Media Type Print Mode Print Using Select Ink Cartridge s Settings on the Print Settin...

Страница 53: ...Full Color Spot Colors Select Ink Cartridge s Resin use ink ribbon cartridges cyan magenta yellow and black are required When you use Print Using to select Single Color or Full Color Spot Colors resin...

Страница 54: ...l Color Spot Colors resin use ink ribbon cartridges for the selected colors are required When Back print is selected however you cannot use special colors gold or silver Single color Printing This per...

Страница 55: ...Color Print Using Full Color Spot Colors Select Ink Cartridge s Resin use ink ribbon cartridges cyan magenta yellow and black are required Select the check box for the color you want to print using a...

Страница 56: ...nting Document Type Automatic Photographs and Graphics Text perform fused polyvalent printing with 145 screen lines line dithering Grayscale cannot be selected Media Type Media for Wax Print Mode VPho...

Страница 57: ...on as an RGB value The RGB compositions default values of the ink ribbon cartridges special colors are as follows R G B Gold 128 128 0 Silver 192 192 192 Use the values from this chart in the printing...

Страница 58: ...s when Printing Cutting is selected When you have selected Printing selecting the Crop Marks check box causes crop marks to be drawn The crop marks are printed on each page outside the printing size A...

Страница 59: ...out printing In the Output Data field choose Cutting then select the Crop Marks check box The machine detects the crop marks on each page automatically performs alignment then carries out cutting Med...

Страница 60: ...nting This performs only printing Cutting is not performed even if the output data contains cutting lines However when you select None in the What to Cut field on the Media Cuttings page all data is p...

Страница 61: ...hics or text This achieves vivid printing for colors with no gradations such as red and blue Grayscale Select this when you want to monochrome or color data as monochrome grayscale Printing uses grada...

Страница 62: ...nsity and cutting position for the selected media type Saving a Media Type Under a New Name You can create a new media type and attach a name to it The media type you save here is treated the same as...

Страница 63: ...e value larger Make the value smaller Micro Feed This adjusts the line pitch of the media when Printing Cutting or Printing is selected If the line pitch is too wide and gaps appear set this to a minu...

Страница 64: ...print mode when performing photo quality printing on wax use media It uses finer gradations than standard printing Finishing This uses wax use ink ribbon cartridges finishing at all locations where d...

Страница 65: ...ou are performing full color printing using the three CMY colors set Document Type to Photographs or Graphics Text to match the usage and for Select Ink Cartridge s choose YMC CMY or the like Restore...

Страница 66: ...urface When you perform printing the orientation of the printed image when viewed from the side opposite the printed surface is the same as the original data You can effectively combine this with Back...

Страница 67: ...setting does not change even if the settings for Media Type or Media Size are changed When the Crop Marks check box is selected the minimum value is 3 cm What to Cut This specifies what lines in the...

Страница 68: ...l When Document Type is set to Photographs this check box is selected automatically When Document Type is set to Grayscale Print Using is set to Single Color or Select Ink Cartridge s is set to YMC or...

Страница 69: ...lick the Color Match button This performs output with automatic conversion of colors for obtaining optimal output results The Use Driver s Matching Match for Photographs and Match for Graphics Text op...

Страница 70: ...with head cleaner or alcohol Also do not damage the surface of the platen during cleaning Doing so may impair printing quality If Printing on the Platen Was Performed by Mistake If the grime is allow...

Страница 71: ...described below to perform cleaning using the head cleaner Cleaner fluid may spray out when the cap is opened Do not open the cap over the platen If the platen is splattered it may become discolored T...

Страница 72: ...way grime from the media feed rollers metal rollers that touch the small rollers You may need to repeat the process several times to remove stubborn grime Be careful not to get any alcohol on the plat...

Страница 73: ...and make sure it is not loose 2 Press down on the orange cleaning pad included with the machine so that the tab on the cleaning pad goes into the hole Make sure the cleaning pad is level 1 While pres...

Страница 74: ...ohol to wipe away grime from the areas described below If rubbing alcohol is not available wipe with a dry cotton swab Do not use water or volatile chemicals such as benzine or thinners Doing so may c...

Страница 75: ...de force that is too high can make the blade wear out prematurely Use the chart below as a general guide for appropriate cutting parameters and blade life Note that attractive cutting may not necessar...

Страница 76: ...er turned on Switch on the power to the machine See 3 2 Switching the Power On and Off Is the ready light dark Press the ready insert button to make the ready light come on Is the front cover open Clo...

Страница 77: ...e Program and Driver Is the driver installed correctly If no driver is installed refer to Part 2 Installing the Driver and install it Are the program s printer settings correct Go to the program and c...

Страница 78: ...d up ink ribbon turned upside down or rewound and reused Once an ink ribbon cartridge has been used up you cannot turn it over or rewind the ink ribbon and reuse it Replace with a new ink ribbon cartr...

Страница 79: ...f one has come loose open the front cover and reinstall it correctly in the ink ribbon cartridge Is the media jammed If the media is jammed go to 3 5 Loading Media and refer to Removing the Media to r...

Страница 80: ...far the load during cutting may affect media feed Adjust the blade tip See 3 4 Installing and Adjusting the Blade The Ink ribbon Cartridges When the ribbon in an ink ribbon cartridge breaks Check the...

Страница 81: ...page and click Refresh 5 When the Add New Hardware Wizard appears reinstall the USB driver When the following phenomena occur during printing The message Could not start print job appears The Status...

Страница 82: ...r images of the sizes you are manipulating Is the free space on the hard disk fragmented When the free space on the hard disk that is used as the work area becomes increasingly fragmented print operat...

Страница 83: ...ck the Details tab to display the Details page If you re using Windows NT 4 0 2000 click the Ports tab To determine whether your is provided with an ECP controller chip or whether DMA Access can be us...

Страница 84: ...lect it 4 Click OK 5 When the Roland PC 12 Properties dialog box reappears click OK For Windows NT 4 0 2000 1 Go to To Perform High speed Printing When Using a Parallel Connection and follow steps 1 t...

Страница 85: ...int black the Image Settings pages using four colors go to the Roland PC 12 dialog box and at the Image Settings page select the Darker Black check box or adjust Brightness and Contrast When you want...

Страница 86: ...d make sure the external and carriage retainers If the internal and external retainers have not been removed then remove them 2 Make sure the power cord is securely inserted all the way into the power...

Страница 87: ...d refer to Cleaning the HP Sensors RE Sensor and Indicator Sticker Error message This print job cannot be completed The printer has encountered an error in the LF motor Remedy 1 The media in use may b...

Страница 88: ...If the ink ribbon cartridge is not installed install it with side B facing up Also make sure that an ink ribbon cartridge for a different model is not installed Refer to 3 3 Installing Ink ribbon Car...

Страница 89: ...quired ink cartridge s XXXX Remedy This appears when a required ink ribbon cartridge was not installed in the PC 12 when printing started The name of the necessary ink ribbon cartridge appears in XXXX...

Страница 90: ...a new ink cartridge Remedy This appears when an ink ribbon cartridge runs out while in printing is progress XXXX indicates the number of the holder and X is a character indicating either the upper or...

Страница 91: ...e changer The printer has encountered an error in the CR motor The printer has encountered an error in the LF motor The printer has encountered an error in the media cutting motor The printer has enco...

Страница 92: ...nk VPhoto Color printing 600 dpi x 600 dpi wax ink or resin ink Standard Color printing 0 3 or less of movement distance or 0 3 mm 0 0118 in or less whichever value is larger 3 0 3 mm 0 0118 in or les...

Страница 93: ...ft margin 3 4 mm 3 16in Bottom margin 31 mm 1 1 4 in Direction of printing Right margin 3 4 mm 3 16in Crop mark printing area 21 8 mm 7 8 in Sheet Material with Crop mark Printing Printing length Prin...

Страница 94: ...margin 13 mm 9 16 in Left margin 3 4 mm 3 16in Direction of printing Right margin 3 4 mm 3 16in Crop mark printing area 21 8 mm 7 8 in 1st page 1st page Printing length Printing length Page spacing 1...

Страница 95: ...in Printing width Top margin 13 mm 9 16 in Left margin 3 4 mm 3 16 in Direction of printing Right margin 3 4 mm 3 16 in Crop mark printing area 21 8 mm 7 8 in 1st page 1st page Printing length Printi...

Страница 96: ...MEMO 94...

Страница 97: ...R1 010808...

Отзывы: