background image

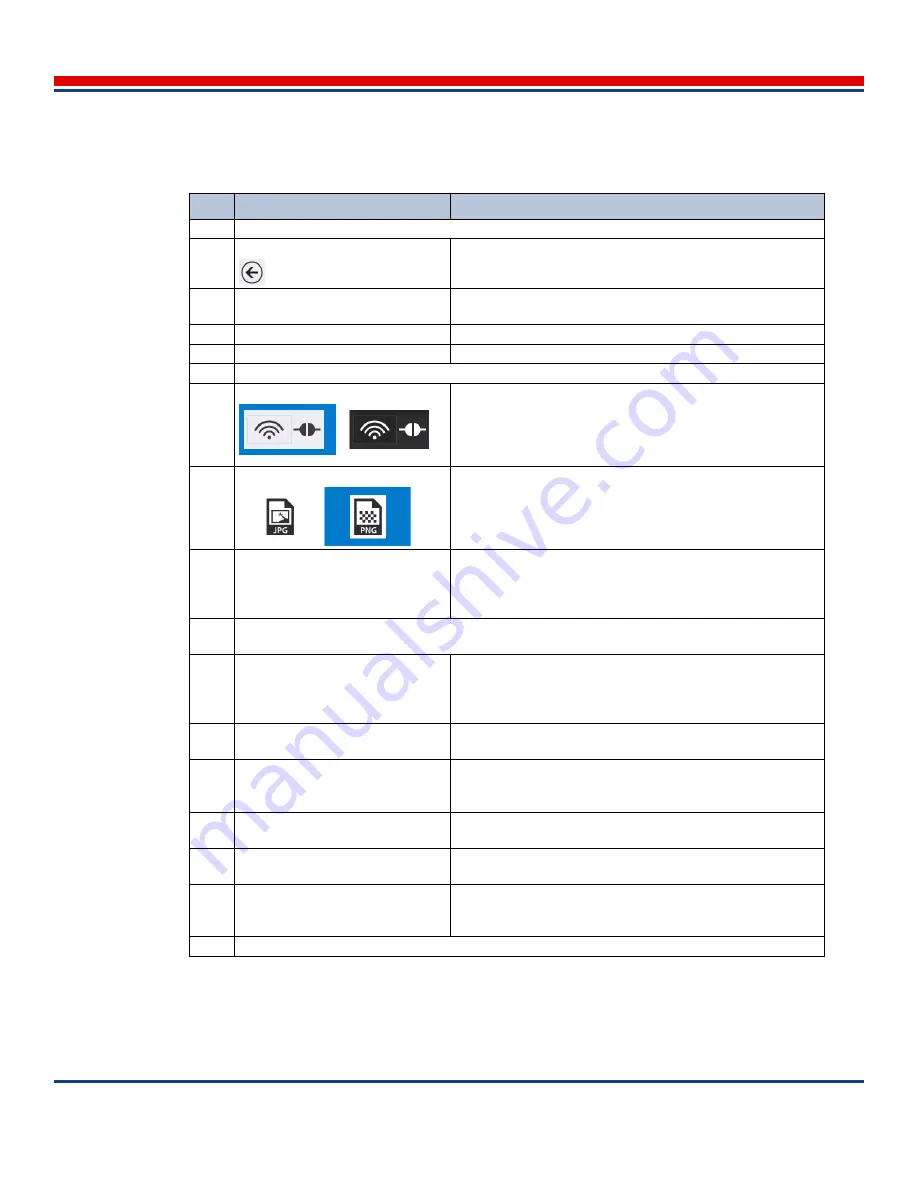
Tablet Primary Screens: Settings General Mode Screen

American Science and Engineering, Inc. 

5-30

MINI 

Z

 Operator Manual  342-9000-1 Rev. B  ECCN EAR99

Table 5-11: Settings General Mode Screen Description (refer to 

Figure 5-11

)

Key

Name

Description

Navigation Bar (top of screen)

1

Back button

Tap once to return to the Home screen

2

General button

Highlighted background indicates this screen is the current 
screen

3

Users button

Tap once to open the 

Settings Users Mode Screen

4

Policies button

Tap once to open the 

Settings Policies Mode Screen

Content Pane (middle of screen)

5

Skins

Tap to set background of all screens: (left example) light, (right 
example) dark

6

Image Format

Tap to set the type of file generated for exports of scan 
images: (left example) JPG (JPEG, lossy format), (right exam-
ple) PNG (non-lossy format)

7

Language

Tap the label of the current language to open a list of the lan-
guages available on the tablet. Tap to select the new lan-
guage and then tap the confirmation button (requires restart of 
tablet). Only appears for supervisor login accounts.

 (Scanner table) Scanner must be powered-on and interconnected with tablet to activate 
these entries

8

WiFi Region

Operator and supervisor accounts: View current setting for 
WiFi transmission standards
Supervisor accounts only: Tap to access WiFi region setting 
screen. (See 

Section 3.6.3.2, Configuring the WiFi Region

)

9

WiFi SSID

Change the WiFi identifier for the scanner unit. (See 

Section 

3.6.3.4, Confidential SSIDs for Scanners

)

10

WiFi Frequency

Change the WiFi frequency band for optimum interference 
rejection. (See 

Section 3.6.3.3, Configuring the WiFi Fre-

quency

)

11

X-ray Beep

Change the audible warning pattern during scanning. (See 

Section 3.6.6, ASEI Audible Warning

)

12

Laser

Change the laser guide beam usage during scanning. (See 

Section 3.6.7, ASEI Laser Guide Beams

)

13

Create Incident Report button

Tap to open screen to create an incident report to submit to 
AS&E. For more information, see 

Section 11.9, Incident 

Reports

.

Status Bar (bottom of screen): see 

Section 3.5

Содержание AS&E MINI Z

Страница 1: ...ator Manual American Science and Engineering Inc 829 Middlesex Turnpike Billerica MA 01821 U S A 1 978 262 8700 www as e com 342 9000 1 Rev B ECCN EAR99 MINI Z Handheld Z Backscatter X ray Screening System ...

Страница 2: ...table installation or oper ational environment for the product c damage or malfunction caused by use of the product for purposes other than those for which it was designed d damage or malfunction caused by disasters or acts of God such as fire flood wind and lightning e damage or malfunction caused by unauthorized attachments or modifications f damage or malfunction caused by repair maintenance or...

Страница 3: ... provide support services worldwide Each FSE with a technical degree in electrical and mechanical engineering or equivalent experience is trained in the opera tion and repair of electronics hydraulics pneumatics mechanics electrical systems and computers Available 7 days a week 24 hours a day FSEs are located at AS E offices in Asia Europe the Middle East and North America Rapiscan AS E is a part ...

Страница 4: ... is based in part on the work of the Independent JPEG Group TurboJPEG API Copyright C 2017 libjpeg turbo All Rights Reserved Redistribution and use in source and binary forms with or without modification are permitted provided that the following conditions are met Redistributions of source code must retain the above copyright notice this list of conditions and the following disclaimer Redistributi...

Страница 5: ...OR PROFITS OR BUSINESS INTERRUPTION HOWEVER CAUSED AND ON ANY THEORY OF LIABILITY WHETHER IN CONTRACT STRICT LIABILITY OR TORT INCLUDING NEGLIGENCE OR OTHERWISE ARISING IN ANY WAY OUT OF THE USE OF THIS SOFTWARE EVEN IF ADVISED OF THE POSSIBILITY OF SUCH DAMAGE The microSD memory card slot and microSIM slot accept external cards American Science and Engineering accepts no responsibility for loss o...

Страница 6: ...American Science and Engineering Inc vi MINI Z Operator Manual 342 9000 1 Rev B ECCN EAR99 ...

Страница 7: ...2 6 Visual Warnings of X Ray Emissions 2 7 Wifi Audible Warnings X Ray Emissions 2 8 Interlocks X Ray Emissions 2 8 Calibration Dock 2 10 Pre Operation Area Check 2 11 Pre Operation System Check 2 11 Pre Operation Scan Path Planning 2 12 Chapter 3 Introduction 3 1 General Description of the System 3 1 Unpacking the System 3 3 Power Connections 3 5 Data Connections 3 6 Ethernet Cable Connection 3 9...

Страница 8: ...vironment 3 40 Accessing the Windows Operating System 3 42 Restoring Normal ASEInspection Mode from Windows Mode 3 43 System Time and Date Setting 3 44 WiFi 5 0 GHz Detection Setting 3 45 Touch Sensitivity Mode Setting 3 47 Screen Brightness Setting 3 50 WiFi Access Lock Out 3 50 Chapter 4 System Components 4 1 Major Exterior Components Overview 4 1 Scanner Controls 4 2 Tablet Controls 4 5 Memory ...

Страница 9: ...d Image Highlighting 7 5 Multiple Images Scan Set up 7 8 Adjusting Multiple Images Scans 7 9 Rescanning 7 11 Aspect Ratio Control 7 11 Operational Considerations 7 12 Annotating Scan Images 7 14 Image Physical Correlations 7 14 Image Groups 7 15 Adding Comments to Scan Images 7 17 Flags for Scan Images 7 18 Faults and Warnings 7 19 ScannerUser and Admin Login Accounts 7 20 Troubleshooting Windows ...

Страница 10: ...ries 9 11 Reference Images 9 12 Backup of Images 9 12 Restoring Images 9 13 Deleting Images 9 15 Chapter 10 User Accounts 10 1 Login Screen 10 2 Changing Users Logout Login 10 2 Password Requirements 10 3 Changing Passwords 10 4 Settings Users Mode Screen 10 6 Modifying User Accounts 10 7 Settings Policies Mode Screen 10 10 Chapter 11 Maintenance 11 1 Touchscreen Cleaning 11 1 Tablet Dashboard PC ...

Страница 11: ... 12 10 Checking the Tablet Main Battery Pack Level 12 11 Recharging the Tablet Main Battery Pack 12 12 Recharge Rate 12 13 Bridge Battery 12 14 Scanner Battery 12 16 Checking the Scanner Battery Level 12 17 Exchanging Batteries in the Scanner 12 18 Recharging the Scanner Battery 12 20 Chapter 13 Options and Accessories 13 1 System Parts List 13 2 Tablet Anti Virus Updating 13 7 Updating Windows De...

Страница 12: ...American Science and Engineering Inc x MINI Z Operator Manual Rev B ECCN EAR99 ...

Страница 13: ...version Overall increase in system speed and image processing Automatic conversion from dynamic contrast mode to manual contrast Dedicated Export screen for offloading image files Inspection delete function moved to the Review screen New intuitive Home screen icons Dual WiFi band options Ruggedized tablet computer for control button maps see Table A 6 Direct Ethernet cable tablet connection Option...

Страница 14: ... a viewer screen For first time views the Adobe PDF End User Agreement may appear Tap the Accept button to continue 2 To expand or reduce the size of the manual pages on screen tap with two fingers on the screen and spread them to enlarge and join them to reduce the page size The system is designed so that a user can perform scanning without having direct access to the operating system of the tabl...

Страница 15: ...to jump to the hyperlink destination To search using conditions in the vertical toolbar at the side of the screen tap the binoculars button The screen updates to display the Search panel with a text entry box Figure Preface 1 PDF Scrolling To move to a specific page tap the PDF image to open a scroll button Tap and drag the scroll button and the cur rent and total page number count displays intera...

Страница 16: ...e keyboard pane appears 3 Tap the Search button to perform the search Figure Preface 3 On screen Keyboard To use the on board keyboard tap any text entry box The on screen keyboard appears See Section 3 4 3 1 2 3 The on screen keyboard stays visible until closed To close the keyboard tap the X icon on the Title bar of the keyboard To move the keyboard tap the title bard then tap and drag the start...

Страница 17: ...ion The individual full sections referenced should be reviewed and understood before carrying out these steps In particular carefully review Chapter 2 System Safety The Basic Operation card is provided as a hardcopy insert into the shipping case with the system and provides a simplified instruction to get the system operational test and shut down The Getting Started pamphlet is provided as a hardc...

Страница 18: ...d in a variety of configurations for cargo and vehicle inspection parcel inspection and personnel screen ing Using a combination of advanced technologies these systems provide superior detection capabili ties with high energy dual energy transmission and Z Backscatter X rays pioneered and perfected by AS E Z Backscatter Technology As X Rays hit an object some are absorbed producing a transmission ...

Страница 19: ...Z Backscatter and For wardscatter views for left right and top side imaging of cargo The Z Portal and the Sentry Por tal can be co located for a multi faceted solution AS E s broad range of cargo and vehicle inspection systems are designed to combat terrorism trade fraud drug trafficking and weapons smuggling Parcel Mail and Package Inspection Systems include the Gemini inspection system a multi t...

Страница 20: ...a succession of pioneering discoveries and developments in the field of X Ray technology including the discovery of the first known X Ray source outside the solar system 1962 the first successful soft X Ray photograph of the sun 1965 the launch of the first satellite dedicated completely to X Ray astronomy 1970 and the launch of the Einstein Obser vatory the world s largest X Ray telescope 1978 Dr...

Страница 21: ...ray technology This basic procedure is intended solely to allow the operator to confirm the operational status of the system as received before continuing with the remainder of system setup and use descriptions in this manual and in training sessions Table 1 1 Initial System Operational Test 1 Setup On the tablet 1 Insert lock and charge the battery pack 2 Press the Power button and release when t...

Страница 22: ...ndicates seeking a tablet connection 4 Setup On the tablet 1 Tap the WiFi button 5 Setup On the tablet 1 Tap the serial number that is on the scanner unit label SN Wait for connection 2 When connected the list closes automatically On the Scanner Unit the yellow light changes to continuous on Table 1 1 Initial System Operational Test continued Ensure the Calibration Dock is rated for 120kV metal fr...

Страница 23: ...mup is required the Warmup Required screen opens Otherwise skip to step 10 7 Warmup On the tablet 1 Tap the Enable Scan button The scanner unit enables and the background of the button changes to blue 8 Warmup On the scanner unit 1 Press and hold one of the red trigger buttons 2 The four warning lamps on the scanner handle corners illuminate The scanner beeps X rays are emitting On the tablet 3 Th...

Страница 24: ...canner beeps twice 3 Release the red trigger buttons 10 Scan On the tablet 1 Tap the Enable Scan button after 35 seconds to enable again the button displays the blue background 11 Scan On the scanner unit 1 Point the scanner unit away from all personnel 2 Press and hold one of the red trigger buttons 3 The four warning lamps on the scanner handle corners illuminate The scanner beeps X rays are emi...

Страница 25: ...rigger buttons 2 The four warning lamps on the scanner handle corners extinguish The scanner beeps twice 3 The scan image is saved automatically The image in this example is the test pattern from the Calibration Dock 13 Power off in either order 1 The scanner unit key to the Off O position 2 The tablet tap Back to Home page then tap Exit Table 1 1 Initial System Operational Test continued 2 1 ...

Страница 26: ...Basics American Science and Engineering Inc Basics vi MINI Z Operator Manual 342 9000 1 Rev A ECCN EAR99 ...

Страница 27: ...ely and understood before starting to operate the system 2 1 Symbols See Table 2 1 for a list and definitions of common symbols that may be used in this manual and or on AS E equipment Table 2 1 List of Symbols Symbol colors vary Explanation Danger Warning Caution Risk of danger or damage See Section 2 2 Admonitions Caution Risk of electric shock CAUTION X RAYS Equipment produces X rays when energ...

Страница 28: ...lt in death or serious injury 2 2 2 Caution Information Box CAUTION indicates a potentially hazardous situation which if not avoided could result in minor or moderate injury As used in this manual a Caution box may appear in procedures or in general text In procedures a Caution box means that the next task check or procedure involves a hazardous situation which if not avoided could result in minor...

Страница 29: ...rd Strong light from the tablet rear camera LED light do no look directly into the beam Do not turn the tablet volume high when using headphones Heat from tablet circuitry on rear of tablet and from AC adapter may cause low temperature burns if carried next to a person s skin for long periods of time while in operation Lasers Two Class 1 laser guide beams can be enabled to indicate the X ray beam ...

Страница 30: ...rect X ray beam emissions During normal operation the MINI Z is safe for the user and for people animals and plants that are outside of the exclusion zone surrounding the direct X ray beam emissions Safety is assured as long as the system is secure all panels are intact and all interlocks are operat ing properly The MINI Z is designed with hardware and software interlocks throughout the sys Figure...

Страница 31: ...of the safety interlocks Do not insert any part of the body or any other objects into X ray generating equipment or electronic housings while X rays are being generated Do not open the MINI Z housing Do not leave the system unattended at any time while it is in operation Do not attempt to service AS E X ray equipment unless trained and certified by the manufacturer Store and transport the equipmen...

Страница 32: ... system is enclosed in a sealed tamper evident external housing There are no user serviceable components inside and it is a hazard if opened and voids the warranty WARNING Do not reach into the beam path while X rays are being generated Do not look into the two laser guide beams emitting from the scanning surface of the scanner unit Please consult your local regulatory authority when disposing of ...

Страница 33: ...the X ray emission window on the scanner face and are set at the 60 fan angle of the emitted X ray beam so they can serve as visual indicators of the extents of the beam path When enabled in the Settings General Laser option group Section 3 6 7 ASEI Laser Guide Beams the laser beams are illuminated at all times when the X ray beam is being emitted see Figure 2 5 Figure 2 4 Safety label on scanner ...

Страница 34: ...sion two beeps During the X ray emission one beep every second of time 2 7 3 Interlocks X Ray Emissions The MINI Z scanner has several mechanical interlocks A key on the scanner housing for main scanner power on off see Figure 2 6 Two trigger buttons on the scanner handle wired in parallel at least one button must always be pressed down in order for X rays to be emitted see Figure 2 6 In the inter...

Страница 35: ... speed before emissions are enabled The tablet must be set to the Scan screen or to one of the two Status screens and the Scan Enable button upper area of the screen tapped to On full color image in the button with dark blue background before X ray emissions are enabled and then a trigger button on the scanner must be pressed within 35 seconds of time to allow emissions to occur At least one of th...

Страница 36: ...e Dock Ensure that only a Dock with black metal frame is used with the 120kV system The Docks with silver metal frame are designed for the 70 kV systems only Figure 2 7 Calibration Dock application 1 The MINI Z face is the section at the front of the scanner 2 Alignment collar in the dock Place the dock on a horizontal surface with the four mounting feet downward 3 Seat the Scanner Unit face down ...

Страница 37: ...n Scan path extents and direction clear obstructions and position the object to optimize access by the scanner Appropriate hand placement to allow free movement throughout the scan Appropriate foot placement to allow balanced movement throughout the scan Consider using two users one to scan the other to monitor the tablet if the scan presents difficul ties 2 7 6 Pre Operation System Check Figure 2...

Страница 38: ...S E Field Service is appropriate 2 7 7 Pre Operation Scan Path Planning The MINI Z system is designed for close quarters maneuvering near objects being scanned particu larly in confined spaces or zones where stationary X ray systems cannot be used However the MINI Z produces an open X ray beam and careful preparation must be made to ensure the directed beam of the MINI Z emission is never swung to...

Страница 39: ...e motion required to complete the scan path Make a practice sweep through the entire scan path Note Ensure that feet and hands are clear of the scan path by a wide margin 4 Review the posture and positioning shown in Figure 7 1 and Figure 7 2 WARNING AS E recommends that the scan path be planned so that the front of the scanner can be within approximately four to six inches 10 15CM of the surface ...

Страница 40: ...System Safety X Ray Safety American Science and Engineering Inc 2 14 MINI Z Operator Manual 342 9000 1 Rev B ECCN EAR99 ...

Страница 41: ... The MINI Z system basically is an X ray scanner unit and a tablet computer that controls the scanner unit and captures and presents images received from the scanner The main components are shown in Figure 3 1 The standard scanner unit provides the AS E signature Z Backscatter technology and the multimode scanner unit will be extensible with future features Figure 3 1 MINI Z System typical Future ...

Страница 42: ...d graphical user interface provides simple operation and management of the scan data The MINI Z system is safe for operators bystanders and the environment The system s X ray dose conforms with applicable ANSI ICRP NCRP and EURATOM radiation safety standards Although the MINI Z system is a low energy and low dose Z Backscatter system it is not designed to scan peo ple The MINI Z system must be use...

Страница 43: ...case along with accessories The layout of the case is shown in Figure 3 2 The contents are described in Table 3 1 Figure 3 2 Packing in Rugged Transport Case Content keys explained in Table 3 1 Table 3 1 MINI Z System Contents Packing typical Description Image Rugged Transport Case with half depth foam insert included Getting Started Guide and Quick Start included 1 Scanner with key 1 2 3 4 5 6 8 ...

Страница 44: ...anual 342 9000 1 Rev B ECCN EAR99 2 Scanner Shoulder Strap 3 Calibration Dock 120 kV rated 4 Tablet 5 Tablet charger power adapter with power cord 6 Scanner batteries 2 each with shipping covers 7 Hand Strap and Stylus for Tablet Table 3 1 MINI Z System Contents Packing typical continued Description Image ...

Страница 45: ...rgers for the batteries must be connected for charging the batteries before use Connecting battery charging compo nents is illustrated in Figure 3 3 and Figure 3 4 8 Scanner battery charger 9 Scanner battery charger power adapter with connector cord 10 Scanner charger power cords for US UK and EU mains 11 Ethernet cable scanner unit M 12 to tablet RJ 45 Table 3 1 MINI Z System Contents Packing typ...

Страница 46: ...et cable for facilities where WiFi is not allowed WiFi connections are illustrated in Figure 3 3 and Ethernet cable connections are illustrated in Figure 3 4 CAUTION It is highly recommended to fully read and understand the battery handling chapter Section 12 4 before proceeding In particular do not install or remove the tablet main battery pack while the AC adapter is connected or while the table...

Страница 47: ...tion Guide Not Using Ethernet Cable 1 Assemble scanner battery charger and charge the scanner battery then insert the charged battery into the scanner 2 Insert battery into tablet and assemble tablet battery charger and charge the tablet battery 3 Push the Power button on the tablet on the scanner insert the key and turn toward to power on 1 2 3 ...

Страница 48: ...rnet Cable 1 Assemble scanner battery charger and charge the scanner battery and insert the charged battery into the scanner 2 Insert battery into tablet and assemble tablet battery charger and charge the battery 3 Connect Ethernet cable between tablet and scanner 4 Push the Power button on the tablet and on the scanner insert the key and turn toward to power on 1 2 3 4 ...

Страница 49: ... automatically detects the presence of the cable and configures itself to use the cable To confirm that the Ethernet cable is being used by the system the interconnect button in the Status bar at the bottom corner of the screen shows a cable symbol for location see Table 3 2 WiFi wireless option Section 3 6 3 No additional hardware is required but the user must config ure the scanner to comply wit...

Страница 50: ...Ethernet RJ 45 clip 2 Ethernet right angle M12 plug with threaded ferrule 1 2 CAUTION The right angle M12 Ethernet connector at the scanner housing is composed of four pins and a free spinning threaded ferrule shown in the figure at right To ensure proper polarity and to avoid damaging the pins the connector is designed with alignment surfaces inside of the connector 1 Be sure to first properly al...

Страница 51: ...on screen opens Setting up the WiFi connection requires use of the tablet controls and the tablet and scanner to be powered The local WiFi regulations are selected in the initial configuration Section 3 6 3 2 The scanner connection in WiFi must be selected each time the tablet and scanner is powered on so for some applications using the Ethernet cable configuration can save time CAUTION Do not app...

Страница 52: ...d entry text box to open the onboard keyboard and type the login password then tap the Enter button Windows operating system opens to the screen that was open when Power saving mode was entered When starting or awakening the tablet on the front of the tablet observe the Power LED circled at right and release the Power button as soon as the Power LED illuminates Then wait for the tablet to initiali...

Страница 53: ... in ASEInspection or when a supervisor account is using the Windows operating system Sleep mode is entered automatically after 2 minutes of inactivity when the tablet is in the ASEIn spection normal operation mode In Sleep mode the tablet continues to draw power and deplete the battery If using Sleep mode for a long period of time consider connecting the AC Adapter While Sleep mode is active the P...

Страница 54: ... in the image above A menu opens 3 Tap the Shut down listing The tablet powers down completely More About Power saving and Sleep Modes The tablet does not enter Sleep mode or Power saving mode if the AC adapter is connected and powered It is not recommended to use Sleep mode or Power saving mode continuously The tablet should be powered off and restarted routinely at least once a week The tablet m...

Страница 55: ...by pressing the Windows Start button on front of the tablet beside the touchscreen Sensitivity to stylus touches and finger touches can be set To verify the tablet is completely shut down observe the Power indicator on the tablet frame outside of the touchscreen If the Power indicator flashes every 2 seconds of time the tablet is in Sleep mode or Power saving mode and has not completely shut down ...

Страница 56: ... point that can accept text is tapped The keyboard can be closed at any time by tapping the X button in the top corner It will reopen again whenever a text touch point is tapped To lock capital letters double tap an upward arrow button The Windows tablet operating system can leave recently used command buttons partially highlighted with a muted back ground such as medium gray for a normally black ...

Страница 57: ...Screen Rotation The tablet allows the user to work with the screen oriented in landscape or portrait orientation This can help with gripping the tablet and in orienting the images when viewing so the screen objects always appear rightside up relative to gravity The two orientations are shown in Figure 3 7 When rotation of the screen is not locked to change orientation simply hold the tablet with t...

Страница 58: ...e user is in a constrained area and cannot hold the screen properly Examples are pro vided in Figure 3 8 Figure 3 7 Rotating the tablet display by rotating the device 1 from landscape to portrait or 2 from portrait to landscape Figure 3 8 Rotation Locking Left Rotation Locked screen orientation remains the same regardless of tablet orientation Right Rotation Unlocked screen orientation changes to ...

Страница 59: ...lock the screen rotation 1 Press the Screen Rotation Lock button until rotation is enabled 2 Rotate the tablet until the screen is in the desired orientation 3 Press the Screen Rotation Lock button again to lock the position When the tablet is powered on or resumes from Sleep mode or Power saving mode the screen rotation remains at the last orientation before entering the suspended state It then q...

Страница 60: ...art on an edge off of the touchscreen and swipe into the touchscreen Flick A quick touch very short drag and lift of the finger Use with a lengthy list by flicking along the length of the list The list entries will rapidly slide through the screen Drag A touch and hold and then moving the finger along the touchscreen without lifting the fin ger Use to pan across images that are larger than can be ...

Страница 61: ...tylus touch Sensitivity to the stylus is set using the tablet Dashboard function Section 3 7 6 Figure 3 9 Press 1 tap 2 and drag 3 gesture 2 3 1 X When Touch Water touchscreen sensitivity is enabled multi touch input is limited to 2 points of simultaneous contact Also the Windows Start button on the touchscreen frame becomes disabled by default See Section 3 7 5 The screen may jump or wander when ...

Страница 62: ...s and links to WiFi Connection and Status screens To move between main screens perform the following actions Tap a button to open the corresponding screen In the case where several related modes of top level screens text link buttons appear in the Navigation pane Several top level screen buttons are pre sented in the Content pane in the Home Screen Figure 3 10 Stylus 1 Stylus 2 Pocket Clip 3 Remov...

Страница 63: ...n buttons for example the keyboard Closing the subscreen returns the operator to the previous primary screen Tapping a selection in some cases closes a screen automatically in other cases a confirmation but ton may be presented For a map of the various main screens see Section A 4 Figure 3 11 General screen layout for reference see descriptions in Tables 3 2 to 3 4 Exact position may vary dependin...

Страница 64: ...unction 7 Gallery Area Header Expand Collapse button Appears in screens where several groups of images are pre sented and the images are arranged under headers Tap this button left example to show or right example to hide the gallery area under the header 8 Current Image Group Name and image sequence display Depending on context displays the name of the image group being shown and the sequence num...

Страница 65: ...nder a header If only one image or group is displayed the corresponding images For each image identifying information is displayed Scanner serial number of the scanner that generated the image Date scan was recorded 17 Lock button In image viewing screens can freeze to position or size of one or more scans Click to toggle locked state 18 Previous Scan button If bolded indicates that there exists o...

Страница 66: ...gure 7 10 22 Warning Status icon Appears when a warning has been issued by the system If the condition is resolved this icon will again be hidden For informa tion tap the Status button on this toolbar to view the Status Overview Mode Screen Warnings section A warning message may also appear see Figure 7 10 23 Scanner Connection Status icon Always visible Left example Scanner and tablet are interco...

Страница 67: ...ap across those clips For full details see Section 28 Scanner Battery Status icon Indicates approximate percentage of scanner battery full charge left example battery full middle example battery approxi mately 60 of full Scanner must be interconnected to tablet to appear When the battery is critically low and the battery should be replaced immediately the icon is red color and flashes right exampl...

Страница 68: ...ection 3 2 3 6 1 Initial Supervisor Account A confidential password protected supervisor account should be created This account can be used to create operator accounts and perform system configuration 1 Ensure the tablet main battery pack is loaded locked in and that the battery power indicator LED displays green 2 Power on the tablet on the tablet left side press the Power button until the Power ...

Страница 69: ...h the user name SITEADMIN A screen opens to set the password a In the New Password text box type a new password If the system has been pre configured for strong passwords the password must include 8 to 14 characters case sensitive At least one upper case letter A Z At least one lower case letter a z At least one numeric character 0 9 At least one special character _ No more than two numbers togeth...

Страница 70: ... there are several bars on the scanner battery pack LCD image below shows five bars indi cating a full charge the pack is loaded and the compartment door is latched 2 Power on the scanner unit turn the key to the on position The Power indicator LED displays steady green If the Ethernet cable is not connected the Status indicator LED displays CAUTION If necessary consider making a temporary record ...

Страница 71: ...onal government wireless communication regulations in the location of use Section 3 6 3 2 3 Select the WiFi frequency band Section 3 6 3 3 If the WiFi 5 0 GHz frequency band is to be used the tablet must be configured to detect that band Section 3 7 4 The default 2 4 GHz frequency band always is available If the Ethernet cable is being used but becomes disconnected during operation the system auto...

Страница 72: ...list Figure 3 12 Scanners that have not been given a confidential SSID appear with the serial number SN that appears on the label of the scanner unit Figure 3 12 WiFi Connection list with a previously selected and connected scanner indi cated 1 WiFi Connection button at bottom corner of all screens highlighted back ground indicates that the list is open 2 Show all check box tap to show all WiFi no...

Страница 73: ...eless transmis sion 1 In the tablet Home Screen tap the Settings button The Settings screen opens 2 At the top corner of the touchscreen tap the General button The Settings General mode screen opens shown in Figure 5 11 Scanners that have been enabled for 5 0 GHz show 5G at the end of the listing name If the 5 0 GHz band has been selected but the scanner unit does not appear in the WiFi Connection...

Страница 74: ...bed in Section 3 7 4 When 5 0 GHz detection is enabled the user can interactively choose between 2 4 GHz and 5 0 GHz using the procedure described in this section Selection between the two bands is done by the user and depends on local conditions and the use of the bands by other WiFi users Selection is persistent between sessions and is stored in the scanner unit When the 5 0 GHz band is selected...

Страница 75: ...he SSID whether it is the default SSID or a customized SSID Serial Number versus SSID When the scanner unit is built at the AS E factory the serial number of the scanner unit is embedded in the scanner memory The serial number uniquely identifies the scanner unit and it matches the visi ble serial number marked on the label on the exterior of the scanner unit housing Figure 3 13 The scanner serial...

Страница 76: ...the following steps 1 In the tablet ASEInspection Software Home Screen tap the Settings button The Settings screen opens 2 At the top of the screen if necessary tap the General button The General screen appears see Figure 5 11 If a custom SSID does not display The Microsoft Windows operating system that is used on the tablet blocks the display of the SSID if it includes certain combinations of spe...

Страница 77: ...s screen appearance color schemes are provided with the MINI Z a light background and a dark back ground This can be changed by any user login account at any time This allows rapid response to changing use conditions The setting remains until manually changed in this screen or until the tablet is restarted 1 In the tablet ASEInspection Software Home Screen tap the Settings button The Settings scre...

Страница 78: ...ote text JPG Use JPEG format Note text PNG Use PNG format This selection applies to all exported files until changed again in this screen or in the Scan Monitor Mode Screen or Export Screen 3 6 6 ASEI Audible Warning Requires a connection to the Scanner The MINI Z has one audible X ray generation indicator It consists of an audible beep The quantity of beeps can be configured to match local govern...

Страница 79: ...ion The list closes It is not necessary to restart the scanner 3 6 8 ASEI Automatic Login Requires supervisor account When the system is shipped from the factory the Automatically Login User feature login without password feature is enabled by default to allow a supervisor SITEADMIN account to open for sys tem set up It is recommended that during these initial procedures the password policies be r...

Страница 80: ... and left to right languages 3 7 Configure Windows Environment There are several settings that affect the interactive behavior of the tablet This section describes those set in the Windows environment These require a supervisor account to access the Windows operating system For more information on Windows user accounts Admin and ScannerUser see Section 7 6 1 For more information on accessing Admin...

Страница 81: ...nd the ASEInspection Home page opens check that the tablet has not inadvertently been set to Tablet mode To do so in the Windows tool tray click the Action Center button to open the Action Center subscreen In the Action Center subscreen check the background color of the Tablet Mode button If the background is blue Tablet mode is active Tap the button to toggle off Tablet mode the background is gra...

Страница 82: ...n updates and the Admin login fields appear 5 Tap in the text field to open the virtual keyboard and type asepassword no spaces lower case letters then tap the Enter button The Windows Desktop opens When switching between the ASEInspection application environment and the Windows operating system if the Windows desktop Welcome screen usually opens identified by the large time and date display To re...

Страница 83: ...wer button If the button is not released promptly the tablet will assume the button is being pressed by accident such as by being held in a briefcase and shut down again When the tablet opens again ASEInspection is displayed in normal operating mode Although it is not the preferred method it is possible in an emergency to shut down the tablet by hold ing the Power button until the Power indicator ...

Страница 84: ...Desktop screen a tool bar appears 2 In the corner the date and time are displayed To open the Windows standard system time and date utility tap and hold the time and date display 3 When a transparent box opens over the time and date area lift finger away from the screen A menu opens 4 Tap Adjust Date Time The Date time utility screen opens 5 If it is necessary to change the tablet internal time an...

Страница 85: ... described in this procedure the user can interactively choose between 2 4 GHz and 5 0 GHz using the procedure described in Section 3 6 3 3 1 Enter the Windows operating system Section 3 7 1 2 To open the Panasonic PC Settings Utility Figure 3 15 shortcut press the A button on the side of the tablet a At the bottom of the Windows Desktop screen a tool bar appears b Tap the Windows Start button A m...

Страница 86: ...B ECCN EAR99 Figure 3 15 Dashboard Panasonic PC Settings Utility WiFi Setting The operating system Windows Start button is located on the tool tray at the bottom of the screen Tap to open the appli cations list tap 1 Panasonic 2 Panasonic PC Settings Utility 3 Settings 4 and 5 Enabled for Wireless LAN IEEE802 11a 1 2 3 4 5 ...

Страница 87: ...tton on the side of the tablet a At the bottom of the Windows Desktop screen a tool bar appears b Tap the Windows Start button A menu appears c Flick up until the Panasonic folder appears Tap the button to open the folder d Tap the Panasonic PC Settings Utility button this opens the operating system version of the Dashboard Figure 3 16 3 Tap Settings Do not use the Touch Operation Support option T...

Страница 88: ...Rev B ECCN EAR99 Figure 3 16 Dashboard Panasonic PC Settings Utility Touch Settings For item descriptions see Table 3 5 1 2 3 4 The operating system Windows Start button is located on the tool tray at the bottom of the screen Tap to open the applications list tap 1 Panasonic 2 Panasonic PC Settings Utility 3 Settings 4 ...

Страница 89: ...water drops Depending on the water drop condition operation may be ignored Disables the Windows Start button on the touchscreen frame Restricts gestures to no more than two points of contact simultane ously CAUTION Do not use unless the option Windows button in Touch Water mode also is enabled in the next setting below Accessing the Windows operating system requires the use of the Windows Start bu...

Страница 90: ...st brightness tap and drag the slider Adjust brightness level 7 To allow automatic adjustment tap the switch Change brightness automatically when lighting changes 8 To commit settings tap the Apply button 3 7 7 WiFi Access Lock Out To prevent the use of WiFi perform the following steps 1 At the bottom of the Windows Desktop screen a tool tray appears If WiFi is enabled the Net works button appears...

Страница 91: ...tton To reenable Wi Fi return to this menu and tap the Airplane mode button again This completes the typical operating system configuration items The MINI Z system is now ready for use Refer to Chapter 6 Scan Procedure To return to the ASEInspection applications refer to Section 3 7 2 To power off the tablet refer to Section 3 4 1 CAUTION Before closing the AS E application make sure the initial a...

Страница 92: ...Introduction Configure Windows Environment American Science and Engineering Inc 3 52 MINI Z Operator Manual 342 9000 1 Rev B ECCN EAR99 ...

Страница 93: ...rimary Screens 4 1 Major Exterior Components Overview The MINI Z systems consists essentially of a scanner and a tablet interface These are shown in Figure 4 1 Although a tablet ships with each MINI Z system any tablet shipped with a MINI Z system can be used with any of the MINI Z scanners of the same release level Figure 4 1 MINI Z scanner system major components 1 top view 2 left side view 3 re...

Страница 94: ... 12 14 Table 4 1 Scanner Controls Key Name Function 1 2 3 4 5 Views 1 Top view of scanner 2 left side view 3 rear view 4 right side view and 5 front view 6 Handle A D shaped handle allowing the user to hold and maneuver the scanner from various orientations 7 Power LED Towards front of scanner Indicates the scanner power status for descriptions see Table 4 2 8 Status LED Towards rear of scanner In...

Страница 95: ...s enabled is 30 seconds 12 Face Cover on the X ray emissions slot on the front side of the scanner 13 X ray On Indicators Four red safety LED arrays one on each bend of the handle that illuminate when X ray emissions are detected 14 AUX1 Connector Cable connector for future features 15 Battery Compartment Compartment with tethered cover housing the scanner battery that is powering the scanner see ...

Страница 96: ...ion with tablet not yet established or tablet has gone into sleep mode after establishing communication scanner X ray ele ments not fully powered Steady yellow Communication with tablet estab lished scanner X ray elements not fully powered scanner Standby mode use trigger buttons on handle to initiate X ray elements Flashing green Communication with tablet established scanner X ray elements fully ...

Страница 97: ...at any time without affecting the state of the scanner except that if a scan is taking place X rays emitting the scan is stopped automatically and any unprocessed image data is lost The lay out of controls for the tablet is shown in Figure 4 3 Figure 4 3 Tablet Front and Side Buttons and Terminals Locations 1 Dashboard 2 Screen Rotate Lock 3 Power 4 Volume 5 Microphones 6 Light Sensor 7 Front Came...

Страница 98: ...IM 19 microSD 20 Main Battery socket 21 Tablet manufacturer warning against prolonged contact 22 Tablet manufacturer model and serial number 23 Main Battery Pack 24 Main Battery Lock unlocked position 25 Battery Hot Swap Status 26 Rear Camera Light 27 Rear Camera Status and 28 Rear Camera Lens Figure repeated in Table A 7 For item descriptions see Table 4 3 18 19 25 20 24 26 23 28 27 22 21 ...

Страница 99: ...ious parameters in the tablet such as Windows operating system access Front 4 Volume rocker switch Sets playback volume for headphones Also used in combination with other keys to set various parameters in the tablet such as Nar rator Front 5 Microphone apertures Two holes with microphone inset Monaural signal Front 6 Light Sensor window Used for sensing ambient light for automatic adjustment of sc...

Страница 100: ... not allow the use of WiFi for communications For proce dure Section 3 7 1 Rear 18 microSIM socket Disconnect the AC power adapter and unlock and remove the main battery to open the door to load or unload a microSIM data card which may be used for system upgrades Card can be used when door is closed and main battery is reinserted or AC power is con nected Rear 19 microSD socket Disconnect the AC p...

Страница 101: ...f the main battery pack can be hot swapped For a list of states see Section 12 4 9 Rear 26 Camera Light Rear window Strong LED light source for flash picture taking Do not look directly into the beam from a close distance Rear 27 Camera Status Rear LED LED illuminates yellow to warn that the camera facing the touch screen is active Rear 28 Camera Lens Rear window Used for taking photographs of obj...

Страница 102: ...il it clicks or remove an installed card by pressing in gently until the card springs out 6 Close the memory card bay door 7 Insert and connect the Main Battery 8 Press both corners on the loose end of the Main Battery pushing it down into the bay until the latch snaps over to the right and locks When loading or unloading a card an embedded Lithium polymer bridge battery provides power while the m...

Страница 103: ...gin accounts 5 1 Home Screen The Home screen is displayed at startup The layout is shown in Table 5 1 The appearance of the software screens can vary according to the orientation of the tablet if automatic rotation is enabled This allows the screen to rotate to maintain an upright appearance relative to gravity regardless of the orientation of the tablet itself Section 3 4 4 Figure 5 1 Home Screen...

Страница 104: ...creen button Copy images from external storage device Restore Screen 8 Backup screen button Copy or move images to external storage device Backup Screen 9 Settings screens button Set screen appearance light or dark background change screen language supervisor accounts incident reports Settings General Mode Screen add and edit user accounts Settings Users Mode Screen and user account policies Setti...

Страница 105: ...ning as it is occurring The screen layout is shown in Figure 5 2 It allows the user to perform scans to comment enhance and export copies of images and to create and annotate image groups For more information see Section 7 4 Operational Considerations Figure 5 2 Scan Monitor Mode Screen Layout The buttons are described in Table 5 2 Scanning operation is described in Section 7 4 Operational Conside...

Страница 106: ... 2 Key Name Description Navigation Bar top of screen 1 Back button Tap once to return to the Home screen Content Pane middle of screen 2 Mode button With this marking indicates Monitor mode is active Tap to switch to Gallery mode of the Scan screen This button is inactive until at least one scan has been taken in the current image group Gallery mode cannot be accessed until then 3 Current Scan Gro...

Страница 107: ...cing Images 7 Previous Image button If bolded indicates that there exists one or more previous scans Tap to display the previous scan If a standard scan group is currently being displayed indicates there exists one or more previous scans in the current standard image group If a Multiple Images scan group is currently being displayed skips any standard scans and goes to the previous Multiple Image ...

Страница 108: ...n 13 X ray Emission Status When visible indicates that X rays are being emitted 14 Scan Enable Status Visible when scanner is interconnected to tablet Left example Full color version indicates that the scanner has been enabled to emit X rays Scan Enable button on this screen has been set Right example Gray version indicates that the scanner has not been enabled to emit X rays scanner is connected ...

Страница 109: ...the images in the image groups created during the current calendar day This screen is available only after at least one scan has been made in the current image group The screen layout is shown in Figure 5 2 For more informa tion see Section 7 4 Operational Considerations Figure 5 3 Scan Gallery Mode Screen Layout The buttons are described in Table 5 3 Scanning operation is described in Section 7 4...

Страница 110: ...next scan is taken the Scan Monitor Mode Screen opens automatically 5 Scan Enable button Tap to enable the scanner trigger switch buttons for 30 seconds of time Highlighted dark blue background indicates that the Scan Enable timer has been set scanning enabled When the next scan is taken the Scan Monitor Mode Screen opens automatically 6 Gallery pane Image thumbnails Displays all image thumbnails ...

Страница 111: ...NI Z Operator Manual 342 9000 1 Rev B ECCN EAR99 5 9 Search mode of the Review screen shown in Figure 5 5 In the Search mode double tap the image of interest to show it in the View mode Figure 5 4 Review View Mode Screen Layout The buttons are described in Table 5 4 1 2 3 4 5 6 7 8 9 10 ...

Страница 112: ...ial Number Serial number of the scanner that gener ated the image User Name User name of the login account that generated the image 5 Image Enhancement Tools menu Tap to open or close the Enhancements Tool menu tools for image enhancement for analysis For more information see Section 8 1 2 Enhancements Toolbar also available in Scan Monitor Mode Screen 6 Previous Image button If bolded indicates t...

Страница 113: ...n an interactive histogram to optimize image characteristics See Section 8 1 5 Histograms 10 Source Technology Indicates the X ray technology used to create the image Bx indi cates Backscatter technology Status Bar bottom of screen see Section 3 5 for full description Table 5 4 Review View Mode Screen Description refer to Figure 5 4 continued Key Name Description ...

Страница 114: ...ew Search mode and image delete screen layout is shown in Figure 5 5 It allows the user to use search criteria to find images The images or groups that match the search criteria are displayed in galleries Groups of images can be deleted or individual images can be selected for viewing Figure 5 5 Review Search Mode and Image Delete Screen Layout The buttons are described in Table 5 5 1 2 3 4 5 8 7 ...

Страница 115: ...full scale do not select the image check boxes simply double tap the image thumbnail itself The check box should remain clear The Review View mode screen opens Table 5 5 Review Search Mode Screen Description refer to Figure 5 5 Key Name Description Navigation Bar top of screen 1 Back button Tap once to return to the Home screen Content Pane middle of screen 2 Mode button With this marking indicate...

Страница 116: ...letion Note The check box may appear to be outside of the image itself To locate it more easily tap the image to select it providing a blue back ground 9 Gallery pane Image thumbnails Displays groups of image thumbnails in an expandable list format Double tap an image thumbnail to select that image for individual viewing in the View mode screen Tap to select the individual image has been selected ...

Страница 117: ... EAR99 5 15 5 6 Export Screen The Export screen layout is shown in Figure 5 6 It allows the user to use search criteria to find previ ously scanned images and to copy them to external data storage See Section 9 6 Exporting Images Figure 5 6 Export Screen Layout The buttons are described in Table 5 6 1 3 4 5 6 2 7 9 7 8 ...

Страница 118: ... the following spinner box message appears 5 Select All Tap to select all images and groups that matched the search criteria 6 Image group headers For each group matching the search displays the name quantity of images and quantity selected from each group and creation date and time range of the images Tap to show thumbnails of the images in that group Tap the check box in the header to select all...

Страница 119: ... Engineering Inc MINI Z Operator Manual 342 9000 1 Rev B ECCN EAR99 5 17 9 Export Tap to perform the export Status Bar bottom of screen see Section 3 5 for full description Table 5 6 Export Screen Description refer to Figure 5 6 continued Key Name Description ...

Страница 120: ... EAR99 5 7 Restore Screen The Restore screen layout is shown in Figure 5 7 It allows the user to load images previously backed up onto an external storage device For more information on restoring images see Section 9 10 Restoring Images Figure 5 7 Restore Screen Layout The buttons are described in Table 5 7 1 2 3 4 5 6 7 8 9 ...

Страница 121: ...cute search for images The contents of the galleries are updated to match the search criteria If the search is performing a multi variable query on a very large quantity of inspection records there may be a delay In that case in the gallery area of the screen the following spinner box message appears 6 Select All Tap to select all images and groups that matched the search criteria 7 Image group he...

Страница 122: ...e The check box may appear to be outside of the image itself To locate it more easily tap the image to select it providing a blue back ground 9 Restore Tap to copy the images from the external storage device images remain on the external storage device Status Bar bottom of screen see Section 3 5 for full description Table 5 7 Restore Screen Description refer to Figure 5 7 continued Key Name Descri...

Страница 123: ...up Screen The Backup screen layout is shown in Figure 5 8 It allows the user to copy or move previously scanned images to removable storage devices USB drive or memory card For more information on backing up images see Section 9 9 Backup of Images Figure 5 8 Backup Screen Layout The buttons are described in Table 5 8 1 2 3 4 5 6 7 8 9 10 ...

Страница 124: ...rch criteria tap to execute search for images The contents of the galleries are updated to match the search criteria If the search is performing a multi variable query on a very large quantity of inspection records there may be a delay In that case in the gallery area of the screen the following spinner box message appears 6 Select All check box Tap to select all images and groups that matched the...

Страница 125: ...to select it providing a blue back ground 9 Backup and Delete button Deletes the backed up images from the tablet after the images have been copied to the destination Tap to move the images to the backup storage device images are removed from the tablet 10 Backup button Tap to copy the images to the backup storage device images remain on the tablet Status Bar bottom of screen see Section 3 5 for f...

Страница 126: ...ystem warnings if any exist The Status Details mode screen Figure 5 10 displays the key operational parameters updating them in real time and allows setting of some of them The Scanner table in the Status Details mode screen presents data read directly from the scanner The scanner must be powered up and connected to the tablet in order for the data to be provided During active scanning the Scan Mo...

Страница 127: ...EAR99 5 25 5 9 1 Status Overview Mode Screen The Status Overview mode screen Figure 5 5 displays basic error conditions faults and system warnings if any exist Tap the Status button to return to the previous non Status screen Figure 5 9 Status Overview Mode Screen Layout The buttons are described in Table 5 9 1 2 3 4 5 6 ...

Страница 128: ... return to the Home screen 2 Overview button Tap to open Status Overview mode screen if not highlighted 3 Details button Tap to open Status Details mode screen Content Pane middle of screen 4 Status display Reports condition of scanner system 5 Faults display Reports any current fault conditions section appears only if faults are detected 6 Warnings display Reports any current warnings section app...

Страница 129: ...etails Mode Screen The Status Details mode screen Figure 5 10 displays the current operational status of the key system parameters Tap the Status button to return to the previous non Status screen Figure 5 10 Status Details Mode Screen Layout The buttons and parameters are described in Table 5 10 1 2 3 5 6 7 8 9 10 11 12 13 14 15 16 17 18 20 19 4 ...

Страница 130: ...On the side of the scale the current rpm is shown in numerals 7 X ray voltage kV Valid only when X rays are emitting 0 70 kV 10 8 X ray current µA Valid only when X rays are emitting 0 140 µA 10 9 X ray operation time hours Cumulative time that the X ray elements have been emitting 10 X ray temperature C Valid only when X rays are emitting 11 Power board temperature 1 C Diagnostic parameter 12 Pow...

Страница 131: ... B ECCN EAR99 5 29 5 10 Settings General Mode Screen The General screen layout is shown in Figure 5 11 It allows the user to set the appearance of the ASEInspection Software screens and create incident reports Figure 5 11 Settings General Mode Screen Layout The buttons are described in Table 5 11 11 1 2 3 4 5 7 6 8 9 10 12 13 ...

Страница 132: ...let Tap to select the new lan guage and then tap the confirmation button requires restart of tablet Only appears for supervisor login accounts Scanner table Scanner must be powered on and interconnected with tablet to activate these entries 8 WiFi Region Operator and supervisor accounts View current setting for WiFi transmission standards Supervisor accounts only Tap to access WiFi region setting ...

Страница 133: ...ion 2 7 7 The Ethernet cable has been connected if used Section 3 3 1 or the WiFi Region has been selected Section 3 6 3 The shoulder strap accessory is attached to the scanner with a tie point looped over each of the two mounting eyes on the scanner housing see Section 11 5 and placed around a shoulder and under WARNING The beam can pass through the target to a distance depending on the shielding...

Страница 134: ...d on and the ASEInspection Software opened to the Home Screen 6 0 1 Enabling Emissions Near the top of the Scan Monitor Mode Screen with a scanner connected the Scan Enable button appears in full color Tap the button to enable Ready mode the background highlights dark blue This enables the trigger interlock systems in the scanner and on the scanner the Status LED goes to steady green Figure 6 1 Sc...

Страница 135: ...tton Scan screen top and the Enabled Status icon Scan screen bottom appear similar The Scan Enable button screen top signals the scanner to allow emissions and the Enabled Status icon screen bottom indicates the scanner status The following modes are indicated by the appearance of the button and the icon 1 No scanner connected Connect scanner to continue 2a or 2b Scanner connected but not enabled ...

Страница 136: ... WiFi Connection button to open a list displaying available scanner connections The scanner must be powered on to be detected Tap the text link matching the target scanner to highlight it The links display the serial number of the Scanner found on the label on the bottom of the scanner housing After a few moments when the connection is established the list subscreen closes automatically and the st...

Страница 137: ...arning lamps on the scanner handle corners flash red once The X ray generation mechanism can be heard coming up to speed The Status LED on the scanner housing blinks green indicating that the system is ready for warm up Important for emission control Align the scanner emission face to fit the Calibration Dock collar and then insert the emission face into the Dock collar until the front bumper of t...

Страница 138: ...on background highlights Figure 6 2 Scanner Handle 1 Enable X ray emissions red trigger button one of two 2 X ray On warning lamp one of four illuminate red 1 2 WARNING The next step results in the emission of X rays The scanner must remain in the Calibration Dock and it is good practice to ensure that no part of the user s body is in front of the emission surface at the front of the scanner ...

Страница 139: ...ust be held down throughout the entire warm up X ray generation period If the red trigger button is released before the full period has elapsed X ray emission will stop immediately and the warm up will have to be started again from the Scan Enable button step 6 At the end of 25 seconds The four X ray On warning lamps on the scanner handle extinguish The system beeps twice The tablet Warmup Require...

Страница 140: ...herwise set the slider to indicate Off see Section 7 2 Multiple Image Scanning Manual Stitching b In the Group Name text box tap in the box to display the on screen keyboard c Type a group reference title see Section 7 5 2 Image Groups d Tap the OK button The subscreen closes e In the on board keyboard top corner tap the X button The keyboard closes 4 At the top corner of the screen tap the Scan E...

Страница 141: ... Orient the scanner at the beginning of the scan path with the scanner bottom perpendicular to the path and the emission face toward object see Figure 6 3 If the scan does not begin the scanner may have reverted to Standby mode The Status LED rearmost status light on the scanner body would be steady yellow At the bottom of the tablet screen the Standby mode icon displays Press and release a red tr...

Страница 142: ...s stop automatically after a maximum of 30 seconds To signify that X ray emissions have stopped The four X ray On warning lamps on the handle extinguish Two warning beeps sound The two beam width warning lasers extinguish and The Radiation icon in the Status bar is hidden 9 Repeat steps 2 through 7 for multiple scans If each new scan starts within 30 seconds of the previous scan ending only steps ...

Страница 143: ...pletely After the scanner is turned off determine if the scanner battery or tablet battery should be recharged or if the scanner battery has reached the recharge limit For more information see Chapter 12 Battery Care Store the system in the Rugged Transport Case provided in a moderate temperature and humidity location CAUTION If the tablet is shut down while a scan is being taken the scan data may...

Страница 144: ...Scan Procedure Normal Startup American Science and Engineering Inc 6 12 MINI Z Operator Manual 342 9000 1 Rev B ECCN EAR99 ...

Страница 145: ...at a constant distance from the object This is illustrated in Figure 7 1 Otherwise if the beam is swung at an angle to the object or moved closer or farther away from the object during the scan or moved with varying speed distortion of the image can result Do not rotate the scanner relative to the scan path If scanning a wide object in multiple scans the indi vidual scan paths should be parallel i...

Страница 146: ...n and scale always move with the bottom edge of the scanner emitting face leading the way keep a constant distance About 6 inches 15 centimeters between the front of the scanner and the target surface while moving consistently 3 left to right for sideways scan paths or 4 top to bottom for vertical scan paths The ASEInspection Software keeps track of the sequence of images in each image group Scans...

Страница 147: ... first for consistency The upper panel shows a scan path across a vehicle tire not following the circle of the tire allows multiple image manual stitching Section 7 2 The lower panel shows how to cover a large area Use either a horizontal or vertical pattern as convenient of individual scans making sure each scan is in the same direction parallel and in sequence down or across so the MINI Z automa...

Страница 148: ... at a consistent resolution optimal for a 6 inch per second scanning rate After initial creation if aspect ratio control is disabled individual scan images can be zoomed and aspect ratios adjusted interactively for optimum matching between scans After initial creation if aspect ratio control is enabled blue background individual scan images can be stretched or compressed vertically by pinching or ...

Страница 149: ...en created during the current calender day and fewer than 4 individual scans are present in the group then the absence of a blue border indicates that the next scan will be added after the last current scan if any If the group is not still active was created before the current calender day then the absence of a blue border simply indicates that no individual scan in the group is currently selected...

Страница 150: ...ual Stitching American Science and Engineering Inc 7 6 MINI Z Operator Manual 342 9000 1 Rev B ECCN EAR99 Figure 7 3 Multiple Image Group Example The single image is selected by tapping once and the blue selection border surrounds only that image ...

Страница 151: ...ngle image mode view but the selected individual image continues highlighted Figure 7 4 Gallery Screen Example Left In a gallery view Scan or Review screens the single image is selected by tapping once and the blue selection box surrounds only that image Double tapping opens the image in the single image mode but if the group is a Multiple view group the entire group of images is displayed in the ...

Страница 152: ...objects behind such barriers For example a bottle could have a profile that appears as a single linear feature in a single scan but would present complete contours when viewed across several sequential scans Figure 7 5 Multiple Image Function and Exported Images Left Exported original images The raw individual scans can vary in length and starting point depending on the technique use Right Exporte...

Страница 153: ...position until the value changes to On To disable multiple images in the Multiple Images slider control tap the control to toggle the slider position until the value changes to Off 5 Tap the OK button to save the name and close the box the group name appears in the current scan group name field 6 If the group is created as a Multiple Images group the four bar icon appears in the group header 7 2 3...

Страница 154: ...in Figure 7 7 To zoom out of an individual scan on the Enhancements tool menu Figure 8 1 ensure the Aspect Ratio enhancement tool button is disabled has a default background and then tap on that scan with two fingers spread apart vertically and pinch the fingers together in a vertical motion item 3 in Figure 7 7 Figure 7 7 Multiple Image Adjustments 1 Move Tap and drag 2 Zoom In enlarge proportion...

Страница 155: ...ckground appears around the selected scan image or in the Scan Monitor Mode Screen a blue border appears around the selected scan image when the Scan Enable button is tapped that same scan image is automatically overwritten by rescanning 7 3 Aspect Ratio Control When operators perform scans they can increase scan resolution by moving the scanner at a slower rate This can result in a smoother image...

Страница 156: ... is automatically zoomed out to show the whole scan Moving from the Scan screen to any other screen automatically disables X rays The only excep tion is moving between the Scan screen and the Status screens In that case it is possible to move back and forth between these screens by tapping the Status button in the lower corner of the screen without interrupting scanning This allows the user to che...

Страница 157: ...ode The tablet and scanner must remain interconnected for scanning to occur If both the Ethernet and the WiFi links are broken for more than two seconds of time the Interconnect status button appears widely separated the four X ray on LEDs on the handle flash once and the scan ner automatically enters Seeking mode with the Status LED on the scanner blinking yellow After 10 minutes the scanner ente...

Страница 158: ...e Screen or Review View Mode Screen The Windows Action Center Section 3 7 6 and the tablet Dashboard functions Section 11 2 allow for changing screen brightness to a limited extent 7 5 Annotating Scan Images 7 5 1 Image Physical Correlations While performing a scan each time the X ray beam is started and stopped a separate image is pro duced The length of the target captured by the image depends o...

Страница 159: ...ps inside the box to enable the on screen keyboard and types the name for the new group The group name is committed to the database when the user taps the OK button The group name cannot be modified after the group is created The software automatically adds a blank space and a numeral 1 2 to the typed text If the user taps the OK button without entering any text the software simply inserts the num...

Страница 160: ...ype the name for the new group The group name cannot be modified after the group is created 4 Select the type of group using the Multiple Images slider button Multiple Images groups is not selected by default To create a Standard image group tap the control until the label changes to Off To change back to creating Multiple Images groups tap the control until the label changes to On Alternatively t...

Страница 161: ...dentification information cannot be changed after a image has been cre ated however comments can be added to individual images Comments can be modified after they are created Comments are included in searches when the text criterion is used To add a comment to an image 1 In the Scan Monitor Mode Screen or the Review View Mode Screen display the individual image of interest 2 Referring to Figure 7 ...

Страница 162: ...n any of the Search Criteria screen applications see Sec tion 9 4 2 Using Search Criteria Flagging also makes it necessary for the user to specifically enable deletion of flagged images see Section 9 11 Deleting Images Figure 7 9 Review View single scan mode screen comments controls comments controls for the Scan Monitor mode screen are similar 1 Current Group Name with text link prompt to add a c...

Страница 163: ...blet screens displays the Fault icon and the Warning icon when those states are present The Status Overview mode screen see Figure 5 9 has the Faults and Warnings sections that dis play messages for various faults and warnings encountered by the MINI Z system When no fault is detected or warning issued these sections are not displayed The error messages are described in Table A 4 In addition when ...

Страница 164: ...ion describes this and the related Admin account The ScannerUser user account and the Admin user account are Windows operating system accounts the kind of accounts used to login to any computer using the Windows operating system After logging into Windows using one of those accounts an operator can log into ASEInspection as for any software application program Figure 7 11 To login to ASEInspection...

Страница 165: ... 7 1 then logging out of the ScannerUser account and finally logging into the Admin account Although ASEInspection can be opened from the Admin user account by double tapping the ASEInspection shortcut button this version of ASEInspection is intended only for service maintenance The screen settings under the Figure 7 11 Windows User Accounts Typical Usage Accessing ASEInspection from the Admin acc...

Страница 166: ...n ASEInspection or other where it entered Sleep mode If the ASEInspection screen has changed characteristics such as display language check if the tablet is in the Admin account To do so on the frame of the screen tap the Windows Start button If the Start menu opens the tablet is in the Admin account When the tablet awakens from Sleep mode while in the Admin account is still active the tablet can ...

Страница 167: ... images can be searched and retrieved using search criteria see Section 9 4 Searching for Images and then displayed and enhanced and shared see Section 9 6 Exporting Images as required To open the Review screens 1 Open the ASEInspection Software to the Home Screen in primary screens tap the Back button 2 Tap the Review button The screen displays either the Review View Mode Screen or Review and Del...

Страница 168: ...ng additional gestures for manipulating images Double tap to zoom in approximately 3X enlargement centered at the point of tap The first double tap displays the image so it fills the width of the Content pane The second double tap zooms in 3X from full width Subsequent double taps will toggle between the two zoom levels To display the entire image perform a two finger tap Pressing and dragging a s...

Страница 169: ...ement Tools Menu Description Key Name Description 1 Mode button With this marking indicates View mode of Review screen or Monitor mode of Scan screen is displayed and the Enhance ment Tools menu is available If the alternate Mode button icon is displayed tap the button to update the screen 2 Current Image Group Name and identification display Displays the name of the image group being shown the se...

Страница 170: ...unless reenabled manually Equalizes the color tonal range density appearance between full white and full black for the currently visible area of the image The equalization updates automatically as the view is changed by zooming or panning always matching the range of color tones Manual adjustment of density appearance by using the press and tap gesture is automatically done or can be done by turni...

Страница 171: ...e Video Tap to reverse tones in grayscale darker areas become lighter and lighter areas become darker This can be of partic ular assistance when viewing the image in changing ambient light conditions In color modes applied colors are replaced with their opposites Table 8 1 Review View and Scan Monitor Modes Enhancement Tools Menu Description continued Key Name Description ...

Страница 172: ...The range of the palette can be changed interactively by using the press and tap gesture This changes the color contrast density allowing optimum enhancement of individual features of interest The two figures below have the same palette applied but with different densities set using the press and tap gesture To extend this effect to lighter or darker ranges repeat the press and tap gesture multipl...

Страница 173: ...is initially enabled In addition if the function is manually disabled it is 12 Aspect Ratio Tap to lock the image width at the current value Allows verti cal elongation and contraction of the image within the screen section to study detail and perceive natural profiles Tap again to return the image to the default zooming proportionally in both width and height With Multiple Images groups applies t...

Страница 174: ...ss and Contrast When Dynamic Contrast is stopped the software allows manual interactive simultaneous adjustment of brightness and contrast Although these adjustments apply to the entire image the user can optimize contrast for any particular feature in the image not just for the average of all the features in the view as does Dynamic Contrast With multi image groups the user can independently adju...

Страница 175: ...dard Windows touchscreen technique 1 Start as if to pan scroll the image pressing and holding one finger on the touchscreen 2 Without moving that finger tap with another finger as if drumming your fingers on a table 3 After that second tap drag your finger The second tap tells the tablet not to move the image but instead change the image appearance The whole movement is illustrated in Figure 8 3 T...

Страница 176: ...that are colored black The right vertical line is the White Point all pixels lighter than that are colored white Figure 8 4 The contrast and brightness effect of the press tap drag gesture in Figure 8 3 Each motion starts from 1 Dynamic Contrast default 2 Finger drag up screen 3 Finger drag down screen 4 Finger drag right screen and 5 Finger drag left screen 2 4 1 5 3 Contrast 0 Brightness 0 Contr...

Страница 177: ...st in the darker grays and the lighter grays are indistinguishable When the range between the Black Point and the White Point is shifted to the lighter side there is more contrast in the lighter grays and the darker grays are indistinguishable Dynamic Contrast sets the position and range of the Black Point and the White Point When Dynamic Contrast is active the vertical lines at the Black Point an...

Страница 178: ... can be useful when interpreting densities when using the Color enhancement Section 8 1 2 Enhancements Toolbar In the example below the brighter purple tone is shown to indicate a higher density than the darker blue tone Both densities appear dark in the grayscale tone range Green appears dark in the grayscale although it is a mid range density ...

Страница 179: ... day the scans created on that day are displayed in the screen for ease of reference Those remain on display until reset occurs After the daily scans are cleared the scans from previous days can be displayed by using the Review and Delete Search Mode Screen To protect against repeating any group name when a group name is repeated the software auto matically makes the newer group name unique by add...

Страница 180: ...and Reference images see Section 9 9 Backup of Images Restore Reload copy images and groups and Reference images that had been previously backed up see Section 9 10 Restoring Images Delete Permanently delete images from the tablet see Section 9 11 Deleting Images External reporting Export see Section 9 6 Exporting Images From the Export Screen screen copy one or more full images without enhancemen...

Страница 181: ...ogin account of the recording user and by marking as Flagged or as Reference images Image numbers are not available for searching Figure 9 1 External Data and Images Operations Overview Archive Inspections Optimized folders do not modify outside of ASEInspection Copy entire folder as a single selection Not for reuse in ASEInspection Can edit files names for convenience TabletserialNumber YYYYMMDD ...

Страница 182: ...ddition the search is insensitive to letter capitalization For example search on EL will return any images or groups with el or EL in the names This provides the most liberal interpretation in order to facilitate rapid image retrieval To use the search function perform the following steps 1 Open the Search mode of the Review screen by tapping the Mode button until it appears marked with a single r...

Страница 183: ...rs in Figure 9 2 It allows the user to choose or enter search criteria to find previously scanned groups of images and to select groups to display in the View screen where they can be seen at full resolution and enhanced to aid in distinguishing details This format is used in all functions that search for images Figure 9 2 Search criteria list layout The buttons are described in Table 9 1 Table 9 ...

Страница 184: ...nter an earliest date and a latest date in either order in the two fields Flick fields up or down to select the date local time at image creation see Section 9 4 4 Date and Time Selection 5 Search text Enable this criterion by tapping the adjacent check box then tap to open an on screen keyboard to type the text to find which can be all or part of image or image group names or image comments 6 Fla...

Страница 185: ...drag the number into the center row 9 5 Selecting Images for Commands For backup restore and deletion images can be selected at three levels see Figure 9 4 Select All check box Located in the top of the Content pane Tap the check box to select every image and image group returned by the search for the command action Select all in group check boxes Located in each header Tap the check box to select...

Страница 186: ...at option group The choice of format can be changed also in any of the screens that can perform the export Export Screen Scan Monitor Mode Screen current scans and Review View Mode Screen restored scans 9 6 1 Exporting a Single Image Export from the Scan or Review screens creates one view area image file with enhancements in the selected format JPEG or PNG for the currently displayed image file If...

Страница 187: ...button The export proceeds A notification appears below the subscreen 6 To close the subscreen on the Enhancements tool bar tap the Export button or tap the upward arrow button above the subscreen The destination folders and image file names are generated automatically based on the image name of the original image and time of export 9 6 2 Exporting Multiple Images Export from the Export screen cre...

Страница 188: ...n tap the target storage device 3 Search for the target images 4 From the returned files select the files to export Tap the check box for each file to export or Tap the check box in the image group header to include the entire group or Tap the check box Select All at the top of the Contents pane to export all files returned by the search query 5 At the bottom of the screen tap the file format sele...

Страница 189: ...p level folder named Archive The archive is an optimized data structure and should not be managed manually If the archive must be copied or moved it should be copied or moved as a single entire folder Select the entire folder including all subfolders and contents and copy or move it If images from the same tablet were previously archived to the same storage device the new images are added to the s...

Страница 190: ...l hard drive to the tablet SD storage device ports or to the USB A port The USB A port is convenient for storing Reference images because the removable storage device can then be readily disconnected from the tablet and conveyed to another MINI Z tablet for restoring the Reference images The SD ports are covered by the Main Battery The MINI Z backup utility allows images and image groups to be loc...

Страница 191: ...hich images or image groups to include in the backup 7 To backup copies of images while leaving the original images on the tablet tap the Backup button Otherwise to copy images to the storage device and then delete the original images from the tablet tap the Backup and Delete button The selected action is performed 8 Perform additional searches and transfers as required To do so return to step 5 i...

Страница 192: ...s displays Tap the storage device to use The tablet searches the selected storage device and updates the Library list with the names of all libraries on the external storage device 4 If no MINI Z archives are found on the device at the top of the screen the Library button displays No Libraries Found In this case locate an external storage device with an AS E archive 5 Otherwise if MINI Z archives ...

Страница 193: ...leting applies at the group level individual image cannot be separately deleted 3 Tap the Delete button at the bottom of the screen If any images in the selected set are flagged and acknowledgement subscreen opens see box below Otherwise a confirmation subscreen opens 4 Tap the OK button to confirm the deletion and clear the subscreen Images that have been flagged are not automatically deleted Ima...

Страница 194: ...Image Management Deleting Images American Science and Engineering Inc 9 16 MINI Z Operator Manual 342 9000 1 Rev B ECCN EAR99 ...

Страница 195: ...appear in the screens for Operator login accounts When creating additional user account names the tablet manufacturer recommends Do not use the following words for user name CON PRN AUX CLOCK NUL COM1 to COM9 LPT1 to LPT9 space or In particular if you create a user name account name that includes the mark a password will be requested at the log on screen even if no password has been set If you try...

Страница 196: ... 10 2 Changing Users Logout Login To leave the ASEInspection Software during normal operations without shutting down the system and allow another user to login perform the following steps The login to the ASEInspection Software application is distinct from the login to the Windows operating system Login to Windows is required for restricted access to perform system set up tasks To prevent unauthor...

Страница 197: ... previous user is logged out 3 The Login screen see Figure 10 1 is displayed The next user should sign in as described in Section 10 1 10 3 Password Requirements These password requirements apply for login to the ASEInspection Software application these do not relate to the Windows operating system access password A supervisor account can set the rules for passwords For information on password pol...

Страница 198: ...me the login account identifier used in this system 10 4 Changing Passwords For security reasons the ASEInspection Software user account passwords are usually configured to require changing periodically see Section 10 7 When the time has come to change a password the ASEInspection Software displays a notice on the login screen the next time the user attempts to log in Both supervisor accounts and ...

Страница 199: ...d the Eye button to view the password characters to confirm they have been correctly entered 4 Tap the New Password box to open the on screen keyboard and enter the new case sensitive password of the user For password requirements see Section 10 3 5 Tap the Re enter Password box to open the on screen keyboard and enter the exact same new case sensitive password of the user 6 Tap the OK button The ...

Страница 200: ...Mode Screen The Users screen layout is shown in Figure 10 4 It allows the creation and editing of supervisor and operator user accounts This screen is available only to supervisor login accounts and is accessed through the Settings button on the Home Screen Figure 10 4 Settings Users Mode Screen Layout The buttons are described in Table 10 1 1 2 3 4 5 6 ...

Страница 201: ...p once to open the Settings Policies Mode Screen Content Pane middle of screen 5 Supervisors header Header for all supervisor accounts Tap once to open a list of all current supervisor accounts To create a new supervisor account tap the New Supervisor button To view or edit an existing supervisor account tap the button representing that account Both open the Modify list 6 Operators header Header f...

Страница 202: ... Tap once to open the on screen keyboard and type a pass word For password requirements see Section 10 3 3 Reenter Password button Tap once to open the on screen keyboard and retype the exact password This must match the entry in the Password field 4 First Name button Type the first given name of the user This is for account identification only and there are no formatting requirements 5 Last Name ...

Страница 203: ...n screen keyboard is displayed it may have to be closed to access the button Tap the X button in the top corner of the keyboard 8 Cancel button Tap to discard changes to the account Note If the on screen keyboard is displayed it may have to be closed to access the button Tap the X button in the top corner of the keyboard Table 10 2 Modify Accounts Description continued Key Name Description ...

Страница 204: ...Rev B ECCN EAR99 10 7 Settings Policies Mode Screen The Policies screen layout is shown in Figure 10 6 It is used by supervisor accounts to set privileges and limit policies for supervisor and Operator accounts Figure 10 6 Settings Policies Mode Screen Layout The buttons are described in Table 10 3 1 2 3 4 5 6 7 8 9 10 11 ...

Страница 205: ... user name of the account selected in this option This is not recommended except for short temporary periods for setup or training To allow automatic login select the user in the drop down box and drag the switch block to the On side To disable automatic login drag the switch block to the Off side Note The selected account remains designated until manu ally changed 6 Login Automatically Clear Inpu...

Страница 206: ...ength of time the user can log in using the same password before they must change their password To enforce password changes by number of days drag the switch block to the On side Tap the numeral to open the on screen keyboard or tap the and buttons to change the value in one day increments To disable quantity limits drag the switch block to the Off side 11 Images Operators can delete images Preve...

Страница 207: ...rd PC Settings The tablet provides a function named Dashboard referred to as the Panasonic PC Settings Utility in the operating system that combines several commonly used functions into one location To access Dashboard through the Windows operating system a supervisor level login account must be used CAUTION There are no user serviceable parts inside of the system Opening the scanner case or the t...

Страница 208: ...rtcut press the A button on the side of the tablet a In the Desktop screen tool tray tap the Windows Start button The applications menu opens b Flick up until the Panasonic folder appears Tap the button to open the folder c Tap the Panasonic PC Settings Utility button this opens the operating system version of the Dashboard To close the Dashboard click the X button in the utility screen title bar ...

Страница 209: ...ows Defender Web based utility to update the tablet software A procedure is provided See Section 13 2 Tablet Anti Virus Updating ASEInspection system software updates may be issued to registered customers The updates are self installing and instructions are provided with the software distribution Password and Removable Access Tablet There are several levels of security for system func tions on the...

Страница 210: ...ess WiFi There are several levels of security for the WiFi connection At any time the Ethernet cable connection between the tablet and the scanner unit can be used When the Ethernet cable is in use the WiFi connection is disabled At any time the WiFi function on the tablet can be disabled by placing the tablet into Airplane mode Enabling or Disabling Airplane mode requires access to the Windows op...

Страница 211: ...the scanner up to the operating position without adjusting the strap see Figure 11 3 CAUTION Special conditions apply to storing and shipping batteries See Section 12 3 Figure 11 2 Repacking Rugged Transport Case figure repeated in Table A 3 1 Scanner with Scanner key 2 Scanner Shoulder Strap 3 Calibration Dock 4 Tablet 5 Tablet power adapter with power cord 6 Tablet Stylus and Hand Grip 7 Scanner...

Страница 212: ...sliding clips are on the outside of the strap when worn so the clips hang straight downward When properly set up the strap does not have to be unclipped to change wearing from one shoulder to the other The two loop connectors are each constructed with a loop at each end One loop fits on the shoulder strap to allow sliding the scanner along the strap The other loop attaches to the mounting eyes of ...

Страница 213: ...houlder Pad as shown on a flat surface and connect the two Pad End Clips with the matching Strap End Clips 3 Attach the two Sliding Clips of the Strap with the matching Loop Clips Figure 11 3 Shoulder Strap Assembly The dashed line indicates the straight middle side of the Shoulder Pad the side that is worn toward the operator s neck 1 Rear of scanner unit 2 eyes on scanner 3 Shoulder strap with t...

Страница 214: ...or the right hand and viewing the touchscreen in any portrait or landscape orientation without any reassembly The hand grip is equipped with two types of connecting strips This is to allow access to the Main Bat tery Pack and to the microSIM and microSD card bays without having to remove the hand strap from the tablet Figure 11 6 Figure 11 5 Hand Position in the Handhold of the Hand Strap The hand...

Страница 215: ...nt orientation Figure 11 7 Hand Strap Strip Fastening 1 Buckle type strips through the buckle through the eye in the pro tective case and then back through the buckle 2 Hook and loop strips through the eye in the protective case and then back on to the surface of the hook section 2 1 The screen may jump or wander when liquid is on the screen including small amounts and when droplets are not close ...

Страница 216: ...indows operating system using the normal methods At the bottom of the Windows Desktop screen a tool bar appears 4 Tap the Windows Start button A menu appears 5 Flick up until the Windows System folder appears Tap the button to open the folder 6 Tap the Control Panel button and in the Control Panel tap the Tablet PC Settings button The dialog box opens ...

Страница 217: ...oice 9 Tap the Calibrate button The utility presents a series of screens with a crosshairs target in each In each screen use the stylus to tap the center of the crosshairs target as accurately as possible 10 Complete the procedure without changing orientation of the screen 11 If the overall result is unsatisfactory in the Display tab tap the Reset button and try again 11 8 Recalibrating the Scanne...

Страница 218: ...in the Details screen labeled Calibrate Scanner appears only for supervisor login accounts and is located between the Scanner table and the Tablet table CAUTION While the calibration procedure is not complex the user is cautioned that it must be performed properly and in its entirety to optimize system performance Figure 11 8 Calibration This link button Calibrate Scanner is on the Status Details ...

Страница 219: ... scanner handle must then be pressed to begin recalibration process and X ray emissions and held through the entire process Figure 11 9 Calibration Dock application 1 The MINI Z face is the section at the front of the scanner 2 The dock itself is configured like a small block with a shallow alignment collar Place the dock on a horizontal surface with the four mounting feet downward 3 Seat the face...

Страница 220: ... hold a trigger button The four X ray On warning lamps on the scanner handle illuminate red and a beep sounds X rays are emitted In the tablet Calibrate screen a progress bar indicates the passage of time while the scanner performs a sequence of graduated warm up stages 11 At the end of the calibration procedure The four X ray On warning lamps on the scanner handle extinguish The system beeps twic...

Страница 221: ...pulls together a variety of different types of files that indicate the current operating con dition of the system being analyzed These files can include recent log files tablet registry files data base files configuration files and a text file that includes the user s own description of the circumstances and contact information The files are bundled and compressed in a standard ZIP file for ease o...

Страница 222: ...n Battery bay for locations see Figure 4 3 and Figure 4 4 This will be the medium for transferring the images to the external computer system 2 In the Home Screen tap the Settings button The Settings screen opens 3 At the top of the screen tap the General button The General screen appears see Figure 5 11 4 Tap the Create Incident Report button A menu opens shown in Figure 11 11 5 Complete the step...

Страница 223: ...nance Incident Reports American Science and Engineering Inc MINI Z Operator Manual 342 9000 1 Rev B ECCN EAR99 11 17 Figure 11 11 Incident Reports Layout The buttons are described in Table 11 2 1 2 3 4 5 6 7 ...

Страница 224: ...n Tap and enter the name of the contact person filing the report 4 Date Tap to open a selection spinner Flick fields up or down to select the Date the incident occurred local time see Section 9 4 4 Date and Time Selection 5 Time Tap to open a selection spinner Flick fields up or down to select the Time the incident occurred local time see Section 9 4 4 Date and Time Selection 6 Incident Descriptio...

Страница 225: ...ger cable Always disconnect the AC adapter from the DC power port before removing or inserting the main battery While the main battery is inside of the tablet body plug the external charger into the DC power port and a compatible mains power source and for normal operation charge the main tablet battery until the battery is full Then disconnect the AC adapter cable The tablet is equipped with an e...

Страница 226: ...can be read out to the tablet If the battery is connected to the charger while it still retains more than 90 of full charge the charger will not start a charging cycle When the scanner unit rechargeable battery is depleted it is designed to retain sufficient residual charge to continue to power the control circuits of the device and allow recharging Immediately recharge a fully depleted battery Do...

Страница 227: ...SEInspection software can be used to mea sure the charge on the battery see Section 12 4 6 and then remove the battery cover the terminals and store it in a cool 10 C to 30 C 50 F to 86 F dark place The scanner battery and the tablet main battery pack are Lithium ion type and should be removed from the scanner and the charger and from the tablet before shipment or storage When shipping by air labe...

Страница 228: ...eing removed to allow access to the data storage card bay an embedded Lithium clock system date battery 12 4 1 Battery Status The tablet Dashboard function Section 11 2 reports the status of the Main Battery and the Bridge Bat tery To access this data 1 Open the Dashboard utility using the normal methods Section 11 2 2 Tap the Status button The Status screen opens At the top of the screen the Batt...

Страница 229: ...rged Main Battery Charging connected to AC power charging starts when less than 95 charge Bridge Battery Charged Main Battery Discharging disconnected from AC power Bridge Battery Charged Battery will shut down with about 1 remaining to save enough power for restart Main Battery removed disconnected from AC power Bridge Battery Status Does not Change Tablet enters Sleep mode after 1 minute screen ...

Страница 230: ...blet a At the bottom of the Windows Desktop screen a tool bar appears b Tap the Windows Start button A menu appears c Flick up until the Panasonic folder appears Tap the button to open the folder d Tap the Panasonic PC Settings Utility button this opens the operating system version of the Dashboard Figure 12 2 4 Tap Support Perform Battery Recalibration The Battery Recalibration subscreen opens 5 ...

Страница 231: ... 7 Figure 12 2 Dashboard Panasonic PC Settings Utility Battery Recalibration Settings 1 2 3 4 The operating system Windows Start button is located on the tool tray at the bottom of the screen Tap to open the applications list tap 1 Panasonic 2 Panasonic PC Settings Utility 3 Support 4 5 Perform battery recalibration 5 6 ...

Страница 232: ... center of the tablet then connect the contacts into the socket on the tablet CAUTION Do not touch the terminals and prevent dust or water from reaching the tablet socket or battery terminals while loading and unloading the battery Always disconnect the AC power supply before loading or unloading the main battery Do not install or remove the battery pack while the tablet is in Sleep mode Removal o...

Страница 233: ... unload the main battery pack 1 Ensure that the AC power supply is disconnected from the tablet 2 Consider saving all data or powering down the tablet 3 Squeeze the battery latch slider to move it to the unlock position do not push down it will lock to prevent accidental release The battery pops up but does not disconnect When the main battery pack is loaded always ensure that the slide latch is f...

Страница 234: ...es whether a hot swap would be successful without the loss of data The light can change status based on the charge level of the Bridge battery connection state of the AC adapter the connection state main battery pack the state of the battery pack lock slider and the state of the tablet software Sleep mode or not This feature should be tested and used with caution to avoid loss of data in the table...

Страница 235: ...past and the length of time the tablet is powered on per operating session Checking the power level period ically helps to ensure that the source is not depleted unexpectedly To check the level of charge of the tablet embedded battery perform the following steps 1 On any screen in the lower corner the Status button appears Tap the button to open the Status screens 2 Open the Details screen see Fig...

Страница 236: ...external AC adapter from the tablet manufacturer see Figure 12 4 To recharge the tablet main battery pack perform the following steps 1 Optionally power off the tablet to reduce recharge time 2 Insert the main battery pack as described in Section 12 4 3 3 Connect the power cord to the AC adapter 4 Insert the AC adapter cable plug into the tablet DC IN charge port on the side of the tablet Figure 1...

Страница 237: ... To per form a battery recharge rate adjustment 1 Enter the Windows operating system Section 3 7 1 2 To open the Panasonic PC Settings Utility Figure 12 5 shortcut press the A button on the side of the tablet a At the bottom of the Windows Desktop screen a tool bar appears b Tap the Windows Start button A menu appears c Flick up until the Panasonic folder appears Tap the button to open the folder ...

Страница 238: ...during a battery hot swap and it may not be fully charged when the change is to be performed so the replacement battery should be prepared and charged if the bridge bat tery is to be used The tablet manufacturer recommends fully recharging the bridge battery once every 12 months to pre vent deterioration of the battery To recharge the bridge battery Figure 12 5 Dashboard Panasonic PC Settings Util...

Страница 239: ...r Manual 342 9000 1 Rev B ECCN EAR99 12 15 1 Power off the tablet 2 Remove the main battery pack 3 Connect the tablet to the AC power adapter 4 Charge the bridge battery for approximately 2 hours continuously CAUTION Strong magnetic fields can cause the bridge battery to malfunction ...

Страница 240: ...r recharging Figure 12 6 Scanner Battery Access 1 scanner housing rear view 2 battery compartment open 3 tethered cover 4 battery with 5 alignment groove and 6 flexible tab for removing battery from com partment Inset 7 shows the LCD display for state of charge five segments showing steady color indicates 100 charge 1 2 3 6 4 5 7 WARNING The scanner unit has a micro data card accessible in the bat...

Страница 241: ...5 10 if not already open in the top corner tap the Details button c In the Details screen the scanner battery status is shown as a percentage in the Scanner table Battery Charge Level row Do not confuse with the Tablet table Battery Charge Level row On the scanner For an alert reading of scanner battery charge level when the state of charge of the scanner battery reaches 15 of full the Power LED o...

Страница 242: ...ry flexible tab straight out from the battery compartment c Align a fully charged battery with the alignment groove facing upwards and the LCD state of charge display facing away from the scanner d Gently push the battery into the battery compartment using finger pressure Ensure that the battery jacks fully seat over the connection tines inside of the battery compartment Similar tines are shown in...

Страница 243: ...ry if the scanner system turns on green LED but will not seek blinking yellow light check in the battery compartment and make sure the micro data card is fully inserted Figure 12 7 Figure 12 7 Micro Data Card Slots 1 Battery compartment open and empty 2 micro data cards slots Be careful not to spring out the micro data card when changing the battery 1 2 ...

Страница 244: ...ht flashing recalibration required steady error in charging Figure 12 8 Scanner Battery Mounting in Charger Left battery aligned 1 5 jack connector on battery 2 5 tine connector in charger battery bay Right battery mounted 3 battery status LED 4 charger status LED 5 LCD display for state of charge 1 2 3 4 5 Battery recalibration is a common feature of smart batteries in which the battery is retaug...

Страница 245: ...rger comes along with an AC adapter and separate power cords with connectors for USA UK and Europe mains systems The charger system includes three small plastic spacers These are not required for the battery provided with this system Figure 12 9 Scanner Battery Charger Setup 1 one of three power cords European USA and UK mains plugs 2 AC adapter 3 charger 1 2 3 ...

Страница 246: ...n appropriate power source see Section A 1 Scanner Specifications Figure 12 10 Scanner Battery Charger Power Cable Options 1 European mains 2 USA mains and 3 UK mains 1 2 3 CAUTION The charger is an open system and the following cautions should be observed Do not expose the charger or the AC adapter to liquids Do not open the charger or the AC adapter Do not restrict the airflow around the charger...

Страница 247: ... the recharge cycle count is acceptable 2 Power down the scanner and remove the battery from the scanner battery compartment as described in Section 12 5 2 Exchanging Batteries in the Scanner 3 Connect the battery charger 4 Insert the depleted battery in the charger battery bay see Figure 12 8 The battery begins to charge if the state of charge of less than 90 of full charge Both charger status LE...

Страница 248: ...Battery Care Scanner Battery American Science and Engineering Inc 12 24 MINI Z Operator Manual 342 9000 1 Rev B ECCN EAR99 ...

Страница 249: ...ering Inc MINI Z Operator Manual 342 9000 1 Rev B ECCN EAR99 13 1 Chapter 13 Options and Accessories This chapter describes major options available for a MINI Z system For the latest information on available options contact AS E ...

Страница 250: ...ccessories that may have been ordered Table 13 1 provides a list of the standard parts and options Compare the packing list to the contents of the shipment to determine which items are included Table 13 1 Parts List for MINI Z System Item Part Number Quantity and Description Image 342 0500 MINI Z System Tablet with protective case installed charger and power cable hand grip and stylus with tether ...

Страница 251: ...al 342 9000 1 Rev B ECCN EAR99 13 3 Scanner Handheld Module Bx standard 120kV with included power switch key Handheld Module future option Cable Assembly Long M12 to Ethernet RJ45 Scanner shoulder strap Table 13 1 Parts List for MINI Z System continued Item Part Number Quantity and Description Image ...

Страница 252: ...ineering Inc 13 4 MINI Z Operator Manual 342 9000 1 Rev B ECCN EAR99 Rugged transport case Scanner battery 2 with contact caps Scanner Battery Charger with US power cord Table 13 1 Parts List for MINI Z System continued Item Part Number Quantity and Description Image ...

Страница 253: ...ience and Engineering Inc MINI Z Operator Manual 342 9000 1 Rev B ECCN EAR99 13 5 Scanner Battery Charger EU power cord Scanner Battery Charger UK Power cord Table 13 1 Parts List for MINI Z System continued Item Part Number Quantity and Description Image ...

Страница 254: ...ring Inc 13 6 MINI Z Operator Manual 342 9000 1 Rev B ECCN EAR99 Soft case backpack with modified padding 342 1406 1 Calibration Dock Phantom Wire Black frame rated for 120kV Table 13 1 Parts List for MINI Z System continued Item Part Number Quantity and Description Image ...

Страница 255: ...mentarily hold the Power button The tablet powers up and opens ASEI 7 Access the Windows operating system Section 3 7 1 8 If Airplane Mode is engaged to prevent the use of WiFi perform the following steps to disable Airplane mode so WiFi can be used Otherwise skip to step 9 a At the bottom of the screen a menu appears If Airplane Mode is enabled an airplane symbol appears b Tap the symbol to open ...

Страница 256: ... process depends on the local WiFi network The Windows desktop opens 13 2 1 2 Downloading Virus Definitions from Defender 1 Tap the tool tray Windows Start button A menu opens 2 Tap S Windows System Windows Defender The Windows Defender Web page opens 3 Follow the instructions to activate protection and to update the anti virus definitions 13 2 1 3 Restoring Normal Tablet Operation 1 To prevent th...

Страница 257: ...ronment IP 54 rated Ambient Operating Temperature 0oC to 45oC 32oF to 113oF Storage Temperature 40o C to 60o C 40o F to 140o F Elevation System operation 0 to 10 000 ft 3000 m System shipping up to 15 000 ft 4500 m pressurization equivalent Warm up Off less than 12 hrs not required Off more than 12 hrs 25 seconds Charging Power Voltage Input 100 VAC 240 VAC 50 60 Hz Current Input 1 4 A Max Battery...

Страница 258: ...in Sleep mode discharges in approximately 9 days Ambient Operating Temperature and Relative Humidity 10oC to 50oC 14oF to 122oF 30 to 80 RH No condensation Battery recharge enabled for internal 0o C to 50o C 32o F to 122o F high ambient temperature derating function Storage Temperature and Relative Humidity 20o C to 60o C 4o F to 140o F 30 to 90 RH No condensation Do not operate in extreme tempera...

Страница 259: ...g 1 Scanner with Scanner key 2 Scanner Shoulder Strap 3 Calibration Dock 4 Tablet 5 Tablet power adapter with power cord 6 Tablet Stylus and Hand Grip 7 Scanner batteries 2 with contact covers 8 Scanner battery charger 9 Scanner battery charger power adapter and cord 10 Scanner battery charger cords for USA UK and EU 11 Ethernet cable Figure repeats Figure 11 2 1 2 3 4 5 8 9 10 6 11 7 ...

Страница 260: ...n as a precaution The user should suspend scanning for a period of time until the system temperature decreases Turn the key off to accelerate cooling Restart when the system has cooled If the fault condition persists turn the key switch off and contact AS E Collimator interlock fault Fault A component in the X Ray generation system has become disconnected and the scanner X ray generation stages ar...

Страница 261: ...ation stages are shut down as a precaution Turn the key off and then on again to attempt to reset the scanner If the fault condition persists turn the key off and contact AS E Motor speed too fast or too slow Warning There are two speed tolerance thresholds for scanner motor speed When the scanner reaches the first limit 10 either too fast or too slow this warning message is displayed image qualit...

Страница 262: ...few times gently to move them Turn the key off and then on again to attempt to reset the scanner If the fault condition persists turn the key off and contact AS E X Ray current error Fault There are two output current thresholds for the scanner X ray tube When the scanner output current rises to more than 10 above its target value during scanning this fault message is displayed and the scanner X r...

Страница 263: ...ain to attempt to reset the scanner If the fault condition persists turn the key off and contact AS E X Ray tube hot Warning There are two temperature thresholds for the scanner X ray tube When the scanner temperature rises above the first limit this warning message is displayed The user should suspend operation until the temperature decreases and the warning message is removed X Ray tube over tem...

Страница 264: ...oups optionally delete images 4 Settings 4 1 Settings General Mode Screen Screen appearance incident reports language 4 2 Settings Users Mode Screen Add and edit user accounts 4 3 Settings Policies Mode Screen Set user accounts administrative polices 5 Export Screen Export multiple full images from tablet memory 6 Backup Screen Copy images to external storage device 7 Restore Screen Copy images fr...

Страница 265: ... Side Locations for rear locations see Table A 7 1 Dashboard 2 Screen Rotate Lock 3 Power 4 Volume 5 Microphones 6 Light Sensor 7 Front Camera Lens 8 Camera Status 9 Power Status 10 Disk Access 11 Battery Status 12 Windows Start 13 DC In 14 Headphone 15 USB Data 16 Touchscreen and 17 Ethernet Figure repeats Figure 4 3 For item descriptions see Table 4 3 1 2 3 8 4 7 9 6 13 11 10 12 14 16 17 5 15 ...

Страница 266: ...able A 6 16 microSIM 17 microSD 18 Main Battery socket 19 Tablet manufacturer warning against prolonged contact 20 Tablet manufacturer model and serial number 21 Main Battery Pack 22 Main Battery Lock unlocked position 23 Battery Hot Swap Status 24 Rear Camera Light 25 Rear Camera Status and 26 Rear Camera Lens Figure repeats Figure 4 4 For item descriptions see Table 4 3 16 17 23 18 22 24 21 26 2...

Страница 267: ...gs 2 8 3 38 3 39 Automatically Login User 3 39 10 1 10 11 autorotate screens 3 17 AUXn connectors 4 3 Available free space tablet hard drive 9 2 B Back button ASEI 3 24 background color for buttons 3 16 background lighting 5 30 backscatter area 2 4 backup images 9 12 Backup screen 5 21 Backup screen button 5 2 bands for WiFi 3 31 Basic Operation reference Preface v batteries bridge 12 14 charge st...

Страница 268: ...er Status icon 3 26 Scanner Standby Mode Status icon 3 26 Screen Version Selection 3 24 Settings Windows 3 50 Settings screens ASEI 5 2 Status screens 3 27 Trigger 4 3 Warmup Required Status icon 3 26 Warning Status icon 3 26 WiFi Connection 3 26 X ray Emission Status icon 3 26 C calibrating the system 11 11 Calibration Dock recalibration 11 12 Calibration screen 11 12 Camera Lens Front 4 7 Camera...

Страница 269: ...p touchscreen gesture 3 20 drag touchscreen gesture 3 20 Dynamic Contrast enhancement menu 8 4 use 8 7 8 8 E Enable Status button 6 3 End User License Agreements EULA 3 29 Enhancement Tools menu 8 2 error conditions Ethernet cable connector assembly 3 10 pin connector assembly 3 10 setup 3 10 Ethernet cable socket for tablet 4 8 Ethernet Connection icon 3 26 Ethernet Terminal scanner 4 2 exclusion...

Страница 270: ... Home button ASEI see Back ASEI Home screen 5 1 hot swapping battery 12 4 hotspot touchscreen see touch point hot swapping 12 14 I icons four vertical bars 7 5 icons see also buttons 3 16 image blue frame 7 5 enhancements 8 1 image group names 7 15 image number appearance 5 10 description 9 4 images backup 9 12 comments 7 17 deleting 9 15 deletion policies 10 10 export 9 8 flagged 7 18 group name ...

Страница 271: ... managing 9 1 Microphones 4 7 microSD card 4 6 4 8 4 9 4 10 A 10 microSD card socket 4 8 microSIM card socket 4 8 Mode button comparison Review screen 8 1 Gallery 5 8 Monitor 5 4 Search 5 13 View 5 10 Modify user accounts screen 10 7 Monitor Scan screen 5 3 moving between screens 3 22 multiple image group comments 7 5 multiple images 7 4 multiple images group 7 15 N names for image groups 7 4 7 15...

Страница 272: ... 11 11 red LED laser guides 4 3 red X ray on LED 4 3 Reference images file structure 9 12 libraries 9 12 Libraries Backup 5 22 Libraries Restore 5 19 related documents Preface v replacement imaging 7 4 reports incident 11 15 Reset enhancement 8 4 8 7 Restore screen button 5 2 restoring images 9 13 Reverse Video enhancement 8 5 Review screen button 5 2 Review Search screen 5 12 Review View screen 5...

Страница 273: ...screen 5 3 Search Review screen 5 12 Settings General screen 5 29 Settings Policies screen 10 10 Settings Users screen 10 6 Status Details screen 5 27 Status Overview screen 5 25 Users Settings screen 10 6 View Review screen 5 8 WiFi Connection 3 32 WiFi Regions 3 34 SD card see microSD card Search Review screen 5 12 searching for images 9 3 searching Help Preface iii security 11 3 selected image ...

Страница 274: ...tablet screen see touchscreen tamper evident seals 2 6 tap touchscreen gesture 3 20 technical support Preface vi text size 3 40 three point multitouch gesture disabled 3 49 thumbnail defined 3 16 time selection controls ASEI 9 7 Windows 3 44 Touch Operation Support 3 47 touch point touchscreen 3 16 touchscreen cleaning 11 1 defined 3 15 double tap 3 20 drag 3 20 flick 3 20 hold 3 20 location 4 8 p...

Страница 275: ...scriptions operational A 4 display operational 7 19 safety 2 2 system operation 7 19 X ray emissions 2 7 water on touchscreen 3 49 Welcome screen 3 42 wet touchscreen 3 15 wide area scanning 7 4 WiFi 5 GHz frequency enable 3 34 3 45 Airplane mode 3 50 enabling use 3 50 frequency selection 3 34 preventing use 3 50 region selection 3 33 regions list 3 34 security 11 3 setup 3 31 SSID 3 35 WiFi butto...

Страница 276: ...Index 10 American Science and Engineering Inc MINI Z Operator Manual Rev B ECCN EAR99 Z zoom in touchscreen 3 20 zoom out touchscreen 3 20 ...

Отзывы: