- 14 -
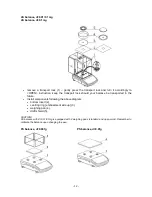
Connect an indicator using port located at the back, next
connect supplementary equipment.
Now, connect the device to the mains (power supply socket
is located at the back).
3.3. SETTINGS
It is necessary to level the balance prior connecting it to the mains. To level the
balance turn its feet until an air bubble takes central position.
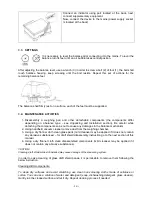
After adjusting the balance level, use a wrench (3) in order to screw a bolt (2) of foot (1), the bolt shall
touch balance housing, keep screwing until the bolt resists. Repeat this set of actions for the
remaining balance feet.
The balance shall firmly rest on a surface, each of the feet must be supported.
3.4. MAINTENANCE ACTIVITIES
1. Disassembly a weighing pan and other detachable components (the components differ
depending on a balance type – see
Unpacking and Installation
section). Be careful while
detaching the components so as not to cause any damages to the balance mechanism.
2. Using handheld vacuum cleaner remove dust from the weighing chamber.
3. Using a dry flannel cloth clean glass parts (mild cleanser may be applied if it does not contain
any abrasive substances) – for draft shield disassembly instruction go to the next section of this
manual.
4. Using a dry flannel cloth clean disassembled components (mild cleanser may be applied if it
does not contain any abrasive substances).
CAUTION!
Cleaning draft shield while still installed may cause damage of the measuring system.
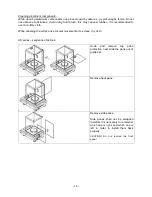
In order to ease cleaning of glass draft shield panes, it is permissible to remove them following the
below instruction.
Cleaning ABS components:
To clean dry surfaces and avoid smutching use clean non-colouring cloths made of cellulose or
cotton. You can use a solution of water and detergent (soap, dishwashing detergent, glass cleaner).
Gently rub the cleaned surface and let it dry. Repeat cleaning process if needed.
Содержание AS X2 Series
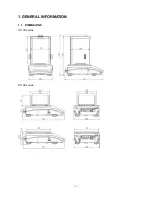
Страница 7: ...7 1 GENERAL INFORMATION 1 1 DIMENSIONS AS X2 series PS X2 series...
Страница 8: ...8 APP X2 series WLC X2 series...
Страница 26: ...26 Enter particular key setup Select the key The selected key is displayed automatically on a home screen...
Страница 96: ...96 Status Completed Signature...
Страница 132: ...132...


