background image


IQ3 Drag Dash Installation Manual  


57

The first parameter 

Circular Buffer Length

 is used to set the amount of data to record in seconds. 

The 

Recording Mode

 is used to determine whether the recording will stop when the maximum 

record time is reached or whether the oldest data will be overwritten. For example, if a 1000 
seconds is entered for Circular Buffer Length and 

Stop after reaching end of buffer

 is selected, 

the program will record data for 1000 seconds and stop.  If 

Continue until stopped manually-

overwrite  oldest  data

  is  selected,  the  program  will  continuously  record  until  stopped  by  the 

operator.  Only the last 1000 seconds of data will be stored. 
  

Starting a Telemetry Session 

  
The next step is to start a telemetry session. Select the 

Telemetry

 icon 

or the 

New 

Telem Session

 menu item located in the 

File

 main menu selection. A dialog box, as shown 

below, will be displayed and you will then be asked to select the configuration file to use for 
this session. 


Select the configuration file as setup above. A dialog box will then be displayed asking if you 
wish to start real time data session. Be sure USB programming cable is connected to dash AND 
the dash is powered up. 
  

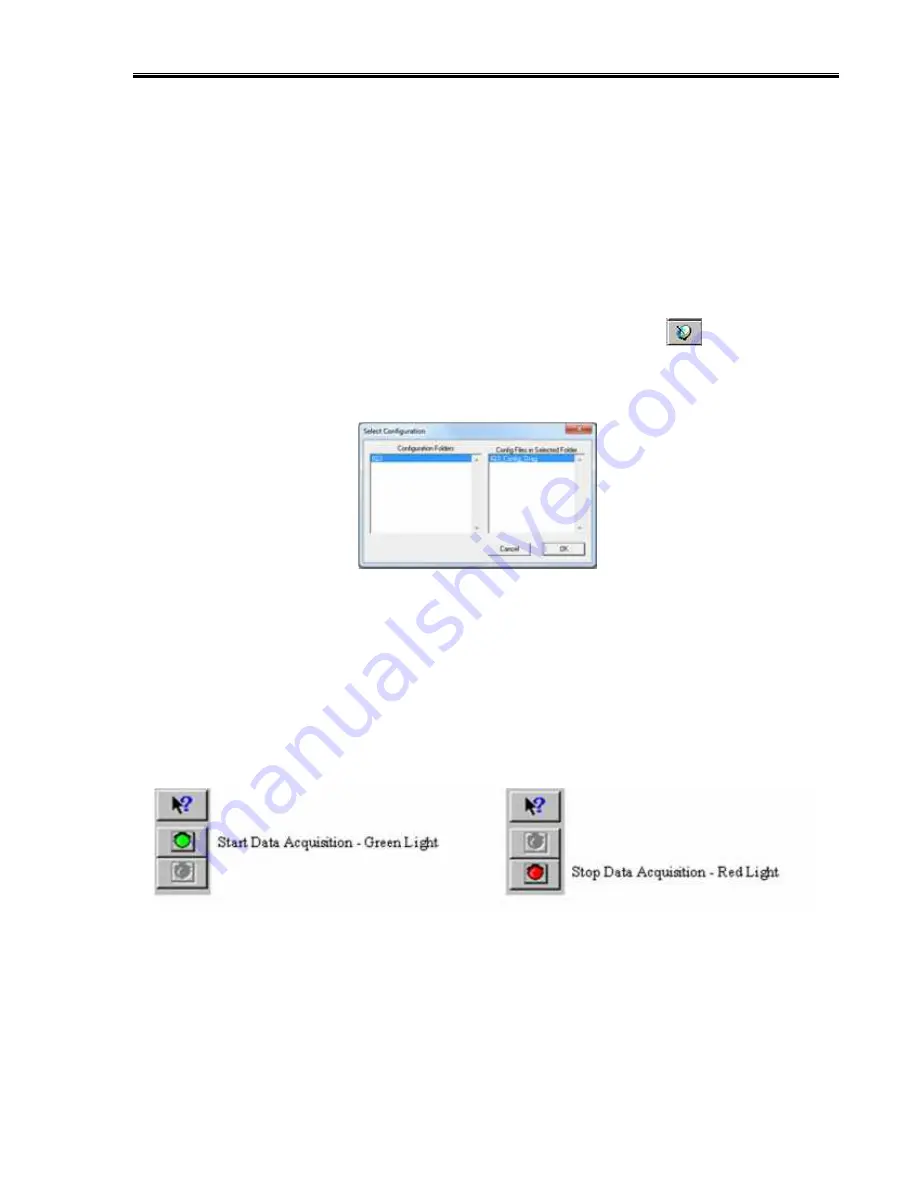
The real time session is controlled via two icons located below the context sensitive help icon in 

tool bar.  Only one icon will be active at a time depending on the status of the telemetry 

session.  The 

Start Data Acquisition 

icon is shown active on the left.  The 

Stop Data Acquisition 

icon is shown active on the right.  


To start the real time data acquisition left click, on the

 Start Data Acquisition

 Icon at the 

bottom of the tool bar.  The data acquisition will start at time 0. Once the real time data 
acquisition has been started, the value of the data channels will be displayed next to the 
channel button in the top portion of the display area.  To display the data from a channel on the 
graphics screen, simply select the channel by left clicking on the channel button in the same 
manner you display data from a recorded file. 

Содержание IQ3 Drag Dash

Страница 1: ...IQ3 Drag Dash Installation Manual 1 IQ3 Drag Dash Installation Manual IQ3 Drag Dash Release Rev B 021016 Racepak IQ3 Drag Dash and V Net are trademarks of Racepak LLC Racepak LLC...

Страница 2: ...IQ3 Data Logger Dash Installation Manual 2...

Страница 3: ...r intention to maintain a mutually beneficial and cordial relationship with each and every customer Racepak LLC warrants all merchandise manufactured by Racepak LLC against defects in workmanship or m...

Страница 4: ...IQ3 Data Logger Dash Installation Manual 4...

Страница 5: ...Dimensions 11 External Features Front 11 External Features Rear 12 Mounting Dimensions 12 Installation 14 General Mounting Requirements 14 Power Supply and Grounding 15 Engine RPM Signal 15 MicroSD M...

Страница 6: ...ting the Correct Time and Date inside Your IQ3 Drag Dash 45 Clearing Data Files from the Memory Card 46 Initiating a Recording with the IQ3 Drag Dash data logger 48 Recording Data 48 Configuring the R...

Страница 7: ...sh b Available channels for display c External optional sensors d Technical specifications 2 Installation a Dash b Software 3 Programming The Display 4 Adding Sensors 5 Software Usage Items Included w...

Страница 8: ...Light LEDs 4 User Programmable Internal Warning Light LEDs with On Screen Text Warning 5 Character Programmable Alpha Numeric Text per Display Channel Rear Mounted Power Ground Adapter Programming But...

Страница 9: ...Draw 350mA Without warning and shift LED s active Reverse Voltage Protection Yes Operating Temperature 32 140 F 0 60 C Mounting Orientation Rear of dash facing direction of travel Memory Maximum micr...

Страница 10: ...seconds to the memory card during recording When power is switched off the last 3 seconds of data may not have been written to the card to so take note of this Once written to the card the file is nu...

Страница 11: ...arning lights for high engine temperature 225 F Oil Pressure Warning Pre set warning light for low oil pressure 20psi Warning Lights 3 4 User programmable warning lights for Inputs 3 4 Micro SD Car Sl...

Страница 12: ...V Net cable Amp 34 Pin Connector Provides input for power ground programming buttons USB Cable Connector Provides input for USB programming cable supplied with package Mounting Studs Nuts Three 10 st...

Страница 13: ...IQ3 Drag Dash Installation Manual 13 Mounting Dimensions Mounting template for printing and drilling Verify printed dimensions on Racepak unit before drilling...

Страница 14: ...ack to the dash Moisture Avoid excessive moisture The IQ3 Drag Dash is designed to be water resistant but not waterproof This means when installed in open cockpit type of vehicles such as dragsters ro...

Страница 15: ...Dash Engine RPM Signal Requirements 5 18V 50 duty cycle square wave output This signal is typically obtained from the tach signal output of an aftermarket ignition box Racepak also offers a GMR Induc...

Страница 16: ...ommend using a 3 to 5 amp fuse when making this power connection The safe operating voltage range is 9 18 volts DC 2 Not Used N A 3 Not Used N A 4 Not Used N A 5 Trans brake Blue Connect to the trans...

Страница 17: ...input requires a standard 5 20 volt 50 duty cycled square wave signal to work properly DO NOT CONNECT THIS WIRE DIRECTLY TO THE IGNITION COIL DOING SO CAN DAMAGE THE CIRCUIT 10 Not Used N A 11 Oil Pre...

Страница 18: ...arket sensors Short circuit protected 50mA max shared between all Sensor 5v outputs 20 Sensor ground not used N A Not used for factory supplied sensors Optional available to supply ground for aftermar...

Страница 19: ...RPM Sensor 12v output Red Connect to the supplied driveshaft sensor Short circuit protected 50mA max 32 Driveshaft RPM Sensor Ground Black Connect to the supplied driveshaft sensor 33 Driveshaft RPM...

Страница 20: ...opriate length pre terminated V Net extension cable V Net cables are available in 12 increments and are equipped with a male connector on one end and a female connector on the opposite end In the even...

Страница 21: ...oftware area of this manual Using the external programming buttons a factory reset can be performed to revert all settings and pages back to as factory shipped excludes hour service values Further det...

Страница 22: ...ger Dash Installation Manual 22 From the factory Page 3 of the IQ3 Drag Dash is programmed to display the following items From the factory Page 4 of the IQ3 Drag Dash is programmed to display the foll...

Страница 23: ...e Utilized to program items such as screen brightness or pulses per revolution tach programming Start Recording Utilized to start a recording when either button is held for 5 seconds REC will be displ...

Страница 24: ...htness LED brightness reset to defaults etc Entering Setup 1 Press and hold the Button 1 for TWO shift light blinks MEDIUM press 2 The Dash will display SETUP 1 3 Confirm you wish to enter the setup m...

Страница 25: ...Press Button 1 EXT WARN BRITE External Warning Light Brightness 1 Minimum Brightness 10 Maximum Brightness Factory Default is 7 Short Press Button 2 to increase value Short Press Button 1 Long Press...

Страница 26: ...lt is 0 Short Press Button 2 Increases by 1 Medium Press Button 2 Decreases by 1 Short Press Button 1 Long Press Button 1 SENS SPEED Type of Drive Shaft Speed Sensor Factory Default is 3 Wire Hall Sho...

Страница 27: ...ncreases by 1 Medium Press Button 2 Decreases by 10 Short Press Button 1 Long Press Button 1 FAN OFF TEMP Fan Off Output value Value to be used for control for fan output Factory Default is 175 Short...

Страница 28: ...150GVT 5v powered 5v 0 4 5v 150 3 300 PSI 0 300 psi Racepak 810 PT 0300GVT 5v powered 5v 0 4 5v 300 3 500 PSI 0 500 psi Racepak 810 PT 0500GVT 5v powered 5v 0 4 5v 500 3 1500 PSI 0 1500 psi Racepak 81...

Страница 29: ...t power and ground Wires ONSCREEN NAME RANGE NOTES SCALING 1 RP DEG F 0 250 F Racepak Single Wire 800 TR 250 style with 499 Ohm pull up 2 RP DEG F 0 300 F Racepak Two Wire 800 TR 300 style with 4 42K...

Страница 30: ...voiding possible damage to the sensor during clutch and or transmission service After you have selected a location position the split collar over the shaft and fix the collar onto the shaft by tighten...

Страница 31: ...ing wires Main connector Pin 17 Yellow Can High Main connector Pin 26 Green Can Low Adapter harnesses available Although the consumer can terminate the mating Deutsch connector and connect to their EC...

Страница 32: ...IQ3 Data Logger Dash Installation Manual 32...

Страница 33: ...Click Next 5 License Agreement After reading Click Yes 6 Choose Destination Location Default C Program Files DatalinkII Click Next 7 Data Logger Installation and Support Select the check box for IQ3 D...

Страница 34: ...and each of the internal channels connected to the IQ3 Drag Dash unit 1 Connect PC to IQ3 Drag Dash unit using the USB programming cable supplied with the IQ3 Drag Dash unit system The USB programming...

Страница 35: ...y to communicate through COM3 If your PC is using a different COM port number it will be necessary to match the DataLink and PC com port settings 1 Connect the supplied USB programming cable between y...

Страница 36: ...rom the pull down menu 3 A Select Configuration dialog window will open A list of folders containing Configuration files will appear on the left side while the actual Configuration files appear on the...

Страница 37: ...ick on the OK button You should now see a new channel button for each sensor 8 Right click on any of the channel boxes to modify change their parameters 9 Once any change is made you must select Send...

Страница 38: ...d select File from the main menu area located across the upper area of the screen 3 Select Open Car Configuration from the pull down menu 4 A Select Configuration dialog window will open A list of fol...

Страница 39: ...he Dash Info tab by right clicking on the main channel button labeled IQ3 Logger ii Select Dash Info tab locate the listing ECU Type under the Custom Programming Options iii Click on ECU type and sele...

Страница 40: ...the Display Pages tab Each input is programmed by selected the text box related to that input area as indicated by the red line extending down to the dash from each text box Each programming function...

Страница 41: ...l reading OK Closes window following programming changes Gear Indicator center of dash Gear Position Remaining Inputs As shown above to program an input area simply locate the desired sensor channel b...

Страница 42: ...s value Channel Tag Text to be displayed above warning channel value when warning is activated 5 chars max Channel Value is Inside Warning Limit Window Triggers warning when sensor value is between Lo...

Страница 43: ...ove Warning Channel One OIL Warning Channel Two Engine RPM above 1000 Text Above Warning Channel Two TACH Text To Display When Warning Values Are Met Oil P When at least one programmed warning channel...

Страница 44: ...ion of the DataLink software The Configuration file contains all the information necessary to convert the raw data saved on the memory card into a format that allows the file to be opened in the DataL...

Страница 45: ...ng the following procedure using the Datalink II software Before beginning insure that the time and date on your PC are set correctly The time is located in the Windows system tray at the lower right...

Страница 46: ...Dash kit package The reader requires an available USB port on your PC The microSD memory card reader provided with the IQ3 Drag Dash does not support Windows 95 or Windows 98 operating systems Cleari...

Страница 47: ...in the memory card reader Now click on the button labeled Clear Data Files From Memory Card The following screen will appear 4 To delete all of the data files on the memory card click on the Delete Al...

Страница 48: ...ogger can be programmed to begin recording once a threshold has been reached for example once the Engine RPM exceeds 3000 rpm Once the recording is started it will continue until the maximum record ti...

Страница 49: ...Menu bar and selecting Open Car Configuration Select the configuration file named IQ3_Config_Dash and click OK Next position the mouse cursor over the IQ3 Logger channel button and click the right mo...

Страница 50: ...selection position the mouse cursor over the selection and click the left mouse button to accept the selection The top line of the edit box will be updated with the newly selected value Setting the S...

Страница 51: ...on your data logger is to send the configuration just edited from your PC to your data logger over the USB communication cable connected above To send the information click on the Send Configuration b...

Страница 52: ...mory card to your PC Remove the SD memory card from the IQ3 Drag Dash data logger and place it in the SD memory card reader connected to you PC Next click the New Upload icon at the top of the left to...

Страница 53: ...right corner Now using left mouse button click and drag the window larger After you have identified the data file you would like to upload select the file by clicking on it with the left mouse button...

Страница 54: ...t OK or Next depending on your configuration file Additional dialog boxes may be displayed These are part of the Run Log sections that are user programmable to allow test information to be entered dur...

Страница 55: ...irst setup the real time parameters in your data logger To setup your data logger s real time configuration position the mouse cursor over the IQ3 Logger channel button and click the right mouse butto...

Страница 56: ...eal time sample rate Note the V Net Sample rate of each module s to be monitored should be equal to or greater than the real time sample rate If they are not then the last data points will be repeated...

Страница 57: ...asked to select the configuration file to use for this session Select the configuration file as setup above A dialog box will then be displayed asking if you wish to start real time data session Be s...

Страница 58: ...et help for any of the menu items simply highlight the menu item by placing the mouse cursor over the menu item Next press the F1 key to display the help Icon Tool Bar Select the button located at the...

Страница 59: ...e dash via the SEND Configuration button as found in the lower right corner of the open window In most instances these settings are also accessed by the external programming buttons IQ3 Logger Product...

Страница 60: ...cate the Device Manager within Windows D Locate Ports COM LPT in the list E Select the or to expose dropdown list F Ensure the Racepak USB Device is listed and a COM number is listed i If no listing i...

Страница 61: ...l prove most beneficial As with any endeavor the work invested in properly learning the usage of the product will pay dividends in the customer s satisfactory There are a variety of books available co...

Страница 62: ...IQ3 Data Logger Dash Installation Manual 62...

Страница 63: ...IQ3 Drag Dash Installation Manual 63 949 709 5555 30402 Esperanza Rancho Santa Margarita CA 92688 USA Fax 949 709 5556 www racepak com IQ3D manual rev C 8 16...

Отзывы: