background image

54

Section 7:  Installing and Using the PressPrint Software for Windows 95/98

Digital Label and Decal Press 2 UserÕs Manual

4.

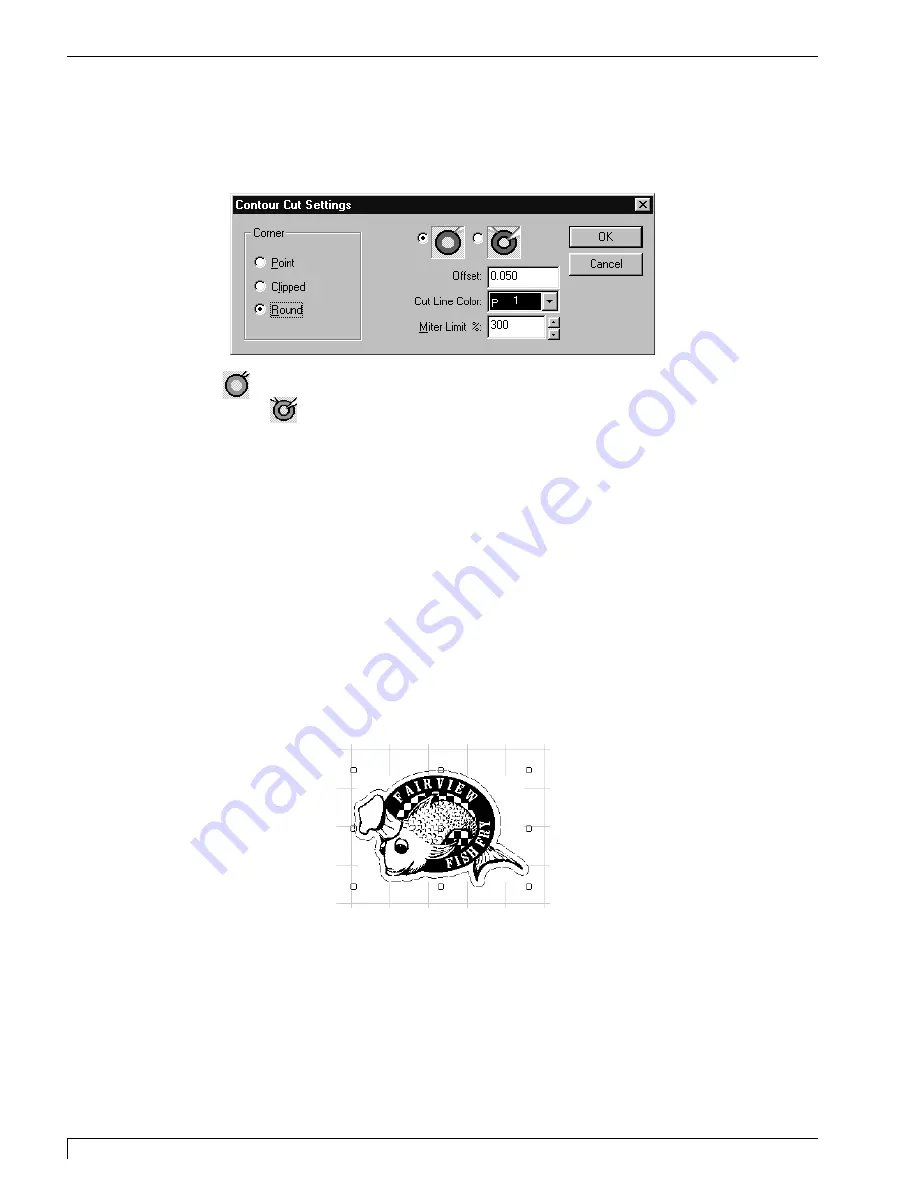
While the image is still selected, click on the Cut menu and select 

Contour Cut

(see Part F of this section for information on PressPrintÕs Die Cut feature). The
Contour Cut Settings window appears. 

5.

Select       to trace a cut line along the exact contour of your imageÕs outside
edge. Select       to trace a cut line along the contour of both the outside and
inside edges of your image. In this case, the software will essentially attempt to
cut away anything it sees as white space. Then, enter the desired 

Offset 

value

to specify how far you would like the cut line to be from the edge of the
colored portion of your image. Entering a value greater than 0 will cause the
cut line to be placed away from the colored portion of your image. Entering a
value less than 0 will cause the cut line to be placed within the colored portion
of your image. Entering an exact value of 0 will cause the cut line to be placed
on the very edge of where the colored portion of your image meets white
space.

6.

Select 

OK 

to begin contouring your image. This process will take from just a

few seconds to a few minutes depending on the size and complexity of your
image. When the image is finished contouring, a dashed cut line will appear
around your image and both will be selected. 

NOTE:

If you imported a bitmap image, you may wish to select 

Show Bitmaps Outlines 

from the

View menu before proceeding. For more information on this option, see its explanation in
Part F of this section

DLDP2.qxd  3/29/99 9:56 AM  Page 54

Содержание Impressa 2

Страница 1: ......

Страница 2: ...opied reproduced or translated into another language without the prior written consent Patent Pending Trademark Acknowledgements IBM is a registered trademark of International Business Machines Corpor...

Страница 3: ...ception which can be determined by turning the equipment off and on the user is encouraged to try to correct the interference by one or more of the following measures Re orient or relocate the receivi...

Страница 4: ...dge 21 D Placing the Ribbon Cartridge into the Printer 22 E About Print Media 22 F Specialty Supplies and Applications 24 G Loading Print Media into the Supply Tray 25 H Adjusting the Supply Tray s In...

Страница 5: ...60 Rotating Images to Maximize Space 61 Anti Aliasing 61 Print Multiple Pages of the Same Label 62 G Creating Serialized Labels 62 H Printing Multiple Spot Color Labels 66 Section 8 Maintenance A Supp...

Страница 6: ...sely related printing technologies to achieve its remarkable output thermal transfer and dye sublimation Thermal Transfer Thermal transfer is a process which uses a resin or wax resin based ribbon rol...

Страница 7: ...f color This results in the blending of one colored dot into the next producing continuous tone photo realistic color accurate images with no dithering B SPECIAL FEATURES With its dual function therma...

Страница 8: ...efer to the remainder of this manual This User s Manual is your complete step by step guide to setting up and printing with your powerful new Digital Label and Decal Press Section 1 Introduction 3 Dig...

Страница 9: ...4 Section 1 Introduction Digital Label and Decal Press 2 User s Manual...

Страница 10: ...t only on 110 120 VAC 50 60 Hz if operating within the United States or Canada For printers that have been shipped outside of the United States and Canada operate the unit only on 220 240 VAC If you h...

Страница 11: ...von qualifiziertem Wartungspersonal berpr fen lassen Keine Geh useteile abnehmen Wartungsarbeiten nur von qualifiziertem Fachpersonal durchf hren lassen Consignes de s curit Avant d utiliser l apparei...

Страница 12: ...vicio autorizado No desarme el armario Para servicio de mantenimiento solicite la atenci n de un t cnico autorizado Precauzioni per la Sicurezza Prima di dare inizio al funzionamento dell unit siete p...

Страница 13: ...O PARA MANUTEN O PE A ASSIST NCIA A UM T CNICO QUALIFICADO Opere a unidade somente em 120 VAC 60 Hz se estiver operando nos Estados Unidos ou Canad Para impressoras enviadas para fora dos Estados Unid...

Страница 14: ...Section 2 Safety Precautions 9 Digital Label and Decal Press 2 User s Manual...

Страница 15: ...10 Section 2 Safety Precautions Digital Label and Decal Press 2 User s Manual...

Страница 16: ...unit in a location where the ventilation holes located on the rear of the unit could become blocked Do not install unit near heat sources such as radiators or air ducts or in a place subject to direct...

Страница 17: ...Ribbon Cartridge 1 Cutter Blade Holder with Blade 1 Printer Driver Software 32 Bit Print Spooler Software Warranty Statement and Registration Card This manual and other printed information Save the c...

Страница 18: ...Line light also serves to indicate a print error condition Such conditions are discussed in Section 9 of this manual The Cancel button cancels the print job currently being printed In order to cancel...

Страница 19: ...h the print media This will cause premature wear on the cutting blade and may even cause the cutter to stall If cut pressure is too low the cutter may not cut deeply enough This makes it difficult to...

Страница 20: ...Parallel Interface Port For more information on this port please refer to Section 5 C or Appendix A NOTE The Serial port and the small switches on the rear panel of the unit are for factory use only L...

Страница 21: ...nvenient Additional cutter blades can also be purchased as needed To remove these items from the inside of the printer refer to the following steps 1 Press the Cover Release Button Allow the cover to...

Страница 22: ...lace the Blade Holder into the Cutter Arm and tighten the gold colored Securing Knob by turning it toward the front of the printer Tighten only until the Blade Holder fits securely within the Cutter A...

Страница 23: ...18 Section 3 Getting Started Digital Label and Decal Press 2 User s Manual...

Страница 24: ...bes the ribbon and print media in each of these categories and explains how to install these print supplies into your digital press This section also explains the specialty supplies which can be used...

Страница 25: ...eet see Part E of this section for more print media information NOTE The 200 Series Dye Sublimation Ribbon can also be used with the 300 Series Vinyls which offer the benefit of greater conformability...

Страница 26: ...an impair print quality Handle the ribbon only by the ends of its ribbon core 2 The supply end of the ribbon is the end with the fresh unused ribbon on it The take up end of the ribbon is the other en...

Страница 27: ...ug tells the digital press which type of ribbon is installed and MUST be present in order for the unit to function E ABOUT PRINT MEDIA 100 Series Plain Paper Label and Decal Stock 100 Series plain pap...

Страница 28: ...eries vinyl stock has a sheet size of 12 x 20 305 x 508mm and comes packaged in 100 sheet quantities 300 Series UL Recognized Polyester Labels and Decals A special 300 Series black ribbon is available...

Страница 29: ...Kit or a commercial grade mug press is highly recommended for transferring printed images NOTE When printing images that will be transferred to a mug the overlay of the 200 Series dye sublimation ribb...

Страница 30: ...MEDIA INTO THE SUPPLY TRAY The digital press has an adjustable Meda Tray Assembly which consists of three separate parts the Supply Tray the Tray Cover and the Output Rack The Supply Tray stores the b...

Страница 31: ...heck to see that it is free of bent edges Handle the print media only along the edges and do not touch the printable side Oil or dirt from your hands can impair print quality 4 Place the print media P...

Страница 32: ...1 The black plastic In Feed Clutch is located on the top left hand corner of the Supply Tray on the same shaft as the tray s rubber In Feed Roller 2 If you intend to print onto 200 Series dye sublima...

Страница 33: ...ng steps to assemble and insert the Media Tray Assembly 1 Place the assembly s Tray Cover onto the Supply Tray so the extensions on the front edges of the Tray Cover engage the securing notches on bot...

Страница 34: ...n both sides of the unit s front interior As the Media Tray Assembly is inserted into the unit you should hear its spring loaded panel automatically unlatch and spring back to its up position This pan...

Страница 35: ...30 Section 4 Ribbons and Print Media Digital Label and Decal Press 2 User s Manual...

Страница 36: ...e Unit 31 Connecting the Unit 5 A APPLYING POWER 1 Locate the power cord supplied with your digital press 2 With the power switch turned OFF place one end of the power cord into the power port on the...

Страница 37: ...resin ribbon and print media installed leave all switches set to the default or up position If you have a 300 Series 3 color resin ribbon and print media installed flip only switch 1 down and turn th...

Страница 38: ...e is not intended to demonstrate print quality but rather to verify that the digital press is mechanically sound Self Test Example Approximately 30 of actual size NOTE The self test procedure in this...

Страница 39: ...rt This port is the means through which it receives data from your computer To connect the unit to your computer simply locate the shielded bi directional parallel cable included with the unit and ref...

Страница 40: ...utter s Pause light however should remain OFF when the unit is ready to print IMPORTANT In order to begin printing you must first install its custom printer driver software along with the PressPrint s...

Страница 41: ...36 Section 5 Connecting the Unit Digital Label and Decal Press 2 User s Manual...

Страница 42: ...tal press the proper commands it needs in order to print Use the following steps to install the printer driver into Windows 95 98 Once the driver is installed put it away in a safe place in case it ev...

Страница 43: ...sed which have new or updated features Before installing an updated printer driver version always delete the existing printer driver version from your system To do this simply select the printer drive...

Страница 44: ...allows your computer to display helpful prompts if an error occurs during operation In order for the 32 Bit Print Spooler to function properly your computer s parallel port must be set to ECP This is...

Страница 45: ...r driver setup window see Part D for further printer driver setup information When this option is selected the 32 Bit Print Spooler will automatically open and close with the start and finish of each...

Страница 46: ...ill print if you have sent multiple jobs to the printer A control button is also provided which allows you to delete every job listed in the queue To delete the job currently being printed simply sele...

Страница 47: ...is set to Printer Port instead of ECP Printer Port you must change the parallel port mode through your system BIOS or setup screen The system BIOS is generally entered by holding down a specific keyb...

Страница 48: ...computer s parallel port to ECP is largely dependent on your brand of computer please refer to your appropriate computer documentation or contact the computer manufacturer for more information on thi...

Страница 49: ...these same printer driver options through the Printer Setup button of the Print window This means that you don t have to go back to the main printer setup window each time you want to change a setting...

Страница 50: ...olor option is available only when the optional PrimaColor Color Matching Upgrade is installed Select this option to enable color matching profiles written specifically for your printer The PrimaColor...

Страница 51: ...bon type When selected this option allows the digital press to apply the software based spatial filter of RasterText technology This filter brings out the fine detail of smaller text and lines and all...

Страница 52: ...only its cut function When the No Targets option is selected the digital press operates similar to a traditional cutter in that it is able to cut shapes and letters out of completely blank label stock...

Страница 53: ...pplies are installed for the selected Ribbon Type This self test procedure can be helpful in assuring that your computer is effectively communicating with the digital press and that it is functioning...

Страница 54: ...variety of extra tools and menu selections which allow you to create more simple label and decal designs directly This section will guide you through the installation process and will also explain ho...

Страница 55: ...ce installed the PressPrint folder shown below will appear in the Programs group of the Start menu Select the PressPrint icon to open PressPrint If PressPrint s Installer Program does not automaticall...

Страница 56: ...software Then click on the Cut menu and select Cutter Settings The Cutter window appears Enter the custom values noted on the sheet labeled Cutter Settings or on the printer s rear panel label and se...

Страница 57: ...the page and decreasing it moves it up Hint 100 thousandths of an inch equals 1 or 2 54mm The Blade Offset indicates the distance from the tip of the blade to the edge of the blade shaft Since the dig...

Страница 58: ...drive and directory in which your file is located Select the specific file you wish to import Select the Merge check box if you intend to import two or more different images onto the same page Click o...

Страница 59: ...om the edge of the colored portion of your image Entering a value greater than 0 will cause the cut line to be placed away from the colored portion of your image Entering a value less than 0 will caus...

Страница 60: ...Number of Pages box shows you how many individual pages will be required to produce the specified number of labels 9 Click on OK to begin duplicating your image Note that if copying multiple pages of...

Страница 61: ...yed your image NOTE If you intend to print with the 200 Series dye sublimation print supplies you may wish to select one of the Anti Aliasing options from the Preferences tab Anti Aliasing causes prin...

Страница 62: ...as many sheets of output as you originally specified While printing you may wish to bring the 32 Bit Spooler to the foreground in order to monitor the status of the print job If you experience an erro...

Страница 63: ...on software for complete instructions When preparing a file to be imported be sure to prepare and import a single image only In other words use PressPrint to duplicate and mass produce the image after...

Страница 64: ...t be broken apart into separate objects Instead when an image is saved or exported in a bitmap format it becomes a single solid object A bitmap file is beneficial in that it provides an easy way to im...

Страница 65: ...out menu specify how you would like the selected objects to align and click on OK Creating A Die Cut A die cut is different from a contour cut in that die cuts provide a preset cut line in shapes such...

Страница 66: ...nment option of the Layout menu to help align the images Once you get a complete row created and aligned as shown below click and drag the pointer around the entire row to select it You can then use t...

Страница 67: ...es to Print window appears enter the number of pages you would like to print and click on OK All specified pages will then be printed The saved print job will remain in the 32 Bit Print Spooler until...

Страница 68: ...would like to place your serialized text 2 Use the text tool to enter the line or lines of text exactly as you would like it to appear in the first label Enter a separate line of text for each text fi...

Страница 69: ...The replacement data file specifies the text txt file you would like to use in your serialized labels Such a file can be created in any text editing program such as the Notepad program in the Windows...

Страница 70: ...the indicated F keys to cut and paste the data into the appropriate column 9 Click on the top gray cell of the numerical text as indicated to select all of the cells Then enter the serialized text int...

Страница 71: ...during the print job and is beneficial if you would like to create a simple two or three color label with no dithering Since separate ribbons are used keep in mind that the alignment of the different...

Страница 72: ...opriate Printer Setup options Ribbon Type etc Then click on the Preferences Tab and select the Separate Colors option This forces the colors in your image to be printed separately Also select the Clip...

Страница 73: ...dia Tray s feed roller 7 When all supplies are once again in place click on OK PressPrint will send the BLACK text to to be printed The cutter targets and cut information will also be sent to the digi...

Страница 74: ...ction you will need the following items Isopropyl alcohol Soft lint free cloth Small vacuum cleaner if available Or to make these maintenance procedures more convenient a Printer Cleaning Kit is avail...

Страница 75: ...ing a Printhead Cleaning Pen from the Printer Cleaning Kit or a soft lint free cloth slightly moistened with isopropyl alcohol firmly wipe back and forth across the surface of the Printhead If using a...

Страница 76: ...image Use the following procedure to clean the inside of the unit periodically or as needed 1 Open the printer s Top Cover by pressing the Cover Release Button 2 Remove the Ribbon Cartridge from the...

Страница 77: ...ia jams Also perform this procedure if you notice any ink on the Platen Roller Use the following steps to clean this roller 1 Open the printer s Top Cover by pressing the Cover Release Button 2 Remove...

Страница 78: ...eed Rollers if you notice voids or spots in printed images down the center of the page if you notice excess dust or debris accumulation on the rollers or if the printer is having difficulty pulling me...

Страница 79: ...d if necessary the Media Tray Assembly from the printer 3 From the Printer controls press the Cancel button to advance the print media Press the On Line button to reverse the print media If the print...

Страница 80: ...ving media fragments within the printer Instead use the following procedure to clear the print media from the printer 1 Open the printer s Top Cover by pressing the Cover Release Button 2 Remove the R...

Страница 81: ...cket first turn the printer power OFF then disconnect the Sensor Connector by sliding it toward the left hand side of the printer until it stops 5 Next firmly pull up on each Securing Lever until each...

Страница 82: ...bracket is disconnected and unlatched gently lift it from the printer 7 Once the bracket is removed clear all traces of the jammed media from the printer If necessary turn the printer power back ON an...

Страница 83: ...Securing Levers 10 Reconnect the Sensor Connector by sliding it toward the right hand side of the printer until it stops 11 Replace the Print Cartridge and close the Top Cover Select the Cancel Print...

Страница 84: ...wax resin inks from the printed page to the Pinch Rollers Refer to the following steps to clean these rollers NOTE If you are using the 100 Series supplies and wish to avoid having to clean the Pinch...

Страница 85: ...Bracket is removed use a Cleaning Pad from the Printer Cleaning Kit or a soft lint free cloth slightly moistened with isopropyl alcohol to thoroughly wipe the Pinch Rollers clean While wiping use the...

Страница 86: ...e of these corners start to lift up as they are cut Excess cutting pressure is required for print media which originally required far less pressure Print media which normally cuts fine starts to stall...

Страница 87: ...RAZOR SHARP AND CAN EASILY CUT YOU BE EXTREMELY CAREFUL WHEN REMOVING THIS BLADE 5 Unscrew and remove the top of the Blade Holder 6 Tip the base of the holder upside down and remove the blade 82 Secti...

Страница 88: ...curing Knob by turning it toward the front of the printer Tighten only until the Blade Holder fits securely within the Cutter Arm To verify proper tightness try rotating the Blade Holder clockwise wit...

Страница 89: ...84 Section 8 Maintenance Digital Label and Decal Press 2 User s Manual...

Страница 90: ...o be obtained by connecting to http www fargo com The printer does not even begin to print Symptoms Nothing happens or an error message comes up in the Windows application program Make sure that the p...

Страница 91: ...inting with the Write Direct to Port option selected from within the printer driver This option devotes all of your system resources to the current print job thereby increasing the rate of data transm...

Страница 92: ...heck that you have properly loaded print media and a print ribbon and that you have not run out of either Replace media as required see Section 4 Make sure the Ribbon Type option selected in the print...

Страница 93: ...eet in length Do you have the unit connected through a switch box If so connect it directly to your computer Do not connect the digital press through a switch box as this can interfere with the flow o...

Страница 94: ...eries can be used with one another If the print media is not feeding effectively from the Media Supply Tray separate the print media to assure it is not sticking together Also be sure the Media Supply...

Страница 95: ...her grainy and unclear For best photo realistic output you should always use high resolution 24 bit images If scanning an image always scan the image at a 24 bit color setting at the same size at whic...

Страница 96: ...1 71 x 17 3 The cutter is cutting too deeply or is not cutting deeply enough The various print media will require unique cutter pressure settings Use the Cutting Pressure Slide to adjust the cut press...

Страница 97: ...it is and the error persists your printer s ribbon sensor is most likely in need of adjustment Refer to the following steps to adjust the unit s ribbon sensor 1 Open the Top Cover 2 Manually wind the...

Страница 98: ...Transfer CMY Approximately 3 minutes per page Wax Resin Thermal Transfer Approximately 1 minute per page Paper Feed Method Friction feed Paper Loading Supply Tray capacity Approximately 50 sheets Outp...

Страница 99: ...for up to one month is normally acceptable but not guaranteed Humidity Operating 20 to 80 RH non condensation Storage 15 to 85 RH non condensation Supply Voltage 110 120 220 240 VAC Supply Frequency 5...

Страница 100: ...t B CENTRONICS TYPE PARALLEL INTERFACE The Centronics type parallel interface is the most widely used printer interface due to its simplicity speed and standardization throughout the PC industry The p...

Страница 101: ...User s Manual Pin assignments are as follows TABLE A 1 Parallel Interface Pin Assignments 14 25 13 PIN 1 36 18 PIN 1 19 WIRE DIAGRAM DB36P DB25P 1 1 2 2 3 3 4 4 5 5 6 6 7 7 8 8 9 9 10 10 11 11 12 12...

Страница 102: ...Aliasing 61 Bitmap files 59 Blade holder 16 17 81 Calibrate 48 Cancel button 13 14 Cancel LED light 13 88 Color matching 45 Contour cut 54 Cut only disable print 47 Cutter blade 81 Cutting pressure sl...

Страница 103: ...t 49 PrimaColor 45 Print media 22 Print pressure bracket 75 Printer cleaning kit 69 Printer controls 13 Printer driver 37 Printhead 70 Resin thermal transfer 20 Ribbon cartridge 16 21 22 Ribbon sensor...

Страница 104: ...Printed in the United States of America P N 510183...

Отзывы: