


164
Change IP
On the searched devices list, check one or more device(s) at the same time. Click Modify IP button, you
can see the following interface. See Figure 5-19.
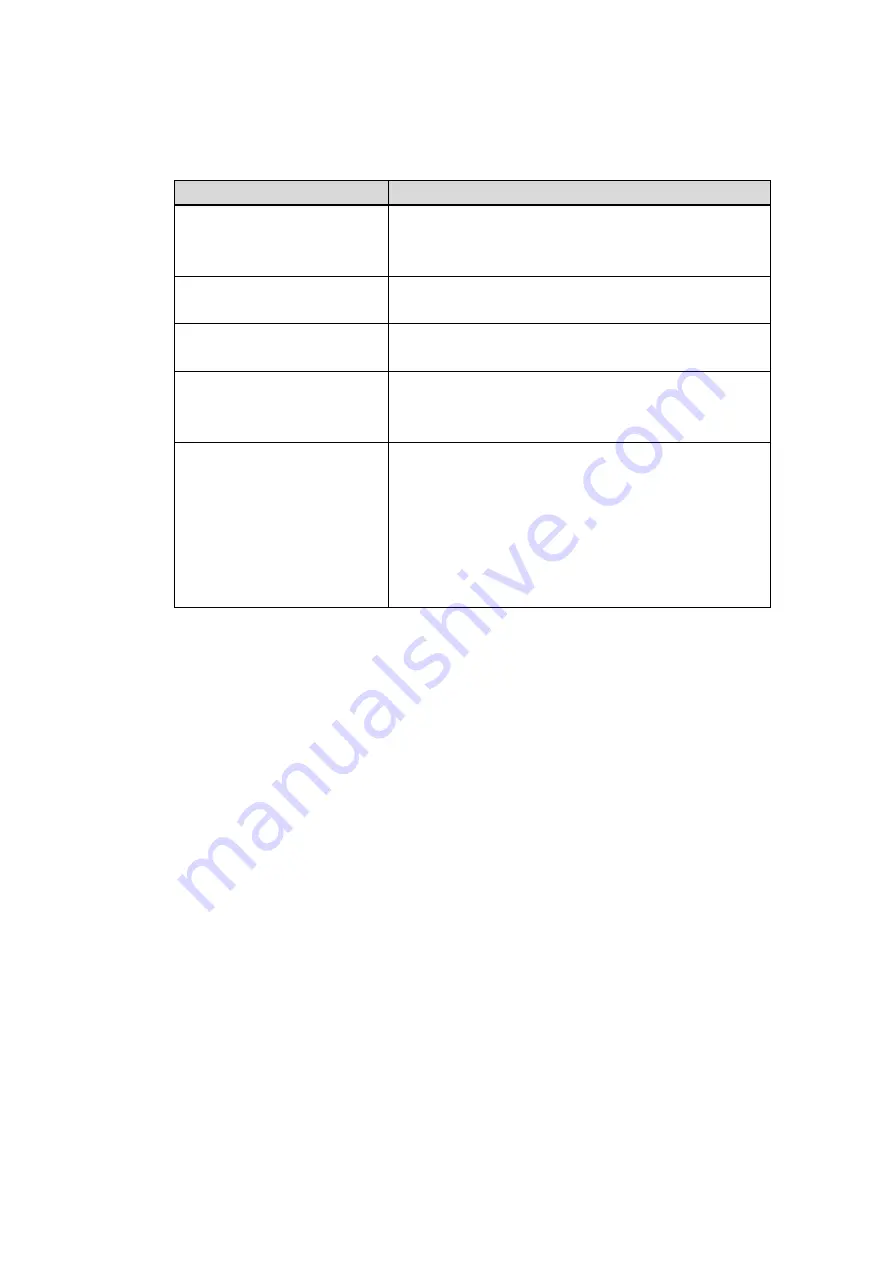
Please refer to the following sheet for log parameter information.
Parameter
Function
DHCP
Check the box here, system can auto allocate the IP
address. The IP address, subnet mask, default
gateway are reference only.
Static
Check the box here, you can set IP address, subnet
mask, default gateway manually.
IP address/subnet
mask/default gateway
You can input corresponding information here.
User name/password
The account you login the remote device. Please
input here to password verification to change the
remote device password.
Incremental value
When you want to change several IP addresses,
once you input the IP address of the first device, the
IP address of the next device will increase
accordingly. For example, when the incremental
value is 1, if the IP address of the first device is
172.10.3.128, the IP address of the second device
will auto be set as 172.10.3.129.
Note
For the static IP address, system will alert you if there is any IP conflict. If you are changing several IP
addresses at the same time, system auto skip the conflicted IP and auto allocate again according to the
incremental value you set.
Содержание K-NL404K/G
Страница 1: ...Network Disk Recorder User s Manual Model No K NL404K G K NL408K G K NL416K G Version 1 0 1 ...
Страница 25: ...19 3 4 Connection Sample Please refer to Figure 3 1 for connection sample Figure 3 1 ...
Страница 69: ...63 Figure 4 61 Figure 4 62 ...
Страница 90: ...84 Figure 4 78 Figure 4 79 ...
Страница 91: ...85 Figure 4 80 Figure 4 81 ...
Страница 99: ...93 Figure 4 87 Figure 4 88 ...
Страница 100: ...94 Figure 4 89 Figure 4 90 ...
Страница 101: ...95 Figure 4 91 Figure 4 92 ...
Страница 104: ...98 Figure 4 94 Figure 4 95 ...
Страница 112: ...106 Figure 4 104 Figure 4 105 ...
Страница 121: ...115 Figure 4 115 ...
Страница 124: ...118 Figure 4 117 In Figure 4 117 click one HDD item the S M A R T interface is shown as in Figure 4 118 ...
Страница 127: ...121 Figure 4 120 Figure 4 121 ...
Страница 132: ...126 Figure 4 125 Figure 4 126 ...
Страница 139: ...133 Figure 4 133 Figure 4 134 ...
Страница 141: ...135 Figure 4 136 ...
Страница 143: ...137 ...
Страница 146: ...140 Figure 4 140 Step 2 Click Add user button Enter Add user interface See Figure 2 141 ...
Страница 151: ...145 Figure 4 144 1 ...
Страница 157: ...151 ...
Страница 158: ...152 Please input your username and password Figure 5 3 ...
Страница 163: ...157 Figure 5 11 You can click this icon to display or hide the PTZ control platform 3D Intelligent Positioning Key ...
Страница 191: ...185 Figure 5 41 ...
Страница 192: ...186 Figure 5 42 ...
Страница 193: ...187 Figure 5 43 Figure 5 44 Figure 5 45 ...
Страница 198: ...192 ...
Страница 199: ...193 Figure 5 49 ...
Страница 205: ...199 Figure 5 55 Figure 5 56 ...
Страница 208: ...202 Figure 5 60 Figure 5 61 Figure 5 62 ...
Страница 239: ...233 ...


