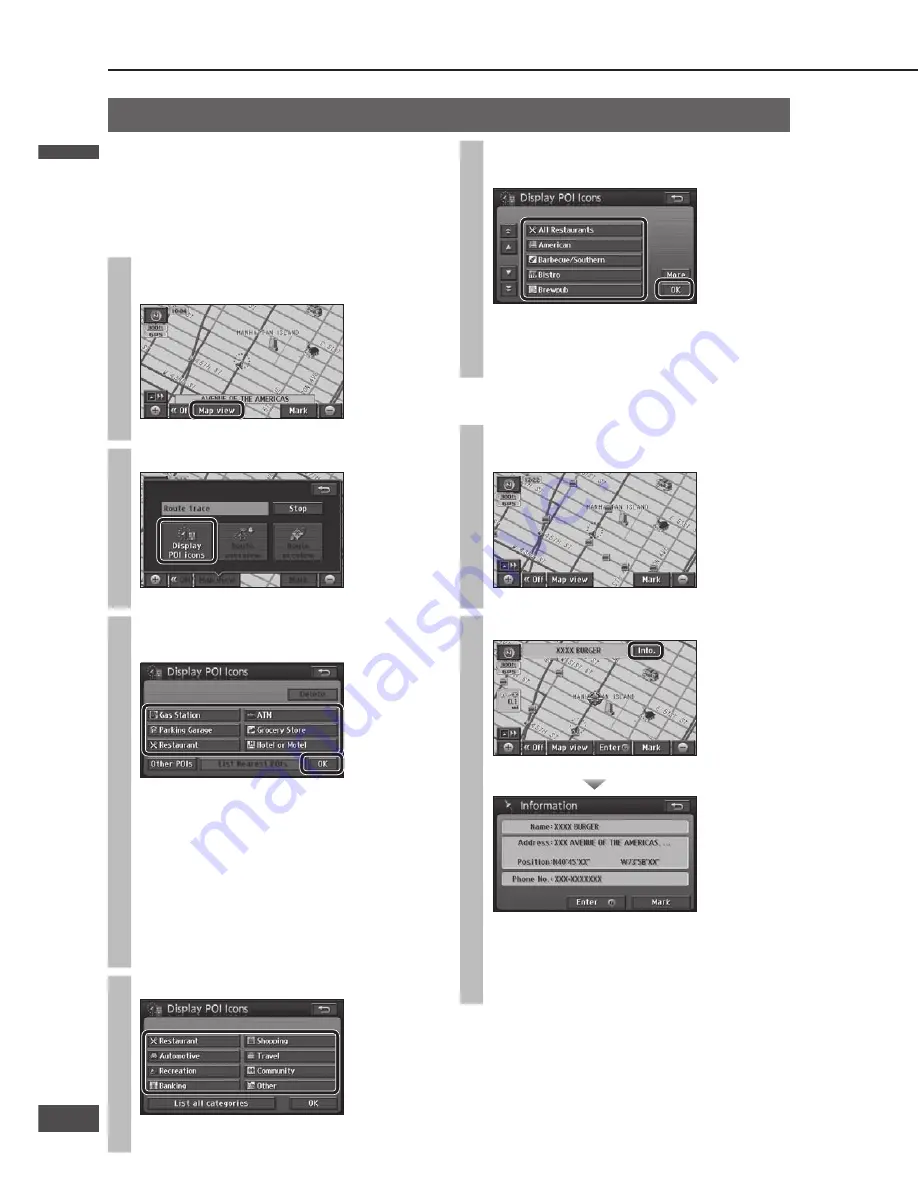
Display POI icons
POI icons for frequently used POIs (Gas stations,
restaurants, etc.) can be displayed on the map. Detailed
information can also be shown for the displayed POI
icons. (Scale: 150 ft – 0.5 mile (50 m – 1 km*))
* This is the scale when “km” is set as the distance
setting (
page 84).
1
Select [Map view] on the current
position screen.
The Change map view screen is displayed.
2
Select [Display POI icons].
The Display POI Icons screen is displayed.
3
Select POI icons from the list and
select [OK].
Selected POI icons are displayed on the map.
Up to 5 icons can be selected. Selected POI
icons are displayed at the upper left.
Selected POI icons can be cancelled by selecting
them again.
Select [Delete] to cancel all selected POI icons.
The icons for displayed POIs can be changed.
Refer to page 84 for the change method.
To select other POI icons, select [Other POIs]
Go to step 4
4
Select a main category.
Select [List all categories] to display the
sub-categories within all main categories.
Search for nearby POI icons
This search covers POIs within a radius of 20 miles
(32 km*) from the current position, or from the center
of the cursor.
* This is the range when “km” is set as the distance
setting (
page 84).
1
Select [Map view] on the current
position screen.
The Change map view screen is displayed.
2
Select [Display POI icons].
The Display POI Icons screen is displayed.
3
Select the POI icons to search for,
then select [List Nearest POIs].
The names of POIs and their distance from the
current position are displayed on touch keys.
4
Select a POI from the list.
The map is displayed.
Select [Sort by] to sort the list.
[Distance]: The list is sorted in order of
proximity.
[Category]: The list is sorted by category.
[Name]: The list is sorted in alphabetical
order.
Select [On route] during route guidance to
search for POIs along the guidance route.
(
page 45)
5
Select POI icons displayed from the
list and select [OK].
Selected POI icons are displayed on the map.
Up to 5 icons can be selected.
To choose another category, select [More], then
repeat from step 4.
To see information on POI icons
1
Put the cursor on POI icons, which
will cause the cursor to fl ash.
The POI name is displayed.
2
Select [Info.].
POI information is displayed.
Select [Enter
] to set it as the destination. If a
destination has already been set, [Add to
] or
[New
] is displayed. Refer to page 37 for details.
[Mark]: Registers the point at the center of the
map as a Contact (Address Book).
Note:
POI name display is automatically removed after it has
been displayed for approximately 6 seconds.
If multiple POIs exist for the same building, the POI icons
may overlap on the map. In that case, the POI names are
displayed sequentially as their POI icons are selected.
Departments and sections within the same POI may,
in some cases, be displayed as individual POI icons.
5
Select [Enter
].
6
Select [Enter].
The All route screen is displayed after the search
is complete.
7
Select [Start].
Route guidance starts.
Note:
This function cannot be used if POI icons are not
displayed.
The displayed distance is the straight distance from
the vehicle position (if a nearby POI was searched
for from the current position screen), or the straight
distance from “
” (if a nearby POI was searched for
from the map screen).
Up to 200 POIs can be searched for, in order of
proximity.
If multiple telephone numbers are registered under the
same name, each is listed.
Search for a destination
(continued)
English
English
50
51
51
50
Содержание CN-NVD905U - Strada - Navigation System
Страница 117: ...Memorandum 343 ...


