


8161-L
PHYSICIAN TRAINING INFORMATION
Qualified physicians should be knowledgeable with Cath lab procedures,
techniques and contrast media usage.
No additional special skills or training are required to operate the Display but
physicians should be thoroughly familiar with the Display and compatible
disposables, and supporting material including all product labeling. Physicians
may contact Osprey Medical to request training.
DIRECTIONS FOR USE
System Overview
The touchscreen Display allows user input for desired contrast use monitoring,
per specific individual case. Following input of monitoring parameters, during a
case the display shows Injection Volume (individual injection mL), Cumulative
Volume (total injected mL), as applicable a physician selected Threshold Volume
(maximum target dose) and a soft touch field to toggle between % contrast in
injection syringe (e.g. 95% contrast indicates a 5% saline/other mix), % of
Contrast Saved on last injection & % Contrast Saved (Avg). When “0” is entered
as the threshold (no threshold) the threshold gauge is not displayed. If the case
is a DyeTect case % contrast saved fields are not applicable and therefore not
selectable by the user. Note that the ON/OFF to contrast savings indicator icon in
the upper left corner of the screen is only displayed when being used with the
DyeVert Plus Module.
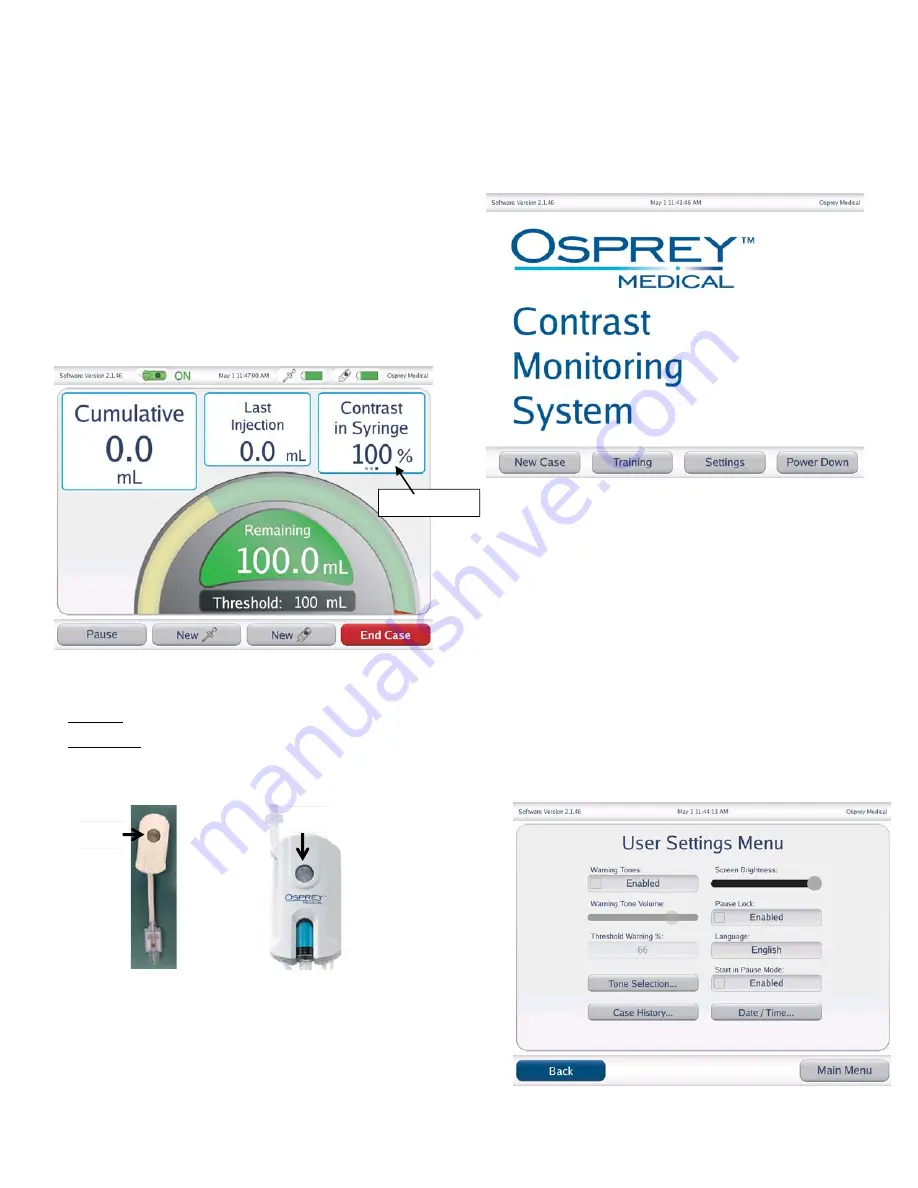
Threshold Case Screen
The Smart Syringe and associated disposable (DyeVert Plus Module, DyeVert
Plus EZ Module or Pressure Module) have two LEDs to provide user feedback.
Solid Green (active for 10 seconds) indicates injections will be counted
towards cumulative volume
Flashing Yellow indicates system is paused and injections will not be counted
towards cumulative volume
The Pause Button allows the user to
Pause
the system to suspend contrast
accounting.
The Display is not intended for indefinite continuous use and should be powered
down periodically (recommend weekly).
The disconnect component for the Display is the plug for the DC power supply
that inserts into the receptacle (outlet) for mains power. To disconnect the
device, remove the plug from the receptacle. The Display should be located such
that it is easy to unplug from the receptacle.
1. Display Set-up and User Settings
a.
Remove
the Display and the DC power supply from protective packaging.
b.
Insert power jack (plug)
of the DC power supply into the receptacle of the
Display. Manually tighten the ring nut onto the socket to prevent inadvertent
disconnect.
c.
Mount the Display
to a standard IV Pole (18mm to 32mm diameter) using
the integral clamp on the back of the Display. Verify that the IV pole is
stable when the Display is mounted to it.
d.
Plug Display
electric power cord into DC power supply and an appropriate
outlet.
e.
Push Power-On
button and the Home Screen (Main Menu) will display.
Home Screen (Main Menu)
f.
From Main Menu, select
Settings
then
User Settings.
User Settings
designate user configurable display parameters. This is only
necessary if
changes to the default settings are desired. To configure settings, select
applicable parameter:
1)
Warning Tones
to enable tones “on” for Threshold, Threshold Exceeded
and battery level.
2)
Warning Tone Volume
to adjust sound level.
3)
Threshold Warning %
(applicable only when a selected threshold is
entered) specifies the percentage of the entered threshold volume
reached during the case that will trigger the warning to the user e.g. a
threshold of 100mL is selected and a 20% threshold warning is selected.
The Display would warn the user when 20mL (20% of 100mL) is
reached.
4)
Tone Selection
to specify type of tones desired.
5)
Screen Brightness.
6)
Language
to allow user to choose English, Espanol, Italiano or Deutsch.
7)
Date/Time
8)
Case History
allows the user to view case summary information
9)
Start in Pause Mode,
when enabled, allows the user to start the case in
pause if the DyeVert Plus stopcock is in the “OFF” to reservoir position.
(DyeVert Plus only).
10)
Pause Lock,
when enabled, bypasses all pause/resume logic in the
software. The system will
only
pause and resume when initiated by the
user by pressing the pause button on the DyeVert Plus / DyeVert Plus
EZ Module or the corresponding soft touch key on the Display.
g.
Select
Main Menu
to return to home screen
Pause
Button
Pause
Button
Triple Toggle


