background image

31

DP20

5

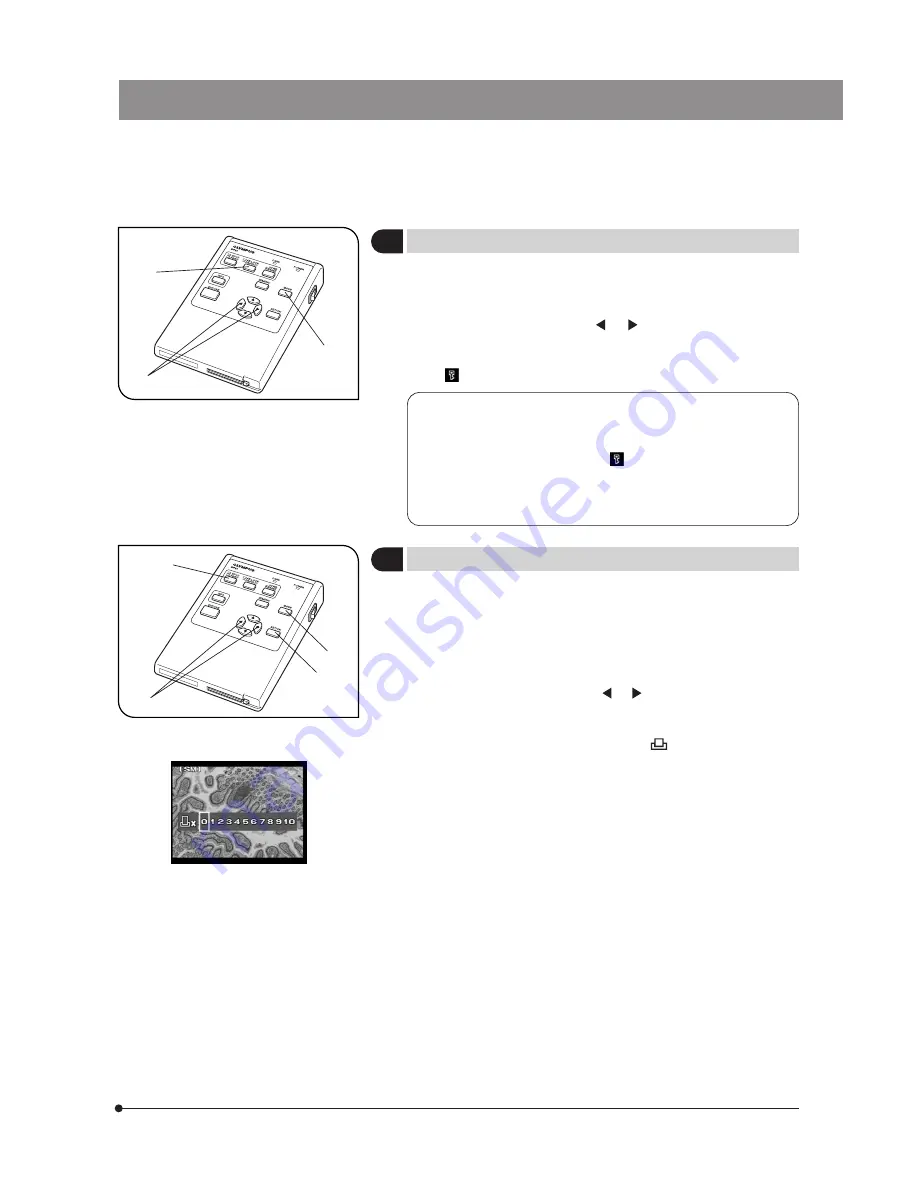
Protecting a Picture (PROTECT)

(Fig. 20)

}The following procedure is used to protect a recorded picture against

accidental erasure.

1. Press the MODE button @ to select PLAY.
2. Press either cross-cursor button     or     ² to select the picture to be

protected.

3. Press the PROTECT button ³. The picture being displayed is protected

and      (protect marking) is shown in the INFO display.

 · It is also possible to protect a picture in the index display. In this

case, move the green frame cursor on the index picture to be
protected.

 · When the protected picture file (     ) is downloaded in a PC, the

downloaded file is given the read-only attribute.

 · A protected picture can be unprotected by displaying it and pressing

the PROTECT button again.

}Print reservation/cancellation of all picture frames, date printing and time

printing can be set by means of the menu (see pages 32 & 33).

1. Press the MODE button @ to select PLAY.
2. Display the picture to be subjected to print reservation, and then press

the PRINT reservation button ².

3. The display shows the display for specifying the number of printouts.

Press either cross-cursor button     or     ³ to place the green frame
cursor on the desired number of printouts and press the SET/OK
button |.

4. The printing of the picture is reserved and “       x <Number of printouts>”

is shown in the INFO display.

}To cancel a print reservation, set the number of printouts to 0.

Fig. 20

1

2

3

Fig. 21

1

2

3

4

6

Making a Print Reservation (PRINT)

(Fig. 21)

Содержание DP20-5E

Страница 1: ...rize yourself fully with the use of this camera we recommend that you study this manual thoroughly before operating the camera Retain this instruction manual in an easily accessible place near the wor...

Страница 2: ......

Страница 3: ...ure Display 21 8 Setting the Scale Display 21 22 9 Setting the Focusing Indicator 23 10 Focusing Area Display 23 11 AE Area Display 23 12 Resetting the Recording Setups 24 13 Setting the CF Card 24 14...

Страница 4: ...imits are designed to provide reasonable protection against harmful interference when the equipment is operated in a commercial environment This equipment generates uses and can radiate radio frequenc...

Страница 5: ...g hours of use To prevent low temperature burning of your skin be careful not to leave your skin in extended contact with those modules 6 Connect the provided power cord correctly and ensure that the...

Страница 6: ...ore when the ISO is equivalent to 100 9 If the specimen has a distribution unsuitable for center average metering it is necessary to use spot metering or exposure adjustment 10 When image magnificatio...

Страница 7: ...use it only in a well ventilated room 2 Parts other than the glass components should be cleaned by wiping with a clean cloth Do not use organic solvents to remove major stains Use a soft cloth slightl...

Страница 8: ...pter Commercially available tripod IX SPT Straight Photo Tube IX2 SPT Straight Photo Tube for IX2 U SPT Straight Photo Tube U DPT Double Port Photo Tube IX70 IX50 Inverted Microscope IX81 IX71 IX51 In...

Страница 9: ...Control Box Some buttons are shown with two functions per button In this case the function in the upper row indicates that in REC mode and that in the lower row indicate that in PLAY mode SPOT button...

Страница 10: ...USB 2 0 connector P 36 38 View from direction A Display connector P 9 Camera cable connector P 9 DC input connector P 9 DP20 Driver DP20 DRV Picture downloading software USB driver USB 2 0 cable P 36...

Страница 11: ...n REC AUTO REC MANUAL and PLAY The display can be switched using the page select markings See pages 17 to 28 for details INFO display When REC MANUAL is set Picture quality P 18 Folder name P 20 Numbe...

Страница 12: ...mber 22 0 5X FN 17 6 1X FN 8 8 If a C mount adapter from other manufacturer than Olympus is used the optical performance of the system may not be manifested fully Be careful in using a C mount TV adap...

Страница 13: ...ending or twisting Do not apply excessive force to them 1 Insert the output connector of the AC adapter into the DC input connector of the control box Always use the power cord provided by Olympus If...

Страница 14: ...of an AC adapter other than the exclusive AC adapter provided with the system Never pull bend or twist the AC adapter cord or power cord excessively or try to extend the power cord If the AC adapter c...

Страница 15: ...ox as far as it will go 2 To remove the CF card push the eject button so that a button pops out 3 Press the eject button again When the CF card comes out pick it with a finger and pull it out Take car...

Страница 16: ...microscope Engage the LBD filter in the microscope s light path Set the intensity control to the indicator or the specified voltage Check the focusing and brightness of the specimen by viewing the dis...

Страница 17: ...xposure adjustment in REC AUTO mode The exposure in REC AUTO mode can be corrected in the range of 2 EV in 1 2 EV steps When the specimen is darkish positive correction is effective because this provi...

Страница 18: ...gain By moving the slide position with the average specimen distribution at the center and locking the exposure time the following effects can be achieved Even when a specimen is recorded by varying t...

Страница 19: ...isplayed As it continues to be displayed press any button so that it disappears before retrying OTWB When OTWB begun in other mode than OTWB mode fails the previous status remains unchanged When the d...

Страница 20: ...pending on the capacity of each CF card The number of remaining pictures is also variable when the CF card contains a DPOF print reservation file etc The CF card has a service life The available capac...

Страница 21: ...ppears on the display Move the cursor on a setting item icon To set other setting item Press either cross cursor button or to select the desired option Move the cursor on the option to be selected Pre...

Страница 22: ...ory setup HQ HIGH JPEG HIGH LOW TIFF JPEG The compression rates are as follows SHQ TIFF No compression SHQ JPEG 1 2 7 HQ JPEG 1 8 SQ JPEG Low 1 2 7 SQ JPEG High 1 8 The sensitivity ISO rating in recor...

Страница 23: ...ay not be obtained with AUTO white balance setting In such case use OTWB One Touch White Balance to let the camera store the illumination condition in memory Manual white balance is also available all...

Страница 24: ...er continuing the file Nos which have been recorded on the previously used CF card to avoid overlapping Example When a CF card recorded till Folder No 100 File No 0005 is exchanged with another CF car...

Страница 25: ...ENU buttons or SET OK MODE buttons ON1 ON2 ON3 ON4 ON5 ON6 ON7 TMP Temporary Saving Detailed setup This item sets the orientation of the scale display Select either the horizontal scale display or ver...

Страница 26: ...setting How to calculate the available photographing magnifications This is equal to Objective magnification x TV adapter magnification Therefore it is 2X with the 4X objective 5X with the 10X objecti...

Страница 27: ...mum level Level 0 Evaluation impossible display Maximum evaluation display The current level is updated every 0 1 second The maximum level is updated when a higher level than the current maximum level...

Страница 28: ...an be erased by all picture erasure To erase pictures in other formats erase them one by one DCF Digital Camera image format standardized by the Japan Electronic Industry Development Association JEIDA...

Страница 29: ...When the date is set the cursor moves to the time position Similarly set the figures of hour and minute and also press the SET OK button after setting each figure 15 Setting the Date Time Factory set...

Страница 30: ...mage is displayed no image or only part of image may be displayed In this case set the main switch of the control box to OFF then press and hold the MENU button and set the main switch to ON As this s...

Страница 31: ...00 or SVGA 800 x 600 In the Scale display range setting select either Display scale and measurements in both display and recorded picture or Displayscaleandmeasurements only on the display screen When...

Страница 32: ...mum number of measurements is 10 including other measurement items Two circle measurement The two circle measurement measures the radius diameters and areas of two circles and the distance between the...

Страница 33: ...cording REC MANUAL manual recording and PLAY playback 1 Select PLAY mode The display plays the last picture recorded in the CF card However if the played picture is the index display the picture in th...

Страница 34: ...edure is used to erase an unwanted picture A procedure for erasing all pictures in a CF card is also available see page 24 1 Select the picture to be erased A picture in the index display can be selec...

Страница 35: ...ribute A protected picture can be unprotected by displaying it and pressing the PROTECT button again Print reservation cancellation of all picture frames date printing and time printing can be set by...

Страница 36: ...the number of printouts is set to 0 including that specified in Making a Print Reservation All picture print reservation Cancel All Note on print reservation DPOF Format for automatic printout on a pr...

Страница 37: ...ved pictures in a CF card the marking appears next to menu item CARD INDEX To make index print reservation of all pictures restart the setting from the beginning will disappear after this The same set...

Страница 38: ...photographed with the SHQ TIFF picture quality mode They are neither impossible with the index display pictures When you want to save the measurement results in the recorded picture press either cros...

Страница 39: ...s 7 1 Before Software Installation Before Installation When the OS is Windows R XP The application software cannot be installed unless the user account is registered as computer administrator If the u...

Страница 40: ...automatically check No not this time and click on the Next button 7 Check Search for the best driver in these locations check Include this location in the search only uncheck Removal media if it is ch...

Страница 41: ...software is not authorized by Microsoft But you can continue installation because this does not present any special problem Microsoft executes certification procedures for PC and peripherals through...

Страница 42: ...at are running 2 Place the DP20 DRV image downloading software CD ROM in the CD ROM drive 3 Connect the control box to a PC using the provided USB 2 0 cable 4 Set the main switch of the control box to...

Страница 43: ...lled 13 Click on the Start button When the Start menu is displayed select Settings Control panel 14 When the Control Panel dialog box opens select System 9 When the Locate File dialog box opens select...

Страница 44: ...on of the device driver before proceeding to the installation of the image downloading software 1 Place the DP20 DRV image downloading software CD ROM in the CD ROM drive 2 Click on the Start button i...

Страница 45: ...When the Control Panel dialog box is displayed select Add Remove Programs This opens the Add Remove Programs Properties dialog box 3 Select DP20 from the list of installed software and click on the Ch...

Страница 46: ...or edited using a computer the software may not be able to display the picture or the software or the computer may malfunction 1 Playing Pictures in a CF Card Pictures recorded in the CF card installe...

Страница 47: ...d to the PC Pictures recorded in the CF card installed in the camera system can be downloaded in the PC 1 Start the software installed in the PC 2 Select Camera in the menu bar then select Download Al...

Страница 48: ...ble CANNOT OPEN FILE Picture file cannot be opened with the DP20 A picture recorded using another digital camera should be played on the digital camera used for recording it CAMERA DAMAGED xxxx The DP...

Страница 49: ...eset to 640 x 480 Plug Play VESA GGC 2B standard Recording medium Compact Flush CF card Type I Recommendations SanDisk or Lexar CF card max capacity 4G bytes Camera mount C mount ISO speed selection 1...

Страница 50: ...0 x 600 Scale display ON Picture file format TIFF Applicable to measurements of recorded pictures in PLAY mode Item Specifications Storage environment 20 to 60 C 4 to 140 F 10 to 90 Operating environm...

Страница 51: ...t until the indication becomes 0 The CF card is full Use another CF card erase unwanted pictures or down load existing pictures to the PC then erase all pictures in the CF card The CF card is not inse...

Страница 52: ...Connect it properly The main switch of the control box is not ON Set the main switch to ON The PC is connected through a hub Remove the hub i Data downloading to PC takes long time The connected PC is...

Страница 53: ...ing Table 1 Certified Cord A power supply cord should be certified by one of the agencies listed in Table 1 or comprised of cordage marked with an agency marking per Table 1 or marked per Table 2 The...

Страница 54: ...ter sterreichischer Verband f r Elektrotechnik VE Danmarks Elektriske Materialkontroll DEMKO National Standards Authority of Ireland NSAI Norges Elektriske Materiellkontroll NEMKO Asociacion Electrote...

Страница 55: ......

Страница 56: ...One Corporate Drive Orangeburg NY 10962 U S A 491B River Valley Road 12 01 04 Valley Point Office Tower Singapore 248373 2 8 Honduras Street London EC1Y OTX United Kingdom 31 Gilby Road Mt Waverley VI...

Отзывы: