


3-12
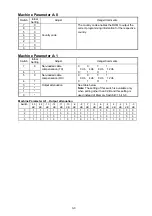
Machine Parameter B:6
Switch
Initial
Setting
Adjust
Usage/Comments
7
0
Printer registration
adjustment (Horizontal)
Switch 76543210 Settings
00010100 20 mm
6
0
at the optional second
cassette
00010011 19 mm
|
5
0
Adjusts the start point to
print.
|
00000011 3 mm
4
0
The plus setting increase the
left margin and the minus
00000010 2 mm
00000001 1 mm
3
0
setting decrease it.
00000000 Initial setting
10000001 -1 mm
2
0
Each setting changes by
1 mm
10000010 -2 mm
10000011 -3 mm
1
0
|
|
0
0
|
10010100 -20 mm
Machine Parameter B:7
Switch
Initial
Setting
Adjust
Usage/Comments
7
0
Printer registration
adjustment (Horizontal)
Switch 76543210 Settings
00010100 20 mm
6
0
at the optional third cassette
00010011 19 mm
|
5
0
Adjusts the start point to
print.
|
00000011 3 mm
4
0
The plus setting increase the
left margin and the minus
00000010 2 mm
00000001 1 mm
3
0
setting decrease it.
00000000 Initial setting
10000001 -1 mm
2
0
Each setting changes by
1 mm
10000010 -2 mm
10000011 -3 mm
1
0
|
|
0
0
|
10010100 -20 mm
Содержание OKIOFFICE 120
Страница 7: ...vi ...
Страница 17: ...1 10 1 7 Dimensions Dimension in mm ...
Страница 23: ...1 16 1 11 ID Label Specification 1 12 Labels location ...
Страница 24: ...2 1 Section2 Machine Composition 2 1 Interconnect Block Diagram ...
Страница 25: ...2 2 ...
Страница 87: ...3 46 Unique Switch F 7 and F 9 Factory use only ...
Страница 190: ...5 60 Note If you re attach the feed roller B put the right and left nibs into the fixing hole as shown ...
Страница 195: ...5 65 10 Move the cassette PCB by sliding it 11 Disconnect the all connectors on the cassette PCB ...