41057610TH Rev. 1
105 /
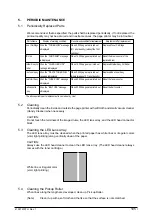
5.2 Cleaning
Periodically clean the inside and outside the page printer with soft cloth and small vacuum cleaner
(Handy Cleaner) when necessary.
CAUTION:
Do not touch the terminals of the image drums, the LED lens array, and the LED head connector
block.
5.3 Cleaning the LED Lens Array
The LED lens array must be cleaned when the printed paper has white lines or irregular colors
(vold, light printing) along vertically down of the paper.
CAUTION:
Always use the LED head cleaner to clean the LED lens array. (The LED head cleaner always
comes with the toner cartridge.)
White line or irregular color
(void, light printing)
5.4 Cleaning the Pickup Roller
When lines along the length are developed, clean up Pick up Roller.
(Note) Clean it up with a soft cloth and the like so that the surface is not scratched.
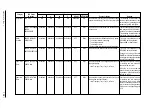
5. PERIODIC MAINTENANCE
5.1 Periodically Replaced Parts
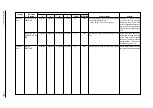
We recomend user that as specified, the parts shall be replaced periodically. (If not replaced, the
printout quality may not be assured and in extreme cases, the page printer may be in trouble.)
The above periodic parts replacement is carried out by User.
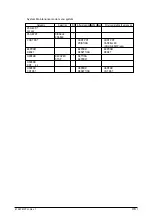
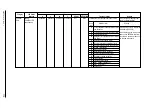
Parts Name
Toner Cartridge
I/D Unit
Holder Assy Oil
Roller
Box toner Assy
Heat Unit Assy
Belt cassette
Assy
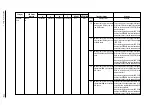
Display of warning condition
When the "TONER LOW" message
is displayed
When the “CHG DRUM” message
is displayed
When the "OIL ROLLER LIFE"
message is displayed
When the "WASTE TONER FULL "
message is displayed
When the “FUSER LIFE” message
is displayed
When the “BELT LIFE” message
is displayed
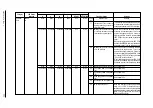
Recommend condition for replacement
When 3,000 page are printed out
(5% print density) (withoyt the first
cartridge)
When 12,000 pages are printed out
When 10,000 page are printed out
When 2,500 page are printed out
(single images of 5% print density)
When 60,000 pages are printed out
When 50,000 pages are printed out
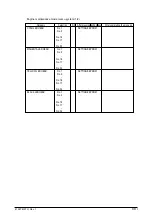
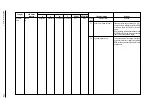
Adjustment after replacement
Replaced Toner Cartridge
Reset the drum counter of the
replaced drum.
Replaced Holder Assy Oil Roller
Replaced Box toner Assy
Reset the fuser counter.
Reset the belt counter.
Содержание OKICOLOR 8
Страница 2: ...OKICOLOR 8 Color LED Page Printer Maintenance Manual 1999 7 14 Rev 1...
Страница 12: ...41057610TH Rev 1 11 This page intentionally left blank...
Страница 44: ...41057610TH Rev 1 43 Figure 3 1 3 2 Parts Layout...
Страница 45: ...41057610TH Rev 1 44 Figure 3 2...
Страница 46: ...41057610TH Rev 1 45 Figure 3 3...
Страница 47: ...41057610TH Rev 1 46 Figure 3 4...
Страница 105: ...41057610TH Rev 1 104 olor check pattern...
Страница 153: ...41057610TH Rev 1 152 5 PXF PCB OPTION PENDTNR TONER UPDOWN B1 A1 B15 A15 8 1 8 1 FSENS JODEN 14 1 1 12 PXFIF...
Страница 154: ...41057610TH Rev 1 153 8 Parts List Fig 8 1 4 1 5 L J 8 9 0 A H B N N M D E C G F I 7 K 3 2 P P 6 O...
Страница 156: ...41057610TH Rev 1 155 Fig 8 2 2 1 O 3 N C 0 9 Q 6 M J 8 7 8 S H E 7 K G 4 P D R L B A F T 5...
Страница 161: ...41057610TH Rev 1 160 Fig 8 4 1 6 6 6 6 5 7 4 2 2 K 2 2 3 C E 0 I C A H H H H B C F J J D G 3 3 3 8 9 9 9...
Страница 166: ...41057610TH Rev 1 165 Fig 8 6 H B E F 2 J 4 4 I 3 3 6 9 8 7 G C D A 0 5 1 5...
Страница 168: ...41057610TH Rev 1 167 Fig 8 7 1 2 5 6 3 4...
Страница 170: ...41057610TH Rev 1 169 Fig 8 8 7 7 5 A 5 6 6 3 3 4 4 0 9 1 8 2...
Страница 172: ...41057610TH Rev 1 171 Fig 8 9 7 6 6 5 5 4 1 8 8 2 3 4 3 7...
Страница 196: ...41057610TH Rev 1 195 SEN1 CN22 CN23 CN24 5 2 PCB Layout AOLT PCB...
Страница 197: ...41057610TH Rev 1 196 6 PARTS LIST 4 D 9 3 B 6 C A E F 2 J I L 0 1 K G G G 5 7 H 9 8...


