Maintenance
7-15
Part 1126187_05
E
2021 Nordson Corporation
Installing the Nozzle Plate Assembly
1. Install the O-ring (4).
2. Grasp the applicator (1) in one hand and carefully align the applicator
needle (3) with its orifice in the nozzle plate assembly (5).
3. Use a 2.5mm hex driver to sequentially tighten the two screws (6) that
secure the nozzle plate (5) to the heater block (7). Torque the screws to a
value of 8-9 in-lb.
4. Go to
General Reassembly
given later in this section.
1
2
3
4
5
6
7
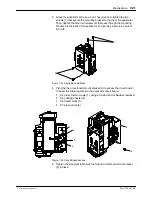
Figure 7-11 Nozzle Plate Installation
1. Applicator
2. Adjustment screws (2)
3. Applicator needle
4. O-ring
5. Nozzle plate assembly
6. Screws (2)
7. Heater block
Содержание Vulcan Jet
Страница 26: ...Description 2 8 Part 1126187_05 E 2021 Nordson Corporation This page intentionally left blank...
Страница 38: ...Installation 3 12 Part 1126187_05 E 2021 Nordson Corporation This page intentionally left blank...
Страница 110: ...Advanced Controller Configuration 6 36 Part 1126187_05 E 2021 Nordson Corporation This page intentionally left blank...
Страница 121: ...Maintenance 7 5 Part 1126187_05 E 2021 Nordson Corporation 1 2 3 5 4 4 6 7 8 Figure 7 2 General Disassembly...
Страница 162: ...Parts 9 4 Part 1126187_05 E 2021 Nordson Corporation Figure 9 2 Vulcan Jet applicator parts...
Страница 163: ...Parts 9 5 Part 1126187_05 E 2021 Nordson Corporation Figure 9 3 Vulcan Jet applicator parts...
Страница 166: ...Parts 9 8 Part 1126187_05 E 2021 Nordson Corporation 5 1 4 2 20 5 9 8 6 7 6X 19 3 Figure 9 5 Controller Assembly...
Страница 171: ......
Страница 172: ......


