22
Target Editor
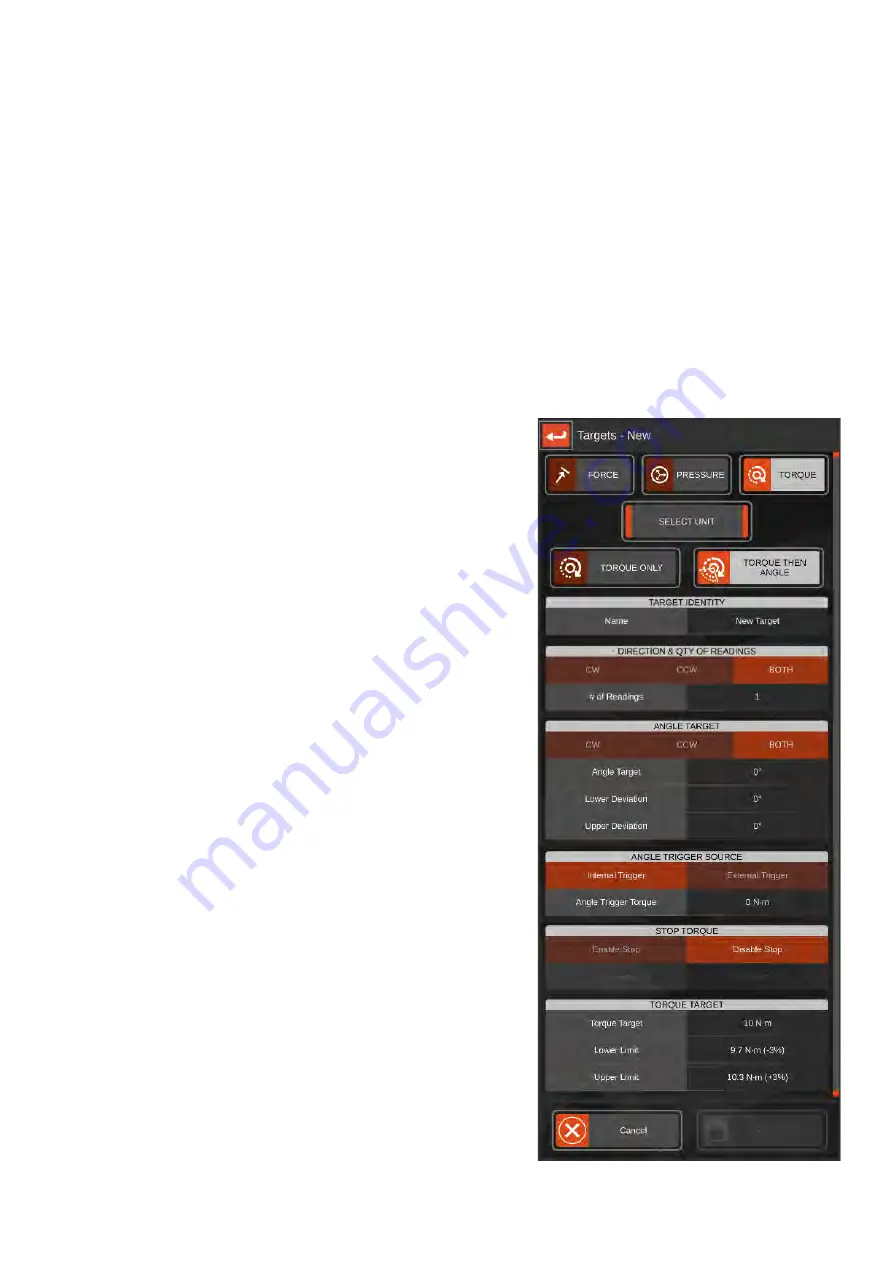
When making a new target, the editor is designed to guide you through the steps needed to set up your target.
When you first open the screen, most of the options will be hidden. First you will need to select a target type
(force, pressure or torque) followed by the desired units and whether angle is required. After that the
remaining options will unlock. If you are editing an existing target, all options will already be unlocked.
Shown below is the full editor layout; to access all options, use your finger to scroll up or down. Note that your
screen will look a little different depending on your target type and whether angle is involved.
For example, if no angle is required then the angle target and angle trigger source fields will be hidden. Also, if
you change the target type, all references to “Torque” will change to match, i.e. “Pressure Target” and “Stop
Pressure”.
See Example 1 (Page 37) - Click Wrench Torque Measurement
TIP: You may need to scroll this screen to see the full list of settings
Select Unit
This will set the units of measurement for
this target. Available units will change
depending on target type (Torque,
Pressure or Force)
Torque Only
This will set a Torque only target (no
angle)
Torque Then Angle
This will set a Torque then angle target
Name
The name for this target in the target list
Direction
You can select Clockwise, Counter
Clockwise or both directions for the target
Qty of Readings
This is how many readings you want to
take with this target
Stop
Torque
If you want the Ancillary port Stop Torque
output to activate at a certain value, set
the desired transducer reading at which
the ancillary port Stop signal is asserted
Torque
Target
This is the target torque.
Lower/Upper Limit
Set the allowable range for a “pass” on
the target value.
Rate
Control
Specify an ISO 6789:2017 rate of
application of torque. The Measurement
Screen dial will guide you through the
cycle to help meet the timings when the
cycle begins.
Direction
The direction of the angle measurement
can be set to either Clockwise, Counter-
Clockwise or Both
Angle Target
This is the target value for the angle in
degrees
Lower Deviation
This is the allowed deviation below the
target angle in degrees.
Upper
Deviation
This is the allowed deviation above the
target angle in degrees.


