SECTION IV. INSTALLATION STEPS
9
A. INSTALL THE FAUCET ASSEMBLY
The most convenient installation would allow the use of an existing spray attachment hole.
If the spray attachment hole is not available, then follow the basic procedures outlined below.
C. DRILLING A PORCELAIN CLAD STEEL OR CAST IRON SINK
1.
Mark the sink location for the center of the faucet. Be sure the location you select is not over a reinforcing rib.
Check the location from below.
2.
Grind away a 1-1/4" diameter circle in the porcelain using a silicon/carbide wheel and high-speed grinder,
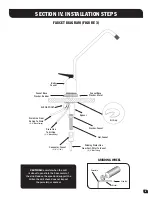
down to the metal surface of the sink. (See Grinding Wheel).
3.
Impact punch a small indent in the center of the area ground away.
4.
Drill a 1/4" pilot hole through the metal base using a standard high-speed drill bit.
5.
Use the pilot hole as a guide to drill a minimum 1" up to a 1-1/4" diameter hole with carbide bits to mount the
R.O. air gap faucet.
B. DRILLING A STAINLESS STEEL SINK
1.
Mark the sink location for the center of the faucet.
2.
Impact punch the sink top to provide a starting point for the drill bit.
3.
Drill a 1/4" pilot hole in the sink using a high-speed drill bit.
4.
Drill a 1/2" diameter hole to accept the bolt of a 1-1/4" Greenlee Chassis Punch.
5.
Set the punch and turn the nut with a wrench to cut the hole.
D. PREPARE THE R.O. AIR GAP FAUCET ASSEMBLY FOR INSTALLATION
1.
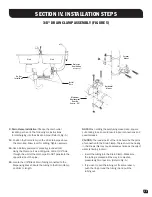
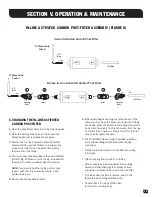
Using the diagram in Figure 3, assemble the Air Gap Spigot with all the components except the slot washer.
Begin with the escutcheon, followed by the rubber gasket, spacer, flat washer, 9/16" nut, and 3/8" spigot adapter.
2.
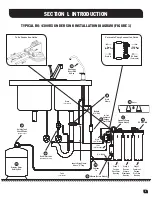
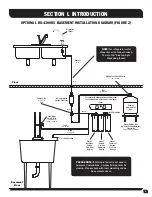
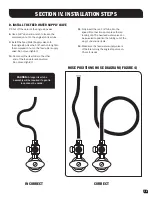
Using the diagram in Figure 2, from under the sink, feed the pre-connected 1/4" black tube and the pre-connected
3/8" blue tube from the R.O. assembly through the hole in the sink. Slip the blue tube into the spigot adapter, and
replace the red locking clip. Slip the 1/4" black tube onto the small hose barb on the base of the spigot.
Installation Tip: To make it easier to slip the tubing over the hose barbs, soak the black tube ends in hot water to soften
the tubing. The tubing will slip onto the hose barbs much more easily, and will conform better as it cools and reduce the
possibility of splitting.
3.
Feed the assembled spigot and tubing through the hole in the sink and let the spigot rest on the rubber gasket and
escutcheon.
4.
Drill a 1/4" pilot hole through the metal base using a standard high-speed drill bit.
5.
From under the sink, slip the slot washer between the sink and the spacer and finger-tighten
the 9/16" nut until snug.
6.
Position the spigot for customer convenience and then use a 9/16" wrench to tighten the nut
to secure the spigot on the sink.


