4-40
Upgrading Your System
10.
While holding the drive in place turn the carrier upside down.
11.
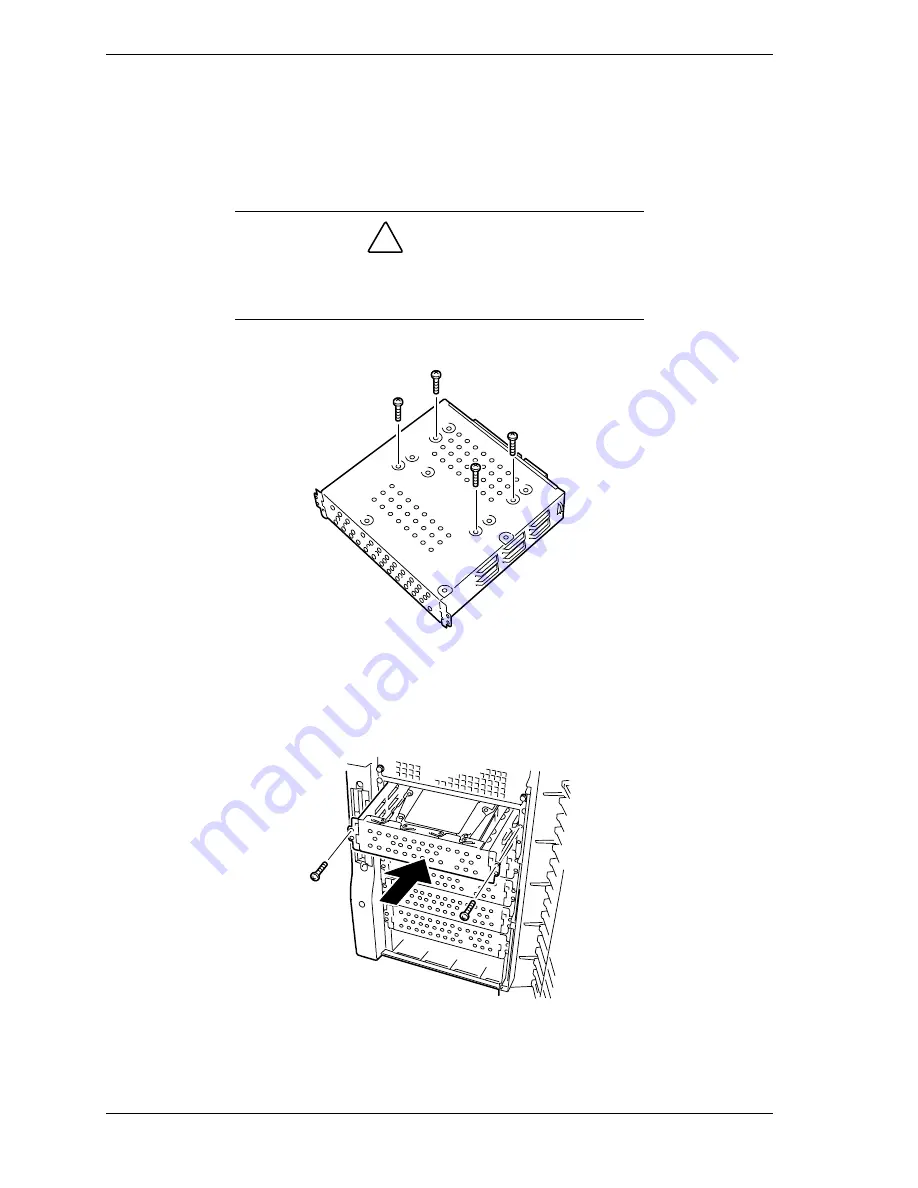
Line up the screw holes in the carrier with the screw holes in the drive. See
Figure 4-38.
12.
Using four screws of the appropriate size and length, secure the drive to the
carrier.
!
CAUTION
When installing a disk drive in a carrier tray always use the
screws that come with the device. Using longer screws or
those of different diameter may cause damage to the device.
Figure 4-38. Securing the Hard Drive to a Disk Carrier Tray
13.
Slide the disk carrier tray into the disk drive bay and secure it to the chassis
with the screws previously removed in step 5 above. See Figure 4-39.
Figure 4-39. Installing the Disk Carrier Tray
Содержание EXPRESS5800/120Lf
Страница 1: ... U s e r s G u i d e EXPRESS5800 120Lf ...
Страница 2: ...NEC ...
Страница 3: ... U s e r s G u i d e EXPRESS5800 120Lf ...
Страница 9: ...Contents vii ...
Страница 10: ...viii Contents ...
Страница 36: ...1 20 System Overview ...
Страница 99: ...Upgrading Your System 4 13 Figure 4 9 Replacing the Real Time Clock Battery ...
Страница 146: ...4 60 Upgrading Your System Figure 4 60 Installing a Power Supply ...
Страница 170: ...5 24 Problem Solving ...
Страница 171: ...A Technical Specifications Server Unit ...
Страница 174: ...A 4 Technical Specifications ...
Страница 175: ...B Connectors Overview External Device Connector Pin Information ...
Страница 190: ...10 Glossary ...
Страница 196: ...Index 4 ...
Страница 197: ...xx ...
Страница 198: ... 456 01575 N00 ...


