background image

SOHOware™ CableFREE   7 

Chapter 3:  Installation 

This chapter gives step-by-step instructions on installing CableFREE. 

3.1 Before you Start 

3.1.1 System Requirements  

Desktop Computer 

Notebook Computer 

486 or better 

Microsoft Windows 95, 98, 98SE, 2000, 
or NT 4.0 

One free PCI slot 

Min. 8MB RAM 

Min. 10MB free hard drive space 

486 or better 

Microsoft Windows 95, 98, 98SE, 2000, 
or NT 4.0 

One free PCMCIA slot 

Min. 8MB RAM 

Min. 10MB free hard drive space 

3.1.2 Prepare the Windows CD-ROM 

Have your Windows installation CD or disks ready, or be sure you know the path 
to the source files, before starting the installation.  The most common reason for a 
failed installation is not having the Windows source files. 

Note:  A search for files named *.cab will usually reveal the location of the source 

files if they are on your hard drive.  If you don’t have a Windows source CD 
or disk and cannot find the Windows source files on your hard disk, contact 
the supplier from whom you bought your PC. 

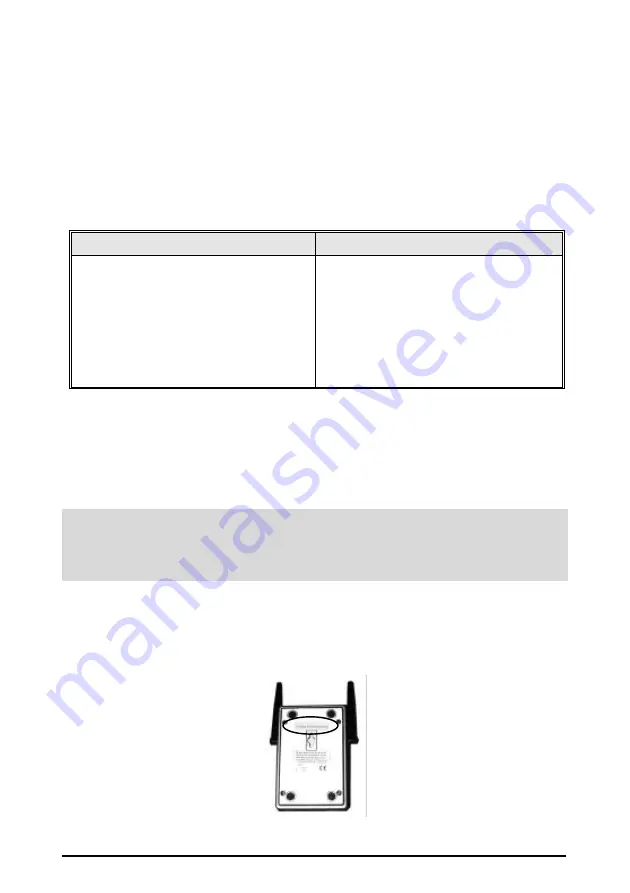
3.1.3 The NetBlaster ID (NetBlaster Users Only) 

You will find the NetBlaster ID on the base of the NetBlaster device.  This ID 
number will be needed during the installation. 


Figure 6.   NetBlaster ID 

Содержание CableFREE

Страница 1: ... NDC Communications Inc Tel 1 408 730 0888 Fax 1 408 730 0889 Technical Support E mail support ndclan com Technical Support Call Center 1 888 785 8222 Toll Free Customer Service US only 800 632 1118 ext 828 Europe and Asia Pacific E mail techsupt ndc com tw NDC Web Site www sohoware com ...

Страница 2: ...ts for a Class B Digital device pursuant to part 15 of the FCC Rules These limits are designed to provide reasonable protection against harmful interference in a residential installation This equipment generates uses and can radiate radio frequency energy and if not installed and used in accordance with the instructions may cause harmful interference to radio communications However there is no gua...

Страница 3: ...ecommended limits Do not touch or move the antenna s while the units are transmitting or receiving Do not operate a portable transmitter near unshielded blasting caps or in an explosive environment unless it is of a type specially certified for such use Operation of the equipment without the antennas connected may damage the radio Warning for Notebook PC Users In order to comply with the FCC RF ex...

Страница 4: ... 1 3 The NetBlaster ID NetBlaster Users Only 7 3 1 4 LED Indicators 8 3 2 HARDWARE INSTALLATION 9 3 2 1 CableFREE NetBlaster Installation 9 3 2 2 CableFREE PCI Card Installation 10 3 2 3 CableFREE PC Card Installation 12 3 3 CABLEFREE SOFTWARE INSTALLATION 13 3 3 1 Windows 95 Installation 14 3 3 2 Windows 98 Installation 18 3 3 3 Windows NT 4 0 Installation 20 3 3 4 Windows 2000 Installation 21 3 ...

Страница 5: ...ONMENTS 41 5 1 INTRODUCTION TO THE NETWORK HOPPER 42 5 2 SETTING UP DIFFERENT NETWORK ENVIRONMENTS 42 5 3 SWITCHING BETWEEN DIFFERENT NETWORK ENVIRONMENTS 43 CHAPTER 6 NETWORK APPLICATIONS 45 6 1 FILE SHARING 45 6 1 1 Sharing Files to the Network 45 6 1 2 Accessing Files on the Network 47 6 2 PRINTER SHARING 48 6 2 1 Sharing Your Printer 48 6 2 2 Accessing A Printer on Your Network 48 6 3 HIGH SPE...

Страница 6: ... 56 CHAPTER 8 TROUBLESHOOTING 57 8 1 LOOK FIRST FOR THE OBVIOUS 57 8 2 HARDWARE INSTALLATION PROBLEMS 57 8 3 SOFTWARE INSTALLATION PROBLEMS 57 8 4 CONNECTION PROBLEMS 58 8 5 INCREASING NETWORK SPEED 59 8 6 FILE PRINTER SHARING PROBLEMS 59 8 7 HIGH SPEED INTERNET CONNECTION SHARING PROBLEMS 60 8 8 WINDOWS NT 4 0 RELATED PROBLEMS 60 8 9 CONSIDER RECENT CHANGES 61 8 10 GETTING HELP 62 USA 62 Europe a...

Страница 7: ...HUB 10 FIGURE 12 REMOVING THE COMPUTER COVER 11 FIGURE 13 INSERTING THE CARD 11 FIGURE 14 REPLACING THE COMPUTER COVER 12 FIGURE 15 CONNECTING THE ANTENNA 12 FIGURE 16 INSERTING THE PC CARD 13 FIGURE 17 UPDATE DEVICE DRIVER WIZARD 14 FIGURE 18 NEW HARDWARE FOUND 14 FIGURE 19 UPDATE DEVICE DRIVER WIZARD 14 FIGURE 20 INSERT DISK 15 FIGURE 21 COPYING FILES 15 FIGURE 22 NETWORK 15 FIGURE 23 NEW HARDWA...

Страница 8: ... 45 SYSTEM PROPERTIES 29 FIGURE 46 CABLEFREE TOOLBAR AND NETBLASTER ICON 31 FIGURE 47 CABLEFREE TASKBAR MENU 32 FIGURE 48 CABLEFREE TASKBAR ICON 33 FIGURE 49 TASKBAR 33 FIGURE 50 PREFERENCES 34 FIGURE 51 CABLEFREE TOOLBAR 35 FIGURE 52 NETWORK PROFILES 36 FIGURE 53 FILE AND PRINTER SHARING 36 FIGURE 54 SIGNAL QUALITY INDICATOR 37 FIGURE 55 TRAFFIC VIEWER 37 FIGURE 56 ADAPTER PROPERTIES ADVANCED INF...

Страница 9: ...FIGURE 67 SHARING A PRINTER 48 FIGURE 68 ADD PRINTER WIZARD 1 49 FIGURE 69 ADD PRINTER WIZARD 2 49 FIGURE 70 ADD PRINTER WIZARD 3 49 FIGURE 71 ADD PRINTER WIZARD 4 50 FIGURE 72 INTERNET EXPLORER 4 X AND 5 X SETUP 51 FIGURE 73 NETSCAPE NAVIGATOR SETUP 52 FIGURE 74 NETWORK PROFILES 56 ...

Страница 10: ...ling NetBlaster Hardware Chapter 3 2 1 Install Hardware on another Computer Checking Network Connections Chapter 4 1 1 Using the CableFREE Utility Chapter 4 NO Installing CableFREE Card Hardware Chapter 3 2 2 3 2 3 Expanding your CableFREE Network Chapter 7 CableFREE Network with a NetBlaster CableFREE Network Without a NetBlaster Installing CableFREE Software Chapter 3 YES Install Hardware on ano...

Страница 11: ...with external antennas One User s Guide and one Quick Guide One Installation CD ROM includes SyGate Internet Sharing software One Installation Floppy Disk for Windows NT 4 0 One CableFREE PCI Card with an external antenna One PC Card One User s Guide and one Quick Guide One Installation CD ROM includes SyGate Internet Sharing software One Installation Floppy Disk for Windows NT 4 0 CableFREE PCI S...

Страница 12: ......

Страница 13: ...rs CD ROMs etc exchange files and play multi player games wirelessly To maintain network performance we recommend that you don t connect more than sixteen computers in a CableFREE network With the addition of a CableFREE NetBlaster to the network each CableFREE PC can share wireless high speed Internet access through a single Cable xDSL modem Now you can take advantage of wireless to move your Cab...

Страница 14: ...ncludes CableFREE PCI Card Fits into a desktop computer s PCI slot to provide a wireless network capability CableFREE PC Card Fits into a notebook s PCMCIA slot to provide a wireless network capability CableFREE NetBlaster Connects a CableFREE PC with an Ethernet interface such as a Cable xDSL modem or a hub CableFREE PCI Card CableFREE PC Card CableFREE NetBlaster ...

Страница 15: ...L modem each CableFREE PC can simultaneously share high speed Internet access as well as printers scanners files etc The following illustration shows this type of network configuration Figure 2 CableFREE PC Broadband Internet Connection In this example the NetBlaster acts as a bridge between the CableFREE PCs and the broadband device To use the NetBlaster in this configuration you need to have an ...

Страница 16: ...ply for an IP address for each networked PC requires no server PC Figure 3 Connecting CableFREE PCs to an Existing LAN To setup this kind of network configuration you need to have an external Cable xDSL modem with an RJ 45 connector an Ethernet hub with two free ports one normal port for the NetBlaster and one Uplink port for the Cable xDSL modem all remote PCs installed with a CableFREE card an I...

Страница 17: ...IP Address In this example the NetBlaster acts as a bridge between a CableFREE network and an existing LAN To use a NetBlaster in this network configuration you need to have an external Cable xDSL modem with an RJ 45 connector an Ethernet hub with two free ports one normal port for the NetBlaster and one Uplink port for the Cable xDSL modem all remote PCs installed with a CableFREE card a server P...

Страница 18: ...k card on each computer The application scenario is as follows Figure 5 CableFREE Home Networking To use CableFREE in this configuration you need to have all networked PCs installed with a CableFREE card external analog modem and an Internet account with Internet sharing software e g SyGate installed on the Server PC is required SyGate is supplied on the CableFREE Starter kit NCF220 or 221 CD ROM ...

Страница 19: ...our Windows installation CD or disks ready or be sure you know the path to the source files before starting the installation The most common reason for a failed installation is not having the Windows source files Note A search for files named cab will usually reveal the location of the source files if they are on your hard drive If you don t have a Windows source CD or disk and cannot find the Win...

Страница 20: ... turn to a steady green if not it will turn to a steady red 2 Ethernet Link Steady Green Indicates linked with a Cable xDSL modem or Ethernet hub 3 Data Transmission with an Ethernet Device Blinking Orange Data is being transmitted between the NetBlaster and Cable xDSL modem or Ethernet hub 4 Radio Link Steady Green Means linked with a CableFREE PC 5 Data Transmission with CableFREE Stations Blink...

Страница 21: ...ableFREE hardware including CableFREE cards and NetBlaster If you do not have a NetBlaster go directly to 3 2 2 CableFREE PCI Card Installation page 10 or 3 2 3 CableFREE PC Card Installation page 12 3 2 1 CableFREE NetBlaster Installation To install the CableFREE NetBlaster with an Ethernet device Cable xDSL modem or Ethernet hub simply follow the steps below step1 Connect the NetBlaster to the C...

Страница 22: ...e test is successful the LED will turn to a steady green if not it will turn to a steady red Note Use only the power adapter included in the package Other types of power adapter may damage the NetBlaster 3 2 2 CableFREE PCI Card Installation To install a CableFREE PCI Card into a computer simply follow these steps step1 Turn off the power to your computer and all peripherals and unplug the power c...

Страница 23: ...PCI slots are usually white ISA slots are usually colored black and are longer and remove the slot cover step4 Carefully install the card in the PCI expansion slot Figure 13 by firmly pressing until the card is snugly seated Be sure the card is fully home then fasten the retaining bracket with the screw from the slot cover Figure 13 Inserting the Card Pull Slot Cover PCI Slot Retaining Bracket ...

Страница 24: ... Note For the best data transmission reception you should place the antenna as high as possible step7 Repeat the above procedure to fit a CableFREE card into each of the other desktop computers to be networked 3 2 3 CableFREE PC Card Installation The PC card fits into a PCMCIA slot The antenna is encased in a plastic case in line with the main body of the PC card such that it extends outside the P...

Страница 25: ...to setup file and printer sharing functions configures the function settings monitors network performance checks system status and permits notebook users to switch between different network environments without reconfiguring network settings For Windows 95 see the next page For Windows 98 go to page 18 for Windows NT 4 0 go to page 20 and for Windows 2000 go to page 21 Note1 Keep the NetBlaster po...

Страница 26: ...ice Driver Wizard Figure 18 New Hardware Found If you see the Update Device Driver Wizard figure go to step1 below If you see the New Hardware Found figure go to New Hardware Found page 16 step1 Insert the CableFREE CD ROM and click Next Figure 19 Update Device Driver Wizard step2 Windows 95 will find the CableFREE Installation program Figure 19 Click Finish Windows may attempt to find the program...

Страница 27: ...ogram Figure 21 Click OK Figure 22 Network step5 If it s the first time you have setup a network on this computer the system will ask you to enter a computer name and workgroup name and a computer description Figure 22 The description field may be left blank Enter the names and click Close step6 Go to Page 23 to choose your network configuration ...

Страница 28: ...and the New Hardware Found dialog box will open Figure 23 Figure 23 New Hardware Found step2 Choose Driver from disk provided by hardware manufacturer and click OK Figure 24 Install From Disk step3 Insert the CableFREE CD ROM in the CD drive Type D or whatever your CD drive is and click OK ...

Страница 29: ...u have setup a network on this computer the system will ask you to enter a computer name and workgroup name and a computer description Figure 25 The description field may be left blank Enter the names and click Close step5 Go to Page 23 to choose your network configuration ...

Страница 30: ...he PC and start the Windows 98 operating system step2 The Add New Hardware Wizard dialog box will open Figure 26 Figure 26 Add New Hardware Wizard 1 step3 Click Next Figure 27 Add New Hardware Wizard 2 step4 Choose Search for the best driver for your device Figure 27 and click Next ...

Страница 31: ...ware Wizard 3 step5 Check CD ROM drive Insert the CableFREE CD ROM in the CD drive and click Next Figure 29 Add New Hardware Wizard 4 step6 Windows will find the driver Figure 29 Click Next step7 Go to Page 23 to choose your network configuration ...

Страница 32: ... on each computer l For non NetBlaster users enter the same CableFREE group name case sensitive on each computer step4 Open the Network Configuration dialog box Click on the Protocols tab to install the TCP IP and NetBEUI protocols step5 The system will ask for the IP address assignment method Check Obtain an IP address from a DHCP server step6 Remember to reinstall the Windows NT Service Pack aft...

Страница 33: ...dated installation procedures will be found at www sohoware com or on a loose sheet inside the package step1 Turn on the power to the PC and start the Windows 2000 operating system Figure 30 Found New Hardware Wizard 1 step2 The Found New Hardware Wizard dialog box will open Figure 30 Click Next Figure 31 Found New Hardware Wizard 2 step3 Choose Search for a suitable driver for my device and click...

Страница 34: ...and then click OK Follow the onscreen messages to complete the installation step10 Restart the computer step11 Click Start Programs CableFREE Utility Network Profiles Figure 32 Network Profiles step12 Choose your network configuration Figure 32 l For NetBlaster users check Connect with NetBlaster and enter the same NetBlaster ID case sensitive on each network computer l For non NetBlaster users un...

Страница 35: ... 2000 and NT users Figure 33 Network Mode step1 Check a box according to whether your network will use a NetBlaster or not Figure 33 Click Next Figure 34 Network Identification 1 If you are using a NetBlaster Enter a computer name Each computer s name must be different Enter the NetBlaster ID on the base of the device which must be capitalized and the same on every computer that will communicate v...

Страница 36: ...a different name but the same Group name must be given to each computer For example you could use your family name as the Group name and use each person s given name as his or her computer s name the Group name is case sensitive step2 The setup program may ask you to insert the Windows CD ROM Figure 36 Figure 36 Insert Disk step3 Insert it and click OK ...

Страница 37: ...Change box will ask if you want to restart your computer Click Yes to complete the installation of the CableFREE driver Note Be sure the path to your Windows source files CD ROM or hard disk is correct You need to type the specific directory of the Windows source files or the system will not find them You are now ready to install the CableFREE Utility ...

Страница 38: ...ick OK step1 The installation program will open the CableFREE Welcome screen automatically Figure 39 Note For Windows NT 4 0 and Windows 2000 users insert the CableFREE CD ROM Click Start Run on the Windows task bar Type the path to the setup files e g if the CD drive is D type d utility setup exe and then click OK The CableFREE utility setup program will then display the CableFREE Welcome screen ...

Страница 39: ...destination folder for the CableFREE Utility program Figure 40 Click Next Figure 41 Setup Complete step4 Check Yes I want to restart my computer Click Finish to restart and auto launch the CableFREE utility Figure 41 Note The screen shown in Figure 41 will vary slightly depending on the Windows operating system ...

Страница 40: ...s to share and then click OK Congratulations You have completed the installation Go to Chapter 4 1 1 to check the network status 3 5 1 Uninstalling the CableFREE Utility Click Start Programs CableFREE Utility Figure 43 Uninstalling the CableFREE Utility Click Uninstall CableFREE Utility Figure 43 When asked to confirm the CableFREE Utility deletion click Yes ...

Страница 41: ...g systems may have a slightly different flow and screens step1 Right click My Computer Click Properties Figure 44 Figure 44 Properties step2 The System Properties screen will open Figure 45 System Properties step3 Click the Device Manager tab step4 Double click the Network Adapters icon step5 Select the CableFREE card and click Remove ...

Страница 42: ...uter Note If the previous installation was aborted you may find a Unknown Device for a Wireless adapter entry If the entry exists delete it from the list and then restart the computer 3 5 3 Removing the Hardware To remove the CableFREE card power off the computer and refer to Chapter 3 2 Reverse the procedure described there ...

Страница 43: ...ing troubleshooting and adapter status report 2 Network Profiles Creates views and modifies network profiles including network adapter NetBlaster ID and other network related settings After creating network profiles you can use Network Hopper available from the NetBlaster Taskbar icon to switch between different network environments quickly 3 Resource Sharing Allows users to setup printer file sha...

Страница 44: ... CableFREE device or by the color of the CableFREE taskbar icon If the CableFREE icon on the Windows taskbar is Green your network is connected Figure 48 If the icon is Black your installation is not complete or the network settings are incorrect Refer to Chapter 8 Troubleshooting for possible solutions If the icon is Yellow your connection status is poor You can improve the connection status by p...

Страница 45: ...to the CableFREE Toolbar Right click the CableFREE Taskbar icon to get Adapter Information Network Profiles Resource Sharing Connection Quality or Traffic Viewer information 4 1 3 CableFREE Utility Preference Settings Right click the CableFREE icon on the taskbar to pop up the following screen Figure 49 Taskbar Click Preferences to open the Preferences page Figure 50 ...

Страница 46: ...g the right mouse button on the icon Prompt for a new network setup at system shutdown logoff If checked before you shutdown the computer CableFREE will automatically ask you for the network profile you want to use at the next startup You can select a stored network profile Refer to Chapter 5 Network Hopper Switching Network Environments for more detailed information Pop up message dialog If check...

Страница 47: ...tem Refer to Chapter 5 Network Hopper Switching Network Environments for more detailed information 4 1 5 Viewing General Information Other information includes a Help menu which will open the Utility help file and an About menu which displays copyright and version information 4 2 CableFREE Toolbar Functions The CableFREE toolbar provides powerful network functions The following section explains ho...

Страница 48: ...etwork information Figure 52 Network Profiles If you are a mobile user refer to Chapter 5 Network Hopper Switching Network Environments for more detailed information 4 2 2 Resource Sharing The CableFREE utility allows you to select the folders and printers you want to share Check the resource you want to share and then click OK Refer to Chapter 6 Network Applications for more detailed information ...

Страница 49: ...s the yellow to red area you are on the edge of the ideal network range Either move your CableFREE PCs closer locate the antenna of the CableFREE PC or the NetBlaster higher or remove any metal obstacles between the CableFREE PCs and the NetBlaster If the bar is black then your network has a problem and you should refer to Chapter 8 Troubleshooting to find possible solutions 4 2 4 Traffic Viewer T...

Страница 50: ...vanced network information read the following section If you don t skip to the next chapter page 41 Firmware Version Firmware is programming that is a semi permanent part of a CableFREE card Because firmware is created and tested like software you can think of firmware versions as CableFREE software versions Adapter Bus Type In a computer a bus is the data path on the computer s motherboard that i...

Страница 51: ...es this computer on the LAN Local Area Network Every computer on the LAN has it s own station address Troubleshooting The Troubleshooting card Figure 57 displays important system information needed by our technical support people should you encounter a problem with a CableFREE device Figure 57 Adapter Properties Troubleshooting If you need our technical support click the Copy to Clipboard button T...

Страница 52: ...re CableFREE 4 2 6 Network Watcher This tool is only available when your CableFREE network does not use a NetBlaster If you don t use a NetBlaster this tool will help you to monitor the computers in the network ...

Страница 53: ...and then click Show Me Details Note Network Hopper is currently not supported in Windows 2000 as Windows 2000 has not been released at time of printing Check the www sohoware com site for a Network Hopper for a Windows 2000 release Figure 58 Network Profiles Click the Save button to take a snapshot of this setup for later retrieval Click the Load button to restore a previously saved setup The Appl...

Страница 54: ...Service Provider and you have to use a different domain name server DNS for each one Network Profiles will change this without requiring a reboot 5 2 Setting up Different Network Environments When you run Network Profiles for the first time it will register the file type nsw as a CableFREE Utility Network Profiles data file Making your first setup file is as simple as this step1 Open Network Profi...

Страница 55: ... any previously saved setups unless you want to replace that setup Each setup is stored in it s own file step4 Repeat steps 1 to 3 until you have created all the setups you need 5 3 Switching Between Different Network Environments Use one of the following methods to switch between network environments Method 1 Open Network Profiles on the CableFREE toolbar select a Network Adapter click the Load b...

Страница 56: ...cally ask you to select a new network environment when the system is shutdown or you log off For example you can pre select your home network configuration when you plan to go home Note If you need to restart the computer to make the changes effective the Network Profiles utility will pop up the following screen Figure 61 Reboot Request b ...

Страница 57: ...haring 6 1 1 Sharing Files to the Network You can use the resource sharing utility on the CableFREE toolbar to share a hard disk drive or CD ROM drive If you only want to share specific files you need to uncheck the shared drive in the CableFREE utility and then designate which files are to be shared step1 Double click My Computer or open Windows Explorer Select the object disk folder file etc to ...

Страница 58: ...object If you want the file to be available to everyone there is no need to set a password If you want to restrict access you can assign a password now Anybody wishing to access the file will then be asked to enter the password Click OK The folder will be marked as shared Figure 64 Figure 64 Shared Folder ...

Страница 59: ... Figure 65 To see more computers double click Entire Network Figure 65 Network Neighborhood step2 Double click the resource folder etc you want to access You can access resources on the computer Dmq as if they were on your own computer Figure 66 Figure 66 Dmq Computer Note If you regularly connect to a particular shared folder you may find it convenient to assign a drive letter to that folder To a...

Страница 60: ... your network This printer must be connected to your computer step3 On the File menu click Properties A Properties dialog box will open Figure 67 Figure 67 Sharing a Printer step4 Click on the Sharing tab and click Shared As Choose a share name for the printer for example EPSON If you want everyone to have access to the printer you don t need to set a password If you want to restrict access assign...

Страница 61: ...oose Network printer Click Next Figure 69 Add Printer Wizard 2 step4 On the next page of the wizard Figure 69 click Browse Figure 70 Add Printer Wizard 3 step5 Select the printer you want to access Figure 70 Click OK to return to the Add Printer Wizard dialog box ...

Страница 62: ...tional Internet access 6 3 1 Broadband Internet Access Sharing Getting Ready for Internet Sharing see Chapter 2 for detailed information The Cable xDSL modem must be switched on Have a single Internet account with multiple IP addresses Any computer from which you want to access the Internet must have a browser installed e g Netscape Navigator Communicator or Microsoft Internet Explorer Accessing t...

Страница 63: ...etscape Navigator click Internet IE or Navigator Figure 72 Internet Explorer 4 x and 5 x Setup step3 If you are an Internet Explorer user check that your Internet connection is set to I Connect via a LAN and then click OK For more detailed information contact your ISP for browser settings step4 If you are a Navigator user check that your ISP settings are correct Ask your ISP about the related sett...

Страница 64: ...CableFREE Combo Starter kit NCF221 step1 Make sure the computer with the dial up modem can access the Internet and that your CableFREE network is working properly step2 Setup SyGate on the computer with the modem You need to setup an IP address on this computer Refer to the SyGate manual supplied with the CableFREE Starter kits for more detailed information 6 4 Playing Multi player Games CableFREE...

Страница 65: ...s each player purchases a copy and installs it on their computer Typically games of this type have both single and multi player modes For playing with others over your CableFREE network you should choose games with multi player modes Games in the second category are available over the Internet You can search for Game on the Internet and then play multi player gaming online ...

Страница 66: ...bsites by typing Game in any search engine e g Yahoo If the game has an associated fee you have to register and setup a billing account typically by credit card You may be required to download a sizeable set of game files to your hard drive Once setup you can play multi player games with your family members or people in the same game area of the Internet 4 If you want to play residence based multi...

Страница 67: ...xpanding your CableFREE network CableFREE Desktop Starter Kit NCF220 NW680SK in Europe to add two desktop PCs CableFREE Combo Starter Kit NCF221 NW680CD in Europe to add one desktop and one notebook PC CableFREE PCI Single Pack NCF130 NW 630A S in Europe to add a desktop PC CableFREE Notebook Single Pack NCF110 NW610A S in Europe to add a notebook PC step2 Follow the Installation Guide to install ...

Страница 68: ...laster to without a NetBlaster Uncheck Connect with NetBlaster and enter a group name Each computer must have the same Group name case sensitive in order to communicate with each other 3 If you want to switch from without a NetBlaster to with a NetBlaster Check Connect with NetBlaster and enter a NetBlaster ID Each computer must have the same NetBlaster ID case sensitive in order to communicate wi...

Страница 69: ... the network 8 2 Hardware Installation Problems Make sure the card is fully home in the computer s PCI PCMCIA slot Uninstall and reinstall the CableFREE card to see if the error message is repeated If so and if possible try the card in another PC to verify that the problem is in the card and not its PC environment Uninstall and reinstall the CableFREE card in another slot 8 3 Software Installation...

Страница 70: ...ee a device conflict message displayed in the Conflicting device list 4 Uncheck Use automatic settings and click on the Change Setting button 5 Select a new IRQ value When the Conflicting device list confirms there are no conflicts click OK to close the windows 6 Restart the computer 8 4 Connection Problems Check the CableFREE Utility Adapter Information to see if the card is working properly If n...

Страница 71: ...umber of obstructions between the CableFREE PCs and the NetBlaster Avoid placing the NetBlaster close to metal objects e g file cabinets metal cubicles metal ceiling floor wall etc Move the NetBlaster and the CableFREE PCs closer to each other If there is a device using the same radio frequency as the CableFREE e g a microwave oven ensure the CableFREE computer or NetBlaster are far enough away fr...

Страница 72: ... the CableFREE card has not been initiated completely before you logon to a Windows NT machine you will see an error message Can t find the CableFREE adapter when the CableFREE Utility program starts Close the utility and re run it again after 1 2 minutes Reinstall the service pack after installing the CableFREE driver and the Network components For notebook users always insert the CableFREE PC Ca...

Страница 73: ...ings to be changed replaced or deleted Did anyone run a personal game or utility program perhaps borrowed from a friend or downloaded from the Internet The program might have introduced a computer virus Has anyone recently customized tidied up or streamlined a computer on the network They may have changed or deleted necessary settings or files ...

Страница 74: ...What error messages you saw Whether the problem can be reproduced The serial number of your CableFREE Network product USA Telephone 1 408 7300888 Toll Free US only Technical Support 1 888 785 8222 Customer Service 1 800 632 1118 ext 828 FAX 1 408 7300889 E mail support ndclan com Europe and Asia Pacific Telephone 886 3 5783966 FAX 886 3 5777989 E mail techsupt ndc com tw For more information about...

Страница 75: ...r is longer NDC shall not be liable under this warranty if its testing and examination disclose that the alleged defect in the product does not exist or was caused by the purchaser s or any third party s misuse neglect improper installation or testing unauthorized attempt to repair or modify or any other cause beyond the range of the intended use or by accident fire lightning or other hazard Softw...

Страница 76: ...r Warranty Period After the warranty period expires all NDC products may be repaired for a reasonable service charge The shipping charges to and from the NDC facility will be borne by the purchaser Return for Credit In the case of a DOA Dead on Arrival or a shipping error a return for credit will automatically be applied to the purchaser s account unless otherwise requested Limitation of Liability...

Страница 77: ...ments set out in the Council Directive on the Approximation of the Laws of the Member States relating to Electromagnetic Compatibility 89 336 EEC The product meets or exceeds the following EMC standards Europe ETS 300 328 ETS 300 339 ETS 300 826 France SP DGPT ATAS 23 ETS 300 328 ETS 300 339 The manufacturer importer is responsible for this declaration Company Name NDC EUROPE CO LTD Company Addres...

Отзывы: