background image

User’s Guide Viper Extreme

CHAPTER 5: Printer menu


79 

AP-75330 – Rev. 1.0 – 14/01/09 

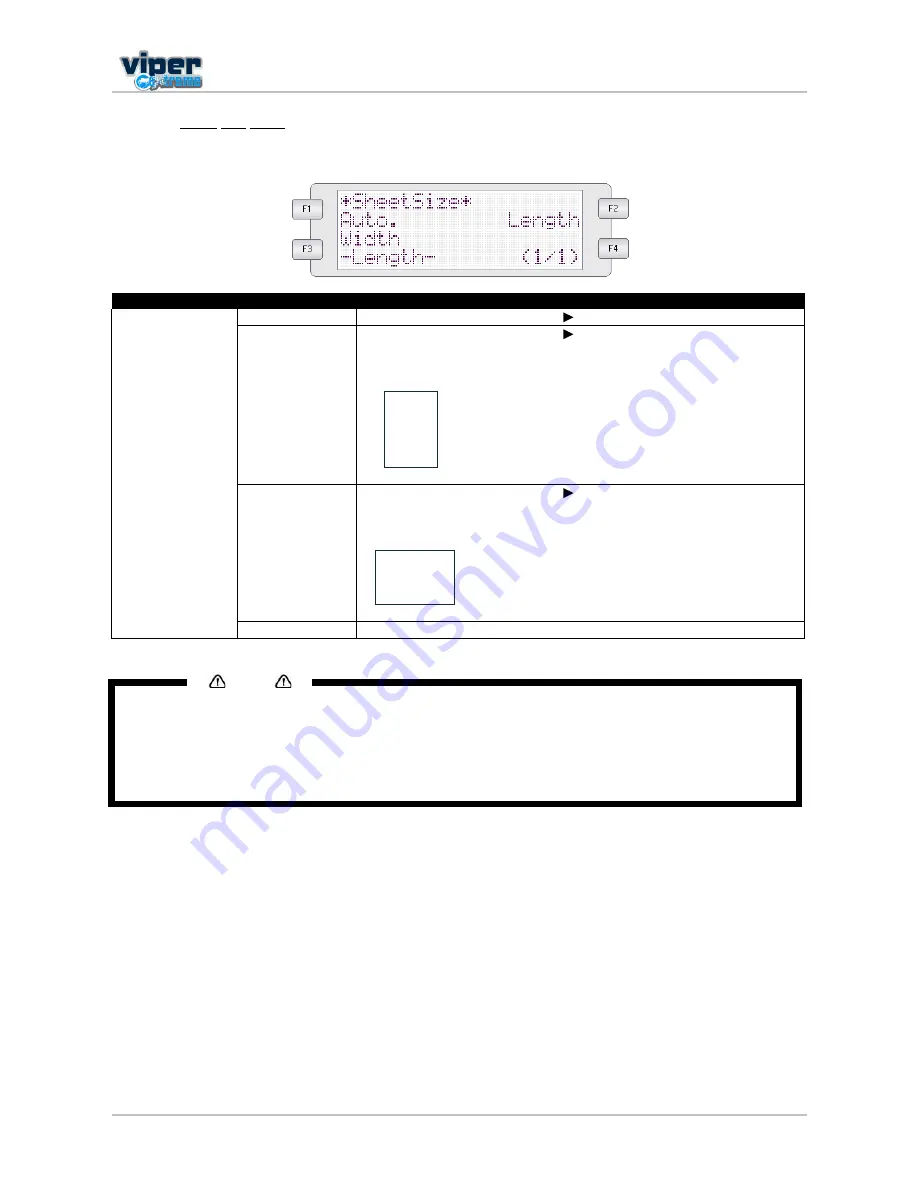
5.4.1.16 Sheet size menu

When loading a sheet of media, set the method for detecting the media.

Setup items

Parameters

Description

SheetSize

Auto

Media measurement sequence

 REAR – RIGHT – LEFT – TOP 

Length

Media measurement sequence

 RIGHT – LEFT – TOP 

Media orientation when loading standard size media.

Width

Media measurement sequence

 RIGHT – LEFT – TOP 

Media orientation when loading standard size media.

-

After setting, shift to the previous hierarchy menu.

Notes

When using sheet media other than recommended media, set to "blank form vertical" or "blank form
horizontal".
The following size of sheet media can be set.

±

ISO series (A0, A1, A2, A3, A4)

±

JIS series (B1, B2, B3, B4)

±

ARCH series (A, B, C, D)

Содержание Viper Extreme

Страница 1: ...User s Guide Viper Extreme Digital Transfer Printer For Maintenance Kits Spares Service and Support Call 44 0 1628 588755 E mail support colourgen com ...

Страница 2: ...User s Guide Viper Extreme 2 AP 75330 Rev 1 0 14 01 09 This page is intentionally left blank ...

Страница 3: ...n contained in this document the party to whom it is given assumes its custody and control and agrees to the following The information herein contained is given in confidence and any part thereof shall not be copied or reproduced without written consent of Mutoh Europe N V This document or the contents herein under no circumstances shall be used in the manufacture or reproduction of the article sh...

Страница 4: ...User s Guide Viper Extreme 4 AP 75330 Rev 1 0 14 01 09 This page is intentionally left blank ...

Страница 5: ...edia Handling 28 3 4 Refilling ink cassettes 35 3 5 Replacing the cutting blade 36 3 6 Replacing the waste bottle 37 3 7 Transfer and transportation 38 4 Preparations before printing 41 4 1 Using media 42 4 2 Testprinting 44 4 3 Set the correct distance adjust Step 48 5 Printer menu 53 5 1 How to work in the menu 56 5 2 Operation panel IN standby mode 58 5 3 Operation panel after printing 66 5 4 M...

Страница 6: ...User s Guide Viper Extreme 6 AP 75330 Rev 1 0 14 01 09 This page is intentionally left blank ...

Страница 7: ...ty instructions 7 AP 75330 Rev 1 0 14 01 09 1 SAFETY INSTRUCTIONS 1 1 Regulations 8 1 2 HANDLING INKS waste 9 1 3 Warnings Cautions and Notes 9 1 4 Safety instructions 10 1 5 Safety labels 12 1 6 Serial number label 13 1 7 Operation labels 14 ...

Страница 8: ...lease inform yourself about the local separate collection system for electrical and electronic products Please act according to local rules and do not dispose of your old products with your normal household waste The correct disposal of your old product will help prevent potential negative consequences for the environment and human health FCC This equipment has been tested and found to comply with...

Страница 9: ...roblems caused by using an ink holder other than those recommended above will not be covered by the warranty and repair expenses will be paid by the customer For handling waste see section 13 on the MSDS sheet Recommendation dispose of product according to federal state provincial and local regulations Inks Waste General advice wear safety glasses and gloves especially when handling the waste ink ...

Страница 10: ...ical devices Make sure that no foreign substances such as dust etc are stuck to the power plug Insert the power plug firmly to the edge of the power socket Do not disable any safety precautions systems Do not operate the unit unless all parts are mounted Do not place the machine in the following areas Doing so may result in the machine tipping or falling over and causing injury Unstable surfaces S...

Страница 11: ...eeling from the casing Do not tilt the machine place it against a wall or turn it upside down Doing so may cause ink to leak inside the machine Movement after transport is also not covered by the warranty When cutting roll media be careful of the following Incorrect handling will result in injury to the hands and fingers from the razor blade When holding the media do not place fingers over the med...

Страница 12: ...p be careful not to cut your fingers Always wear gloves when performing maintenance in that area Always wear goggles when performing maintenance in that area 3 Front platen The front platen can be very hot up to 70 C be careful not to burn your hands 4 Rear pressure rollers When loading media be careful not to pinch your fingers between the pressure rollers and print platform ï î í ì ë ê ...

Страница 13: ...te bottle Always wear gloves when performing maintenance in that area Always wear goggles when performing maintenance in that area The liquid in the waste bottle may cause health hazards but is not a toxic liquid 1 6 SERIAL NUMBER LABEL N Name Additional info 1 Machine name xx 65 or 90 machine size 2 Serial number 3 Electrical specifications 4 CE mark 5 WEEE mark ÓËÌÑØ Û ÒòÊò ß ïí Þ ó èìðð Ñ Ó ÞÛÔ...

Страница 14: ...tions 14 AP 75330 Rev 1 0 14 01 09 1 7 OPERATION LABELS N Type 1 2 For more colour configurations see further on in this manual 1C1H Extr 2x4 1x8 Yellow Cyan Magenta Spotcolor 2 Yellow Magenta Magenta Yellow Cyan Cyan Spotcolor 1 Spotcolor 3 Spotcolor 4 ...

Страница 15: ...2 1 Part names and functions 16 2 1 1 Front 16 2 1 2 Rear 17 2 1 3 Position and function of the heating elements 18 2 2 Operation panel 19 2 2 1 Operation keys 19 2 2 2 LCD monitor and status lamps 20 2 3 Installation requirements 21 2 3 1 Installation environment requirements 21 2 3 2 Required space 21 ...

Страница 16: ...rator safe from moving parts Only open and or close the cover to perform following operations Media setting and replacement Cutter blade replacement Cleaning the cleaning wiper 4 Operation panel To control the printer 5 Ink compartment cover Covers the ink compartment 6 Stand Carries the main body 7 Waste bottle assembly Collects the waste fluid 8 Winder control panel To operate the winding system...

Страница 17: ...ation Mutoh provides an APS system for collection of VOCs that are emitted at the printing area When you want to connect your own air purification system a tube connection is available Please refer to the latest price list for more information 2 N Name 1 Network interface connector 2 Centronics connector 3 Foot switch connector 4 Power cable connector 5 Bulk ink system connector 1 2 ...

Страница 18: ...tion and function of the heating elements Heater element Temperature Function Pre heater Heater A 20 70 C The pre heater expands the transfer paper before it hits the pinch rollers Dryer Heater D 20 70 C The dryer helps to make the media touch dry before it reaches the automatic take up system ...

Страница 19: ...the Viper Extreme 2 F1 key To select the function or parameter displayed in the left upper corner 3 F2 key To select the function or parameter displayed in the right upper corner 4 F3 key To select the function or parameter displayed in the left lower corner 5 F4 key To select the function or parameter displayed in the right lower corner 6 MENU key To browse between the different menus 1 5 2 5 7 M...

Страница 20: ...DATA Orange ON The printer receives print data Flashing The printer analyses received data OFF The printer waits to receive print data 14 MEDIA SET Orange ON The nip roller is in the release position Media has not been loaded OFF The nip roller is in the secured position The media has not been loaded 15 ROLL Orange ON The media type is set to roll media OFF The media type is set to sheet media 16 ...

Страница 21: ...220V 240V 6A In order to protect the printer for over currents short circuits and earth faults equip the building installation with an automatic breaker double pole of 20 A and an earth leakage switch of 300 mA Environmental Recommended working environment Temperature 25 Humidity 30 to 60 without condensation Operational conditions Temperature 19 to 26 Humidity 30 to 60 without condensation Rate o...

Страница 22: ...User s Guide Viper Extreme CHAPTER 2 Product overview 22 AP 75330 Rev 1 0 14 01 09 This page is intentionally left blank ...

Страница 23: ...revent media cockling 28 3 3 2 Measurements to minimize head touching cockling media 29 3 3 3 Media retainers media holder 30 3 3 4 Using the ETT system 32 3 3 5 Pressure rollers disabler tool 34 3 4 Refilling ink cassettes 35 3 5 Replacing the cutting blade 36 3 5 1 Replacement time 36 3 5 2 Replacement procedure 36 3 6 Replacing the waste bottle 37 3 6 1 Replacement Time 37 3 6 2 Replacement Pro...

Страница 24: ...peration panel to switch the unit ON The POWER lamp of the operation panel will light green Step 2 The unit will initial start up operations Step 3 After finishing initial start up operations the unit will enter the normal operating condition Notes If there are any problems during the initial start up operation the unit will display a message and the operation stops If the operation stops refer to...

Страница 25: ...N Press the key again to switch the power OFF Power OFF will be displayed for a few seconds Notes If pressing the POWER key by mistake press the POWER key again Step 3 The printer will perform the power OFF operation The operation panel displays All lamps and the LCD of the operation panel will switch OFF The product will automatically switch the power OFF Notes If there are problems during the po...

Страница 26: ... optimum printing conditions Notes The size of the media can change at a fixed ratio according to the temperature changes of the working environment Before using media place the media roll in the working environment for at least 24 hours to have it match to the temperature of the working area Printing before the media could accommodate to the printing environment may cause media jams due to slippa...

Страница 27: ... Sheet media Set when loading sheet media Sheet media Lever Down Up F3 Lever up Switches between up and down motion of the pressurizing lever Use this when starting over from the media setup Lever down Media Type F4 User 1 Set media type for printing For setup values of printing operation eight settings of user 1 8 are available Refer to Menu Overview User 2 User 3 User 4 User 5 User 6 User 7 User...

Страница 28: ...fore handling the printer 3 3 1 1 Unwinder winder 100 The Unwinder winder 100 system always provides an equal tension on the media when printing It is important that the Unwinder winder 100 is perfectly lined out to prevent cockling To line out the Unwinder winder 100 please refer to the user s guide Handling Roll Media Print environment of transfer paper Environmental Recommended working environm...

Страница 29: ...erwise media will slant and the media retainers could tear the transfer paper 3 3 2 Measurements to minimize head touching cockling media In case of media cockling following tools are available to avoid the print heads to touch the media protect heads and print result 3 3 2 1 ETT patent pending The ETT Extra Tension Tool pulls the media in line with the print platform The tension on the sides is a...

Страница 30: ...make sure to firmly set it to the platen of the printer unit In case the media holder declines or loosens it might hit the print head and cause trouble Notes When using the media holder please do the following Set to Normal or TakeupReel on the Media Detection menu When setting the Media Detection menu to OFF define a smaller value than the media width on the Media Width menu 3 3 3 1 Installing St...

Страница 31: ... Basics 31 AP 75330 Rev 1 0 14 01 09 3 3 3 2 Uninstalling To remove the media retainers please follow the instructions below Step 1 Carefully pull the lid towards you and unlock the media retainer from behind the print platform OK NOT OK ...

Страница 32: ...TT holding bar Notes Make sure to correctly install the extra tensioning tool ETT There are three different ETT s a Left ETT a middle ETT and a Right ETT Please note that the outer sides of the Right and Left ETT have longer springs than the insides Place the PE strip over the transitions between the different ETT segments Only use the middle part of the ETT if media width is larger than 44 for 65...

Страница 33: ...the ETT Notes It is very important to install the plastic covers onto the ETT These covers prevent the media from being jammed between the ETT Step 6 Install the roll media Please refer to loading roll media Step 7 Bring the ETT holding bar with the previously installed ETT s forward The extra tension is set to the outer sides ...

Страница 34: ...ing thus providing the necessary space for media to expand Step 1 Take the pressure roller disabler tool as follows in your right hand Step 2 Pull the pressure roller you want to disable down with your left index finger Step 3 Place the pressure roller disabler tool in the space created when pulling the pressure roller down Step 4 The pressure roller disabler tool is now positioned as follows ...

Страница 35: ...he following Performing no printing or other operations Make sure that the display on the operation panel shows the normal state The MEDIA SET light on the operation panel goes off Step 2 Pull out the little plug on the top of the open cassette Step 3 Place the funnel in the opening of the cassette Step 4 Fill the cassette to a level of 60 62 mm measured from bottom of cassette to obtain perfect p...

Страница 36: ...Step 2 Go to the H Unlock menu Setup Menu 5 7 and unlock the head Step 3 Open the front cover Step 4 While pressing the cutting blade holder tab rotate the cutting blade holder lever in the direction shown on the picture Step 5 Take out the cutting blade 1 Cutting blade holder tab 2 Cutting blade holder lever 3 Pull down tab 4 Rotate lever as shown Step 6 Insert the new cutter into the media cutti...

Страница 37: ...ocedures Follow the steps below to empty the waste bottle Step 1 Open the lid and remove the waste bottle Step 2 As soon as the waste bottle has been removed the following message appears Step 3 Pour the waste liquid in another bottle and dispose it according to the local regulations Step 4 Replace the waste bottle Step 5 Be sure to close the lid Step 6 Press the ENTER key to confirm that waste bo...

Страница 38: ...nwinder Winder 100 system Step 3 Make sure the head is in the right edge position capping position Step 4 Disconnect the power cable of the printer winding system and all other cables Step 5 Turn in the four feet of the printer Step 6 Turn in the six feet of the Unwinder Winder 100 Step 7 Transfer the printer to its new location Notes THE CASTERS ATTACHED TO THE STAND HAVE BEEN DESIGNED FOR TRANSF...

Страница 39: ...below Step 1 Power off the unit Step 2 Remove all cables Step 3 Lock the carriage with the special bracket that came with the unit or use tape so that the carriage is firmly fixed Step 4 Take out all ink cassettes and replace them with dummy cassettes These can be ordered with your Mutoh distributor Step 5 Secure the dummy cassettes with tape so that they cannot come loose during transport Step 6 ...

Страница 40: ...User s Guide Viper Extreme CHAPTER 3 Basics 40 AP 75330 Rev 1 0 14 01 09 This page is intentionally left blank ...

Страница 41: ... media 42 4 1 1 Media range 42 4 1 2 Cautions on handling media 42 4 1 3 Precaution on storing media 43 4 1 4 The printing area 43 4 2 Testprinting 44 4 3 Set the correct distance adjust Step 48 4 3 1 Basics about the step 48 4 3 2 How to determine and change the step 49 4 3 3 How to change the step on the fly 51 4 3 4 Printing flow 52 ...

Страница 42: ... environment Following are the appropriate temperature and humidity ranges for printing Do not use creased damaged torn curled or wrapped media The size of the media can change at a fixed ratio according to the temperature changes of the working environment Before using media place the media roll in the working environment for at least 24 hours to have it match to the temperature and humidity of t...

Страница 43: ...ia Do not store media in high temperature high humidity or direct sunlight Store sheet media in the original bag after unpacking Unused roll media must be removed from the Unwinder rewound tightly and stored in the original wrapping bag and the box Do not wet media 4 1 4 The printing area 4 1 4 1 Roll media 4 1 4 2 Sheet media ...

Страница 44: ... Step 5 Select which test pattern to print F1 Distance Check Prints a pattern to check if the distance adjustment step is correct If not you can change it easily Please refer to the next chapter for more information on how to evaluate this pattern F2 NozzleCheck Prints a test pattern to check if there are any nozzles missing Depending on the amount of missing nozzles perform a little normal or pow...

Страница 45: ...be replaced soon Visualizes the lifetime on the basis of stars E F New part E F Part needs to be replaced Maintenance Record Version 1 00 InkCart 1 E F InkCart 2 E F InkCart 3 E F InkCart 4 E F InkCart 5 E F InkCart 6 E F InkCart 7 E F InkCart 8 E F Cutter Life E F Page Count E F Waste Ink E F CR Motor Life E F PF Motor Life E F Head Life E F Cleaner Life E F Pump Life E F F1 Uni Directional Print...

Страница 46: ...0 F3 Bi Directional 400 Prints the bi directional test pattern at 400 cps for head height 1 2 and 3 Every block must be checked for stair case effects In case this symptom occurs contact an Authorized Mutoh technician to readjust the heads For when printing in 540 dpi Fast 540 SAME PATTERN F4 Bi Directional 480 Prints the bi directional test pattern at 480 cps for head height 1 2 and 3 Every block...

Страница 47: ...75330 Rev 1 0 14 01 09 F1 Colour Palette Prints a test pattern to compare the colour settings of the computer with the printed colour of the printer This palette is printed in the mode you are currently working PrintMode settings We recommend printing the palette in 360x360 ...

Страница 48: ...er which results in white bands between two print passes Therefore a function called distance adjust or step is added to the menu to control this feed operation Refer to the table below for visual support The passes overlap each other the passes are printed too far from each other Step between the print passes is too small Step between the print passes is too large Notes We recommend to start prin...

Страница 49: ... WHEN PRINTING ROLL TO SHEET THAN WHEN PRINTING ROLL TO ROLL Step 3 Perform a NozzleCheck to be sure all nozzles are present If not perform the necessary cleanings Step 4 Set the step to 100 00 Step 5 Print the test pattern Setup Menu 1 7 TestPrint F3 Dist Check F1 Step 6 To evaluate the print you look for gaps or overlaps between the different passes 1 4 The direction of the adjustment increase o...

Страница 50: ...ore printing 50 AP 75330 Rev 1 0 14 01 09 Step 7 Step is too small overlap visible between passes Step is too big gap visible between passes Step 8 Change the step if necessary Step 9 Print the test pattern again until no gap or overlap is visible anymore ...

Страница 51: ...User s Guide Viper Extreme CHAPTER 4 Preparations before printing 51 AP 75330 Rev 1 0 14 01 09 4 3 3 How to change the step on the fly Step 1 Press while printing Step 2 Press or to change the step ...

Страница 52: ...MAGE Refer to profiles section on www mutoh be SET STEP Refer to chapter Set the correct distance adjust DECIDE WHICH WEAVING PATTERN TO USE SIGN PICTURE Refer to chapter I technology PRINT IMAGE It is highly recommended to use one of the profiles Mutoh is making available on the website A lot of parameters are included The most important ones are Ink an colour management related Ink Restrictions ...

Страница 53: ...ration panel after printing 66 5 3 1 Cut off media with the printer knife 66 5 3 2 Manually cut off media 67 5 4 Menu overview 1 7 7 7 68 5 4 1 Setup Menu 1 7 70 5 4 1 1 Ink status menu 70 5 4 1 2 Origin setup menu 71 5 4 1 3 Test print menu 72 5 4 1 4 Media setup menu 72 5 4 1 5 Media type menu 73 5 4 1 6 User media menu 74 5 4 1 7 Ink dry time menu 75 5 4 1 8 Head Height menu 75 5 4 1 9 Vacuum m...

Страница 54: ... 4 10 Remote panel 101 5 4 4 11 Remote connection 101 5 4 4 12 File management setup menu 101 5 4 4 13 Write mode menu 102 5 4 4 14 Re print menu 103 5 4 4 15 File delete menu 104 5 4 4 16 Re name menu 105 5 4 4 17 Format menu 106 5 4 4 18 Initialize setup menu 107 5 4 4 19 All Initialize menu 108 5 4 4 20 Media setup Initialize menu 108 5 4 4 21 Printmode 108 5 4 4 22 Command setup Initialize men...

Страница 55: ... Rev 1 0 14 01 09 5 4 5 13 InkSupply menu 119 5 4 6 Setup menu 6 7 119 5 4 6 1 H Unlock menu 119 5 4 6 2 Wiper clean menu 120 5 4 6 3 Tank change menu 120 5 4 6 4 Tubing Flush menu 121 5 4 7 Setup menu 7 7 122 5 4 7 1 Version Check menu 122 5 4 7 2 Area menu 122 ...

Страница 56: ... assigned to F4 key 6 Left of 4th line Displays the currently set media type 7 Right of 4th line Displays the approximate amount of remaining media that is currently set Units m However the amount displays only when either Roll media 1 Roll media 2 or Roll media 3 is selected in the Roll media setting menu 5 1 2 Menu screen In the SetupMenu changes can be made to the printer settings The LCD monit...

Страница 57: ... 1 From main screen to menu screen Press either or when the printer is in the main screen to go to menu screen 1 7 7 7 5 1 3 2 From menu screen to main screen To switch from a menu screen to the main screen take following actions Press the CANCEL key Leave the printer for 3 minutes when the status is in the setting menu display or or leave the printer idle for 3 minutes ...

Страница 58: ...or backward follow the steps below Step 1 Verify the following regarding the condition of the printer It is currently not printing Step 2 Press the F1 key of the operation panel To shift to the Cut Feed menu Step 3 Press the F3 key or the F4 key The product will perform following operations Setup items Key name Parameters Description Cut Feed F1 Cut Cut media F2 Dist Adj Set step F3 Forward Feeds ...

Страница 59: ... not currently printing Step 2 Press the F2 key of the operation panel To shift to the cleaning menu Step 3 Press the F1 key or the F2 key The product will perform following operations Setup items Key name Parameters Description Cleaning F1 ALL Clean all heads Pump 1 Only clean head 2 and 3 Pump 2 Only clean head 6 and 7 Pump 3 Only clean head 1 and 4 Pump 4 Only clean head 5 and 8 F2 Little Perfo...

Страница 60: ...temperature 5 2 3 1 Change the heater temperature To change the temperature of the heater press the F1 key The display will mention the following Press the F2 key to decrease the temperature Press the F4 key to increase the temperature Press the ENTER key to confirm the requested temperature change Press the CANCEL key to leave the menu without changing the heater settings 5 2 3 2 Change the dryer...

Страница 61: ...heating elements The display will mention SET ON In case the heating elements are deactivated the display will mention SET ON Press the F4 key to activate the heating elements The display will mention SET OFF Please note that after finishing a printing job and no other print job is sent to the printer the heating elements will keep their temperature for approximately 15 minutes After 15 minutes th...

Страница 62: ...re rollers have been raised The MEDIA SET lamp switches ON orange The pressure rollers are lowered The MEDIA SET lamp will switch off Notes YOU CAN ALSO MONITOR THE UP AND DOWN MOVEMENT OF THE PRESSURE ROLLERS USING THE FOOT SWITCH INSTEAD OF THE OPERATION PANEL 5 2 5 ENTER Print mode check Use the following procedure to check the print mode currently set Step 1 Press the ENTER key The operation p...

Страница 63: ...the print job after 15 minutes you must reset the heaters to their correct setting While printing you can pause and resume the print job by pressing the F4 key When pressing pause the printer will finish the current band The carriage will stay still at the end of the band for about 15s After 15s the carriage will move to the carriage station and the heads will be capped in if you open the cover wi...

Страница 64: ...hown in the Printing menu on page 4 Two situations are possible No length information provided with the job The printer cannot know progress and remaining time However size of the already printed area is shown Length information is provided the printer calculates progress and remaining time The correctness of this depends on the correctness of the provided information ...

Страница 65: ... on the quantity of missing nozzles and which head a little normal or powerful cleaning on head 1 2 head 3 4 or ALL could be done Step 1 Press the F2 key of the operation panel to shift to the cleaning menu Step 2 Press the F1 key or the F2 key The product will perform following operations Setup items Key name Parameters Description Cut Feed F1 ALL pump 1 pump 2 pump 3 pump 4 Clean ALL heads or he...

Страница 66: ...be cut on the desired position When roll media has been set If OFF is set on the cut media menu If Take Up Roll is set in the media detection setup menu When sheet media has been set Step 1 Make sure that the MEDIA SET lamp on the operation panel is OFF Step 2 Press the F3 key Shift to the cut and feed menu Step 3 Press the F3 or F4 key to feed the media to the desired position Step 4 Press the F1...

Страница 67: ... 1 0 14 01 09 5 3 2 Manually cut off media This section explains how to cut the media manually Cut the media according to the following procedure Step 1 Feed media to the desired position using the F3 and F4 key Step 2 Cut the roll media following the cutting groove ...

Страница 68: ... menu 68 AP 75330 Rev 1 0 14 01 09 5 4 MENU OVERVIEW 1 7 7 7 This section describes how to set the Menu settings and setup items Step 1 Make sure that the operation panel is normal Step 2 Press the MENU or MENU key The screen shows following Menu ...

Страница 69: ...entronics setting Sets Centronics Interface communication mode Network setting Makes the settings for the network interface Setup menu 4 7 Utility setting Makes various advanced function settings Initialize setting Returns the parameters to factory default value File management Makes various settings for the processing method of the printing data sent from the computer to the installed hard disk S...

Страница 70: ...Ink status for the ink cassette slots 1 8 Display Line 2 ink cassette slots 1 3 Line 3 ink cassette slots 4 6 Line 4 ink cassette slots 7 8 Symbols Ink Colour K Black C Cyan M Magenta Y Yellow c Light Cyan m Light Magenta W Cleaning Liquid Type of Ink D Dye P Pigment X Cleaning Cassette Ink Remaining 100 must always remain 100 because you are working with a BIS system or open cassettes CANCEL key ...

Страница 71: ...ount by operating the following keys F1 key Feeds media forward F2 key Moves the print head to the left F3 key Feeds media backward F4 key Moves the print head to the right ENTER key Determines the setup values then returns to the previous hierarchical menu CANCEL key shifts to the previous hierarchy menu Refer to Setup menu Notes When printing data from the hard disk the printing will start from ...

Страница 72: ...directional test pattern at 400 cps BiDir480 Print bi directional test pattern at 480 cps TestPrint 3 3 Palette Print colour palette TestPrint 1 3 3 3 CANCEL key shift to the previous hierarchy menu 5 4 1 4 Media setup menu Setup items Parameters Description Media setting Type Sets the media type used for test printing Sheet size Sets the method of detecting the size of the media when sheet media ...

Страница 73: ... User media 1 Sets the type of media used to print For setup values of printing operation eight settings of user media 1 8 can be set Refer to User media menu User media 2 User media 3 User media 4 Types 2 2 User media 5 User media 6 User media 7 User media 8 Type 1 2 2 2 CANCEL key to shift to the previous hierarchy menu Refer to Media setup menu ...

Страница 74: ...H dealer Setup items Parameters Description User media 1 8 1 2 InkDryTime In order to let the ink for the printing dry the time between the end of the print and the beginning of the next print is set Refer to InkDry menu HeadHeight Sets the distance head height between the print head and the media Refer to Head Height menu Vacuum Makes the setting for the sucking power of the media to the printing...

Страница 75: ...hierarchy menu Refer to User media menu 5 4 1 8 Head Height menu Set the distance head height between the print head and the media According to the media thickness 3 head height levels are available Setup items Parameters Description HeadHeight Low This setting makes a distance of 1 2 mm between the head and the media Middle This setting makes a distance of 2 2 mm between the head and the media Hi...

Страница 76: ...form is low Medium The suction of the media to the print platform is medium High The suction of the media to the print platform is high Use this setting when media is cockling After setting shift to the previous hierarchy menu Refer to User media menu 5 4 1 10 Thickness menu Setup items Parameters Description Thickness 50µm 100µm 1500µm Operate the following keys to change media thickness F2 key t...

Страница 77: ...recommend setting the pre heater temperature at 50 C This to expand the transfer media before reaching the pressure rollers 5 4 1 12 Drier menu Notes The default drier setting is set to 50 C The function of the drier D Heating the printed transfer media evaporates the water fast enough so that the print is touch dry when wound 5 4 1 13 HStatus menu Check the temperature of the heating elements Not...

Страница 78: ...enu Refer to Change media feed compensation value menu Print2 Performs printing by media feed compensation for fine adjustment Prints a correction pattern with a width of 0 02 in steps of 0 01 around the centre of the correction value currently set Refer to Printing by Media feed compensation menu CANCEL key Shifts to the previous hierarchy menu Refer to User media menu 5 4 1 15 Change menu Setup ...

Страница 79: ...ength Media measurement sequence RIGHT LEFT TOP Media orientation when loading standard size media Width Media measurement sequence RIGHT LEFT TOP Media orientation when loading standard size media After setting shift to the previous hierarchy menu Notes When using sheet media other than recommended media set to blank form vertical or blank form horizontal The following size of sheet media can be ...

Страница 80: ...eters Description Media cutting Off No media feed after printing Auto When finishing a print job the media feeds forward to the cut position and is automatically cut Manual Feed media to the media cut position after printing Use regular cutting blades available from hardware stores When selecting Auto proceed to the Shortest Cut Length menu If Manual or Off has been selected the screen changes to ...

Страница 81: ...5 4 2 1 Printing mode menu Setup items Parameters Description Print mode setup Print mode 1 For each setup value of Printing mode four settings are available Refer to Printing mode setup menu Print mode 2 Print mode 3 Print mode 4 CANCEL key to shift to the previous hierarchy menu Refer to Setup menu ...

Страница 82: ... To set print head moving direction for printing Refer to Printing direction menu HeadSet To set which heads are used for printing Repeat printing To make settings for the repeat print Refer to Repeat printing menu Printing mode 1 4 2 2 Head speed To set the head speed Refer to Head speed menu Weaving To set Intelligent interweaving Refer to I Intelligent interweaving Scanwidth To make settings fo...

Страница 83: ... to interlace setup items after the print quality items settings have been finished Refer to InterLace Setup menu 720 360dpi 360 720dpi Diagonal 720dpi Condition 2 5 540 720dpi 720 720dpi 1080 1080dpi 1440 720dpi Condition 3 5 720 1440dpi Diagonal 1440 1440 1440dpi 2160 1080dpi Condition 4 5 1080x2160dpi Diagonal 2160 2880 1440dpi 1440x 2880dpi Condition 5 5 Diagonal 2880 Condition 1 4 4 4 CANCEL ...

Страница 84: ... To shift to the previous hierarchy menu Refer to Setup menu CANCEL key To shift to the previous hierarchy menu Refer to Setup menu 5 4 2 6 Headset To select which head must print Setup items Parameters Description Headset Native Default printer settings for normal printing modes 1234 Set Selected print mode utilizes only the first 4 heads Double Density This setting prints 4 colour mode in double...

Страница 85: ...erval time for the repeat print Refer to Interval time menu CANCEL key To shift to the previous hierarchy menu Refer to Setup menu 5 4 2 8 Repeat times menu To set the number of repeats per line of printing Setup items Parameters Description Times Once to 99 times Operate the following keys to change repeat times F2 key Increases the setup value F4 key Decreases the setup value ENTER key To confir...

Страница 86: ... F2 key Increases the setup value F4 key Decreases the setup value ENTER key Confirms the setup value shift to the previous hierarchy menu CANCEL key Cancels the setup value shifts to the previous hierarchy menu Refer to To repeat the printing menu 5 4 2 10 Head Speed Menu Setup items Parameters Description HeadSpeed Normal Print at normal speed Fine Print at half speed Only available in 720x720 C...

Страница 87: ...ped look that will save you time and boost your output quality Difficult images will print smoother banding will be suppressed neutralized and you will have to spend less time fine tuning your printer to create great looking output Moreover when using wave tuned profiles you will be able to boost your printer s colour gamut as the i intelligent interweaving technology allows depositing more ink he...

Страница 88: ...g time Please find more details below Setup items Parameters Description Drying time ScanWidth DataWidth Carriage moves only over the printing area Short MediaWidth Carriage moves to the end of the media Depending on MediaWidth FullWidth Carriage moves over the full width of the printer Long Notes The setup list indicates this setting This setting works with HDD printing This setting has no effect...

Страница 89: ...tomatically determines the size of printing data sent from the computer and then determines the amount of roll media required without wasting media If sheet media is loaded the layout function is disabled Setup items Parameters Description Layout Joint Makes settings for stitching print Refer to Joint printing menu CutPos To set the media cutting position after printing has been completed Refer to...

Страница 90: ...media cutting position after printing has been finished Setup items Parameters Description Cutting position Standard To cut the media to fit the media width so that it meets the regulated size Data To cut the media according to the size of the printing data Shifts to the previous hierarchy menu Refer to Layout setup menu ...

Страница 91: ...r to CMY K menu CANCEL key Shifts to the previous hierarchy menu Refer to Setup menu 5 4 2 18 CMY K menu To set how to draw black Setup items Parameters Description CMY K No If MH GL GL2 are set on the Command Settings menu be sure to use CMY mixed colours ink If RTL PASS is set use both CMY mixed colours ink and K black ink Yes Always use K black ink To shift to the previous hierarchy menu Refer ...

Страница 92: ...vailable Refer to Roll media length menu Roll media 2 Roll media 3 CANCEL key To shift to the previous hierarchy menu Refer to Setup menu 5 4 3 2 Roll media length menu Setup items Parameters Description Roll media 1 4 1 m to 30 m to 999 m Operate the following keys to change the roll media length F2 key Increases the setup value F4 key Decreases the setup value ENTER key Confirms the setup value ...

Страница 93: ... 5 4 3 4 Network setting menu Notes The network settings menu is available if a network interface board is installed Be sure to consult the network administrator before making the settings in the Network Settings menu Setup items Parameters Description Network 1 2 IP address To set the IP address of the product Refer to IP address menu Subnet mask To set the subnet mask of the product Refer to Sub...

Страница 94: ...rchy CANCEL key Cancels the setting value and moves the screen to the menu of the previous hierarchy Refer to Network setting menu 5 4 3 6 Subnet mask menu Setup items Parameters Description Subnet mask 000 000 000 000 255 255 255 000 255 255 255 255 Use the following keys to change the Subnet Mask F1 key Moves one digit to the left on the setting value to be changed F2 key Increases the setting v...

Страница 95: ...y Moves one digit to the left on the setting value F2 key Increases the setting value F3 key Moves one digit to the right on the setting value F4 key Reduces the setting value ENTER key Sets the setting value and moves the screen to the menu of the previous hierarchy CANCEL key Cancels the setting value and moves the screen to the menu of the previous hierarchy Refer to Network setting menu 5 4 4 ...

Страница 96: ... media detection is not performed for initial media to set the width of the media in the tray Refer to Media width menu Utility 2 3 SmartTop The ideal temperature of the media is near to the Preheater This area of the paper is fed before a print starts to obtain perfect quality Autoclean Performs cleaning cycles while printer is idle at the set temperature SlantCh Whether to perform a slantcheck o...

Страница 97: ... perform media detection automatically OFF No media detection Take up mechanism Make this setting when using the optional take up system RollFeed Make this setting when using the Unwinder winder 100 Standard with your Digital Transfer Printer CANCEL key to shift to the previous hierarchy menu Refer to Utility menu Notes WHEN SETTING TAKE UP MECHANISM THE FOLLOWING LIMITS ARE APPLIED TO THE OPERATI...

Страница 98: ... be set in the following ranges 65 model 210mm 1651mm 90 model 210mm 2240mm Notes On the media width menu If a value larger than the width of the media has been set media or the product may be contaminated by the ink during printing If a value smaller than the width of the set media has been set media may not be cut correctly Setup items Parameters Description media width 65 model 210mm 841mm 1651...

Страница 99: ... automatically perform a cleaning at a set interval while waiting idle default OFF Printing Printer will automatically perform a cleaning at a set interval while printing Before print Printer will automatically perform a cleaning before printing F1 choose the interval OFF 1 hour 2 hours 3 hours 4 hours 5 hours 6 hours 9 hours 12 hours 18 hours or 24 hours F2 choose the cleaning type Normal Little ...

Страница 100: ...um mediawidth 1651 mm for a 65 Viper Extreme and 2240 mm for a 90 Viper Extreme without any margins left and right Be sure that the media has been loaded symmetrically to the outer grid rolls OFF the default margins of 5 mm left and right are used xmm set the left and right margins between 1 and 5 mm ON EDGE there are no margins allowed edge to edge printing edgePrn not possible will be displayed ...

Страница 101: ...thod of the printing data sent from computer to the installed hard disk in the printer Notes The items on the File Management menu are displayed if a hard disk has been installed Setup items Parameters Description File management 1 2 Write mode To set writing method of printing data to the hard disk Re print Set this when you want to print the printing data saved on the hard disk Delete Set this w...

Страница 102: ... The printing data is sized to fit the media If there is no media in the printer the printing data cannot be written Setup items Parameters Description Writing Off No writing to the hard disk Performs printing immediately Write Prn Prints while writing the data to the hard disk Write Prn Prints after writing the data to the hard disk Writeonly Writes the data to the hard disk without printing Note...

Страница 103: ...printing will start from the same printing start position Use an ink configuration with the same colour and type of ink that will be used during the printing data write Setup items Parameters Description Re print File name Operate the following keys to select the print file F1 key to select file name with back feed way F3 key to select file name with forward feed way Number 0 to 99 Operate the fol...

Страница 104: ...d If you delete a file by the File delete menu you cannot retrieve that file again If you want to use the deleted file again send the printing data to the hard disk again Setup items Parameters Description Delete File name Operate the following keys to select the file you want to delete F1 key To select file name with back feed way F3 key To select file name with forward feed way ENTER key Deletes...

Страница 105: ...up items Parameters Description To be changed file name Characters you want to change Operate the following keys to select the characters you want to change F1 key To select characters you want to change with back feed way F3 key To select characters you want to change with forward feed way Characters you can use are A Z or 0 9 Operate the following keys to select the to be changed characters F2 k...

Страница 106: ...up items Parameters Description Format No Format has not been performed Yes To perform formatting CANCEL key Cancels setup value shifts to the previous hierarchy menu Setup items Parameters Description Format Format will be performed OK ENTER key Product starts formatting The following messages are displayed on the operation panel Format Format HardDisk After formatting to shift to the previous hi...

Страница 107: ...etup menu to the factory setting Refer to Layout Setup Initialize menu Func Returns parameters in the function setup menu to the factory setting Refer to Function setup Initialize menu Roll media Returns parameters in the roll media setup menu to the factory setting Refer to Roll media setup Initialize menu Interface Returns parameters in the Centronics setup menu to the factory setting Refer to C...

Страница 108: ...ialize setup menu 5 4 4 20 Media setup Initialize menu Setup values of Media setup menu are set to the factory default settings Setup items Parameters Description Media setup Initialize NO No initialization OK To perform initialization After setting to shift to the previous hierarchy menu Refer to Initialize setup menu 5 4 4 21 Printmode Setup items Parameters Description Printing mode initialize ...

Страница 109: ...t Setup Initialize menu Setup values of Layout Setup menu are set to the factory default settings Setup items Parameters Description Layout Setup Initialize NO No initialization OK To perform initialization After setting to shift to the previous hierarchy menu Refer to Initialize setup menu 5 4 4 24 Function setup Initialize menu Setup values of Function setup menu are set to the factory default s...

Страница 110: ...menu 5 4 4 26 Centronics Initialize menu Setup values of Centronics menu are set to the factory default settings Setup items Parameters Description Centronics Initialize NO No initialization OK To perform initialization After setting to shift to the previous hierarchy menu Refer to Initialize setup menu 5 4 4 27 Network Initialize menu Setup values of Network menu are set to the factory default se...

Страница 111: ...orm initialization After setting to shift to the previous hierarchy menu Refer to Initialize setup menu 5 4 5 Setup menu 5 7 5 4 5 1 Data dump menu To perform dump printing for online function check Setup items Parameters Description Data Dump Start End Notes Service persons use dump printing to check the functions of the printer Do not use this function for normal printing All CANCEL key To exit ...

Страница 112: ...Wash menu Ink Load To load ink Refer to Ink Load menu 2 2 InkSupply To choose between the cassettes or the BIS system CANCEL key shift to the previous hierarchy menu Refer to Setup menu 5 4 5 3 Smart chip menu To choose whether you want to work with or without smart chip Setup items Parameters Description Smart chip Mutoh Smart chips are enabled The printer recognizes the ink cassettes with smart ...

Страница 113: ...etup Dye sub ink and Pigmented ink CMYK CMYK Dye6cm 1 x 6 colours Dye sub ink CMYKLcLm Pig 6 cm 1 x 6 colours Pigmented sub ink CMYKLcLm Pig 6 OG 1 x 6 colours Pigmented sub ink CMYK and 2 spot colours Dye 8 1 x 8 colours Dye sub ink CMYKLcLm and 2 spot colours Pig 8 1 x 8 colours Pigmented ink CMYKLcLm and 2 spot colours Dye 1C1H extreme Support for 1 colour 1 head 4 colour print modes Be aware t...

Страница 114: ...etup Dye sub ink pigment ink Bk pigment Cy Pigment Bk Dye Cy Dye Ma Dye Ye Dye Ma Pigment Ye Pigment 1x6 LC Lm Dye sub ink Bk Cy Cleaning Cleaning Ye Ma Lc Lm 1x6 spotcolour 1 spot colour 2 Dye sub ink Bk Cy Green Spot 1 Orange Spot 2 Ye Ma Cleaning Cleaning 1x8 Lc Lm Spotcolour 1 Spotcolour 2 Dye sub ink Bk Cy Green Spot 1 Orange Spot 2 Ye Ma Lc Lm 1C1H Extreme Dye sub ink Bk Ye Cy Ma Ma Cy Ye Bk...

Страница 115: ...to the previous hierarchy menu Refer to Ink manager menu 5 4 5 6 Wash Pump 1 2 menu To clean the ink lines connected to ink slots 1 4 5 8 for pump 1 2 Notes You can stop this cleaning cycle Stop when the waste lines are free from ink and are discharging a clear fluid Setup items Parameters Description Wash start Starts the wash cycle for the selected pumps stop Stops the wash cycle for the selecte...

Страница 116: ... stop Stops the wash cycle for the selected pumps If this is not chosen the wash cycle takes 7 minutes After setting shift to the previous hierarchy menu Refer to Ink manager menu Notes During washing the operation panel returns to the ink manager menu To stop washing go back to the start stop wash menu 5 4 5 8 Wash All menu Notes You cannot stop this cleaning cycle It takes 11 minutes and uses ab...

Страница 117: ... 4 5 10 Load Pump 1 2 menu To fill the ink lines connected to ink slots 1 4 5 8 for pump 1 2 Notes You can stop this ink load cycle Stop when the waste lines show ink discharging from the printer Setup items Parameters Description InkLoad start Starts the inkload cycle for the selected pumps stop Stops the inkload cycle for the selected pumps If this is not chosen the inkload cycle takes 7 minutes...

Страница 118: ...the ink load cycle for the selected pumps If this is not chosen the ink load cycle takes 7 minutes After setting shift to the previous hierarchy menu Refer to Ink manager menu Notes During ink loading the operation panel returns to the ink manager menu To stop ink loading go back to the start stop Ink Load menu 5 4 5 12 Load All menu Notes You cannot stop the ink load cycle It takes 11 minutes and...

Страница 119: ...r in cassette mode Setup items Parameters Description Ink Supply ON Make use of a Mutoh Bulk Ink System OFF Only use cassettes CANCEL key shifts to the previous hierarchy menu 5 4 6 Setup menu 6 7 5 4 6 1 H Unlock menu Setup items Parameters Description H Unlock No Do not unlock the head Yes To unlock the head CANCEL key shifts to the previous hierarchy menu Refer to Setup menu ...

Страница 120: ... Do not perform a wiper clean Yes Perform a wiper clean CANCEL key shifts to the previous hierarchy menu Refer to Setup menu 5 4 6 3 Tank change menu Notes Refer to Replacing the waste liquid tank for details regarding the procedure for changing the waste fluid tank Setup items Parameters Description Tank change Cancel Do not change the tank To shift to the previous hierarchy menu Refer to Setup m...

Страница 121: ...are stopping and the head re caps The tubing flush can be started via the Tubing Flush menu Notes The numbers of the heads refer to the numbers above a nozzle check If you select Head 1 2 pump 1 of pump motor 1 and pump 1 of pump motor 2 starts pumping The pump motors turn clockwise Cap 1 4 5 and 8 are pumping If you select Head 3 4 pump 2 of pump motor 1 and pump 2 of pump motor 2 starts pumping ...

Страница 122: ...eck the installed firmware and heater system version Setup items Parameters Description Version Check CANCEL key shift to the previous hierarchy menu 5 4 7 2 Area menu Check the total amount of the printed area x xx m in the printer s life time Setup items Parameters Description Area CANCEL key shift to the previous hierarchy menu ...

Страница 123: ...aintenance 123 AP 75330 Rev 1 0 14 01 09 6 PERIODICAL MAINTENANCE 6 1 Done by end user 124 6 1 1 Weekly maintenance 125 6 1 2 Three monthly maintenance 129 6 1 3 6 monthly maintenance 130 6 1 4 Cleaning 132 6 2 Done by authorised Mutoh technician 135 ...

Страница 124: ...eads Weekly 4 Clean spitting box mesh Weekly 5 Replace the wipers Every 3 months 6 Change the upper sponge at the back of the capping station Every 6 months 7 Change the filter of the fans Every 6 months Notes All cleaning in Ink areas must be done with Mutoh Water based cleaning solution Above maintenance cycle is based on use 8 hours day 5 days week and 44 weeks year If you use the machine more ...

Страница 125: ...the end of the week when you will shut down the printer the ink has to be removed from some parts so it cannot harden Otherwise some parts will break down or result in bad print quality Notes In the box you will find all supplies to perform the maintenance Normally this is enough for 6 months In case you re out of stock order a new kit at Mutoh s Order Entry Department 6 1 1 1 Clean the wipers Ste...

Страница 126: ...330 Rev 1 0 14 01 09 Step 3 Clean the wipers with a polyknit wiper If necessary use some Water based Cleaning Liquid to remove drops of ink Make sure to wear gloves Step 4 Press the ENTER key when the cleaning is done Step 5 The carriage will go back to its home position ...

Страница 127: ...b If you see ink dust or something else clean it immediately to maintain your print quality Make sure to wear gloves Step 4 Press the ENTER key when the cleaning is done Step 5 The carriage will go back to its home position 6 1 1 3 Clean around the bottom of the heads Step 1 Power ON the printer and go to the WiperClean menu Step 2 Press the F2 key to accept the carriage to move to the left side o...

Страница 128: ...inter and go to the WiperClean menu Step 2 Press the F2 key to accept the carriage to move to the left side of the machine The carriage will move to the left maintenance cover Step 3 Open the front cover Step 4 Moisten the edges of the spitting box mesh Step 5 Press the ENTER key when done The carriage will automatically go to its home position ...

Страница 129: ...r based Cleaning Liquid Step 5 Insert the moistened wiper with a pair of tweezers Be sure to insert the wiper correctly as shown below When standing in front of the machine Be sure that the wiper clicks in the wiper holder Step 6 Close the front cover and press the ENTER key The head will cap in Notes Be careful not to break the lips of the wiper arm while installing the wipers Do not touch the wi...

Страница 130: ...nge at the back of the capping station Step 1 Power ON the printer and go to the WiperClean Menu This will cause the unlocking of the carriage Step 2 Remove the two screws fixing the sponge 1 Screws to remove the capping sponge from the plate Step 3 Replace the sponge and tighten it again to the plate with the two screws 1 Capping sponge 2 Plate ...

Страница 131: ...re to read and understand all safety information Wear gloves when replacing the filter fan Step 1 Make sure the printer is not operating Step 2 Take out the old filter fan Step 3 Take the new filter and fold it two or 3 times until a thickness of 30 mm Step 4 Insert the new filter fan into its place Make sure to properly cover the hole ...

Страница 132: ... a soft cloth 6 1 4 2 Cleaning the inside of the printer 1 Cleaning frequency Clean once a month 2 Cleaning procedure The following are instructions for cleaning the inside of the printer Follow the steps below Step 1 Open the front cover Step 2 Use a soft brush to carefully clean away any dust or dirt on the pressure rollers Notes Do not blow off media dust inside the printer using an air dusting...

Страница 133: ... to TestPrinting to perform nozzle check printing Step 3 Check if the print head referring to the diagram below Step 4 Check if the printer is in the main screen Step 5 Press the F2 key I The printer enters the cleaning menu Step 6 Press the F2 key to change the parameters Key Parameter Description F2 little Performs a little cleaning Normal Performs a Normal cleaning powerful Performs a powerful ...

Страница 134: ...lly stabilized condition improving print quality considerably Step 9 Perform a nozzle check again and check the print head Notes When there are still some missing nozzles after some cleanings it could be possible that the ink cycle is not completely airtight To solve this moist the sides of the caps and perform a new cleaning Unlock the head with the Tubingflush menu to moisten the caps After mois...

Страница 135: ...n needed 6 monthly 3 Apply grease on Y motor belt when needed 6 monthly 4 Apply grease on roller path carriage when needed 6 monthly 5 Apply grease on capping station camm gears when needed 6 monthly 6 Clean in maintenance area 6 monthly 7 Dust removal in fan area underneath print platform 6 monthly 8 Change dampers yearly 9 Change pumps yearly 10 Change wiper arm and wipers yearly 11 Change spitt...

Страница 136: ...User s Guide Viper Extreme CHAPTER 6 Periodical maintenance 136 AP 75330 Rev 1 0 14 01 09 This page is intentionally left blank ...

Страница 137: ...r messages 143 7 3 1 Status messages 143 7 3 2 Message type error display and solutions 144 7 3 3 Data error display and solutions 145 7 3 4 Command error display and solutions 146 7 3 5 Error requiring a restart 147 7 3 6 Heater element errors 147 7 4 When media jams occur 148 7 4 1 How to remove a piece of media cut media 148 7 4 2 How to remove a piece of media roll media 148 ...

Страница 138: ...Close the front cover Refer to Media handling The printer does not work after media has been loaded N Possible cause Solutions References 1 The front cover is open Close the front cover Refer to Media handling 2 The pressure rollers have been raised Lower the pressure rollers lever Refer to Media handling 3 You did not load the media straight into the printer Load the media straight into the print...

Страница 139: ...rectly Refer to Loading media 2 You used the scale or mirror setting Switch OFF the scale or mirror setting or make the setting again Refer to Menu setup 3 You set the origin or starting position Switch OFF the origin or starting position setting or make the setting again Refer to Menu setup Media jams occur frequently The Viper Extreme prints on transfer paper with water based disperse dye inks A...

Страница 140: ... printer rarely prints correctly only after initial ink charging Let the printer rest for at least 30 minutes Perform cleaning a few times and check again Refer to Head cleaning 3 The printer is sucking air Perform a weekly maintenance and perform a tubingflush with Mutoh waterbased cleaning liquid The media is damaged when loading it N Possible cause Solutions References 1 The loading position of...

Страница 141: ...the media Refer to Loading media 7 You did not use media retainers Use media retainers Tracing media or other thin media cannot be detected N Possible cause Solutions References 1 You used the printer in direct sunlight or other locations not appropriate for the specified environment Use the printer in the specified environment Refer to Product Specifications Media size is wrong during media Initi...

Страница 142: ... Media type 2 You used bond media Refer to Media type 3 The printed surface is not the printable side Pay attention to the printable side to load media correctly Refer to Media handling 4 Did you try head cleaning Perform head cleaning Perform powerful cleaning Clean the surface of the print head Refer to Head cleaning Refer to Cleaning the cleaning wiper Lines are missing N Possible cause Solutio...

Страница 143: ... Media handling 3 Receiving The printer receives data 4 Converting The printer is converting data 5 Plotting The printer prints 6 Warning Waste Ink Tank Empty the waste bottle Refer to Empty the waste bottle 7 Warning Ink Tube Life Contact the dealer where you bought the printer or MUTOH s technical support centre Displays of the operational status N Display Solutions References 1 Ink Refill min T...

Страница 144: ...as fed at an angle into the printer The printer stops Reload the media Refer to Loading media 3 End Of Roll Roll media runs out The printer stops Load new roll media Refer to Replacing media 4 Cover Open The front cover is open The printer stops Close the front cover 5 Please Set Media The pressure roller has been raised There is no media Set the media and lower the pressure roller 6 Media JAM Err...

Страница 145: ...M 64 MB Short of memory while converting or printing data Consider increasing the memory capacity Notes The shows the colour of the ink causing the error according to the following codes 1 8 ink cassette slot number All All ink cassettes 7 3 3 Data error display and solutions Following are data errors and possible solutions during printer operations Data errors are displayed when a communication e...

Страница 146: ...messages are displayed and the printer stops Solve the problem to delete the error message and restart the printer N Message Descriptions Solution Reference 1 command status MH Error The computer sends Invalid command data Make sure that the settings of the computer and the printer match Refer to Menu setup Notes In error messages are code numbers indicating what error occurred indicates the comma...

Страница 147: ... Press any key to stop the beep sounds If an error requiring a restart has occurred solve the problems to restart the printer and delete the error If the same error message is displayed again contact your local MUTOH dealer Be sure to inquire the code numbers of the error messages N Message Descriptions Solutions References 1 E System error An error which cannot be solved promptly has occurred 1 I...

Страница 148: ...h ON orange The operation panel displays the following message Notes For raising or lowering the pressure rollers use the foot switch instead of the operation panel Step 2 If a piece of media or media dust is stocked in the printer open the front cover and remove the piece of media or media dust Step 3 If there is an error requiring a restart power the printer OFF and ON again 7 4 2 How to remove ...

Отзывы: