


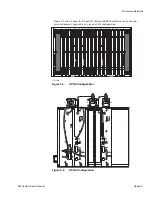
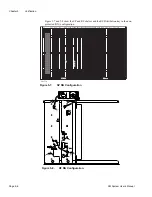


Microwave Networks
CM System User’s Manual
Page 5-9
If the above checks fail, check external test equipment and troubleshoot the SP modules
using the flowcharts in Chapter 6 and the alarm menu on the LMT.
Remove loopbacks and set
PATH
SWITCHING
(071) to AUTO for normal operation.
Modulator Frequency
Check the 70 MHz (intermediate frequency) test point on the MOD and record the value
in Table 5-G.
LO Frequency
The LO frequency, which the RX synthesizer module produces, establishes the RF
operating frequencies. The actual LO frequency is the Rx frequency plus or minus
70 MHz (see Appendix E). Check the LO frequency after installation and periodically to
ensure that the LO does not drift over time.
TX Carrier/RX LO
The transmit carrier frequency is the difference between the IF (70 MHz) from the MOD
and the first conversion LO frequency (measured at the transmitter LPBK LO OUT
connector,) added or subtracted from the TX LO frequency. Read the TX LO frequency at
the LO MON port on the receiver.
1.
Calculate the transmitter carrier frequency by taking the difference between the IF fre-
quency (70 MHz) and the first conversion LO frequency (measured at the transmitter
LPBK LO OUT connector) and then add or subtract the TX LO frequency.
2.
Record this value in Table 5-G.
3.
Use the LO FREQ adjustment on the front of each RXU to trim the frequency to within
200 Hz of the desired LO frequency. If the adjustment is out of range, toggle the LO
FREQ ADJ switch on the front of the RXU and repeat the adjustment process.
Output Power
Check transmitter output power after installation and again after replacing a transmitter.
NOTE:
Adjust transmitter output power with the TXU switched on-line and APC off.
To check transmitter output power on the primary (A) TXU:
1.
Put the A TXU online (screen 071) and set APC to OFF (screen 87.) On non-protected
systems, the RF LPBK switch on the adjacent RXU must be set ON to force the TXU
off-line.
2.
Attach a power meter to the
ONLINE
MON
connector of the transmit filter (RF Distribu-
tion tray).
3.
Note the specified Tx (APC Low) output power for the radio you are installing (
see
specifications in Chapter 1
) and subtract from that number the value written near the
on-line MON port. Note the result.
4.
If needed, adjust Tx output power using TX PWR ADJ on the transmitter until the
measured power matches the result of Step 3.
5.
Repeat Steps 2, 3 and 4 for the secondary transmitter after switching Tx B online.
Example:
Note the specified Tx output power with APC off from the specification table in Chapter
1; for this example: +18 dBm. Switch the A radio on-line. If the label near the on-line
MON port is 24.5 dB, subtract that from 18 dBm. The result is -6.5 dBm. Now adjust, if
needed, TX PWR ADJ until you measure -6.5 dBm at the
ONLINE
MON
port. Place the
secondary (B) radio on-line and repeat the procedure.
Содержание CM7
Страница 2: ......
Страница 4: ...Page iv 5 04 05 CM7 8 100Base T System User s Manual ...
Страница 16: ...Glossary Page xvi CM System Users Manual X Y Z ...
Страница 24: ...Microwave Networks CM7 8 100Base T System User s Manual Pagexxiv ...
Страница 62: ...Chapter 2 Operation Page 2 18 5 02 05 CM 100Base T System User s Manual ...
Страница 64: ...Chapter 3 Module Descriptions Page 3 2 CM7 8 100Base T ...
Страница 88: ...Section 3 3 Transmitter Unit Page 3 3 6 CM7 8 System User s Manual ...
Страница 96: ...Section 3 5 RF Power Supply Unit Page 3 5 4 CM System User s Manual ...
Страница 100: ...Section 3 6 SP Power Supply Unit Page 3 6 4 CM System User s Manual ...
Страница 106: ...Section 3 7 Alarm and Control Unit Page 3 7 6 11 18 03 CM 100Base T System User s Manual ...
Страница 124: ...Section 3 11 SYNDES Page 3 11 6 CM System User s Manual ...
Страница 130: ...Section 3 12 SCU Page 3 12 6 11 18 03 CM 100Base T System User s Manual ...
Страница 138: ...Section 3 13 OWU Page 3 13 8 CM System User s Manual ...
Страница 150: ...Section 3 15 NMU Page 3 15 6 CM System User s Manual ...
Страница 192: ...Chapter 5 Verification Page 5 20 CM System User s Manual ...
Страница 194: ...Chapter 6 Maintenance Page 6 2 7 23 03 CM 100Base T System User s Manual ...
Страница 224: ...Chapter 6 Maintenance Page 6 32 7 23 03 CM 100Base T System User s Manual ...
Страница 225: ...CM System User s Manual Page 1 Place any site research or reference material here Site Engineering ...
Страница 226: ...Site Engineering Page 2 CM System User s Manual ...
Страница 230: ...Appendix A T I Curves Page A 4 CM7 8 100Base T System User s Manual ...
Страница 267: ...Microwave Networks CM System User s Manual PageB 37 ...
Страница 268: ...Appendix B QuikLink Page B 38 CM System User s Manual ...
Страница 282: ...Appendix D Alarm Codes Page D 6 5 02 05 CM 100Base T System User s Manual ...
Страница 290: ...Appendix E Setting Frequency Page E 8 CM7 8 System User s Manual ...
Страница 312: ...CM7 8 100Base T System User s Manual Page I 4 Microwave Networks ...


