


52
546001.A.6 - July 17, 2019
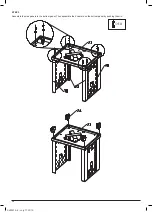
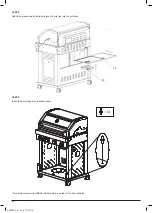
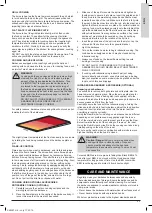
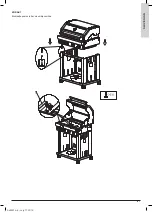
ensure that the hood is up.
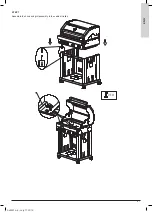
SPARK IGNITION
Push the knob control in and turn anticlockwise to the high
position. You should hear clicking as the igniter creates sparks to
light the gas. Once lit, release the igniter button.
DIFFICULTY LIGHTING
If the burner doesn’t light first go, check the gas controls and
try a couple more times. If the burner still does not light, wait a
few minutes to allow the gas to disperse before trying again. If
satisfactory operation cannot be achieved, consult your retailer
before proceeding.
NOTE:
Failure to follow the lighting procedures correctly can
lead to a hazardous condition.
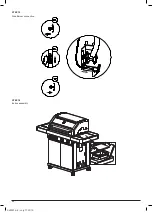
MAIN BURNER AND SIDE BURNER LIGHTING (INTEGRATED
IGNITION)
1. Open the lid before igniting the barbecue
2. Check all the knobs are in the “OFF” • position
3. Open the gas control valve at the gas cylinder
NOTE:
The valves fitted to this BBQ include a safety feature.
The valve must be depressed before turning. This
feature prevents accidental activation of the knob.
4. From the “OFF” • position, push in then turn control knob anti-
clockwise to the “HI” position until hear a “click” sound
5. Repeat step 4, 3-4 times until the burner is lit
6. If the burner fails to light, turn “OFF” • and wait for 5 minutes,
then begin from step 4
7. Once a burner is lit, similarly light the remaining burners.
8. Turn the knob anticlockwise to adjust the heat from High -
Medium - Low to your heat requirement.
FOR MANUAL LIGHTING (MAIN BURNER)
IMPORTANT
Use a match holder and long match stick or BBQ
lighter for lighting the BBQ manually to avoid burning
your hand.
1. Open the lid before igniting the barbecue.
2. Check all the knobs are in the “OFF” • position.
3. Open the gas control valve at the gas cylinder.
4. From the “OFF” • position, push in and then turn the control
knob anticlockwise to the “HI” position.
5. Hold a lit match (in a match holder) next to one of the main
burners. The burner will light from the match.
Once a burner is lit, the burner next to it can be turned on and will
light off the lit burner. Repeat until all burners are alight.
Each burner can be adjusted. Turn the knob anticlockwise to
adjust the heat from High - medium - Low to your heat
requirement.
FOR MANUAL LIGHTING (SIDE BURNER)
1. Turn all knobs to “OFF” • then open the LP tank valve. Always
keep your face and body as far from the grill as possible
when lighting.
2. Raise side burner lid.
3. Push in and then turn control knob anticlockwise to “HI”
position.
4. Use a match holder and long match stick or BBQ lighter for
lighting the BBQ manually to avoid burning your hand. Place
a lit match near the burner until the burner ignites.
5. If burner fails to light, turn “OFF” • and wait 5 minutes, then
try again. If burner still does not light after repeated attempts,
call your local dealer for assistance.
REAR BURNER LIGHTING (ELECTRONIC IGNITION)
1. Open the lid before igniting the barbecue.
2. Check all the knobs are in the “OFF” • position.
3. Open the gas control valve at the gas cylinder.
4. Operate the rear burner knob in combination with the
electronic ignition push button on the side burner table.
5. From the “OFF” • position, push in then turn control knob anti-
clockwise to the “HI” position.
6. Keep the knob pushed in at the “HI” position for 8 seconds
whilst pressing the electronic ignition push button.
7. Repeat the steps from beginning, 3-4 times until the burner
is lit.
8. Once the rear burner has ignited keep the knob pushed in
at the “HI” position for 20 seconds until stabilized then
release the rear burner control knob.
9. If the burner fails to light, turn “OFF” • and wait for 5 minutes,
then repeat the steps from beginning.
10. Turn the knob anticlockwise to adjust the heat from High –
Medium – Low to your heat requirement.
FOR MANUAL LIGHTING (REAR BURNER)
1. Open the lid before igniting the barbecue.
2. Check all the knobs are in the “OFF” • position.
3. Open the gas control valve at the gas cylinder.
4. From the “OFF” • position, push in and then turn the rear
burner control knob anticlockwise to the “HI” position.
5. Hold a lit match (in a match holder) next to rear burner. The
burner will light from the match.
FOR REAR BURNER: LP gas takes longer time to travel
from the valve to the rear burner. Keep the knob pushed in at
the “HI” position for a further 20 seconds until stabilized,
then release the rear burner control knob. Repeat from step
4, 3-4 times until the burner is lit.
6. If the burner fails to light, turn off and wait 5 minutes, then
begin from step 4.
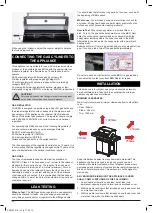
IMPORTANT
Keep a spray bottle of soapy water near the gas
supply valve and check the connections before each
use.
TURNING OFF A BURNER
WARNING!
Do not light the grill if odour of gas is present.
It is important to ensure that all control valves,
including the gas cylinder, are turned off after use.
When using the rear burner and rotisserie use 1 or
2 of the main burners at the low heat setting if a little
extra heat is required. Do not use the rear burner in
combination with main burners on high heat setting
when the hood is closed.
Caution / Danger:
Extreme
care is required when cooking with hood in closed
position. Frequent checks must be undertaken for the
heat and temperature to ensure safe cooking.
Too much heat can cause fire..
Push in then turn each burner control knob clockwise to the “OFF”
• position.
TURNING OFF YOUR BARBECUE
When you have finished using your barbecue, turn off the gas
at the bottle. Push in and then turn all the control valves fully
clockwise to the “OFF” • position. Wait until the barbecue is
sufficiently cool before replacing the barbecue lid or closing its
hood. Once cooled, a protective cover should always be fitted to
the barbecue to protect your investment from the ailments when
not in use.
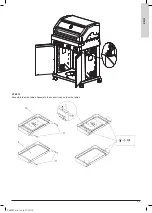
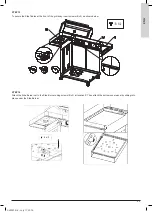
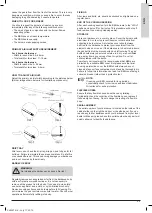
WARMING RACK
Warming racks are a convenient way to keep cooked food warm
or to warm items such as bread rolls. Always check that your
warming rack is properly fitted before use.
Содержание MB
Страница 2: ...2 546001 A 6 July 17 2019 ...
Страница 13: ...13 546001 A 6 July 17 2019 GER SCHRITT 7 Montieren Sie die Haube und den Grill an den Gehäusewagen ...
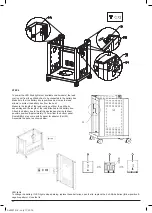
Страница 18: ...18 546001 A 6 July 17 2019 SCHRITT 15 Seitenbrenner Anschluss SCHRITT 16 Eisbox Montage ...
Страница 31: ...31 546001 A 6 July 17 2019 GER ...
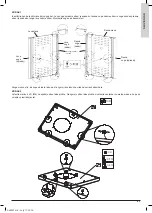
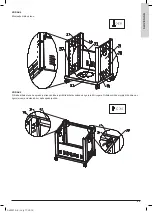
Страница 41: ...41 546001 A 6 July 17 2019 EN G STEP 7 Assemble the hood and grill assembly to the cabinet trolley ...
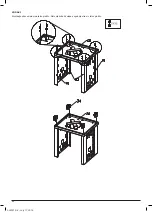
Страница 46: ...46 546001 A 6 July 17 2019 STEP 15 Side Burner connection STEP 16 Icebox assembly ...
Страница 67: ...SL OVEN IA N 67 546001 A 6 July 17 2019 KORAK 7 Montirajte pokrov in žar na ohišje vozička ...
Страница 72: ...72 546001 A 6 July 17 2019 KORAK 15 Priključek stranskega gorilnika KORAK 16 Montaža zaboja za led ...
Страница 93: ...U K R A N IA N 93 546001 A 6 July 17 2019 КРОК 7 Встановіть гриль з кришкою на основу корпус ...
Страница 98: ...98 546001 A 6 July 17 2019 КРОК 15 Підключення бічного пальника КРОК 16 Встановлення ящика для льоду ...
Страница 111: ...U K R A N IA N 111 546001 A 6 July 17 2019 ...
Страница 121: ...H U N GA R IA N 121 546001 A 6 July 17 2019 7 LÉPÉS Szerelje fel a kocsira a grillkészüléket a burkolattal együtt ...
Страница 126: ...126 546001 A 6 July 17 2019 15 LÉPÉS Az oldalsó égőfej bekötése 16 LÉPÉS jégtároló doboz beszerelése ...
Страница 139: ...H U N GA R IA N 139 546001 A 6 July 17 2019 ...
Страница 149: ...R U SSIA N 149 546001 A 6 July 17 2019 ШАГ 7 Установите колпак и гриль на тележку корпуса гриля ...
Страница 154: ...154 546001 A 6 July 17 2019 ШАГ 15 Подключение боковых горелок ШАГ 16 Монтаж холодильного бокса ...
Страница 177: ...C R OAT IA N 177 546001 A 6 July 17 2019 KORAK 7 Montirajte poklopac i roštilj na kolica kućišta ...
Страница 182: ...182 546001 A 6 July 17 2019 KORAK 15 Priključak bočnog plamenika KORAK 16 Montaža kutije za led ...
Страница 200: ...200 546001 A 6 July 17 2019 TRIN 3 Montér sidepanelerne på bundpanelet Montér derefter de 4 hjul på bundpanelet ...
Страница 203: ...D A N ISH 203 546001 A 6 July 17 2019 TRIN 7 Montér grillboks 7 og toplåg 1 på grillkabinettet ...
Страница 205: ...D A N ISH 205 546001 A 6 July 17 2019 TRIN 10 Saml sideborde 9 og 10 Montér støttestænger 11 på sidebordene 9 11 11 10 ...
Страница 208: ...208 546001 A 6 July 17 2019 TRIN 15 Tilslutning af sidebrænder TRIN 16 Samling af isboks marinadeboks ...
Страница 226: ...226 546001 A 6 July 17 2019 STEG 3 Montera sidopanelerna på bottenpanelen Montera därefter de 4 hjulen på bottenpanelen ...
Страница 229: ...SW ED ISH 229 546001 A 6 July 17 2019 STEG 7 Montera grillboxen 7 och toppluckan 1 på grillkabinettet ...
Страница 231: ...SW ED ISH 231 546001 A 6 July 17 2019 STEG 10 Samla sidobord 9 och 10 Monterastödstängerna 11 på sidoborden 9 11 11 10 ...
Страница 234: ...234 546001 A 6 July 17 2019 STEG 15 Anslutning av sidobrännare STEG 16 Samling av islåda marineringslåda ...
Страница 255: ...POL ISH 255 546001 A 6 July 17 2019 KROK 7 Zamontuj zespół pokrywy i grilla do wózka ...
Страница 257: ...POL ISH 257 546001 A 6 July 17 2019 KROK 10 Zamontuj półki boczne oraz poręcze na półkach bocznych 9 11 11 10 ...
Страница 260: ...260 546001 A 6 July 17 2019 KROK 15 Podłączenie palnika bocznego KROK 16 Montaż pojemnika na lód ...
Страница 272: ...Urheberrechte 2019 Masport Begrenzt AL KO Geräte GmbH Ichenhauser Str 14 D 89359 Kötz Germany ...