48
546001.A.6 - July 17, 2019
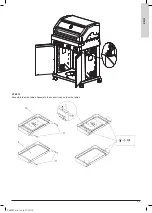
FLAME TAMER CONFIGURATION
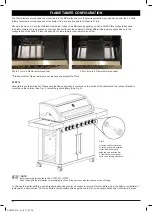
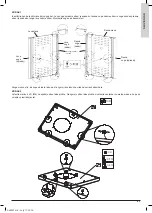
The Flame tamers are required to be inserted in to the BBQ directly above the stainless steel Burner tubes and under the 2 x Grills
(Flame tamers are not required under the Plate), there are location points for these to fit in to.
Shown in photos 3 & 4 are the stainless steel burner tubes of the BBQ and depending on which Grill & Plate configuration used,
the Flame tamers are to be placed so that they sit directly over these Burners. Whilst different Burners are exposed due to the
configuration of the Grills & Plate, the quantity of Flame tamers required remains at four.
Photo 3 (note 4 Flame tamers required)
Photo 4 (note 4 Flame tamers required)
**Please note that Flame tamers are not required underneath the Plate.
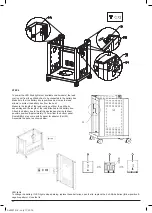
STEP 19
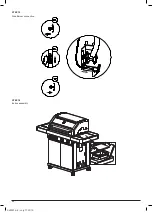
Assemble the cylinder bracket. Please note that the support bar is mounted on the inside of the cabinet and the cylinder bracket is
mounted on the outside (See Fig. 1). Install the igniter battery (See Fig. 2).
Fig. 2
Unscrew igniter button cap
by turning counterclockwise.
Install AAA battery with
negative end inserted first.
Screw back on the igniter
button cap turning clockwise.
NOTE
:
Before operating this appliance LEAK TEST ALL JOINTS
Read thoroughly the information on assembling the hose & regulator and also the section on Leak Testing.
To Change the igniter battery, unscrew igniter button cap counter clockwise to remove. Remove battery from the battery compartment,
replace with a new alkaline “AAA” size battery. Install battery with negative end in first, screw igniter button cap clockwise into place.
Содержание MB
Страница 2: ...2 546001 A 6 July 17 2019 ...
Страница 13: ...13 546001 A 6 July 17 2019 GER SCHRITT 7 Montieren Sie die Haube und den Grill an den Gehäusewagen ...
Страница 18: ...18 546001 A 6 July 17 2019 SCHRITT 15 Seitenbrenner Anschluss SCHRITT 16 Eisbox Montage ...
Страница 31: ...31 546001 A 6 July 17 2019 GER ...
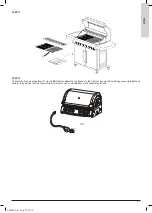
Страница 41: ...41 546001 A 6 July 17 2019 EN G STEP 7 Assemble the hood and grill assembly to the cabinet trolley ...
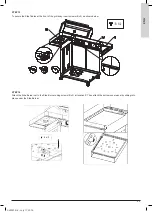
Страница 46: ...46 546001 A 6 July 17 2019 STEP 15 Side Burner connection STEP 16 Icebox assembly ...
Страница 67: ...SL OVEN IA N 67 546001 A 6 July 17 2019 KORAK 7 Montirajte pokrov in žar na ohišje vozička ...
Страница 72: ...72 546001 A 6 July 17 2019 KORAK 15 Priključek stranskega gorilnika KORAK 16 Montaža zaboja za led ...
Страница 93: ...U K R A N IA N 93 546001 A 6 July 17 2019 КРОК 7 Встановіть гриль з кришкою на основу корпус ...
Страница 98: ...98 546001 A 6 July 17 2019 КРОК 15 Підключення бічного пальника КРОК 16 Встановлення ящика для льоду ...
Страница 111: ...U K R A N IA N 111 546001 A 6 July 17 2019 ...
Страница 121: ...H U N GA R IA N 121 546001 A 6 July 17 2019 7 LÉPÉS Szerelje fel a kocsira a grillkészüléket a burkolattal együtt ...
Страница 126: ...126 546001 A 6 July 17 2019 15 LÉPÉS Az oldalsó égőfej bekötése 16 LÉPÉS jégtároló doboz beszerelése ...
Страница 139: ...H U N GA R IA N 139 546001 A 6 July 17 2019 ...
Страница 149: ...R U SSIA N 149 546001 A 6 July 17 2019 ШАГ 7 Установите колпак и гриль на тележку корпуса гриля ...
Страница 154: ...154 546001 A 6 July 17 2019 ШАГ 15 Подключение боковых горелок ШАГ 16 Монтаж холодильного бокса ...
Страница 177: ...C R OAT IA N 177 546001 A 6 July 17 2019 KORAK 7 Montirajte poklopac i roštilj na kolica kućišta ...
Страница 182: ...182 546001 A 6 July 17 2019 KORAK 15 Priključak bočnog plamenika KORAK 16 Montaža kutije za led ...
Страница 200: ...200 546001 A 6 July 17 2019 TRIN 3 Montér sidepanelerne på bundpanelet Montér derefter de 4 hjul på bundpanelet ...
Страница 203: ...D A N ISH 203 546001 A 6 July 17 2019 TRIN 7 Montér grillboks 7 og toplåg 1 på grillkabinettet ...
Страница 205: ...D A N ISH 205 546001 A 6 July 17 2019 TRIN 10 Saml sideborde 9 og 10 Montér støttestænger 11 på sidebordene 9 11 11 10 ...
Страница 208: ...208 546001 A 6 July 17 2019 TRIN 15 Tilslutning af sidebrænder TRIN 16 Samling af isboks marinadeboks ...
Страница 226: ...226 546001 A 6 July 17 2019 STEG 3 Montera sidopanelerna på bottenpanelen Montera därefter de 4 hjulen på bottenpanelen ...
Страница 229: ...SW ED ISH 229 546001 A 6 July 17 2019 STEG 7 Montera grillboxen 7 och toppluckan 1 på grillkabinettet ...
Страница 231: ...SW ED ISH 231 546001 A 6 July 17 2019 STEG 10 Samla sidobord 9 och 10 Monterastödstängerna 11 på sidoborden 9 11 11 10 ...
Страница 234: ...234 546001 A 6 July 17 2019 STEG 15 Anslutning av sidobrännare STEG 16 Samling av islåda marineringslåda ...
Страница 255: ...POL ISH 255 546001 A 6 July 17 2019 KROK 7 Zamontuj zespół pokrywy i grilla do wózka ...
Страница 257: ...POL ISH 257 546001 A 6 July 17 2019 KROK 10 Zamontuj półki boczne oraz poręcze na półkach bocznych 9 11 11 10 ...
Страница 260: ...260 546001 A 6 July 17 2019 KROK 15 Podłączenie palnika bocznego KROK 16 Montaż pojemnika na lód ...
Страница 272: ...Urheberrechte 2019 Masport Begrenzt AL KO Geräte GmbH Ichenhauser Str 14 D 89359 Kötz Germany ...


