


50
546001.A.6 - July 17, 2019
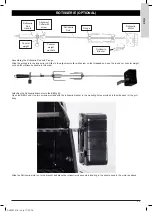
While using the rotisserie, adjust the counter weight to balance
the food being cooked
CONNECTING THE GAS CYLINDER TO
THE APPLIANCE
This appliance is only suitable for use with low-pressure butane,
propane or their mixture gas and fitted with the appropriate low-
pressure regulator via a flexible hose. The barbecue is set to
operate
28-30 mbar regulator with butane gas @ category I3+
37mbar regulator with propane gas @ category I3+
37 mbar regulator with butane, propane or their mixtures @
category I3B/P(37)
30 mbar and 50mbar regulator with butane, propane or their
mixtures @ category I3B/P(30) or category I3B/P(50) respectively
CAUTION!
Only the gas type and Gas Category listed in the rating label
on the barbecue could be used on your barbecue.
GAS REGULATOR
This BBQ is designed to operate using a 5kg LPG gas bottle and
the pressure regulator should correspond to the pressure and
gas category of the appliance. Your nearest Gas Retailer can
advise of the correct gas pressure. The regulator should comply
with EN16436 Or EN16129 with current version and national
regulation.
For operating this BBQ, use one of the following Regulators (if
you are not sure, please see your nearest gas Retailer),
28-30/37 mbar regulator for I3+
28-30mbar regulator for I3B/P(30)
50 mbar regulator for I3B/P(50)
Always use the gas bottle in the upright position.
The life expectancy of the regulator is estimated as 10 years. It is
recommended that the regulator is changed within 10 years of the
date of manufacture or the national conditions require it.
GAS HOSE
The type of replaceable hose should meet the standard of
EN1763-1-Class 3. The hose used must conform to the relevant
standard for the country of use. The length of the hose must
be 0.7 meters (minimum) and 1.5 meters (maximum). Worn or
damaged hose must be replaced. Ensure that the hose is not
obstructed, kinked, or in contact with any part of the barbecue
other than at its connection. It is recommended that the hose is
changed within 1 year of the date of manufacture or the national
conditions require it.
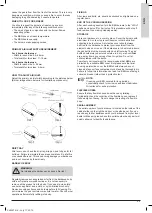
LEAK TESTING
When to Test:
The BBQ gas bottle, regulator & hose assembly
should be checked for leaks, using the soapy water leak test,
every time you reconnect your regulator to the BBQ gas bottle.
You should also test after any long period of non-use, such as at
the beginning of BBQ season.
What to use:
You will need a soapy water solution to check for
any leaks. Mixing liquid hand soap with water will work fine (do
not use any other household cleaning products).
How to Test
: Put some soapy water in a spray bottle or a
dish. Turn on the gas bottle but do
not
turn on the BBQ. Next,
spray the entire valve, regulator and hose assembly with the
soapy water including where the hose connects to the BBQ.
Alternatively, you can apply the soapy water with a paint brush,
basting brush.
Bubbles will form if there is a gas leak and you may also smell the
gas. If you find a leak, turn off the gas bottle immediately!
Do not turn back on or attempt to use the BBQ if a gas leak has
been detected, contact your local BBQ Dealer for repair.
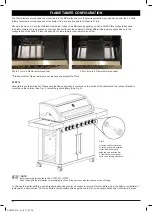
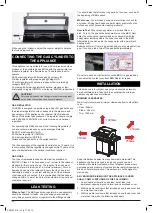
INSTALLATION
This barbecue is for outdoor use only and should be placed in
a well-ventilated area. Take care to ensure that the minimum
clearances guidelines are followed.
MINIMUM CLEARANCES:
We strongly recommend minimum clearances from combustible
to be:
• Rear - 450mm
• Sides - 250 mm
• Top - 1000 mm
1000mm
450mm
250mm
250mm
Keep this barbecue away from any flammable materials! This
appliance shall only be used in an above ground open-air
situation with natural ventilation, without stagnant areas, where
gas leakage and products of combustion are rapidly dispersed by
wind and natural convection. This barbecue is not designed for
marine use.
ANY ENCLOSURE IN WHICH THE APPLIANCE IS USED
SHALL COMPLY WITH ONE OF THE FOLLOWING:
1. An enclosure with walls on all sides, but at least one
permanent opening at ground level and no overhead cover.
2. Within a partial enclosure that includes an overhead cover and
no more than two walls.
3. Within a partial enclosure that includes an overhead cover and
more than two walls, the following shall apply:
Содержание MB
Страница 2: ...2 546001 A 6 July 17 2019 ...
Страница 13: ...13 546001 A 6 July 17 2019 GER SCHRITT 7 Montieren Sie die Haube und den Grill an den Gehäusewagen ...
Страница 18: ...18 546001 A 6 July 17 2019 SCHRITT 15 Seitenbrenner Anschluss SCHRITT 16 Eisbox Montage ...
Страница 31: ...31 546001 A 6 July 17 2019 GER ...
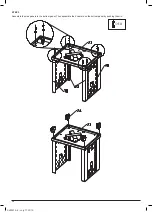
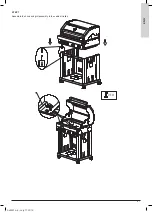
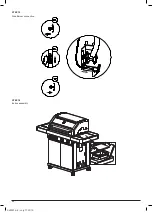
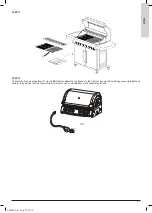
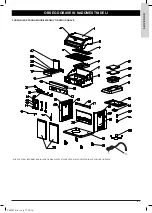
Страница 41: ...41 546001 A 6 July 17 2019 EN G STEP 7 Assemble the hood and grill assembly to the cabinet trolley ...
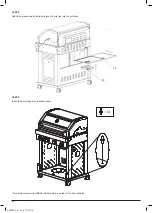
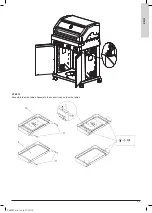
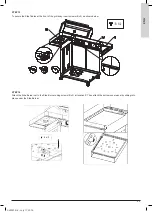
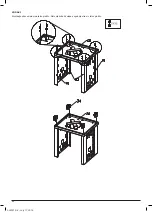
Страница 46: ...46 546001 A 6 July 17 2019 STEP 15 Side Burner connection STEP 16 Icebox assembly ...
Страница 67: ...SL OVEN IA N 67 546001 A 6 July 17 2019 KORAK 7 Montirajte pokrov in žar na ohišje vozička ...
Страница 72: ...72 546001 A 6 July 17 2019 KORAK 15 Priključek stranskega gorilnika KORAK 16 Montaža zaboja za led ...
Страница 93: ...U K R A N IA N 93 546001 A 6 July 17 2019 КРОК 7 Встановіть гриль з кришкою на основу корпус ...
Страница 98: ...98 546001 A 6 July 17 2019 КРОК 15 Підключення бічного пальника КРОК 16 Встановлення ящика для льоду ...
Страница 111: ...U K R A N IA N 111 546001 A 6 July 17 2019 ...
Страница 121: ...H U N GA R IA N 121 546001 A 6 July 17 2019 7 LÉPÉS Szerelje fel a kocsira a grillkészüléket a burkolattal együtt ...
Страница 126: ...126 546001 A 6 July 17 2019 15 LÉPÉS Az oldalsó égőfej bekötése 16 LÉPÉS jégtároló doboz beszerelése ...
Страница 139: ...H U N GA R IA N 139 546001 A 6 July 17 2019 ...
Страница 149: ...R U SSIA N 149 546001 A 6 July 17 2019 ШАГ 7 Установите колпак и гриль на тележку корпуса гриля ...
Страница 154: ...154 546001 A 6 July 17 2019 ШАГ 15 Подключение боковых горелок ШАГ 16 Монтаж холодильного бокса ...
Страница 177: ...C R OAT IA N 177 546001 A 6 July 17 2019 KORAK 7 Montirajte poklopac i roštilj na kolica kućišta ...
Страница 182: ...182 546001 A 6 July 17 2019 KORAK 15 Priključak bočnog plamenika KORAK 16 Montaža kutije za led ...
Страница 200: ...200 546001 A 6 July 17 2019 TRIN 3 Montér sidepanelerne på bundpanelet Montér derefter de 4 hjul på bundpanelet ...
Страница 203: ...D A N ISH 203 546001 A 6 July 17 2019 TRIN 7 Montér grillboks 7 og toplåg 1 på grillkabinettet ...
Страница 205: ...D A N ISH 205 546001 A 6 July 17 2019 TRIN 10 Saml sideborde 9 og 10 Montér støttestænger 11 på sidebordene 9 11 11 10 ...
Страница 208: ...208 546001 A 6 July 17 2019 TRIN 15 Tilslutning af sidebrænder TRIN 16 Samling af isboks marinadeboks ...
Страница 226: ...226 546001 A 6 July 17 2019 STEG 3 Montera sidopanelerna på bottenpanelen Montera därefter de 4 hjulen på bottenpanelen ...
Страница 229: ...SW ED ISH 229 546001 A 6 July 17 2019 STEG 7 Montera grillboxen 7 och toppluckan 1 på grillkabinettet ...
Страница 231: ...SW ED ISH 231 546001 A 6 July 17 2019 STEG 10 Samla sidobord 9 och 10 Monterastödstängerna 11 på sidoborden 9 11 11 10 ...
Страница 234: ...234 546001 A 6 July 17 2019 STEG 15 Anslutning av sidobrännare STEG 16 Samling av islåda marineringslåda ...
Страница 255: ...POL ISH 255 546001 A 6 July 17 2019 KROK 7 Zamontuj zespół pokrywy i grilla do wózka ...
Страница 257: ...POL ISH 257 546001 A 6 July 17 2019 KROK 10 Zamontuj półki boczne oraz poręcze na półkach bocznych 9 11 11 10 ...
Страница 260: ...260 546001 A 6 July 17 2019 KROK 15 Podłączenie palnika bocznego KROK 16 Montaż pojemnika na lód ...
Страница 272: ...Urheberrechte 2019 Masport Begrenzt AL KO Geräte GmbH Ichenhauser Str 14 D 89359 Kötz Germany ...