


171
© 2010 Martin Professional A/S
Maxedia 4
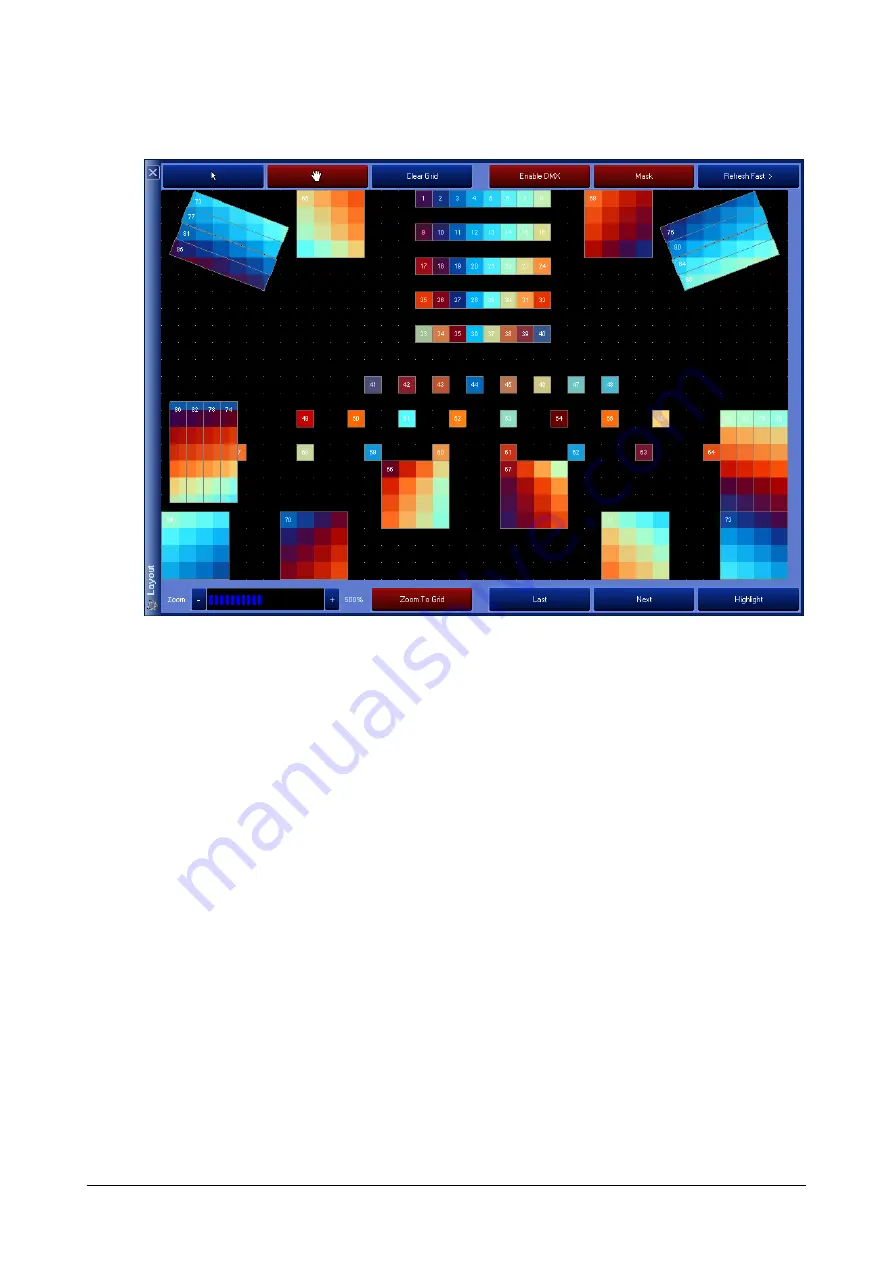
Layout
The Layout window gives you a schematic representation of the lighting fixtures that you have
pixelmapped in your show and which video pixel will supply each fixture with color information. Each
box defined by the grid of white dots represents one pixel of the video output. Each lighting fixture that
has been placed in the scene is represented by a box that is numbered with fixture number and is
scaled to represent the general dimensions of that fixture. In this example fixtures 1 thru 64 are
single pixel fixtures. Fixtures 65 thru 72 are 16 pixels each arranged in a 4 by 4 square, and fixtures
73 thru 88 are 6 pixel bars. The lighting fixtures will receive the color information for the color that is
playing in the pixel of the grid that it is placed over in the grid.
The Arrow button at the top allows you to select fixtures in the grid and click and drag them to
reposition them. When your view is zoomed in to a point where all of the grid cannot be displayed at
the same time, the Hand button allows you to drag the grid to view parts of it that were off the display.
When the Enable DMX button is selected (Red), the Maxedia will output DMX information to the
lighting rig. The Mask button is a toggle, when it is unselected (Blue) all pixels in the grid will show
the video that is playing thru that pixel. When it is selected (Red) only the pixels that have lighting
fixtures placed over them will play video in the preview (as shown above). The Refresh button has a
drop down menu that allows you to select the refresh rate (Off, Slow, Medium, or Fast) of the video
preview on this screen (the actual DMX output refresh rate can be adjusted in the DMX-Out Settings
window found on the Pixelmapping Dim Groups screen). In the lower left is a slider that allows you to
zoom the preview window and a Zoom To Grid button that will zoom out to the point that the entire
grid will be visible in the preview window. The Next and Last buttons select the next or last fixture in
the patch. When the Highlight button is selected (Red) Maxedia will send full open white to any and
all currently selected fixtures. Highlight is very useful to verify that the fixtures are patched correctly
and receiving DMX from the Maxedia.
Содержание Maxedia 4
Страница 1: ... 2010 Martin Professional A S Maxedia 4 User Manual DRAFT VERSION ...
Страница 14: ...7 2010 Martin Professional A S Maxedia 4 Connections to the Maxedia are different for each hardware revision ...
Страница 17: ...10 2010 Martin Professional A S Maxedia 4 ...
Страница 36: ...29 2010 Martin Professional A S Maxedia 4 ...
Страница 127: ...120 2010 Martin Professional A S Maxedia 4 ...
Страница 145: ...138 2010 Martin Professional A S Maxedia 4 The Proc Amp tab lets you fine tune the video capture ...
Страница 147: ...140 2010 Martin Professional A S Maxedia 4 ...
Страница 149: ...142 2010 Martin Professional A S Maxedia 4 If Hard Edge is selected no overlapping video will be sent ...
Страница 151: ...144 2010 Martin Professional A S Maxedia 4 ...
Страница 155: ...148 2010 Martin Professional A S Maxedia 4 System Network ...
Страница 159: ...152 2010 Martin Professional A S Maxedia 4 Plugins ...


