


4D-Nucleofector™ Manual –
Bioscience Solutions
11
2.7.3
Operating Software
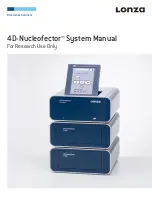
The 4D-Nucleofector™ System is operated via a 5.7 inch touch screen
display and controlled by intuitive software. Table 2.2 will familiarize
you with the functions of the touch fields and the basic features of the
operating software.
Table 2.2:
Main menu and general commands or icons
Home icon (1)
Return to the main menu
Top bar (2)
Return to the “Choose a vessel” screen
Wrench icon (3)
–
Shut Down
– activates transport lock (for X and Y Unit) and
shuts down 4D-Nucleofector™ System (software version 4.0 or
later, in older versions it may not be available or only activate the
transport mode; see chapter 2.7.4 for further details)
–
Device Cleaning
– allows convenient cleaning of the vessel tray
(see chapter 2.12.5 for details)
–
Help
–
Settings
– opens the settings menu (see chapter 2.12 for
details)
–
Status
*
– shows device status
–
Open
* – opens the tray of the units
–
Close
* – close the tray of the units
* Only available when X or Y Unit are selected
Lock icon (4)
Activates transport lock (for X and Y Unit) and shuts down the
system (software version 4.0 or later, in older versions it may not
be available or only activate the transport mode)
BACK
Return to previous screen
CLR
Reset settings for an experiment or a Nucleofection vessel
SAVE
Save experiment or results file
LOAD
Load predefined experiments
OK/START
Confirm selection or execute a program
A-Z, Z-A, Top 10, Last
10
Sort a list alphabetically, display the most frequent 10 items or the
most recent 10 items
Magnifier symbol
Activate search functions
i
Display additional information (text)
<, >
Arrow keys to switch between experimental setup screens
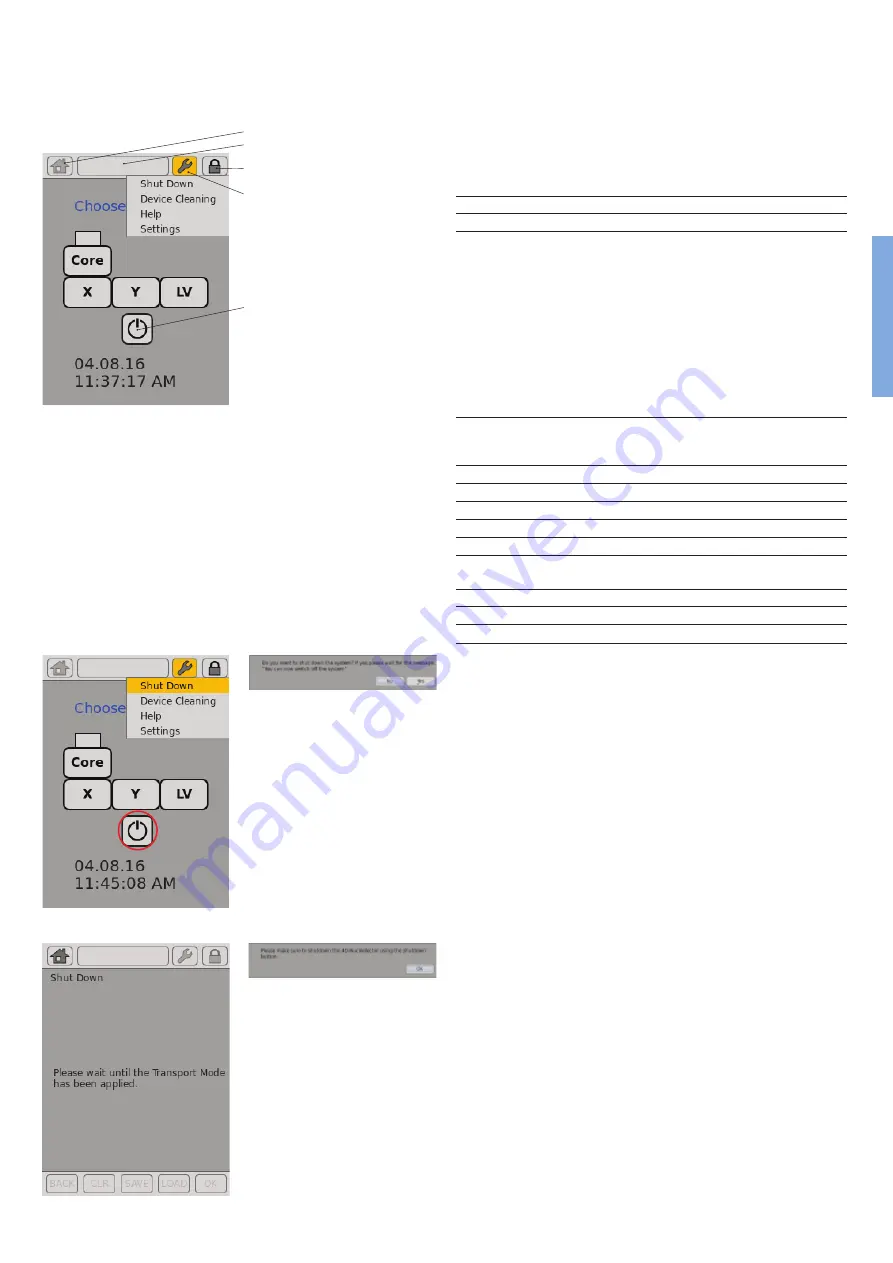
2.7.4
Turning off the 4D-Nucleofector™ System
This chapter explains how to turn off the 4D-Nucleofector™ System properly.
Following this procedure will guarantee a safe shut down of the system
and protection against damage of interior fragile parts. The described
procedure is valid for software version 4.0 or newer. Older versions may
not provide a software shut down (version 2.12 - 2.15) or only offer the
transport mode (version 2.16). It is strongly recommended to upgrade
the system to the newest software version (chapter 2.12.7).
– Press the “Lock” icon (figure 2.9, A, circle). Alternatively you can
press the “Wrench” icon and select “Shut Down”.
– A message will appear asking whether you want to shut down the
system (figure 2.9, B). Upon pressing “YES”, first the transport lock
will be applied (for X or Y Unit) (figure 2.9, C).
– Wait until you receive the message “You can now switch off the system”
NOTE: By pressing “BACK” you would release the transport lock again.
– Finally, switch off the device via the main power switch located at
the rear of the Core Unit. If the system was turned off via the power
switch directly (without previous software shut down), a reminder will
appear once you turn the system on again next time (figure 2.9, D).
1
A
B
Figure 2.9:
System shut down
Figure 2.8:
Software screen elements
C
D
2
3
4
4
2


