Lonza 4D-Nucleofector Скачать руководство пользователя страница 10

10   

Bioscience Solutions

 – 4D-Nucleofector™ Manual

2.7  General Use Instructions

This section gives an overview of the 4D-Nucleofector™ System operating 
software. Details of the Nucleofection process can be found in the cell-
type specific Optimized Protocols (

www.lonza.com/optimized-protocols

).

NOTE:

   All screenshots shown in this section refer to software version 

4.0. 

2.7.1 

Turning on the 4D-Nucleofector™ System

Turn on the system using the main power switch at the rear of the  
Core Unit. The system will boot up — this process may take a few  
moments — and the blue LED at the front of the Core Unit will be lit. 
Once the start-up procedure is complete, the 4D-Nucleofector™ graphical 
user interface (touch screen) will display the software main screen. 
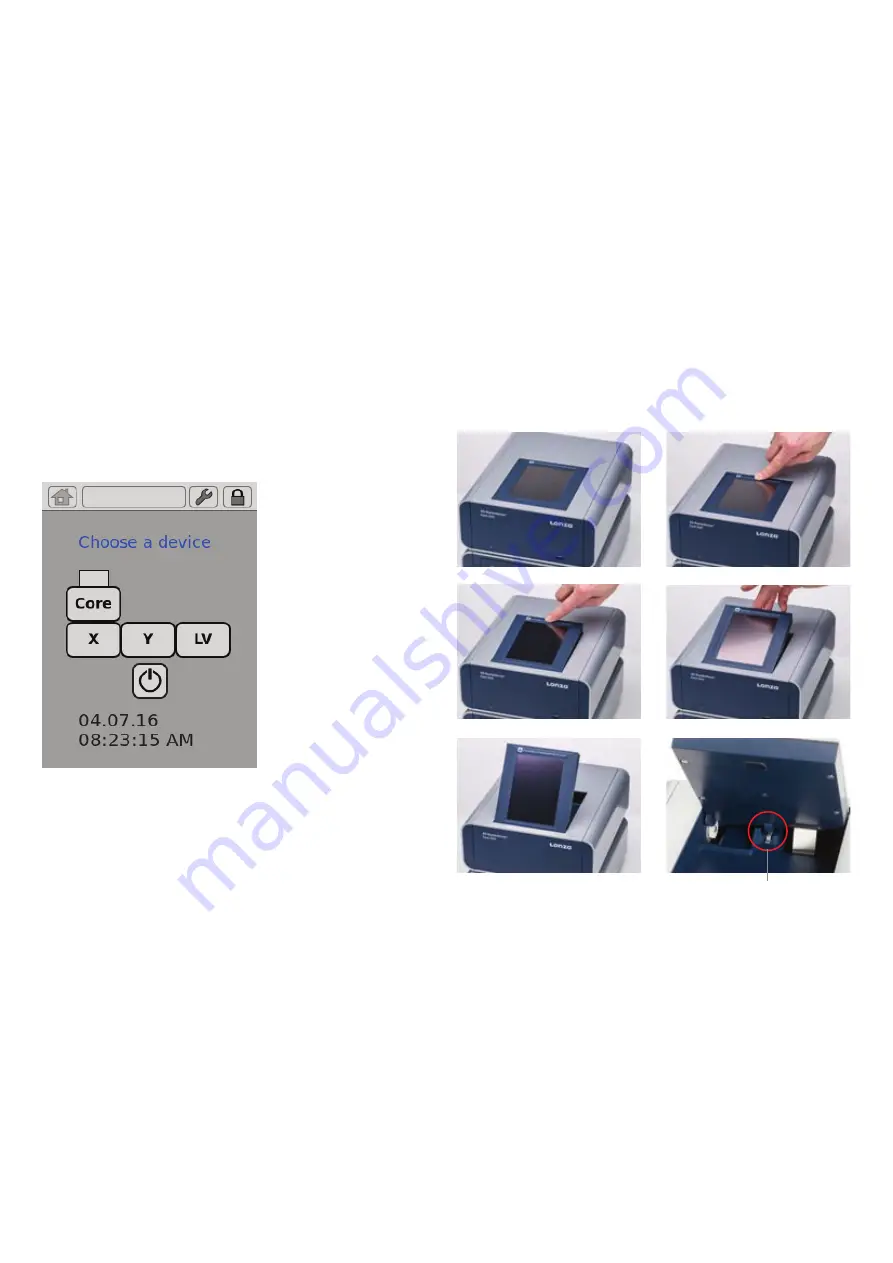
The main screen (figure 2.6) displays the current configuration of the 
4D-Nucleofector™ System (Core Unit and functional units).

Figure 2.6:

 Main screen

2.7.2 

Adjusting the Position of the Touch Screen

The touch screen of the 4D-Nucleofector™ System can be set at four  
angles (0°, 30°, 45°, and 60°), providing convenient access for the user. 
Press the label on top of the display frame to unlock the display from its 
home position. From this starting position, the user can adjust it to the 
most convenient angle by simply pulling it into a more upright position. The 
screen can be returned to its home position by moving it to the 60° position 
and then pulling it gently forward towards the front of the Core Unit. A 
switch will be activated, and the screen will drop automatically back into 
the starting position. Press down the screen to lock it in its home position.

NOTE:  

Do not try to close the display when the system is switched 
off. If there is a need to close it during OFF status or in case the 
display gets stuck, use the release knob shown in figure 2.7 
(red circle).

Figure 2.7:

 Releasing the touch screen

3

4

5

6

1

2

Emergency release

Содержание 4D-Nucleofector

Страница 1: ...Bioscience Solutions 4D Nucleofector System Manual For Research Use Only...

Страница 2: ...System conveys to the buyer the non transferable right to use the system as well as Lonza s proprietary Nucleofector Technology for research conducted by the buyer whether the buyer is an academic or...

Страница 3: ...ofector Y Unit 18 2 10 1 Defining a New Experiment 18 2 10 2 Loading Samples 19 2 10 3 Running the Experiment 19 2 11 4D Nucleofector LV Unit 20 2 11 1 Using the 1 mL Nucleocuvette Cartridge Fixed Vol...

Страница 4: ...owing reliable transfection of adherent cells and cells in suspension Transfection of Any Substrate Nucleofector Technology offers high flexibility within applications since the same transfection para...

Страница 5: ...ioscience Solutions 5 The 4D Nucleofector System Support Teams Europe Scientific Support 32 87 321 611 scientific support eu lonza com North America Scientific Support 1 800 521 0390 toll free scienti...

Страница 6: ...power supply before cleaning and disinfecting the case Useadampclothtowipedowntheoutercasewithwateror70 80 ethanol Do not use any aerosols for cleaning Avoid wetting the cuvette holder within the cuv...

Страница 7: ...nit 1 mL or LV Nucleocuvette Cartridge for LV Unit 24 well Dipping Electrode Array forYUnit UsingconsumablesfromanyothersourcethanLonzawill preclude all warranty and liability claims Do not alter the...

Страница 8: ...mple rescue also see 3 2 using wheel accessible after removal of side panel via screw behind termination plug A typical 4D Nucleofector System includes 1 One 4D Nucleofector Core Unit 2 At least one f...

Страница 9: ...for completeness 2 Stack the units with the Core Unit containing the touch screen on top figure 2 4 3 Connect the units figure 2 5 by using the interface cables Connect the interface outlet port of t...

Страница 10: ...ector System Core Unit and functional units Figure 2 6 Main screen 2 7 2 Adjusting the Position of the Touch Screen The touch screen of the 4D Nucleofector System can be set at four angles 0 30 45 and...

Страница 11: ...onfirm selection or execute a program A Z Z A Top 10 Last 10 Sort a list alphabetically display the most frequent 10 items or the most recent 10 items Magnifier symbol Activate search functions i Disp...

Страница 12: ...s Load Samples chapter 2 9 2 10 or 2 11 Execute Nucleofection Experiment chapter 2 9 2 10 or 2 11 Prepare Samples According to Cell type Specific Optimized Protocol 2 8 General Instructions for Runnin...

Страница 13: ...ntaining cells and substrate The selected Nucleofection program will be applied to this position 2 No DNA Negative control Nucleofection program applied to vessel with cells but without substrate 3 No...

Страница 14: ...line of the list The experiment selected will be highlighted Confirm your selection by pressing OK 5 By pressing on the icons displaying the Nucleofection vessels or wells you can check the settings...

Страница 15: ...Z to find conditions more quickly a Select the desired cell type code by tapping on the appropriate line of the cell list The cell type selected will be highlighted For additional information about t...

Страница 16: ...leocuvette Strip theyellowpinattherearend of thestripmustbevisible figure2 14 C Ifthestripismounted inthewrongorientationitsrearendwillstayabovethestripholder and the yellow pin is hardly visible figu...

Страница 17: ...te s Proceed willbe displayed figure 2 15 C Load next samples and press YES to continue or press NO to interrupt the experiment 12 When the experiment is complete a result file summarizing the Nucleof...

Страница 18: ...line of the cell list The cell type selected will be highlighted For additional information about the cell type selected press i b To confirm your selection press OK c If required modify pulse code b...

Страница 19: ...the softwarewillcheckforusedwellsandofferyoudifferentoptionshow to continue 2 10 3 Running the Experiment 12 Afterloadingthesamplespress START toruntheexperiment figure 2 18 A 13 The progress of the...

Страница 20: ...part area 3 Injection port rear side 4 Air outlet port with 0 2 M sterile filter Components of the LV Nucleocuvette Cartridge figure 2 19 B C 1 Cartridge 2 Venting tube with 0 2 M sterile filter 3 Inl...

Страница 21: ...of defining solution and program code via the CELL TYPE PROGRAM both parameters can also be selected manually e g in casenopredefinedcelltypeprogramisavailable Foraddingnewcell type programs please r...

Страница 22: ...y a color code green for OK figure 2 22 C yellow in case of few errors and red in case of multiple errors figure 2 22 D If errors occurred you can check for more details by pressing More details There...

Страница 23: ...KIP and continue with step 14 4 Upon pressing YES the pinch valves will automatically open for 30 secondsallowingtoconvenientlyinsertthetubesintothethreepinch valves and a new window will appear figur...

Страница 24: ...o cell type specific protocol and mount it into a 4D Nucleofector LV Reservoir Rack figure 2 23 I 12 RemovetheredcapfromtheSpirosconnectorontheoutlettubeofthe cartridge and connect it to the swabbable...

Страница 25: ...apter 2 12 3 17 Optional At this stage or at step 20 you can save your defined experimentforfutureusebypressingthe SAVE button figure2 24 D Akeyboardwillappearallowingyoutodefineaname max length 26 ch...

Страница 26: ...pressing START H I Figure 2 25 Setup Checklist for LV Nucleocuvette Cartridge 1 Cartridge inserted in slot 2 Short venting tube with filter attached to the male Luer connector on the front plate 3 Tub...

Страница 27: ...rs figure 2 26 E and red in case of multiple errors figure 2 26 G If errors occurred you can check for more details by pressing More details The result details figure 2 26 F H will display the type of...

Страница 28: ...ttings list Firmware update update the system software see chapter 2 12 7for details Device cleaning opens the tray of the functional modules to remove it for cleaning see chapter 2 12 5 for details S...

Страница 29: ...he NEW field Edit existing programs by pressing EDIT or save your programs onto a USB stick by pressing SAVE figure 2 27 E To create a new custom program or to edit an existing program Press NEW or se...

Страница 30: ...D Nucleofector SystemwiththePCEditorsoftware seechapter2 13 Itisnecessaryto perform synchronization with each firmware update To start synchronization Insert a USB stick into the USB port on the front...

Страница 31: ...drive Insert 4D Nucleofector user information USB stick into the USB port of your PC Copy all files from the 4D Nucleofector PC Editor software folder to your hard disk preferably into a folder calle...

Страница 32: ...tion figure 2 29 B Select the USB stick and press SAVE Unplug the USB stick from your PC as soon as the experiment file has been saved NOTE Do not unplug the stick while saving Turn on the 4D Nucleofe...

Страница 33: ...easing DNA amount may lead to higher transfection efficiency but at the same time result in higher cell mortality Cell number in Nucleofection sample too high or too low Please use the cell numbers re...

Страница 34: ...irection of the red arrow as far as it will go figure 3 1 B Model variant B Newer Unplug system from main power Remove the terminator cap or cable connection to next unit figure 3 1 C Insert screw dri...

Страница 35: ...argecircumventingthesampleandis oftenaccompaniedbyaflashandanoise Thisproblemisusuallycaused by imperfect cuvettes or cuvette filling The 4D Nucleofector System is equipped with a hardware safety feat...

Страница 36: ...e of dipping electrodes that had been used before Err 22 Used well A weak pulse occurred Efficiency may be sub optimal Re used dipping electrode or inappropriate Nucleofector Solution Clear the error...

Страница 37: ...a for the Licensed Process and or the Purchased Device is complete Lonza does not warrant either that the use of the License does not infringe third parties rights or does not cause damages to third p...

Страница 38: ...n interfaces interface RS422 USB Lonza interface for module connection Shuttle HV Out X Unit only Spannungsbegrenzung voltage limitation limitation de tension 1500 V Strombegrenzung current limitation...

Страница 39: ...4D Nucleofector Manual Bioscience Solutions 39 6...

Страница 40: ...partyowners Theinformationcontainedhereinisbelievedtobecorrect and corresponds to the latest state of scientific and technical knowledge However nowarrantyismade eitherexpressedorimplied regarding it...

Отзывы: