background image

Diagnostic information

2-163


7558-

xxx

Go Back

Previous

Next

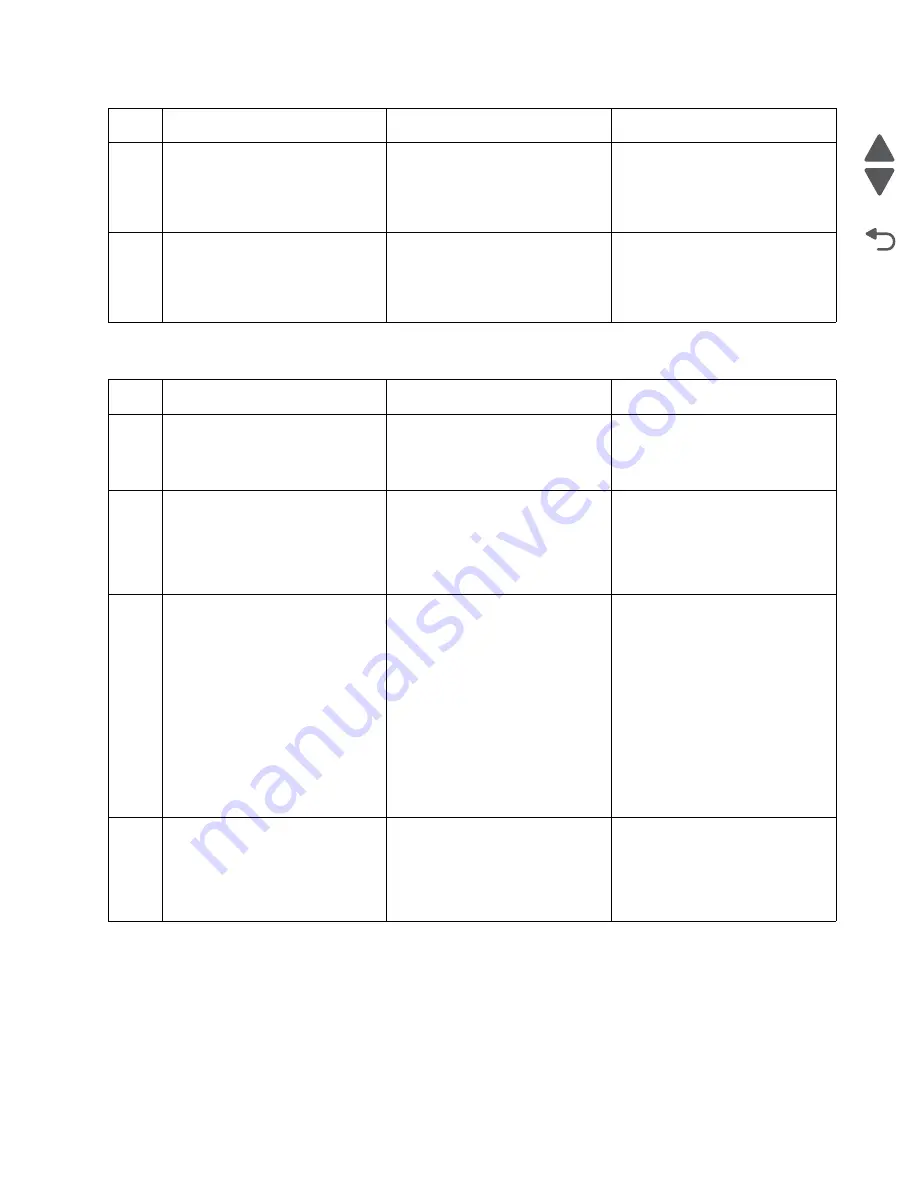
285.15 Sensor (ADF inverter) lag jam (inverting)

8

Check the ADF registration motor 

for proper connection.

Is the above component 
properly connected?

Replace the ADF registration 

motor. Go to 

“ADF registration 

motor removal” on page 4-221

.

Replace the connections.

9

Place an undamaged document 

in the ADF, and perform an ADF 

test.

Does the error remain?

Replace the ADF controller 

PCBA. Go to 

“ADF controller 

PCBA removal” on page 4-206

.

Problem resolved

Step

Action and questions

Yes

No

1

Check the media path.

Is the media path free of any 
media or media fragments?

Go to step 2.

Remove any media or media 

fragments.

2

Check the ADF rollers for wear.

Is the ADF feed/pick roller 
assembly or the ADF 
separation roller guide free of 
excess wear?

Go to step 3.

Replace the ADF feed/pick roller 

assembly. Go to 

“ADF feed/pick 

roller assembly removal” on 
page 4-213

.

3

Check the sensor (ADF 

registration) for proper operation.

1. Enter the Diagnostics Menu.
2. Touch 

SENSOR TESTS

.

3. Touch 

ADF/SCANNER 

SENSOR TESTS

.

4. Touch 

Sensor (ADF 

registration)

.

Does the display on the 
operator panel change every 
time the sensing area of the 
above sensor is interrupted or 
blocked?

Go to step 5.

Go to step 4.

4

Check the sensor (ADF 

registration) for proper 

connection.

Is the above component 
properly connected?

Replace the sensor (ADF 

registration). Go to 

“Sensor 

(ADF registration) removal” on 
page 4-250

.

Replace the connections.

Step

Action and questions

Yes

No

Содержание X95 series

Страница 1: ...le of contents Start diagnostics Safety and notices Trademarks Index Lexmark and Lexmark with diamond design are trademarks of Lexmark International Inc registered in the United States and or other countries Revision November 20 2014 ...

Страница 2: ...ring any obligation to you References in this publication to products programs or services do not imply that the manufacturer intends to make these available in all countries in which it operates Any reference to a product program or service is not intended to state or imply that only that product program or service may be used Any functionally equivalent product program or service that does not i...

Страница 3: ...input type specifications 1 9 Printer 1 9 Finisher 1 9 Supported finishing features 1 10 Media guidelines 1 12 Unacceptable paper 1 13 Selecting paper 1 13 Selecting preprinted forms and letterhead 1 13 Using recycled paper and other office papers 1 14 Storing paper 1 15 Tools required for service 1 15 Acronyms 1 16 Diagnostic information 2 1 Start 2 1 POR Power On Reset sequence 2 2 Error codes a...

Страница 4: ...nnection error 2 56 121 04 Heat belt center overheat error 2 57 121 05 Heat belt rear disconnection error 2 58 121 06 Heat belt rear overheat error 2 58 121 07 Heat belt center temperature increase failure 2 59 121 08 Heat belt rear temperature increase failure 2 59 121 09 Fuser temperature lag error 2 60 121 10 Heat belt rotation failure 2 61 121 11 Fuser temperature recovery failure 2 61 121 12 ...

Страница 5: ...Lower engine PCBA fuse 13 blown 2 90 191 18 Upper engine PCBA data failure 2 90 191 19 Upper engine PCBA access failure 2 91 191 20 Upper engine PCBA buffer failure 2 91 191 23 Lower engine PCBA fuse 14 blown 2 91 191 24 Lower engine PCBA fuse 15 blown 2 92 191 25 Lower engine PCBA fuse 16 blown 2 92 200 01 Sensor registration static jam 2 92 200 03 Sensor registration late jam feeding from the tr...

Страница 6: ...lag jam 2 159 285 13 Sensor ADF inverter late jam inverting 2 161 285 15 Sensor ADF inverter lag jam inverting 2 163 287 01 Sensor ADF scan width 1 static jam 2 164 288 01 Sensor ADF scan width 2 static jam 2 165 289 01 Sensor ADF scan width 3 static jam 2 166 295 00 Size mismatch jam mix size 2 166 295 01 295 09 and 295 10 Size mismatch jam no mix size 2 168 295 03 Too short size jam 2 171 295 04...

Страница 7: ...g jam 2 232 486 01 Sensor lower media exit static jam 2 233 486 03 Sensor lower media exit late jam 2 234 486 05 Sensor lower media exit lag jam 2 236 487 05 Sensor compiler media present late jam 2 237 491 01 Sensor booklet media entrance static jam 2 239 491 03 Sensor booklet media entrance late jam 2 240 491 05 Sensor booklet media entrance lag jam 2 242 492 01 Sensor booklet compiler media pre...

Страница 8: ...8 955 xx RIP card assembly NAND CRC failure 2 268 956 00 RIP card assembly processor failure 2 269 956 01 RIP card assembly processor over temperature failure 2 269 956 02 RIP card assembly cooling fan failure 2 269 956 03 RIP card assembly FPGA failure 2 270 980 04 Duplex controller card assembly communication failure 2 270 980 05 Engine flicker communication failure 2 271 957 01 BITZ1 initialize...

Страница 9: ...aults 3 10 Fax Low Power Support 3 10 Fax Storage Location 3 11 FB Edge Erase 3 11 Font Sharpening 3 11 Format Fax Storage 3 11 Jobs on Disk 3 11 Key Repeat Initial Delay 3 12 Key Repeat Rate 3 12 Min Copy Memory 3 12 NumPad Job Assist 3 12 Panel Menus 3 13 Paper Prompts 3 13 PPDS Emulation 3 13 Print Quality Pages 3 13 Reports 3 13 Menu Settings Page 3 13 Event Log 3 13 Require Standby 3 14 Reset...

Страница 10: ...t Test 3 26 Print Quality Pages Diagnostics Menu 3 26 PRINTER SETUP 3 27 Configuration ID 3 27 Mono and Color Page Count 3 27 Parallel Strobe Adjustment all parallel ports 3 27 Permanent Page Count 3 27 Reset Color Calibration 3 27 Serial Number 3 27 U S Non U S Defaults 3 27 REPORTS 3 28 SCANNER TESTS 3 28 ASIC Test 3 28 Feed Test SCANNER TESTS 3 28 Scanner Manual Registration 3 29 SCANNER CALIBR...

Страница 11: ...Transfer 3 66 Step 7 Electric Discharge 3 67 Step 8 Cleaning Transfer belt 2nd transfer roll 3 67 Step 9 Fusing 3 67 Paper path theory 3 68 MFP paper path 3 68 Paper feed process 3 70 Registration 3 71 Transfer 3 72 Fusing exit 3 72 Duplexing 3 74 Scanner theory 3 75 ADF paper path 3 76 Color theory 3 76 Finisher theory of operations 3 80 Media transport 3 80 Bridge unit assembly paper path 3 80 F...

Страница 12: ...nsors and motors 3 103 Booklet media bin 3 105 Operation 3 105 Functions of upper media bin sensors 3 105 Stacker media bin 3 105 Operation 3 106 Full stack detection 3 107 Functions of stacker media bin sensors motors 3 108 Booklet tray 3 109 Power supply and interlock 3 110 TTM theory of operations 3 112 Media transport 3 113 Media transport path 3 113 Functions of main components 3 113 Media tr...

Страница 13: ...ia size 3 124 1TM theory of operations 3 125 Media transport 3 126 Media transport path 3 126 Media transport path 3 126 Functions of main components 3 126 Media tray assembly 3 126 Rear media guide 3 126 Bottom plate 3 126 Tray 2 media tray assembly 3 127 1TM media feed units 3 127 Media feed unit assembly 3 127 Media feed lift motor 3 127 Switch media size 3 128 Sensor media out 3 128 Sensor med...

Страница 14: ...nter top cover removal 4 15 Rear lower cover removal 4 17 Rear upper cover removal 4 19 Scanner left cover removal 4 19 Scanner rear cover removal 4 20 Scanner right cover removal 4 21 Scanner top cover removal 4 22 Print engine removal procedures 4 24 1st transfer conductor housing removal 4 24 1st transfer retract clutch assembly removal 4 26 2nd transfer roller removal 4 28 ATC sensor PCB brack...

Страница 15: ...C developer drive motor cooling fan removal 4 139 PC developer drive motor removal 4 140 Pick roller removal 4 144 Printer left duplex door assembly removal 4 145 Printer media turn guide removal 4 146 Printer tray 1 feeder removal 4 147 Printhead retract door removal 4 148 Registration drive motor removal 4 150 Registration transport roller assembly removal 4 152 RIP PCBA removal 4 153 eSF soluti...

Страница 16: ...val 4 230 FB CCD sensor assembly removal 4 230 Flatbed scanner assembly removal 4 233 Large platen glass removal 4 237 LED exposure bar removal 4 238 Scanner carriage motor removal 4 239 Scanner controller PCBA removal 4 241 Sensor ADF angle removal 4 244 Sensor ADF closed interlock removal 4 245 Sensor ADF document set removal 4 245 Sensor ADF feedout removal 4 246 Sensor ADF inverter removal 4 2...

Страница 17: ... removal 4 310 Decurler clutch removal 4 313 Sensor bridge media entrance removal 4 315 Sensor bridge media exit removal 4 317 Sensor bridge top door interlock removal 4 319 Sensor decurler cam HP removal 4 321 Sensor decurler cover interlock removal 4 322 Finisher removal procedures 4 324 Booklet bin assembly removal 4 324 Booklet bin hookup cable assembly removal 4 324 Booklet controller card as...

Страница 18: ... entrance removal 4 385 Sensor booklet end guide HP removal 4 386 Sensor booklet front tamper HP removal 4 386 Sensor booklet knife folding removal 4 387 Sensor booklet knife HP removal 4 388 Sensor booklet media entrance removal 4 389 Sensor booklet rear tamper HP removal 4 390 Sensor booklet unit interlock removal 4 390 Sensor booklet unit media exit removal 4 391 Sensor buffer path removal 4 39...

Страница 19: ...dia out actuator removal 4 438 HCF media tray assembly removal 4 439 HCF media tray front cover removal 4 440 HCF media tray lift coupling assembly removal 4 441 HCF pick roll assembly removal 4 442 HCF pick roll shaft assembly removal 4 442 HCF rear cover removal 4 444 HCF sensor HCF media size removal 4 444 HCF sensor HCF media tray set removal 4 445 HCF sensor tray 5 feedout removal 4 446 HCF s...

Страница 20: ...PS 5 32 TTM rear 5 33 TTM left 5 35 TTM tray 2 3 4 feeder 5 36 TTM tray 2 3 4 media size sensor 5 37 Finisher sensors 5 38 Finisher compiler 5 39 Finisher stapler 5 40 Finisher media compiler guide 5 41 Finisher punch unit 5 42 Finisher rear 5 43 Finisher LVPS stacker 5 45 Finisher controller PCBA 5 47 Finisher booklet maker 1 5 49 Finisher booklet maker 2 5 50 Finisher controller card 5 51 Finish...

Страница 21: ... 4 7 30 Assembly 30 Tray module media feed 7 31 Assembly 31 Tray module media transport 1 7 32 Assembly 32 Tray module media transport 2 7 33 Assembly 33 Tray module covers 1 7 34 Assembly 34 Tray module covers 2 7 35 Assembly 35 TTM trays 7 36 Assembly 36 TTM media feed 1 7 37 Assembly 37 TTM media feed 2 7 38 Assembly 38 TTM left door 7 40 Assembly 39 TTM tray support 7 41 Assembly 40 TTM drive ...

Страница 22: ... Assembly 83 Booklet maker 3 7 88 Assembly 84 Booklet maker 4 7 89 Assembly 85 Booklet maker 5 7 90 Assembly 86 Booklet maker 6 7 91 Assembly 87 Booklet maker 7 7 92 Assembly 88 Booklet maker 8 7 93 Assembly 89 Booklet maker 9 7 94 Assembly 90 ADF assembly 7 95 Assembly 91 ADF covers and components 1 7 96 Assembly 92 ADF covers and components 2 7 97 Assembly 93 ADF base 7 98 Assembly 94 ADF drive ...

Страница 23: ...Unis et ailleurs conforme aux exigences de la norme UL 60950 1 relative à la sécurité du matériel informatique La tête d impression DEL contenue dans ce produit est un DEL de type diffus et ne dépasse pas le niveau de classe I pendant un fonctionnement normal l entretien par l utilisateur ou les conditions d entretien recommandées Les têtes d impression DEL de classe I ne sont pas considérées comm...

Страница 24: ...kravene i UL 60950 1 Safety of Information Technology Equipment LED printhovedet som er en del af dette produkt er en diffus type LED og overskrider ikke Klasse I niveauer under normal drift brugervedligeholdelse eller foreskrevne servicebetingelser LED printhoveder i Klasse I betegnes ikke som farlige printhead LEDilmoitus Tämä tuote on sertifioitu Yhdysvalloissa ja muualla UL 60950 1 Tietoteknii...

Страница 25: ...ran peligrosos この製品が UL 60950 1 情報機器の安全性 の要件を満たしていることを米国および他の地域で承認されて います この製品に組み込まれているLED印字ヘッドは反射式LEDで 通常の使用 ユー ザのメンテナンスまたは所定のサービス状態においてクラス1レベルを超えることはあ りません クラス1印字ヘッドLED製品は危険製品とみなされていません 본 제품은 미국 및 미국 외 지역에서 UL 60950 1의 요구 사항을 준수하며 ITE Information Technology Equipment 안전성을 준수하는 제품으로 승인되었습니다 이 제품에 포함된 LED 프린트헤드는 분산형 LED이며정상性인 작동 사용자 유지관리 또는 사전 설명된 서비스 조건에서는 클래스 I 수준을 초과하지 않습니다 클래스 I 프린트헤드 LED 제품은 ...

Страница 26: ...xxvi Service Manual 7558 xxx Go Back Previous Next ...

Страница 27: ...ntenance qualifié Le démontage et l entretien de ce produit pouvant présenter certains risques électriques le personnel d entretien qualifié devra prendre toutes les précautions nécessaires ATTENTION Ce symbole indique la présence d une tension dangereuse dans la partie du produit sur laquelle vous travaillez Débranchez le produit avant de commencer ou faites preuve de vigilance si l exécution de ...

Страница 28: ...ormación sobre el mantenimiento de este producto está dirigida exclusivamente al personal cualificado de mantenimiento Existe mayor riesgo de descarga eléctrica y de daños personales durante el desmontaje y la reparación de la máquina El personal cualificado debe ser consciente de este peligro y tomar las precauciones necesarias PRECAUCIÓN este símbolo indica que el voltaje de la parte del equipo ...

Страница 29: ...t d aquest producte està orientada exclusivament a professionals i no està destinada a ningú que no ho sigui El risc de xoc elèctric i de danys personals pot augmentar durant el procés de desmuntatge i de servei d aquest producte El personal professional ha d estar ne assabentat i prendre les mesures convenients PRECAUCIÓ aquest símbol indica que el voltatge de la part de l equip amb la qual esteu...

Страница 30: ...les and service checks used to isolate failing field replaceable units FRUs 3 Diagnostic aids contains tests and checks used to locate or repeat symptoms of printer problems 4 Repair information provides instructions for making printer adjustments and removing and installing FRUs 5 Locations uses illustrations to identify the connector locations and test points on the printer 6 Preventive maintena...

Страница 31: ...user failure on page 2 62 2013 11 4 Parts catalog Assembly 55 Changed P N to 40X7464 to 40X6726 2013 10 21 Parts catalog Assembly 37 Updated description of 40X7334 Added 40X0588 and 40x0727 Deleted 40X7336 40X7337 and 40X7338 2013 10 7 Replaced 40X7511 with 40X7512 in Parts catalog Assembly 108 2013 9 4 Replaced 40X0727 with 40X7334 in the Parts catalog Assembly 37 2013 08 01 Updated Parts catalog...

Страница 32: ...ontains navigation buttons in the right margin of each page making it easier and quicker to navigate Button Description Previous Click to move the document view backward by one page Next Click to move the document view forward by one page Go Back Click to return to the last page viewed ...

Страница 33: ...tatements CAUTION A caution identifies something that might cause a servicer harm CAUTION This type of caution indicates there is a danger from hazardous voltage in the area of the product where you are working Unplug the product before you begin or use caution if the product must receive power in order to perform the task CAUTION This type of caution indicates a hot surface CAUTION This type of c...

Страница 34: ...xxxiv Service Manual 7558 xxx Go Back Previous Next ...

Страница 35: ...drawer a 550 sheet drawer with a 100 sheet multipurpose feeder MP Feeder 550 sheet drawer Additional memory one 128MB 256MB 512MB or 1GB memory card may be added Flash memory card one 256MB card may be added Font cards one language card can be added Input options include 520 sheet drawer 3TM 3 Tray Module each tray is capable of holding up to 520 sheets TTM Tandem Tray Module three different trays...

Страница 36: ...eless Option Connections Gigabit ethernet USB 2 0 high speed Lexmark X950 X952 X954 Scanner Scanner type Color Flatbed Scanner with ADF Scan technology Charge Coupled Device CCD Light source White LED Number of light sources 1 LED array per CCD Module Scanner ADF ADF Type ADF Scanner ADF document input and output capacity 110 Sheets 20 lb 75 g m2 bond Scanner media depth thickness Maximum 0 11 mm ...

Страница 37: ...Document size sensing paper length sensing only on flatbed Print Engine Print technology Color LED Duplex output Standard Paper feed orientation Short edge and long edge fed Fax Modem Built in Group 3 compatible Full Function Fax 33 600 bps Max V 34 Half Duplex Network protocol Lexmark X950 Lexmark X952 Lexmark X954 10 100 1000 Base TX Ethernet Standard USB2 0 High speed device port USB A host por...

Страница 38: ...s energy use especially when the printer is idle Printer engine motors do not start until it is ready to print A short delay occurs before the first page is printed The printer enters Sleep mode after one minute of inactivity When the printer enters Sleep mode the printer control panel display and the standard exit bin lights are turned off If scanning is supported the scanner lamps are activated ...

Страница 39: ...PDF v1 6 HTML Direct Image Models Height Width Depth Weight Lexmark X950 771 mm 30 4 in 672 mm 26 5 in 668 mm 26 3 in 84 2 kg 185 lb Lexmark X952 Lexmark X954 Optional 550 sheet Drawer 135 mm 5 3 in 590 mm 23 2 in 539 mm 21 2 in 14 kg 31 lb Description Clearances Lexmark X950 X952 X954 1 Right side 100 mm 4 in 2 Front 610 mm 24 in 3 Left side 385 mm 24 in Supported Not supported 1 2 3 4 5 ...

Страница 40: ...es packaged Up to 1 month from the date of manufacture when kept in storage non condensing in the following harsh environment 20 to 0 C or 35 to 40 C 4 to 32 F or 95 to 104 F 5 to 20RH or 80 to 95RH Up to 24 months from the date of manufacture when kept in storage non condensing in the following normal environment 0 to 35 C 32 to 104 F 15 to 80RH Printer with cartridges packaged 40 to 40 C 40 to 1...

Страница 41: ...apacity 100 sheets 100 sheets 100 sheets Total standard input capacity 620 2180 3660 Duplex Type of duplex Standard Standard Standard Standard output sources Standard output bin 500 500 500 Input source 520 sheet tray 2 000 sheet drawer MP feeder Manual paper Manual envelope Duplex ADF Scanner glass A4 210 x 297 mm A5 148 x 210 mm A6 105 x 148 mm JIS B5 182 x 257 mm Letter 216 x 279 mm Legal 216 x...

Страница 42: ...arch 98 x 191 mm 9 Envelope 98 x 226 mm Com 10 Envelope 105 x 241 mm DL Envelope 110 x 220 mm C5 Envelope 162 x 229 mm B5 Envelope 176 x 250 mm Other envelope 86 x 165 mm to 216 x 356 mm Input source 520 sheet tray 2 000 sheet drawer MP feeder Manual paper Manual envelope Duplex ADF Scanner glass Supported Not supported ...

Страница 43: ...ermine the possible exit destinations of print jobs which use supported paper types and weights The paper capacity of each exit bin is listed in parentheses Paper capacity estimations are calculated based on 75 g m2 20 lb paper Input type 520 sheet tray 2 000 sheet Drawer MP feeder Manual paper Manual Envelope Duplex ADF Scanner glass Paper Bond Glossy Heavy Glossy Colored Custom Type x Letterhead...

Страница 44: ...d up to 220 g m2 60 lb Supported finishing features Notes The finisher shown is the booklet finisher Bin 2 is available only when the booklet finisher is installed All paper tray capacities are based on 75 g m2 20 lb paper Input type Standard 500 sheet bin Second exit bin Bin 1 Bin 2 Bin 3 Plain paper Card stock Transparencies Recycled Callout Part name 1 Finisher standard bin 2 Finisher Bin 1 3 F...

Страница 45: ... installed The paper capacity is 1 500 sheets when the booklet finisher is installed Bin 1 finishing features Size Punch Offset Single Double staple Double dual staple A3 A4 A5 Executive Folio JIS B4 JIS B5 Legal Letter Statement Tabloid Universal Envelopes any size For the Universal paper size the finishing edge must be at least 9 in 229 mm for a 3 hole punch and 10 in 254 mm for a 4 hole punch P...

Страница 46: ...se paper feeding problems Curl can occur after the paper passes through the printer where it is exposed to high temperatures Storing paper unwrapped in hot humid cold or dry conditions even in the trays can contribute to paper curling prior to printing and can cause feeding problems Smoothness Paper smoothness directly affects print quality If paper is too rough toner cannot fuse to it properly If...

Страница 47: ...ted papers that can be affected by the temperature in the printer fuser Preprinted papers that require a registration the precise print location on the page greater than 2 3 mm 0 9 in such as optical character recognition OCR forms In some cases registration can be adjusted with a software application to successfully print on these forms Coated papers erasable bond synthetic papers thermal papers ...

Страница 48: ... perfect The energy required to de ink and deal with additives such as colorants and glue often generates more carbon emissions than does normal paper production However using recycled papers enables better resource management overall Lexmark concerns itself with the responsible use of paper in general based on life cycle assessments of its products To gain a better understanding of the impact of ...

Страница 49: ...possible on a pallet or shelf rather than on the floor Store individual packages on a flat surface Do not store anything on top of individual paper packages Tools required for service Flat blade screwdrivers various sizes 1 Phillips screwdriver magnetic 2 Phillips screwdriver magnetic 2 Phillips screwdriver magnetic short blade 7 32 inch 5 5 mm open end wrench 7 0 mm nut driver Needlenose pliers D...

Страница 50: ...rd Disk Drive HID Human Interface Device HP Home Position HVPS High Voltage Power Supply IGBT Insulated gate Bipolar Transistor INA Internal Network Adapter ISP Internal Solutions Port ITU Image Transfer Unit K Black LCD Liquid Crystal Display LDAP Lightweight Directory Access Protocol LED Light Emitting Diode LEF Long edge Fed LES Lexmark Embedded Solution LVPS Low Voltage Power Supply M Magenta ...

Страница 51: ...ncy Identification RIP Raster Imaging Processor ROM Read Only Memory SE Service Engineer SEF Short edge Fed SMTP Simple Mail Transfer Protocol SNMP Simple Network Management Protocol TPS Toner Patch Sensing TTM Tandem Tray Module URL Uniform Resource Locator USB Universal Serial Bus V ac Volts alternating current V dc Volts direct current Y Yellow ...

Страница 52: ...1 18 Service Manual 7558 xxx Go Back Previous Next ...

Страница 53: ...on page 2 40 For information regarding electrical connections see Locations on page 5 1 Additional information can be found at the following locations Understanding the operator panel on page 3 1 Printer theory of operations on page 3 60 Finisher theory of operations on page 3 80 TTM theory of operations on page 3 112 3TM theory of operations on page 3 119 1TM theory of operations on page 3 125 Hi...

Страница 54: ...k splash screen appears with a progress bar in the center until the code is loaded 3 The scanner exposure lamp flashes several times 4 The fuser cooling fan turns on 5 The fuser assembly lamps turn on 6 The RIP card assembly cooling fan turns on 7 Operator panel LED becomes solid 8 The transport motor turns on The following is an example of the screen that appears after the code is loaded ...

Страница 55: ...t job Change paper source to custom string load orientation Try one or more of the following Touch Use current paper source to ignore the message and print from the selected tray Load the correct paper size and type in the tray verify the paper size and type settings are specified in the printer control panel Paper menu and then touch Paper changed continue Touch Cancel job to cancel the print job...

Страница 56: ...l the files stored on the printer hard disk Empty the hole punch box 1 Empty the hole punch box For instructions on emptying the hole punch box from the printer control panel touch More Information 2 Reinsert the hole punch box into the finisher and then touch Continue to clear the message Error reading USB drive Remove USB An unsupported USB device has been inserted Remove the USB device and then...

Страница 57: ... to clear the message and continue printing If the printer finds a tray that has the correct paper type and size it feeds from that tray If the printer cannot find a tray with the correct paper type and size it prints from the default paper source Cancel the print job Load src with size Try one or more of the following Load the specified paper in the tray or feeder Touch Paper loaded continue to c...

Страница 58: ...ontinue to clear the message and continue printing Touch Cancel job to cancel the print job Manual feeder expects paper size Check paper source guides Try one or more of the following Load the specified paper size in the manual feeder Physically adjust paper source guides to a recognized paper size Touch Continue to clear the message and continue printing If the printer finds a tray that has the c...

Страница 59: ...that the wheel on Tray 1 is set to the paper size loaded in the tray Make sure the paper size matches the document you are trying to print Touch Continue to clear the message and print using a different tray Check the tray length and width guides and make sure the paper is loaded properly in the tray Make sure the correct paper size and type are specified on the Print Properties or Print dialog se...

Страница 60: ...rinter will find a similar font and reformat the affected text Cancel the current print job 51 Defective flash detected Try one or more of the following Touch Continue to clear the message and continue printing Cancel the current print job 52 Not enough free space in flash memory for resources Try one or more of the following Touch Continue to clear the message and continue printing Downloaded fon...

Страница 61: ...Buffer menu item is not set to Disabled 56 Standard parallel port disabled Try one or more of the following Touch Continue to clear the message The printer discards any data received through the parallel port Make sure the Parallel Buffer menu item is not set to Disabled 56 USB port x disabled Try one or more of the following Touch Continue to clear the message The printer discards any data receiv...

Страница 62: ...ssage and continue printing 82 xx Waste toner bottle missing Reinsert the waste toner bottle into the printer 82 xx Waste toner bottle nearly full Order a replacement waste toner bottle immediately 1 Replace the waste toner bottle For instructions on installing the waste toner bottle from the printer control panel touch More Information 2 Touch Continue to clear the message and continue printing 8...

Страница 63: ...his does not cancel the scan job All successfully scanned pages will be processed further for copying faxing and e mailing 280 06 Paper missing This message appears when the scanner is instructed to scan from the ADF but there is no paper in the tray Try one or more of the following Touch Continue to clear the message Touch Cancel job to cancel the job and clears the message Touch Scan from automa...

Страница 64: ...age 3 58 455 Staple Jam A jam is detected at the stapler Go to 455 staple jam on page 3 56 4yy xx Paper Jam Check area Jam is detected at the bridge unit Go to 4yy xx paper jams on page 3 52 1xx service error codes Error code Description Action 111 01 Service printhead error LED printhead K failure Open circuit detected in the LED printhead Go to 111 01 LED printhead K failure on page 2 43 111 02 ...

Страница 65: ...failure M on page 2 45 113 03 Service printhead error LED printhead M failure Open circuit detected in the LED printhead Go to 113 02 113 04 LED printhead signal failure M on page 2 45 113 04 Service printhead error LED printhead M failure Open circuit detected in the LED printhead Go to 113 02 113 04 LED printhead signal failure M on page 2 45 114 01 Service printhead error LED printhead Y failur...

Страница 66: ...115 06 Service printhead error Single LED printhead mismatch failure Go to 115 06 Single LED printhead mismatch failure on page 2 49 115 07 Service printhead error Multiple LED printhead read failure Communication failed between the upper engine PCBA and more than one LED printhead Go to 115 07 Multiple LED printhead read failure on page 2 49 115 08 Service printhead error Single LED printhead rea...

Страница 67: ...ure rolls and motor Go to 120 02 Fuser pressure roll retract motor failure on page 2 55 121 01 Service fuser error Encoder pulse fail No change was detected on the speed of the belt for more than 1 second Go to 121 01 Encoder pulse failure on page 2 55 121 03 Service fuser error Heat belt center disconnection error Open circuit is detected at the fuser heat belt Go to 121 03 Heat belt center disco...

Страница 68: ...12 Fuser failure on page 2 62 121 13 Service fuser error Fuser thermostat failure The Fuser Assembly Thermostat is broken Go to 121 13 Fuser thermostat failure on page 2 62 126 01 Service fuser error Fuser interface failure There is a a broken link between upper engine PCBA and the fuser Go to 126 01 Fuser driver interface failure on page 2 62 126 02 Service fuser error Fuser driver to upper engin...

Страница 69: ...or K failure on page 2 66 132 03 Service engine error ATC sensor M failure There is an error at the ATC sensor Go to 132 03 ATC sensor M failure on page 2 69 132 04 Service engine error ATC sensor C failure There is an error at the ATC sensor Go to 132 04 ATC sensor C failure on page 2 70 137 01 Service engine error ATC sensor Y failure There is an error at the ATC sensor Go to 137 01 Upper printe...

Страница 70: ...ioning Go to 156 01 Toner dispense motor C failure on page 2 79 157 01 Service engine error Toner dispense motor M failure The toner dispense motor is not functioning Go to 157 01 Toner dispense motor M failure on page 2 79 158 01 Service engine error Toner dispense motor Y failure The toner dispense motor is not functioning Go to 158 01 Toner dispense motor Y failure on page 2 80 171 01 Service e...

Страница 71: ...ear upper center cooling fan is not functioning Go to 175 07 Fuser driver PCBA cooling fan failure on page 2 85 175 08 Service engine error Rear left upper cooling fan failure The rear left upper cooling fan is not functioning Go to 175 08 Upper exhaust cooling fan failure on page 2 85 191 01 Service engine error Lower engine PCBA detect failure The lower engine PCBA is not detected Go to 191 01 L...

Страница 72: ...Service engine error Lower engine PCBA fuse 13 blown A fuse has blown Go to 191 17 Lower engine PCBA fuse 13 blown on page 2 90 191 18 Service engine error Upper engine PCBA data failure Data values are not normal on the upper engine memory Go to 191 18 Upper engine PCBA data failure on page 2 90 191 19 Service engine error Upper engine PCBA access failure Data values are not normal on the upper e...

Страница 73: ...200 55 Sensor registration lag jam on page 2 96 200 53 Paper jam Sensor registration late jam 80K interval for feed rollers exceeded in tray 1 The media is late reaching the sensor registration within the specified time after being fed from any given media tray Go to 200 53 Sensor registration late jam 80K interval exceeded for feed rolls on page 2 98 200 55 Paper jam Sensor registration lag jam 8...

Страница 74: ...it Go to 203 03 Sensor upper redrive late jam on page 2 110 203 05 Paper jam Sensor upper redrive lag jam The media reached the sensor upper redrive but did not clear it within the specified time Go to 203 05 Sensor upper redrive lag jam on page 2 112 230 01 Paper jam Sensor duplex wait static jam Media remains detected by the sensor duplex wait after power on Go to 230 01 Sensor duplex wait stati...

Страница 75: ...started Go to 243 03 243 06 Sensor tray 3 feed out late jam on page 2 122 243 06 Paper jam Sensor tray 3 feed out failed to pick jam The media is late reaching the sensor tray 3 feed out within the specified time after the feed from tray 4 has started Go to 243 03 243 06 Sensor tray 3 feed out late jam on page 2 122 243 56 Paper jam Sensor tray 3 feed out late jam 80K interval for feed rollers exc...

Страница 76: ...Sensor MPF feed out lag jam on page 2 135 250 06 Paper jam Sensor MPF feed out failed to pick jam The media is late reaching the sensor MPF feed out within the specified time after the feed from the MPF has started Go to 250 06 Sensor MPF feed out late jam on page 2 138 250 56 Paper jam Sensor MPF feed out late jam 80K interval for feed rollers exceeded in tray 3 The media is late reaching the sen...

Страница 77: ... 149 283 03 Scanner jam Sensor ADF registration late jam The media is late reaching the sensor ADF registration within the specified time after pre registration has started Go to 283 03 Sensor ADF registration late jam on page 2 149 283 05 Scanner jam Sensor ADF registration lag jam The media reached the sensor ADF registration but did not clear it within the specified time Go to 283 05 Sensor ADF...

Страница 78: ...ia remains detected by the sensor ADF scan width 1 after power on Go to 287 01 Sensor ADF scan width 1 static jam on page 2 164 288 01 Scanner jam Sensor ADF scan width 2 static jam Media remains detected by the sensor ADF scan width 2 after power on Go to 288 01 Sensor ADF scan width 2 static jam on page 2 165 289 01 Scanner jam Sensor ADF scan width 3 static jam Media remains detected by the sen...

Страница 79: ...e 2 168 3xx service error codes Error code Description Action 324 xx Service finisher error Tray 2 lift motor failure The Tray 2 lift motor did not raise to the appropriate position Go to 324 xx Tray 2 lift motor failure on page 2 172 334 xx Service finisher error Tray 3 lift motor failure The Tray 3 lift motor did not raise to the appropriate position Go to 334 xx Tray 3 lift motor failure on pag...

Страница 80: ... carriage HP lag jam on page 2 181 381 07 Service finisher error Stapler unit error The sensing area of the sensor stapler unit motor HP inside the stapler unit assembly is not interrupted within the specified timer after the stapler unit motor starts moving to the home position Go to 381 07 Stapler unit failure on page 2 182 381 08 Service finisher error Sensor media eject clamp HP late error The...

Страница 81: ... during the specified time after the punch unit starts moving to the home position Go to 381 16 Sensor punch cam HP late jam on page 2 195 381 17 Service finisher error Sensor punch cam HP lag error The sensor punch cam HP activated but did not clear within the specified time Go to 381 17 Sensor punch cam HP lag jam on page 2 196 381 18 Service finisher error Sensor punch carriage shift HP late er...

Страница 82: ... Go to 381 26 Sensor decurler cam HP late jam on page 2 199 381 29 Service finisher error Sensor decurler cam HP lag error The sensor decurler cam HP activated but did not clear within the specified time Go to 381 27 Sensor decurler cam HP lag jam on page 2 200 381 30 Service finisher error Sensor booklet front tamper HP late error The sensor booklet front tamper HP didn t activate within the spec...

Страница 83: ... on page 2 211 381 38 Service finisher error Sensor booklet knife HP lag error The sensor booklet knife HP activated but did not clear within the specified time Go to 381 38 Sensor booklet knife HP lag jam on page 2 213 381 39 Service finisher error Booklet stapler error The booklet stapler unit is not completely inserted into the booklet maker unit assembly or it has failed Go to 381 39 Booklet S...

Страница 84: ...or bridge media exit late jam on page 2 221 481 01 Service finisher error Sensor finisher media entrance static jam Media remains detected by the sensor finisher media entrance Go to 401 01 Sensor finisher media entrance static jam on page 2 217 481 03 Service finisher error Sensor finisher media entrance late jam The media is late reaching the sensor bridge media exit within the specified time Go...

Страница 85: ...error Sensor lower media exit static jam Media remains detected by the sensor lower media exit Go to 486 01 Sensor lower media exit static jam on page 2 233 486 03 Service finisher error Sensor lower media exit late jam The media is late reaching the sensor upper media exit within the specified time Go to 486 03 Sensor lower media exit late jam on page 2 234 486 05 Service finisher error Sensor lo...

Страница 86: ... 2 244 493 05 Service finisher error Sensor booklet media exit lag jam The sensor booklet media exit activated but did not clear within the specified time Go to 493 05 Sensor booklet media exit lag jam on page 2 246 8xx service error codes Error code Description Action 841 00 Service scanner failure Image pipeline ASIC failure The image pipeline for processing the data that comes from the scanner ...

Страница 87: ...d between the scanner controller card assembly and the RIP card assembly Go to 842 12 Scanner unit assembly communication failure on page 2 252 843 00 Service scanner failure Sensor scanner HP failure An failure occurred while counting the pulses of the scanner drive motor assembly After the Carriage Motor turned on the sensor scanner HP did not turn on within the specified time Go to 843 00 Senso...

Страница 88: ...bly Go to 843 26 Scanner controller card assembly failure 2 on page 2 256 844 00 Service scanner failure Exposure lamp failure A failure has occurred with the exposure lamp Go to 844 00 Exposure lamp failure on page 2 256 844 01 Service scanner failure White reference exposure lamp Illumination failure The large platen glass is not properly installed or missing The white reference initialization o...

Страница 89: ... Switch platen interlock open The system detected that the switch platen interlock is open Go to 846 13 Switch platen interlock open on page 2 261 849 00 Service hard drive error Hard drive configuration ID mismatch The device does not have a hard drive installed even though its configuration ID indicates that a hard drive should be present Go to 849 00 Hard drive failure on page 2 261 9xx service...

Страница 90: ...ard assembly communication failure on page 2 266 940 04 Service data error IM logic failure A software control related error has occurred Go to 940 04 IM logic failure on page 2 268 951 xx Service NVRAM failure RIP card assembly NVRAM failure A failure has occurred in the RIP card assembly NVRAM Go to 951 xx RIP card assembly NVRAM failure on page 2 268 953 xx Service NVRAM failure Operator panel ...

Страница 91: ...oading error has occurred Go to 957 02 BITZ2 initialize failure on page 2 272 980 04 Service duplex comm Duplex controller card assembly communication failure A communication error occurred between the printer engine card assembly and the duplex controller card assembly Go to 980 04 Duplex controller card assembly communication failure on page 2 270 980 05 Service flicker communication error Engin...

Страница 92: ...the device Step Action and questions Yes No 1 POR the device Does the error reoccur Go to step 2 Problem resolved 2 Write down the exact 900 xx error code displayed Turn the device off Clear the print queues Disconnect all communication cables and remove all memory options Remove all ISP and modem cards Restart the device into Diagnostics mode Does the 900 xx error reoccur during startup Go to ste...

Страница 93: ...e device a Multi function printer Go to step 11 Go to step 13 11 Run a copy job Does the 900 xx error reoccur Go to step 31 Go to step 12 12 Run a scan to PC job Does the 900 xx error reoccur Go to step 31 Go to step 13 13 Is there optional memory installed Go to step 14 Go to step16 14 Reinstall the memory and send a print job to the device Does the 900 xx error reoccur Go to step 15 Go to step 1...

Страница 94: ... Restart the printer to operating mode Does the 900 xx error reoccur Go to step 25 Problem resolved 25 Replace the faulty ISP option Restart the device Does the 900 xx error reoccur Go to step 31 Go to step 26 26 Are there any more ISP options to install Go to step 27 Problem resolved 27 Install the next ISP option Restart the device Does the 900 xx error reoccur Go to step 29 Go to step 28 28 Run...

Страница 95: ...he LED Printhead K properly 2 Check the event log for the history of errors that occurred 1 Enter the Diagnostics Menu 2 Navigate to EVENT LOG 3 Touch Display Event Log Has any connection related errors occurred Go to step 111 02 111 04 LED printhead K signal failure on page 2 43 Replace the LED Printhead K Go to LED printhead removal on page 4 105 Step Action and questions Yes No 1 Check the LED ...

Страница 96: ...Replace the LED Printhead C Go to LED printhead removal on page 4 105 Step Action and questions Yes No 1 Check the LED printhead Is the above component properly connected Go to step 2 Replace the connections Replace the printhead flat data cable 2 Replace the LED printhead Go to LED printhead removal on page 4 105 Does the error remain Go to step 3 Problem resolved 3 Replace the printhead interfac...

Страница 97: ...o to LED printhead removal on page 4 105 Does the error remain Go to step 3 Problem resolved 3 Replace the printhead interface contact Does the error remain Go to step 4 Problem resolved 4 POR the machine Does the error continue Replace the upper printer engine PCBA Go to Upper printer engine PCBA removal on page 4 189 Problem resolved Step Action and questions Yes No 1 Check the LED printhead Y f...

Страница 98: ...e Replace the upper printer engine PCBA Go to Upper printer engine PCBA removal on page 4 189 Problem resolved Step Action and questions Yes No 1 Check each LED printhead for proper connections Is the above component properly connected Go to step 2 Replace the connections 2 Replace the printhead flat data cable assembly Does the error remain Go to step 3 Problem resolved 3 Replace the printhead in...

Страница 99: ...gine PCBA card assembly Go to Lower engine PCBA removal on page 4 106 Go to step 5 Problem resolved 5 POR the machine Does the error continue Replace the upper printer engine PCBA Go to Upper printer engine PCBA removal on page 4 189 Problem resolved Step Action and questions Yes No 1 Check the LED printhead for proper connections Is the above component properly connected Go to step 3 Replace the ...

Страница 100: ...e the printhead flat data cable assembly Does the error remain Go to step 3 Problem resolved 4 Replace the printhead interface contact Does the error remain Go to step 4 Problem resolved 5 POR the machine Does the error continue Replace the lower engine PCBA card assembly Go to Lower engine PCBA removal on page 4 106 Go to step 6 Problem resolved 6 POR the machine Does the error continue Replace t...

Страница 101: ...nstall with the correct LED printhead Go to LED printhead removal on page 4 105 Step Action and questions Yes No 1 Check the LED printhead for proper connections Is the above component properly connected Go to step 2 Replace the connections 2 Replace the printhead interface contact Does the error remain Go to step 3 Problem resolved 3 POR the machine Does the error continue Replace the lower engin...

Страница 102: ...l on page 4 189 Problem resolved Step Action and questions Yes No 1 Check the LED printhead for proper connections Is the above component properly connected Go to step 2 Replace the connections 2 Replace the printhead interface contact Does the error remain Go to step 3 Problem resolved 3 POR the machine Does the error continue Replace the lower engine PCBA Go to Lower engine PCBA removal on page ...

Страница 103: ...Does the error continue Replace the lower engine PCBA Go to Lower engine PCBA removal on page 4 106 Go to step 7 Problem resolved 7 POR the machine Does the error continue Replace the upper printer engine PCBA Go to Upper printer engine PCBA removal on page 4 189 Problem resolved Step Action and questions Yes No 1 Check the LED printhead for proper installation Is the LED Printhead properly instal...

Страница 104: ...tions 3 Replace the printhead flat data cable Does the error remain Go to step 4 Problem resolved 4 Replace the printhead interface contact Does the error remain Go to step 5 Problem resolved 5 Check the PC developer drive motor assembly Is the above component properly installed Go to step 6 Replace connections and re install the PC developer drive motor assembly 6 POR the machine Does the error c...

Страница 105: ...Printhead properly installed Go to step 2 Install the LED printhead properly 2 Check the LED printhead for proper connections Is the above component properly connected Replace the LED printhead Go to LED printhead removal on page 4 105 Go to step 3 Replace the connections 3 Replace the printhead flat data cable Does the error remain Go to step 4 Problem resolved 4 Replace the printhead interface c...

Страница 106: ...er engine PCBA Go to Upper printer engine PCBA removal on page 4 189 Problem resolved Step Action and questions Yes No 1 Check the fuser drive motor for proper operation When performing motor tests ensure that all cover and door interlock switches are overridden 1 Enter the Diagnostics Menu 2 Touch MOTOR TESTS 3 Touch PRINTER MOTOR TESTS 4 Touch Fuser lower redrive 1st transfer retract motor Does ...

Страница 107: ... the fuser assembly Is the above component properly connected Go to step 2 Replace the connections 4 Replace the fuser assembly Go to Fuser assembly removal on page 4 87 Does the error remain Go to step 3 Problem resolved 5 POR the machine Does the error continue Replace the lower engine PCBA Go to Lower engine PCBA removal on page 4 106 Go to step 6 Problem resolved 6 POR the machine Does the err...

Страница 108: ...4 87 Does the error remain Go to step 3 Problem resolved 3 POR the machine Does the error continue Replace the upper printer engine PCBA Go to Upper printer engine PCBA removal on page 4 189 Problem resolved Step Action and questions Yes No 1 Check the fuser assembly Is the above component properly connected Go to step 2 Remove foreign particles and replace the connections 2 Replace the fuser asse...

Страница 109: ...7 Does the error remain Go to step 4 Problem resolved 4 Check the fuser driver for poor connection or damaged connector Is the fuser driver properly connected Go to step 5 Replace the connection 5 Replace the fuser driver See Fuser driver PCBA removal on page 4 93 Does the error remain Go to step 6 Problem resolved 6 Check the sub LVPS for poor connection or damaged connector Is the component prop...

Страница 110: ...tions Yes No 1 Enter into invalid engine code and flash the PJL file Go to support lexmark com or go to the following link http downloads lexmark com webcontent kbase downloads 744_001_00nvm_ver2 zip Does the error remain Go to step 2 Problem resolved 2 Check if the fuser assembly is properly connected Is the fuser assembly properly connected Go to step 3 Remove foreign particles and replace the c...

Страница 111: ...5 Call the next level of support Problem resolved Step Action and questions Yes No 1 Check the fuser assembly Is the above component properly connected Go to step 2 Remove foreign particles and replace the connections 2 Replace the fuser assembly Go to Fuser assembly removal on page 4 87 Does the error remain Go to step 3 Problem resolved 3 POR the machine Does the error continue Replace the upper...

Страница 112: ... removal on page 4 93 Does the error remain Go to step 6 Problem resolved 6 Check the sub LVPS for poor connection or damaged connector Is the component properly connected Go to step 7 Replace the connection 7 Replace the sub LVPS See Sub LVPS PCBA removal on page 4 168 Does the error remain Go to step 8 Problem resolved 8 Check the LVPS for poor connection or damaged connector Is the component pr...

Страница 113: ...he connections 2 Replace the fuser assembly Go to Fuser assembly removal on page 4 87 Does the error remain Go to step 3 Problem resolved 3 POR the machine Does the error continue Replace the upper printer engine PCBA Go to Upper printer engine PCBA removal on page 4 189 Problem resolved Step Action and questions Yes No 1 Check the fuser assembly Is the above component properly connected Go to ste...

Страница 114: ...Go to step 2 Remove foreign particles and replace the connections 2 Replace the fuser assembly Go to Fuser assembly removal on page 4 87 Does the error remain Go to step 3 Problem resolved 3 POR the machine Does the error continue Replace the upper printer engine PCBA Go to Upper printer engine PCBA removal on page 4 189 Problem resolved Step Action and questions Yes No 1 Check the fuser driver PC...

Страница 115: ...Go to Fuser driver PCBA removal on page 4 93 Problem resolved Step Action and questions Yes No 1 Remove the sub LVPS PCBA Go to Sub LVPS PCBA removal on page 4 168 Check the fuser driver PCBA Is the above component properly connected Go to step 2 Replace the connections 2 Replace the fuser driver PCBA Go to Fuser driver PCBA removal on page 4 93 Does the error remain Go to step 3 Problem resolved ...

Страница 116: ...moval on page 4 93 Does the error remain Go to step 2 Problem resolved 2 POR the machine Does the error continue Replace the upper printer engine PCBA Go to Upper printer engine PCBA removal on page 4 189 Problem resolved Step Action and questions Yes No 1 Remove the fuser cooling fan Go to Fuser cooling fan removal on page 4 87 Replace the fuser driver PCBA Go to Fuser driver PCBA removal on page...

Страница 117: ...blem resolved Step Action and questions Yes No 1 Check the fuser driver PCBA Is the above component properly connected Go to step 2 Replace the connections 2 Replace the fuser driver PCBA Go to Fuser driver PCBA removal on page 4 93 Does the error remain Go to step 3 Problem resolved 3 POR the machine Does the error continue Replace the upper printer engine PCBA Go to Upper printer engine PCBA rem...

Страница 118: ...idge 2 Check the ATC sensor PCB Is the above component properly connected Go to step 3 Replace the connections 3 Remove the ATC sensor PCB Go to ATC sensor PCB removal on page 4 30 Does the error remain Go to step 4 Problem resolved 4 Check the toner dispense motor for proper operation When performing motor tests ensure that all cover and door interlock switches are overridden 1 Enter the Diagnost...

Страница 119: ...achine Does the error continue Replace the lower engine PCBA Go to Lower engine PCBA removal on page 4 106 If the error remains then go to step 9 Problem resolved 9 POR the machine Does the error continue Replace the upper printer engine PCBA Go to Upper printer engine PCBA removal on page 4 189 Problem resolved Step Action and questions Yes No 1 Check the path from the toner cartridge to the deve...

Страница 120: ...n When performing motor tests ensure that all cover and door interlock switches are overridden 1 Enter the Diagnostics Menu 2 Touch MOTOR TESTS 3 Touch PRINTER MOTOR TESTS 4 Touch Developer motor Does the above component operate properly Go to step 8 Go to step 7 7 Check the developer motor for proper connection Is the above component properly connected Replace the PC developer drive motor Go to P...

Страница 121: ...oper operation When performing motor tests ensure that all cover and door interlock switches are overridden 1 Enter the Diagnostics Menu 2 Touch MOTOR TESTS 3 Touch PRINTER MOTOR TESTS 4 Touch M toner dispense motor Does the above component operate properly Go to step 6 Go to step 5 5 Check the toner dispense motor for proper connection Is the above component properly connected Replace the toner d...

Страница 122: ...tion and questions Yes No 1 Check the path from the toner cartridge to the developer Is the above component free from obstacles Go to step 2 Remove the toner blockages including internal clogs inside the developer and toner cartridge 2 Check the ATC sensor PCB Is the above component properly connected Go to step 3 Replace the connections 3 Remove the ATC sensor PCB Go to ATC sensor PCB removal on ...

Страница 123: ...erate properly Go to step 8 Go to step 7 7 Check the developer motor for proper connection Is the above component properly connected Replace the PC developer drive motor Go to PC developer drive motor removal on page 4 140 Replace the connection 8 POR the machine Does the error continue Replace the lower engine PCBA Go to Lower engine PCBA removal on page 4 106 If the error remains then go to step...

Страница 124: ...e registration drive motor Go to Registration drive motor removal on page 4 150 Replace the connections 3 POR the machine Does the error continue Replace the lower engine PCBA Go to Lower engine PCBA removal on page 4 106 If the error remains then go to step 4 Problem resolved 4 POR the machine Does the error continue Replace the upper printer engine PCBA Go to Upper printer engine PCBA removal on...

Страница 125: ...ck the drum motor for proper operation When performing motor tests ensure that all cover and door interlock switches are overridden 1 Enter the Diagnostics Menu 2 Touch MOTOR TESTS 3 Touch PRINTER MOTOR TESTS 4 Touch KCMY drum transfer belt motor Does the above component operate properly motor rotating Go to step 3 Go to step 2 2 Check the drum motor for proper connection Is the above component pr...

Страница 126: ...evel removal on page 4 157 Reseat the cable 4 Check the tray 1 media feed lift motor for proper operation When performing motor tests ensure that all cover and door interlock switches are overridden Navigate to Diagnostics Menu MOTOR TESTS PRINTER MOTOR TESTS Tray1 Feed Lift Motor Does it operate properly Go to step 6 Go to step 5 5 Check the motor for proper connection Is it properly connected Re...

Страница 127: ...y connected Replace the transfer belt motor Go to PC developer drive motor removal on page 4 140 Replace the connections 3 POR the machine Does the error continue Replace the lower engine PCBA Go to Lower engine PCBA removal on page 4 106 Go to step 4 Problem resolved 4 POR the machine Does the error continue Replace the upper printer engine PCBA Go to Upper printer engine PCBA removal on page 4 1...

Страница 128: ...cted Does the above component operate properly motor rotating Go to step 5 Go to step 4 4 Check the 1st belt rolls retract motor for proper connection Is the above component properly connected Replace the 1st transfer belt rolls retract motor Go to Fuser lower redrive 1st BTR retract motor removal on page 4 99 Replace the connections 5 POR the machine Does the error continue Replace the upper prin...

Страница 129: ...rly motor rotating Go to step 5 Go to step 4 4 Check the 2nd transfer roller retract motor for proper connection Is the above component properly connected Replace the printer left duplex door assembly Go to Printer left duplex door assembly removal on page 4 145 Replace the connections 5 POR the machine Does the error continue Replace the upper printer engine PCBA Go to Upper printer engine PCBA r...

Страница 130: ...es the error remain Go to step 2 Problem resolved 2 Check the toner smart chip PCB Is the above component properly connected Go to step 3 Replace the connections 3 Check the toner dispense motor for proper operation When performing motor tests ensure that all cover and door interlock switches are overridden 1 Enter the Diagnostics Menu 2 Touch MOTOR TESTS 3 Touch PRINTER MOTOR TESTS 4 Touch K tone...

Страница 131: ... Touch MOTOR TESTS 3 Touch PRINTER MOTOR TESTS 4 Touch C toner dispense motor Does the above component operate properly motor rotating Go to step 5 Go to step 4 4 Check the toner dispense motor for proper connection Is the above component properly connected Replace the toner dispense motor Go to Toner dispense motor removal on page 4 173 Replace the connections 5 POR the machine Does the error con...

Страница 132: ... step 4 4 Check the toner dispense motor for proper connection Is the above component properly connected Replace the toner dispense motor Go to Toner dispense motor removal on page 4 173 Replace the connections 5 POR the machine Does the error continue Replace the upper printer engine PCBA Go to Upper printer engine PCBA removal on page 4 189 Problem resolved Step Action and questions Yes No 1 Rep...

Страница 133: ... Replace the connections 5 POR the machine Does the error continue Replace the upper printer engine PCBA Go to Upper printer engine PCBA removal on page 4 189 Problem resolved Step Action and questions Yes No 1 Check the fuser cooling fan Is the above component properly connected Go to step 2 Replace the connections 2 Replace the fuser cooling fan Go to Fuser cooling fan removal on page 4 87 Does ...

Страница 134: ... PCBA removal on page 4 189 Problem resolved Step Action and questions Yes No 1 Check the LVPS sub cooling fan Is the above component properly connected Go to step 2 Replace the connections 2 Replace the LVPS sub cooling fan Go to LVPS sub cooling fan removal on page 4 118 Does the error continue Go to step 3 Problem resolved 3 POR the machine Does the error continue Replace the lower engine PCBA ...

Страница 135: ... resolved 3 POR the machine Does the error continue Replace the lower engine PCBA Go to Lower engine PCBA removal on page 4 106 Problem resolved Step Action and questions Yes No 1 Check the PC developer drive motor cooling fan Is the above component properly connected Go to step 2 Replace the connections 2 Replace the PC developer drive motor cooling fan Go to PC developer drive motor cooling fan ...

Страница 136: ...nections 2 Replace the suction fan Go to Suction fan removal on page 4 170 Does the error continue Go to step 3 Problem resolved 3 POR the machine Does the error continue Replace the upper printer engine PCBA Go to Upper printer engine PCBA removal on page 4 189 Problem resolved Step Action and questions Yes No 1 Check the front upper cooling fan Is the above component properly connected Go to ste...

Страница 137: ...r exhaust fan Is the above component properly connected Go to step 2 Replace the connections 2 Replace the upper exhaust fan Go to Upper exhaust cooling fan removal on page 4 187 Does the error continue Go to step 3 Problem resolved 3 POR the machine Does the error continue Replace the upper printer engine PCBA Go to Upper printer engine PCBA removal on page 4 189 Problem resolved Step Action and ...

Страница 138: ...ck the following parts circuits for overcurrent and overvoltage LED printhead Y M C K Printhead interface contact Y M C K Are the current and voltage values normal Go to step 2 Replace the faulty parts 2 POR the machine Does the error continue Replace the lower engine PCBA Go to Lower engine PCBA removal on page 4 106 Problem resolved Step Action and questions Yes No 1 Warning Remove the cause of ...

Страница 139: ...resolved Step Action and questions Yes No 1 Warning Remove the cause of blown fuse before replacing the lower engine PCBA Check the finisher circuit for overcurrent and overvoltage Are the current and voltage values normal Go to step 2 Replace the faulty parts or repair the circuits 2 POR the machine Does the error continue Replace the lower engine PCBA Go to Lower engine PCBA removal on page 4 10...

Страница 140: ...n Are the current and voltage values normal Go to step 2 Replace the faulty parts or repair the circuits 2 POR the machine Does the error continue Replace the lower engine PCBA Go to Lower engine PCBA removal on page 4 106 Problem resolved Step Action and questions Yes No 1 Warning Remove the cause of blown fuse before replacing the lower engine PCBA Check the following parts circuits for overcurr...

Страница 141: ...re replacing the lower engine PCBA Check the following parts circuits for overcurrent and overvoltage 2nd transfer roller contact retract motor Printer left duplex door assembly Are the current and voltage values normal Go to step 2 Replace the faulty parts or repair the circuits 2 POR the machine Does the error continue Replace the lower engine PCBA Go to Lower engine PCBA removal on page 4 106 P...

Страница 142: ...gine PCBA removal on page 4 106 Problem resolved Step Action and questions Yes No 1 Warning Remove the cause of blown fuse before replacing the lower engine PCBA Check the PC Developer drive motor Y M C circuits for overcurrent and overvoltage Are the current and voltage values normal Go to step 2 Replace the faulty parts or repair the circuits 2 POR the machine Does the error continue Replace the...

Страница 143: ...The machine Does the error continue Go to step 2 Problem resolved 2 Turn the power OFF and check whether there is poor connection between the EEPROM and the upper engine PCBA Are there no problems with the connection Turn the power OFF and replace the upper printer engine assembly Go to Upper printer engine PCBA removal on page 4 189 Step Action and questions Yes No 1 Warning Remove the cause of b...

Страница 144: ...o 1 Warning Remove the cause of blown fuse before replacing the lower engine PCBA Check the registration transport roller assembly Are the current and voltage values normal Go to step 2 Replace the faulty part or repair the circuits 2 POR the machine Does the error continue Replace the lower engine PCBA Go to Lower engine PCBA removal on page 4 106 Problem resolved Step Action and questions Yes No...

Страница 145: ... 4 106 Go to step 6 Problem resolved 6 POR the machine and perform a PRINT test Go to PRINT TESTS on page 3 26 Does the error continue Replace the upper printer engine PCBA Go to Upper printer engine PCBA removal on page 4 189 Problem resolved Step Action and questions Yes No 1 Check the media path Is the media path free of any media fragments Go to step 2 Remove any media or media fragments 2 Che...

Страница 146: ...e media transport MPF drive motor for proper operation When performing motor tests ensure that all cover and door interlock switches are overridden 1 Enter the Diagnostics Menu 2 Touch MOTOR TESTS 3 Touch PRINTER MOTOR TESTS 4 Touch Tray x feed lift motor pick 5 Touch Tray x feed lift motor feed Does the above component operate properly Go to step 8 Go to step 7 7 Check the media feed lift motor f...

Страница 147: ... display on the operator panel change every time the sensing area of the above sensor is interrupted or blocked Go to step 4 Go to step 3 3 Check the sensor registration for proper connection Is the above component properly connected Replace the registration transport roll assembly Go to Registration transport roller assembly removal on page 4 152 Replace the connections 4 Check the registration d...

Страница 148: ...127 Replace the connection 8 POR the machine and perform a PRINT test Go to PRINT TESTS on page 3 26 Does the error continue Replace the lower engine PCBA Go to Lower engine PCBA removal on page 4 106 Problem resolved 9 POR the machine and perform a PRINT test Go to PRINT TESTS on page 3 26 Does the error continue Replace the upper printer engine PCBA Go to Upper printer engine PCBA removal on pag...

Страница 149: ... Go to Step 5 5 Check the sensor registration for proper connection Is the above component properly connected Replace the media transport MPF drive motor assembly Go to Media transport MPF drive motor removal on page 4 127 Replace the connections 6 Check the fuser drive motor for proper operation 1 Enter the Diagnostics Menu 2 Touch MOTOR TESTS 3 Touch PRINTER MOTOR TESTS 4 Touch Fuser lower redri...

Страница 150: ...4 127 Replace the connection 10 POR the machine Does the error continue Replace the lower engine PCBA Go to Lower engine PCBA removal on page 4 106 Problem resolved Step Action and questions Yes No 1 Check the media path Is the media path free of any media fragments Go to step 2 Remove any media or media fragments 2 Check the registration transport roll assembly Is the above component free of exce...

Страница 151: ...egistration motor for proper connection Is the above component properly connected Replace the registration drive motor Go to Registration drive motor removal on page 4 150 Replace the connection 7 Check the media feed lift motor assembly for proper operation When performing motor tests ensure that all cover and door interlock switches are overridden 1 Enter the Diagnostics Menu 2 Touch MOTOR TESTS...

Страница 152: ...he media transport MPF drive motor Go to Media transport MPF drive motor removal on page 4 127 Replace the connections 11 Check the tray module upper transport motor for proper operation When performing motor tests ensure that all cover and door interlock switches are overridden 1 Enter the Diagnostics Menu 2 Touch MOTOR TESTS 3 Touch PRINTER MOTOR TESTS 4 Touch 1TM 3TM TTM upper transport motor D...

Страница 153: ... component properly connected Replace the tray module lower transport motor Go to Tray module lower transport motor removal on page 4 283 Replace the connection 15 Perform a print test Go to PRINT TESTS on page 3 26 Does the error continue Replace the lower engine PCBA Go to Lower engine PCBA removal on page 4 106 Problem resolved Step Action and questions Yes No 1 Check the media path Is the medi...

Страница 154: ...lt for proper operation 1 Enter the Diagnostics Menu 2 Touch SENSOR TESTS 3 Touch PRINTER SENSOR TESTS 4 Touch Sensor paper on belt Does the display on the operator panel change every time the sensing area of the above sensor is interrupted or blocked Go to step 4 Go to step 3 3 Check the sensor media on belt for proper connection Is the above component properly connected Replace the sensor media ...

Страница 155: ...oller contact retract motor assembly for proper connection Is the above component properly connected Replace the 2nd transfer roller contact retract motor assembly Go to 2nd Transfer Roller Contact Retract Motor assembly removal on page Replace the connection 8 Check the media transport MPF drive motor assembly for proper operation When performing motor tests ensure that all cover and door interlo...

Страница 156: ...2 Perform a print test Go to PRINT TESTS on page 3 26 Does the error continue Replace the lower engine PCBA Go to Lower engine PCBA removal on page 4 106 Problem resolved Step Action and questions Yes No 1 Check the media path Is the media path free of any media fragments Go to step 2 Remove any media or media fragments 2 Check the sensor fuser exit for proper operation 1 Enter the Diagnostics Men...

Страница 157: ...e the sensing area of the above sensor is interrupted or blocked Go to step 4 Go to step 3 3 Check the sensor fuser exit for proper connection Is the above component properly connected Replace the fuser assembly Go to Fuser assembly removal on page 4 87 Replace the connection 4 Check the registration drive motor assembly for proper operation When performing motor tests ensure that all cover and do...

Страница 158: ...perly connected Replace the 2nd transfer roller contact retract motor assembly Go to 2nd Transfer Roller Contact Retract Motor assembly removal on page Replace the connection 8 Check the fuser drive motor for proper operation When performing motor tests ensure that all cover and door interlock switches are overridden 1 Enter the Diagnostics Menu 2 Touch MOTOR TESTS 3 Touch PRINTER MOTOR TESTS 4 To...

Страница 159: ...MPF drive motor removal on page 4 127 Replace the connection 12 Check the registration clutch for proper operation When performing motor tests ensure that all cover and door interlock switches are overridden 1 Enter the Diagnostics Menu 2 Touch MOTOR TESTS 3 Touch PRINTER MOTOR TESTS 4 Touch Registration clutch Does the above component operate properly Go to step 14 Go to step 13 13 Check the regi...

Страница 160: ...ser assembly removal on page 4 87 3 Check the sensor fuser exit for proper connection Is the above component properly connected Replace the fuser assembly Go to Fuser assembly removal on page 4 87 Replace the connections 4 Check the upper redrive motor When performing motor tests ensure that all cover and door interlock switches are overridden 1 Enter the Diagnostics Menu 2 Touch MOTOR TESTS 3 Tou...

Страница 161: ...eplace the connection 8 Check the fuser lower redrive 1st transfer retract motor for proper operation When performing motor tests ensure that all cover and door interlock switches are overridden 1 Enter the Diagnostics Menu 2 Touch MOTOR TESTS 3 Touch PRINTER MOTOR TESTS 4 Touch Fuser lower redrive 1st transfer retract motor Does the above component operate properly Go to step 8 Go to step 9 9 Che...

Страница 162: ... the above component properly connected Replace the upper redrive assembly Go to Upper redrive assembly removal on page 4 192 Replace the connection 4 Check the upper redrive assembly Is the above component free of excess wear and damage Go to step 5 Replace the upper redrive assembly Go to Upper redrive assembly removal on page 4 192 5 Check the printer left duplex door assembly Is the above comp...

Страница 163: ...r upper redrive for proper connectin Is the above component properly connected Replace the upper redrive assembly Go to Upper redrive assembly removal on page 4 192 Replace the connections 5 Check the fuser drive motor for proper operation When performing motor tests ensure that all cover and door interlock switches are overridden 1 Enter the Diagnostics Menu 2 Touch MOTOR TESTS 3 Touch PRINTER MO...

Страница 164: ... 192 Replace the connection 9 POR the machine and perform a print test Go to PRINT TESTS on page 3 26 Does the error continue Replace the lower engine PCBA card Go to Lower engine PCBA removal on page 4 106 Problem resolved 10 POR the machine and perform a print test Go to PRINT TESTS on page 3 26 Does the error continue Replace the upper printer engine PCBA Go to Upper printer engine PCBA removal...

Страница 165: ... interlock switches are overridden 1 Enter the Diagnostics Menu 2 Touch MOTOR TESTS 3 Touch PRINTER MOTOR TESTS 4 Touch upper redrive motor forward 5 Touch upper redrive motor reverse Does the above component operate properly Go to step 7 Go to step 6 6 Check the upper redrive motor for proper connection Is the above component properly connected Replace the upper redrive assembly Go to Upper redri...

Страница 166: ...ted Replace the printer left duplex door assembly Go to Printer left duplex door assembly removal on page 4 145 Replace the connections 4 POR the machine and perform a print test Go to PRINT TESTS on page 3 26 Does the error continue Replace the lower engine PCBA Go to Lower engine PCBA removal on page 4 106 Problem resolved 5 POR the machine and perform a print test Go to PRINT TESTS on page 3 26...

Страница 167: ...r left duplex door assembly Go to Printer left duplex door assembly removal on page 4 145 Replace the connections 5 Check the duplex motor for proper operation When performing motor tests ensure that all cover and door interlock switches are overridden 1 Enter the Diagnostics Menu 2 Touch MOTOR TESTS 3 Touch PRINTER MOTOR TESTS 4 Touch Duplex motor reverse Does the above component operate properly...

Страница 168: ...sts ensure that all cover and door interlock switches are overridden 1 Enter the Diagnostics Menu 2 Touch MOTOR TESTS 3 Touch PRINTER MOTOR TESTS 4 Touch Upper redrive diverter gate Does the above component operate properly Go to step 11 Go to step 10 10 Check the upper redrive diverter gate for proper connection Is the above component properly connected Replace the upper redrive assembly Go to Up...

Страница 169: ... 5 Go to step 4 4 Check the sensor registration Is the above component properly connected Replace the media transport MPF drive motor Go to Media transport MPF drive motor removal on page 4 127 Replace the connection 5 Check the Duplex Motor for proper operation When performing motor tests ensure that all cover and door interlock switches are overridden 1 Enter the Diagnostics Menu 2 Touch MOTOR T...

Страница 170: ...o to step 3 3 Check the sensor tray 2 feed out for proper connection Is the above component properly connected Clean or replace the sensor tray 2 feed out Go to Sensor tray module feedout removal on page 4 276 Replace the connection 4 Check the connection between the lower engine PCBA and the tray module controller PCBA Are the above components properly connected Replace the tray module controller...

Страница 171: ... out for proper operation 1 Enter the Diagnostics Menu 2 Touch SENSOR TESTS 3 Touch PRINTER SENSOR TESTS 4 Touch Sensor tray 2 feed out Does the display on the operator panel change every time the sensing area of the above sensor is interrupted or blocked Go to step 6 Go to step 5 5 Check the sensor tray 2 feed out for proper connection Is the above component properly connected Clean or replace th...

Страница 172: ...ce the upper printer engine PCBA Go to Upper printer engine PCBA removal on page 4 189 Problem resolved Step Action and questions Yes No 1 Check the media path Is the media path free of any media fragments Go to step 2 Remove any media or media fragments 2 Check the pick feed rollers for wear Is the above component free of excess wear and damage Go to step 3 Replace the pick feed rollers Go to Pic...

Страница 173: ... to step 8 Go to step 7 7 Check the tray module upper transport motor for proper connection Is the above component properly connected Replace the tray module upper transport motor Go to Tray module upper transport motor removal on page 4 290 Replace the connections 8 POR the machine and perform a print test Go to PRINT TESTS on page 3 26 Does the error continue Replace the lower engine PCBA Go to ...

Страница 174: ...er PCBA removal on page 4 282 If the problem remains go to step 5 Replace the connections 5 POR the machine and perform a print test Go to PRINT TESTS on page 3 26 Does the error continue Replace the lower engine PCBA Go to Lower engine PCBA removal on page 4 106 Problem resolved 6 POR the machine and perform a print test Go to PRINT TESTS on page 3 26 Does the error continue Replace the upper pri...

Страница 175: ...es are overridden 1 Enter the Diagnostics Menu 2 Touch MOTOR TESTS 3 Touch PRINTER MOTOR TESTS 4 Touch 1TM 3TM TTM upper transport motor Does the above component operate properly Go to step 8 Go to step 7 7 Check the tray module upper transport motor for proper connection Is the above component properly connected Replace the tray module upper transport motor Go to Tray module upper transport motor...

Страница 176: ...cess wear and damage Go to step 3 Replace the pick feed rollers Go to Pick roller removal on page 4 144 3 Check the transport rollers for wear Is the above component free of excess wear and damage Go to step 4 Replace the transport rollers Go to Tray module transport rollers removal on page 4 289 4 Check the sensor tray 3 feed out for proper operation 1 Enter the Diagnostics Menu 2 Touch SENSOR TE...

Страница 177: ...lace the connections 8 Check the the tray module controller PCBA for proper connection Is the above component properly connected Replace the tray module controller PCBA Go to Tray module controller PCBA removal on page 4 282 If the error remains then go to step 9 Replace the connections 9 POR the machine and perform a print test Go to PRINT TESTS on page 3 26 Does the error continue Replace the lo...

Страница 178: ...PCBA removal on page 4 282 If the problem remains go to step 5 Replace the connections 5 POR the machine and perform a print test Go to PRINT TESTS on page 3 26 Does the error continue Replace the lower engine PCBA Go to Lower engine PCBA removal on page 4 106 Problem resolved 6 POR the machine and perform a print test Go to PRINT TESTS on page 3 26 Does the error continue Replace the upper printe...

Страница 179: ...ray 4 feed out Go to Sensor tray module feedout removal on page 4 276 Replace the connection 6 Check the tray module feed lift motor for proper operation When performing motor tests ensure that all cover and door interlock switches are overridden 1 Enter the Diagnostics Menu 2 Touch MOTOR TESTS 3 Touch PRINTER MOTOR TESTS 4 Touch Tray 4 feed lift motor feed 5 Touch Tray 4 feed lift motor lift Does...

Страница 180: ...PCBA for proper connection Is the above component properly connected Replace the tray module controller PCBA Go to Tray module controller PCBA removal on page 4 282 Go to step 11 Replace the connections 11 POR the machine and perform a print test Go to PRINT TESTS on page 3 26 Does the error continue Replace the lower engine PCBA Go to Lower engine PCBA removal on page 4 106 Problem resolved 12 PO...

Страница 181: ...out for proper connection Is the above component properly connected Clean or replace the sensor tray 4 feed out Go to Sensor tray module feedout removal on page 4 276 Replace the connection 6 Check the tray module feed lift motor for proper operation When performing motor tests ensure that all cover and door interlock switches are overridden 1 Enter the Diagnostics Menu 2 Touch MOTOR TESTS 3 Touch...

Страница 182: ...erly connected Replace the tray module controller PCBA Go to Tray module controller PCBA removal on page 4 282 If the error remains then go to step 11 Replace the connections 11 POR the machine and perform a print test Go to PRINT TESTS on page 3 26 Does the error continue Replace the lower engine PCBA Go to Lower engine PCBA removal on page 4 106 Problem resolved 12 POR the machine and perform a ...

Страница 183: ...r wear Is the above component free of excess wear and damage Go to step 3 Replace the feed rollers Go to HCF feed roll assembly removal on page 4 434 3 Check the transport rollers for wear Is the above component free of excess wear and damage Go to step 4 Replace the transport rollers Go to HCF transport roller kit removal on page 4 452 4 Check the sensor tray 5 feed out for proper connection Is t...

Страница 184: ...place the HCF transport motor Go to HCF transport motor removal on page 4 452 Replace the connections 9 Check the the HCF controller card PCBA for proper connection Is the above component properly connected Replace the HCF controller card PCBA Go to HCF controller card PCBA removal on page 4 432 Go to step 10 Replace the connections 10 POR the machine and perform a print test Go to PRINT TESTS on ...

Страница 185: ... above component properly connected Replace the HCF transport motor Go to HCF transport motor removal on page 4 452 Replace the connections 6 Check the the HCF controller card PCBA for proper connection Is the above component properly connected Replace the HCF controller card PCBA Go to HCF controller card PCBA removal on page 4 432 Go to step 7 Replace the connections 7 POR the machine and perfor...

Страница 186: ...4 Touch HCF feed lift motor feed 5 Touch HCF feed lift motor lift Does the above component operate properly Go to step 7 Go to step 6 6 Check the HCF feed lift motor for proper connection Is the above component properly connected Replace the HCF feed lift motor Go to HCF feed lift motor removal on page 4 433 Replace the connections 7 Check the HCF transport motor for proper operation When performi...

Страница 187: ...dia path Is the media path free of any media fragments Go to step 2 Remove any media or media fragments 2 Check the MPF rollers for wear Is the MPF feed pick roller assembly free of excess wear Go to step 3 Replace the MPF feed roller Go to MPF roller removal on page 4 130 3 Check the sensor MPF feed out for proper operation 1 Enter the Diagnostics Menu 2 Touch SENSOR TESTS 3 Touch PRINTER SENSOR ...

Страница 188: ... on page 4 150 Replace the connections 7 Check the 2nd transfer roller contact retract motor for proper operation When performing motor tests ensure that all cover and door interlock switches are overridden 1 Enter the Diagnostics Menu 2 Touch MOTOR TESTS 3 Touch PRINTER MOTOR TESTS 4 Touch 2nd transfer rollers retract motor contracted 5 Touch 2nd transfer rollers retract motor retracted Does the ...

Страница 189: ...ower redrive 1st BTR retract motor removal on page 4 99 Replace the connection 11 Check the media transport MPF drive motor assembly for proper operation When performing motor tests ensure that all cover and door interlock switches are overridden 1 Enter the Diagnostics Menu 2 Touch MOTOR TESTS 3 Touch PRINTER MOTOR TESTS 4 Touch MPF feed lift motor feed 5 Touch MPF feed lift motor pick Does the a...

Страница 190: ...moval on page 4 152 Replace the connection 15 POR the machine Does the error continue Replace the lower engine PCBA card assembly Go to Lower engine PCBA removal on page 4 106 Problem resolved Step Action and questions Yes No 1 Check the media path Is the media path free of any media fragments Go to step 2 Remove any media or media fragments 2 Check the MPF rollers for wear Is the MPF feed rollers...

Страница 191: ...ep 7 Go to step 6 6 Check the MPF feed lift motor for proper connection Is the above component properly connected Replace the MPF tray feeder Go to MPF tray feeder removal on page 4 131 Go to step 7 7 Print a sample page using the MPF Does the error continue Replace the lower engine PCBA Go to Lower engine PCBA removal on page 4 106 Problem resolved 8 Print a sample page using the MPF Does the err...

Страница 192: ...nterlock switches are overridden 1 Enter the Diagnostics Menu 2 Touch MOTOR TESTS 3 Touch PRINTER MOTOR TESTS 4 Touch MPF feed lift motor forward 5 Touch MPF feed lift motor reverse Does the motor rotate normally Go to step 7 Go to step 6 6 Check the MPF feed motor for proper connection Is the above component properly connected Replace the MPF tray feeder Go to MPF tray feeder removal on page 4 13...

Страница 193: ...SENSOR TESTS 4 Touch Sensor ADF feed out Does the display on the operator panel change every time the sensor actuator is operated Go to step 5 Go to step 4 4 Check the sensor ADF feed out for proper connection Is the above component properly connected Replace the sensor ADF feed out Go to Sensor ADF feedout removal on page 4 246 Replace the connections 5 Check the ADF feed motor for proper operati...

Страница 194: ...ESTS 3 Touch ADF SCANNER SENSOR TESTS 4 Touch Sensor ADF pre registration Does the display on the operator panel change every time the sensor actuator is operated Go to step 4 Replace the sensor ADF pre registration Go to Sensor ADF pre registration removal on page 4 247 3 Check the sensor ADF pre registration for proper connection Is the above component properly connected Go to step 4 Replace con...

Страница 195: ... Replace the connection 4 Check the ADF feed motor for proper operation When performing motor tests ensure that all cover and door interlock switches are overridden 1 Enter the Diagnostics Menu 2 Touch MOTOR TESTS 3 Touch ADF SCANNER MOTOR TESTS 4 Touch ADF feed motor forward 5 Touch ADF feed motor reverse Does the motor rotate normally Go to step 6 Go to step 5 5 Check the ADF feed motor for prop...

Страница 196: ... feed pick roller assembly removal on page 4 213 or ADF separation roller guide removal on page 4 226 3 Check the inverter gate Is the inverter gate free of damage and warpage and does it move smoothly Go to step 4 Replace the ADF sensor actuator guide Go to ADF sensor actuator guide removal on page 4 225 4 Check the sensor ADF pre registration for proper operation 1 Enter the Diagnostics Menu 2 T...

Страница 197: ... the connections 8 Check the ADF nip release solenoid for proper operation When performing motor tests ensure that all cover and door interlock switches are overridden 1 Enter the Diagnostics Menu 2 Touch MOTOR TESTS 3 Touch ADF SCANNER MOTOR TESTS 4 Touch ADF nip release solenoid Does the above component operate properly Go to step 10 Go to step 9 9 Check the ADF nip release solenoid for proper c...

Страница 198: ...or guide Go to ADF sensor actuator guide removal on page 4 225 4 Check the sensor ADF pre registration for proper operation 1 Enter the Diagnostics Menu 2 Touch SENSOR TESTS 3 Touch ADF SCANNER SENSOR TESTS 4 Touch Sensor ADF pre registration Does the display on the operator panel change every time the sensing area of the above sensor is interrupted or blocked Go to step 6 Go to step 5 5 Check the...

Страница 199: ... Go to step 9 9 Check the ADF nip release solenoid for proper connection Is the above component properly connected Replace the ADF nip release solenoid Go to ADF nip release solenoid removal on page 4 219 Replace the connections 10 Place an undamaged document in the ADF and perform an ADF test Does the error remain Replace the ADF controller PCBA Go to ADF controller PCBA removal on page 4 206 Pro...

Страница 200: ...oper operation 1 Enter the Diagnostics Menu 2 Touch SENSOR TESTS 3 Touch ADF SCANNER SENSOR TESTS 4 Touch Sensor ADF inverter Does the display on the operator panel change every time the sensing area of the above sensor is interrupted or blocked Go to step 7 Go to step 6 6 Check the sensor ADF inverter for proper connection Is the above component properly connected Replace the sensor ADF inverter ...

Страница 201: ...ck the sensor ADF registration for proper operation 1 Enter the Diagnostics Menu 2 Touch SENSOR TESTS 3 Touch ADF SCANNER SENSOR TESTS 4 Touch Sensor ADF registration Does the display on the operator panel change every time the sensing area of the above sensor is interrupted or blocked Go to step 4 Go to step 3 3 Check the sensor ADF registration for proper connection Is the above component proper...

Страница 202: ... operator panel change every time the sensing area of the above sensor is interrupted or blocked Go to step 6 Go to step 4 5 Check the sensor ADF registration for proper connection Is the above component properly connected Replace the sensor ADF registration Go to Sensor ADF registration removal on page 4 250 Replace the connections 6 Check the ADF feed motor for proper operation When performing m...

Страница 203: ... to ADF feed pick roller assembly removal on page 4 213 3 Check the ADF inverter Is the inverter gate free of damage and warpage and does it move smoothly Go to step 4 Replace the ADF sensor actuator guide Go to ADF sensor actuator guide removal on page 4 225 4 Check the sensor ADF pre registration for proper operation 1 Enter the Diagnostics Menu 2 Touch SENSOR TESTS 3 Touch ADF SCANNER SENSOR TE...

Страница 204: ...lace the sensor ADF pre registration Go to Sensor ADF pre registration removal on page 4 247 Replace the connections 8 Check the ADF feed motor for proper operation When performing motor tests ensure that all cover and door interlock switches are overridden 1 Enter the Diagnostics Menu 2 Touch MOTOR TESTS 3 Touch ADF SCANNER MOTOR TESTS 4 Touch ADF feed motor forward 5 Touch ADF feed motor reverse...

Страница 205: ...form an ADF test Does the error remain Replace the ADF controller PCBA Go to ADF controller PCBA removal on page 4 206 Problem resolved Step Action and questions Yes No 1 Check the media path Is the media path free of any media or media fragments Go to step 2 Remove any media or media fragments 2 Check the ADF rollers for wear Is the ADF feed pick roller assembly or the ADF separation roller guide...

Страница 206: ...step 6 6 Check the sensor ADF registration for proper connection Is the above component properly connected Replace the sensor ADF registration Go to Sensor ADF registration removal on page 4 250 Replace the connections 7 Check the ADF feed motor for proper operation When performing motor tests ensure that all cover and door interlock switches are overridden 1 Enter the Diagnostics Menu 2 Touch MOT...

Страница 207: ...e ADF and perform an ADF test Does the error remain Replace the ADF controller PCBA Go to ADF controller PCBA removal on page 4 206 Problem resolved Step Action and questions Yes No 1 Check the media path Is the media path free of any media or media fragments Go to step 2 Remove any media or media fragments 2 Check the ADF rollers for wear Is the ADF feed pick roller assembly or the ADF separation...

Страница 208: ... Check the sensor ADF pre registration for proper connection Is the above component properly connected Replace the sensor ADF pre registration Go to Sensor ADF pre registration removal on page 4 247 Replace the connections 7 Check the ADF registration motor for proper operation When performing motor tests ensure that all cover and door interlock switches are overridden 1 Enter the Diagnostics Menu...

Страница 209: ...ed motor Go to ADF feed motor removal on page 4 212 Replace the connections 11 Place an undamaged document in the ADF and perform an ADF test Does the error remain Replace the ADF controller PCBA Go to ADF controller PCBA removal on page 4 206 Problem resolved Step Action and questions Yes No 1 Check the media path Is the media path free of any media or media fragments Go to step 2 Remove any medi...

Страница 210: ...y media or media fragments 2 Check the ADF rollers for wear Is the ADF feed pick roller assembly or the ADF separation roller guide free of excess wear Go to step 3 Replace the ADF feed pick roller assembly Go to ADF feed pick roller assembly removal on page 4 213 3 Check the sensor ADF inverter for proper operation 1 Enter the Diagnostics Menu 2 Touch SENSOR TESTS 3 Touch ADF SCANNER SENSOR TESTS...

Страница 211: ...tions 7 Place an undamaged document in the ADF and perform an ADF test Does the error remain Replace the ADF controller PCBA Go to ADF controller PCBA removal on page 4 206 Problem resolved Step Action and questions Yes No 1 Check the media path Is the media path free of any media or media fragments Go to step 2 Remove any media or media fragments 2 Check the ADF rollers for wear Is the ADF feed p...

Страница 212: ...peration 1 Enter the Diagnostics Menu 2 Touch SENSOR TESTS 3 Touch ADF SCANNER SENSOR TESTS 4 Touch Sensor ADF inverter Does the display on the operator panel change every time the sensing area of the above sensor is interrupted or blocked Go to step 8 Go to step 7 7 Check the sensor ADF inverter for proper connection Is the above component properly connected Replace the sensor ADF inverter Go to ...

Страница 213: ...to step 11 11 Check the ADF nip release solenoid for proper connection Is the above component properly connected Replace the ADF nip release solenoid Go to ADF nip release solenoid removal on page 4 219 Replace the connections 12 Place an undamaged document in the ADF and perform an ADF test Does the error remain Replace the ADF controller PCBA Go to ADF controller PCBA removal on page 4 206 Probl...

Страница 214: ...peration 1 Enter the Diagnostics Menu 2 Touch SENSOR TESTS 3 Touch ADF SCANNER SENSOR TESTS 4 Touch Sensor ADF inverter Does the display on the operator panel change every time the sensing area of the above sensor is interrupted or blocked Go to step 7 Go to step 6 6 Check the sensor ADF inverter for proper connection Is the above component properly connected Replace the sensor ADF inverter Go to ...

Страница 215: ... any media or media fragments 2 Check the ADF rollers for wear Is the ADF feed pick roller assembly or the ADF separation roller guide free of excess wear Go to step 3 Replace the ADF feed pick roller assembly Go to ADF feed pick roller assembly removal on page 4 213 3 Check the sensor ADF registration for proper operation 1 Enter the Diagnostics Menu 2 Touch SENSOR TESTS 3 Touch ADF SCANNER SENSO...

Страница 216: ...n When performing motor tests ensure that all cover and door interlock switches are overridden 1 Enter the Diagnostics Menu 2 Touch MOTOR TESTS 3 Touch ADF SCANNER MOTOR TESTS 4 Touch ADF registration motor Does the above component operate properly Go to step 9 Go to step 8 8 Check the ADF registration motor for proper connection Is the above component properly connected Replace the ADF registrati...

Страница 217: ... ADF and perform an ADF test Does the error remain Replace the ADF controller PCBA Go to ADF controller PCBA removal on page 4 206 Problem resolved Step Action and questions Yes No 1 Check the media path Is the media path free of any media or media fragments Go to step 2 Remove any media or media fragments 2 Check the sensor ADF scan width 2 for proper operation 1 Enter the Diagnostics Menu 2 Touc...

Страница 218: ...el change every time the sensing area of the above sensor is interrupted or blocked Go to step 4 Go to step 3 3 Check the sensor ADF scan width 3 for proper connection Is the above component properly connected Replace the sensor ADF scan width 3 Go to Sensor ADF scan width 3 removal on page 4 261 Replace the connections 4 Place an undamaged document in the ADF and perform an ADF test Does the erro...

Страница 219: ... document tray width 2 Does the display on the operator panel change every time the sensing area of the above sensor is interrupted or blocked Go to step 5 Replace the ADF document tray Go to ADF document tray removal on page 4 208 5 Check the sensor ADF document tray width 3 for proper operation 1 Enter the Diagnostics Menu 2 Touch SENSOR TESTS 3 Touch ADF SCANNER SENSOR TESTS 4 Touch Sensor ADF ...

Страница 220: ...nt tray media guide position Are the document tray media guides set correctly Go to step 2 Adjust the document tray media guides to the proper position 2 Check the sensor ADF document tray width 1 for proper operation th 3 for proper operation 1 Enter the Diagnostics Menu 2 Touch SENSOR TESTS 3 Touch ADF SCANNER SENSOR TESTS 4 Touch Sensor ADF document tray width 1 Does the display on the operator...

Страница 221: ...for proper operation th 3 for proper operation 1 Enter the Diagnostics Menu 2 Touch SENSOR TESTS 3 Touch ADF SCANNER SENSOR TESTS 4 Touch Sensor ADF document tray width 3 Does the display on the operator panel change every time the sensing area of the above sensor is interrupted or blocked Go to step 8 Go to step 7 7 Check the sensor ADF document tray width 3 Is the above component properly connec...

Страница 222: ... 257 Replace the connection 12 Check the sensor ADF scan width 3 for proper operation 1 Enter the Diagnostics Menu 2 Touch SENSOR TESTS 3 Touch ADF SCANNER SENSOR TESTS 4 Touch Sensor ADF scan width 3 Does the display on the operator panel change every time the sensing area of the above sensor is interrupted or blocked Go to step 14 Go to step 13 13 Check the sensor ADF scan width 3 for proper con...

Страница 223: ...ce an undamaged document in the ADF and perform an ADF test Does the error remain Replace the RIP PCBA Go to RIP PCBA removal on page 4 153 Problem resolved Step Action and questions Yes No 1 Check the document size Is the correct size document being inserted into the ADF Go to step 2 Insert the proper size document into the ADF 2 Check the sensor ADF pre registration sensor ADF feed out and ADF c...

Страница 224: ...vel removal on page 4 157 Reseat the cable 4 Check the tray 2 media feed lift motor for proper operation When performing motor tests ensure that all cover and door interlock switches are overridden Navigate to Diagnostics Menu MOTOR TESTS PRINTER MOTOR TESTS Tray 2 Feed Lift Motor Does it operate properly Go to step 6 Go to step 5 5 Check the motor for proper connection Is it properly connected Re...

Страница 225: ...e 4 157 Reseat the cable 4 Check the tray 3 media feed lift motor for proper operation When performing motor tests ensure that all cover and door interlock switches are overridden Navigate to Diagnostics Menu MOTOR TESTS PRINTER MOTOR TESTS Tray 3 Feed Lift Motor Does it operate properly Go to step 6 Go to step 5 5 Check the motor for proper connection Is it properly connected Replace the media fe...

Страница 226: ... Reseat the cable 4 Check the tray 4 media feed lift motor for proper operation When performing motor tests ensure that all cover and door interlock switches are overridden Navigate to Diagnostics Menu MOTOR TESTS PRINTER MOTOR TESTS Tray 4 Feed Lift Motor Does it operate properly Go to step 6 Go to step 5 5 Check the motor for proper connection Is it properly connected Replace the media feed lift...

Страница 227: ...ray 5 media level removal on page 4 456 Reseat the cable 4 Check the tray 5 media feed lift motor for proper operation When performing motor tests ensure that all cover and door interlock switches are overridden Navigate to Diagnostics Menu MOTOR TESTS PRINTER MOTOR TESTS Tray 5 Feed Lift Motor Does it operate properly Go to step 6 Go to step 5 5 Check the motor for proper connection Is it properl...

Страница 228: ...er connection Is the above component properly connected Replace the sensor front tamper HP Go to Sensor front tamper HP and sensor rear tamper HP removals on page 4 395 Replace the connections 4 Check the front tamper motor for proper operation When performing motor tests ensure that all cover and door interlock switches are overridden 1 Enter the Diagnostics Menu 2 Touch MOTOR TESTS 3 Touch FINIS...

Страница 229: ...s the above component properly connected Replace the sensor front tamper HP Go to Sensor front tamper HP and sensor rear tamper HP removals on page 4 395 Replace the connection 4 Check the front tamper motor for proper operation When performing motor tests ensure that all cover and door interlock switches are overridden 1 Enter the Diagnostics Menu 2 Touch MOTOR TESTS 3 Touch FINISHER MOTOR TESTS ...

Страница 230: ...ove component properly connected Replace the sensor rear tamper HP Go to Sensor front tamper HP and sensor rear tamper HP removals on page 4 395 Replace the connection 4 Check the rear tamper drive motor for proper operation When performing motor tests ensure that all cover and door interlock switches are overridden 1 Enter the Diagnostics Menu 2 Touch MOTOR TESTS 3 Touch FINISHER MOTOR TESTS 4 To...

Страница 231: ...on Is the above component properly connected Replace the sensor rear tamper HP Go to Sensor front tamper HP and sensor rear tamper HP removals on page 4 395 Replace the connection 4 Check the rear tamper motor for proper operation When performing motor tests ensure that all cover and door interlock switches are overridden 1 Enter the Diagnostics Menu 2 Touch MOTOR TESTS 3 Touch FINISHER MOTOR TEST...

Страница 232: ...ve component properly connected Replace the sensor stapler carriage HP Go to Sensor stapler carriage HP removal on page 4 407 Replace the connection 4 Check the stapler carriage motor assembly for proper operation When performing motor tests ensure that all cover and door interlock switches are overridden 1 Enter the Diagnostics Menu 2 Touch MOTOR TESTS 3 Touch FINISHER MOTOR TESTS 4 Touch Stapler...

Страница 233: ...ve component properly connected Replace the sensor stapler carriage HP Go to Sensor stapler carriage HP removal on page 4 407 Replace the connection 4 Check the stapler carriage motor assembly for proper operation When performing motor tests ensure that all cover and door interlock switches are overridden 1 Enter the Diagnostics Menu 2 Touch MOTOR TESTS 3 Touch FINISHER MOTOR TESTS 4 Touch Stapler...

Страница 234: ...e 3 22 Does the error remain Replace the finisher controller PCBA Go to Finisher PCBA removal on page 4 356 Problem resolved Step Action and questions Yes No 1 Check the sensor media eject clamp HP for proper operation 1 Enter the Diagnostics Menu 2 Touch SENSOR TESTS 3 Touch FINISHER SENSOR TESTS 4 Touch Sensor media eject clamp HP Does the display on the operator panel change every time the sens...

Страница 235: ...moval on page 4 343 Replace the connection 5 Perform a POR Does the error continue when the power is turned off on Replace the finisher controller PCBA Go to Finisher PCBA removal on page 4 356 Problem resolved Step Action and questions Yes No 1 Check the sensor media eject clamp HP for proper operation 1 Enter the Diagnostics Menu 2 Touch SENSOR TESTS 3 Touch FINISHER SENSOR TESTS 4 Touch Sensor ...

Страница 236: ...tor removal on page 4 343 Replace the connection 5 Perform a POR Does the error continue when the power is turned off on Replace the finisher controller PCBA Go to Finisher PCBA removal on page 4 356 Problem resolved Step Action and questions Yes No 1 Check the sensor media eject shaft HP for proper operation 1 Enter the Diagnostics Menu 2 Touch SENSOR TESTS 3 Touch FINISHER SENSOR TESTS 4 Touch S...

Страница 237: ...ly removal on page 4 372 Replace the connection 5 Check the media eject clamp clutch for proper operation When performing motor tests ensure that all cover and door interlock switches are overridden 1 Enter the Diagnostics Menu 2 Touch MOTOR TESTS 3 Touch FINISHER MOTOR TESTS 4 Touch Media eject clutch Does the above component make an audible clicking noise Go to step 7 Go to step 6 6 Check the me...

Страница 238: ...ve component properly connected Replace the sensor media eject shaft HP Go to Sensor media eject shaft HP removal on page 4 398 Replace the connection 3 Check the eject shaft roll motor for proper operation When performing motor tests ensure that all cover and door interlock switches are overridden 1 Enter the Diagnostics Menu 2 Touch MOTOR TESTS 3 Touch FINISHER MOTOR TESTS 4 Touch Media eject mo...

Страница 239: ...val on page 4 371 Replace the connection 7 Perform a POR Does the error continue when the power is turned off on Replace the finisher controller PCBA Go to Finisher PCBA removal on page 4 356 Problem resolved Step Action and questions Yes No 1 Check the vertical transport mechanism of the stacker bin for obstacles and damage Are the any obstacles in the vertical transport mechanism of the stacker ...

Страница 240: ...to step 5 5 Check the sensor stacker bin level R for proper connection Is the above component properly connected Replace the sensor stacker bin level R Go to Sensor stacker bin level R removal on page 4 405 Replace the connection 6 Check the sensor stacker bin level F for proper operation 1 Enter the Diagnostics Menu 2 Touch SENSOR TESTS 3 Touch FINISHER SENSOR TESTS 4 Touch Sensor stacker bin lev...

Страница 241: ...ge 4 410 Replace the connection 10 Perform a POR Does the error continue when the power is turned off on Replace the finisher controller PCBA Go to Finisher PCBA removal on page 4 356 Problem resolved Step Action and questions Yes No 1 Check the sensor stacker bin level R for proper operation 1 Enter the Diagnostics Menu 2 Touch SENSOR TESTS 3 Touch FINISHER SENSOR TESTS 4 Touch Sensor Stacker bin...

Страница 242: ...ctuator for proper operation Is the media stacker bin actuator installed properly Does it enter the sensing area of the sensor stacker bin upper limit Go to step 6 Repair the media stacker bin actuator 6 Check the sensor stacker bin upper limit for proper operation 1 Enter the Diagnostics Menu 2 Touch SENSOR TESTS 3 Touch FINISHER SENSOR TESTS 4 Touch Sensor stacker bin upper limit Does the displa...

Страница 243: ... Replace the connection 10 Perform a POR Does the error continue when the power is turned off on Replace the finisher controller PCBA Go to Finisher PCBA removal on page 4 356 Problem resolved Step Action and questions Yes No 1 Check the media stacker bin actuator for proper operation Is the media stacker bin actuator installed properly Does it enter the sensing area of the sensor stacker bin uppe...

Страница 244: ... R removal on page 4 405 Replace the connection 6 Check the sensor stacker bin level F for proper operation 1 Enter the Diagnostics Menu 2 Touch SENSOR TESTS 3 Touch FINISHER SENSOR TESTS 4 Touch Sensor Stacker bin level 2 Does the display on the operator panel change every time the sensing area of the above sensor is interrupted or blocked Go to step 8 Go to step 7 7 Check the sensor stacker bin ...

Страница 245: ...r bin lift motor down Does the above component operate properly Go to step 12 Go to step 11 11 Is the stacker bin lift motor connected properly Replace the stacker bin lift motor Go to Stacker bin lift motor assembly removal on page 4 410 Replace the connection 12 Perform a POR Does the error continue when the power is turned off on Replace the finisher controller PCBA Go to Finisher PCBA removal ...

Страница 246: ...nsor punch unit side reg pair Go to Sensor punch unit side registration pair with bracket removal on page 4 402 Replace the connection 5 Check the punch carriage shift motor for proper operation When performing motor tests ensure that all cover and door interlock switches are overridden 1 Enter the Diagnostics Menu 2 Touch MOTOR TESTS 3 Touch FINISHER MOTOR TESTS 4 Touch Punch carriage shift motor...

Страница 247: ...perly connected Replace the sensor punch cam HP Go to Sensor punch hole select sensor punch cam front and sensor punch unit HP removal on page 4 400 Replace the connection 4 Check the punch unit motor for proper operation When performing motor tests ensure that all cover and door interlock switches are overridden 1 Enter the Diagnostics Menu 2 Touch MOTOR TESTS 3 Touch FINISHER MOTOR TESTS 4 Touch...

Страница 248: ...connected Replace the sensor punch cam HP Go to Sensor punch hole select sensor punch cam front and sensor punch unit HP removal on page 4 400 Replace the connection 4 Check the punch unit motor for proper operation When performing motor tests ensure that all cover and door interlock switches are overridden 1 Enter the Diagnostics Menu 2 Touch MOTOR TESTS 3 Touch FINISHER MOTOR TESTS 4 Touch Punch...

Страница 249: ...d Replace the sensor punch carriage shift HP Go to Sensor punch carriage shift HP removal on page 4 399 Replace the connection 4 Check the punch carriage shift motor for proper operation When performing motor tests ensure that all cover and door interlock switches are overridden 1 Enter the Diagnostics Menu 2 Touch MOTOR TESTS 3 Touch FINISHER MOTOR TESTS 4 Touch Punch carriage shift motor forward...

Страница 250: ...place the sensor punch carriage shift HP Go to Sensor punch carriage shift HP removal on page 4 399 Replace the connection 4 Check the punch carriage shift motor for proper operation When performing motor tests ensure that all cover and door interlock switches are overridden 1 Enter the Diagnostics Menu 2 Touch MOTOR TESTS 3 Touch FINISHER MOTOR TESTS 4 Touch Punch carriage shift motor forward 5 T...

Страница 251: ...heck the bridge decurler cam clutch for proper operation When performing motor tests ensure that all cover and door interlock switches are overridden 1 Enter the Diagnostics Menu 2 Touch MOTOR TESTS 3 Touch FINISHER MOTOR TESTS 4 Touch Decurler cam clutch Does the above component make an audible clicking sound Go to step 5 Go to step 4 4 Is the bridge decurler cam clutch properly connected Replace...

Страница 252: ... on the operator panel change every time the sensing area of the above sensor is interrupted or blocked Go to step 3 Go to step 2 2 Is the sensor decurler cam HP properly connected Replace the sensor decurler cam HP Go to Sensor decurler cam HP removal on page 4 321 Replace the connection 3 Check the bridge decurler cam clutch for proper operation When performing motor tests ensure that all cover ...

Страница 253: ...s turned off on Replace the finisher controller PCBA Go to Finisher PCBA removal on page 4 356 Problem resolved Step Action and questions Yes No 1 Check the booklet unit interface connector assembly Is the above component free of damage Go to step 2 Replace the booklet unit interface contact 2 Check the main connector on the booklet unit sensor interface cable assembly Is the above component free ...

Страница 254: ...that all cover and door interlock switches are overridden 1 Enter the Diagnostics Menu 2 Touch MOTOR TESTS 3 Touch FINISHER MOTOR TESTS 4 Touch Booklet tamper front motor reverse 5 Touch Booklet tamper front motor reverse Does the above component operate properly Go to step 6 Go to step 5 8 Is the booklet front tamper motor properly connected Replace the booklet front tamper motor Go to Booklet fr...

Страница 255: ...he above component free of damage Go to step 4 Replace the booklet motor interface cable assembly 4 Check the booklet front tamper by moving it manually Does the above component slide back and forth properly Go to step 5 Remove obstructions 5 Check the sensor booklet front tamper HP for proper operation 1 Enter the Diagnostics Menu 2 Touch SENSOR TESTS 3 Touch FINISHER SENSOR TESTS 4 Touch Sensor ...

Страница 256: ...n the power is turned off on Replace the booklet controller card assembly Go to Booklet controller card assembly removal on page 4 325 Problem resolved 10 Perform a POR Does the error continue when the power is turned off on Replace the finisher controller PCBA Go to Finisher PCBA removal on page 4 356 Problem resolved Step Action and questions Yes No 1 Check the booklet unit interface connector a...

Страница 257: ...e booklet end guide drive motor for proper operation When performing motor tests ensure that all cover and door interlock switches are overridden 1 Enter the Diagnostics Menu 2 Touch MOTOR TESTS 3 Touch FINISHER MOTOR TESTS 4 Touch Booklet end guide drive motor Does the above component operate properly Go to step 9 Go to step 8 8 Is the booklet end guide drive motor properly connected Replace the ...

Страница 258: ...e above component free of damage Go to step 4 Replace the booklet motor interface cable assembly 4 Check the booklet rear tamper by moving it manually Does the above component slide back and forth properly Go to step 5 Remove obstructions 5 Check the sensor booklet rear tamper HP for proper operation 1 Enter the Diagnostics Menu 2 Touch SENSOR TESTS 3 Touch FINISHER SENSOR TESTS 4 Touch Sensor boo...

Страница 259: ...or continue when the power is turned off on Replace the booklet controller card assembly Go to Booklet controller card assembly removal on page 4 325 Problem resolved 10 Perform a POR Does the error continue when the power is turned off on Replace the finisher controller PCBA Go to Finisher PCBA removal on page 4 356 Problem resolved Step Action and questions Yes No 1 Check the booklet unit interf...

Страница 260: ...or for proper operation When performing motor tests ensure that all cover and door interlock switches are overridden 1 Enter the Diagnostics Menu 2 Touch MOTOR TESTS 3 Touch FINISHER MOTOR TESTS 4 Touch Booklet tamper rear motor forward 5 Touch Booklet tamper rear motor reverse Does the above component operate properly Go to step 6 Go to step 5 8 Check the booklet rear tamper motor Is the above co...

Страница 261: ...nsor booklet knife folding for proper operation 1 Enter the Diagnostics Menu 2 Touch SENSOR TESTS 3 Touch FINISHER SENSOR TESTS 4 Touch Sensor booklet knife folding Does the display on the operator panel change every time the sensing area of the above sensor is interrupted or blocked Go to step 6 Go to step 5 5 Check the sensor booklet knife folding Is the above component properly connected Replac...

Страница 262: ...onent free of damage Go to step 2 Replace the booklet unit interface contact 2 Check the main connector on the booklet unit sensor interface cable assembly Is the above component free of damage Go to step 3 Replace the booklet sensor interface cable assembly 3 Check the main connector on the booklet unit motor interface cable assembly Is the above component free of damage Go to step 4 Replace the ...

Страница 263: ...damage Go to step 3 Replace the booklet sensor interface cable assembly 3 Check the main connector on the booklet unit motor interface cable assembly Is the above component free of damage Go to step 4 Replace the booklet motor interface cable assembly 4 Check the sensor booklet knife HP for proper operation 1 Enter the Diagnostics Menu 2 Touch SENSOR TESTS 3 Touch FINISHER SENSOR TESTS 4 Touch Sen...

Страница 264: ...ll cover and door interlock switches are overridden 1 Enter the Diagnostics Menu 2 Touch MOTOR TESTS 3 Touch FINISHER MOTOR TESTS 4 Touch Booklet folding exit drive motor Does the above component operate properly Go to step 10 Go to step 9 9 Is the booklet folding exit drive motor assembly properly connected Replace the booklet folding exit drive motor assembly Go to Booklet folding exit drive mot...

Страница 265: ...face cable assembly 4 Check the sensor booklet knife HP for proper operation 1 Enter the Diagnostics Menu 2 Touch SENSOR TESTS 3 Touch FINISHER SENSOR TESTS 4 Touch Sensor booklet knife HP Does the display on the operator panel change every time the sensing area of the above sensor is interrupted or blocked Go to step 6 Go to step 5 5 Is the sensor booklet knife HP properly connected Replace the s...

Страница 266: ...ected Replace the booklet folding exit drive motor assembly Go to Booklet folding exit drive motor assembly removal on page 4 329 Replace the connection 10 Perform a POR Does the error continue when the power is turned off on Replace the booklet controller card assembly Go to Booklet controller card assembly removal on page 4 325 Problem resolved 11 Perform a POR Does the error continue when the p...

Страница 267: ...xit drive motor assembly removal on page 4 329 Go to step 7 7 Perform a print test booklet stapled document Does the error remain Replace the booklet controller card assembly Go to Booklet controller card assembly removal on page 4 325 Problem resolved 8 Perform a POR Does the error continue when the power is turned off on Replace the finisher controller PCBA Go to Finisher PCBA removal on page 4 ...

Страница 268: ... is turned off on Replace the booklet controller card assembly Go to Booklet controller card assembly removal on page 4 325 Problem resolved 7 Perform a POR Does the error continue when the power is turned off on Replace the finisher controller PCBA Go to Finisher PCBA removal on page 4 356 Problem resolved Step Action and questions Yes No 1 Check the booklet controller card assembly and the finis...

Страница 269: ...media entrance for proper connection Is the above sensor properly connected Replace the sensor finisher media entrance Go to Sensor finisher media entrance removal on page 4 394 Replace the connection 4 Check the finisher controller PCBA for proper connection Is the above component properly connected Go to step 5 Replace the connections 5 Perform a print test Does the error remain Replace the fini...

Страница 270: ...heck the bridge drive motor for proper operation Caution When performing motor tests ensure that all cover and door interlock switches are overridden 1 Enter the Diagnostics Menu 2 Touch MOTOR TESTS 3 Touch FINISHER MOTOR TESTS 4 Touch Bridge unit motor Does the above component operate properly Go to step 7 Go to step 6 6 Check the bridge drive motor connection Is the above motor properly connecte...

Страница 271: ...connection Is the above sensor properly connected Replace the sensor bridge media entrance Go to Sensor bridge media entrance removal on page 4 315 Replace the connection 5 Check the bridge drive motor for proper operation Caution When performing motor tests ensure that all cover and door interlock switches are overridden 1 Enter the Diagnostics Menu 2 Touch MOTOR TESTS 3 Touch FINISHER MOTOR TEST...

Страница 272: ...the operator panel change every time the sensing area of the above sensor is interrupted or blocked Go to step 4 Go to step 3 3 Check the sensor bridge media exit connection Is the above sensor properly connected Replace the sensor bridge media exit Go to Sensor bridge media exit removal on page 4 317 Replace the connection 4 Check the bridge drive motor for proper operation Caution When performin...

Страница 273: ...of the above sensor is interrupted or blocked Go to step 4 Go to step 3 3 Check the sensor bridge media exit for proper connection Is the above component properly connected Replace the sensor bridge media exit Go to Sensor bridge media exit removal on page 4 317 Replace the connection 4 Check the bridge drive motor for proper operation Caution When performing motor tests ensure that all cover and ...

Страница 274: ...ce for proper operation 1 Enter the Diagnostics Menu 2 Touch SENSOR TESTS 3 Touch FINISHER SENSOR TESTS 4 Touch Sensor finisher media entrance Does the display on the operator panel change every time the sensing area of the above sensor is interrupted or blocked Go to Step 4 Go to Step 3 3 Check the sensor finisher media entrance for proper connection Is the above component properly connected Repl...

Страница 275: ...he sensing area of the above sensor is interrupted or blocked Go to Step 4 Go to Step 3 3 Check the sensor finisher media entrance for proper connection Is the above component properly connected Replace the sensor finisher media entrance Go to Sensor finisher media entrance removal on page 4 394 Replace connections 4 Check the finisher controller card assembly for proper connection Is the above co...

Страница 276: ... 393 Replace connections 4 Check the finisher controller PCBA for proper connection Is the above component properly connected Go to Step 5 Replace connections 5 POR the machine Does the error continue Replace the finisher controller PCBA Go to Finisher PCBA removal on page 4 356 Problem resolved Step Action and questions Yes No 1 Check the media path Is the media path free of any media fragments G...

Страница 277: ...A removal on page 4 356 Problem resolved Step Action and questions Yes No 1 Check the media path Is the media path free of any media fragments Go to step 2 Remove any media or media fragments 2 Check the sensor diverter gate for proper operation 1 Enter the Diagnostics Menu 2 Touch SENSOR TESTS 3 Touch FINISHER SENSOR TESTS 4 Touch Sensor diverter gate Does the display on the operator panel change...

Страница 278: ... upper bin for proper operation When performing motor tests ensure that all cover and door interlock switches are overridden 1 Enter the Diagnostics Menu 2 Touch MOTOR TESTS 3 Touch FINISHER MOTOR TESTS 4 Touch Finisher diverter gate solenoid upper bin Does the above component operate properly Go to step 8 Go to step 7 7 Check the finisher diverter gate for proper connection Is the above component...

Страница 279: ...sensing area of the above sensor is interrupted or blocked Go to Step 4 Go to Step 3 3 Check the sensor buffer path for proper connection Is the above component properly connected Replace the sensor buffer path Go to Sensor buffer path removal on page 4 392 Replace connections 4 Check the finisher controller PCBA for proper connection Is the above component properly connected Go to Step 5 Replace ...

Страница 280: ...r tests ensure that all cover and door interlock switches are overridden 1 Enter the Diagnostics Menu 2 Touch MOTOR TESTS 3 Touch FINISHER MOTOR TESTS 4 Touch Entrance paddle motor Does the above component operate properly Go to step 6 Go to step 5 5 Check the entrance paddle motor for proper connection Is the above component properly connected Replace the entrance paddle motor Go to Stepper motor...

Страница 281: ... gate solenoid Does the above component operate properly Go to step 10 Go to step 9 9 Check the buffer diverter gate solenoid for proper connection Is the above component properly connected Replace the buffer diverter gate solenoid Go to Buffer diverter gate solenoid removal on page 4 341 Replace the connection 10 Check the finisher controller PCBA for proper connection Is the above component prop...

Страница 282: ...ections 4 Check the finisher controller PCBA for proper connection Is the above component properly connected Go to Step 5 Replace the connections 5 POR the machine Does the error continue Replace the finisher controller PCBA Go to Finisher PCBA removal on page 4 356 Problem resolved Step Action and questions Yes No 1 Check the media path Is the media path free of any media fragments Go to step 2 R...

Страница 283: ... removal on page 4 356 Problem resolved Step Action and questions Yes No 1 Check the media path Is the media path free of any media fragments Go to step 2 Remove any media or media fragments 2 Check the sensor upper media exit for proper operation 1 Enter the Diagnostics Menu 2 Touch SENSOR TESTS 3 Touch FINISHER SENSOR TESTS 3 Touch Sensor upper media exit Does the display on the operator panel c...

Страница 284: ...moval on page 4 417 Replace the connection 6 Check the finisher controller PCBA for proper connection Is the above component properly connected Go to Step 7 Replace the connections 7 POR the machine Does the error continue Replace the finisher controller PCBA Go to Finisher PCBA removal on page 4 356 Problem resolved Step Action and questions Yes No 1 Check the media path Is the media path free of...

Страница 285: ...Does the above component operate properly Go to step 6 Go to step 5 5 Check the buffer transport motor for proper connection Is the above component properly connected Replace the buffer transport motor Go to Stepper motor buffer transport and belt buffer transport removal on page 4 417 Replace the connection 6 Check the finisher controller PCBA for proper connection Is the above component properly...

Страница 286: ... Replace connections 4 Check the finisher controller PCBA for proper connection Is the above component properly connected Go to Step 5 Replace the connections 5 POR the machine Does the error continue Replace the finisher controller PCBA Go to Finisher PCBA removal on page 4 356 Problem resolved Step Action and questions Yes No 1 Check the media path Is the media path free of any media fragments G...

Страница 287: ...e component properly connected Replace the entrance paddle motor Go to Stepper motor entrance paddle and belt entrance paddle removal on page 4 419 Replace the connection 6 Check the exit stepper motor for proper operation When performing motor tests ensure that all cover and door interlock switches are overridden 1 Enter the Diagnostics Menu 2 Touch MOTOR TESTS 3 Touch FINISHER MOTOR TESTS 4 Touc...

Страница 288: ...terrupted or blocked Go to Step 4 Go to Step 3 3 Check the sensor lower media exit for proper connection Is the above component properly connected Replace the sensor lower media exit Go to Sensor lower media exit removal on page 4 396 Replace connections 4 Check the entrance paddle motor for proper operation When performing motor tests ensure that all cover and door interlock switches are overridd...

Страница 289: ...per motor exit assembly and belt exit removal on page 4 420 Replace the connection 8 Check the finisher controller PCBA for proper connection Is the above component properly connected Go to Step 9 Replace the connections 9 POR the machine Does the error continue Replace the finisher controller PCBA Go to Finisher PCBA removal on page 4 356 Problem resolved Step Action and questions Yes No 1 Check ...

Страница 290: ...cted Replace the clamp drive motor Go to Clamp drive motor removal on page 4 343 Replace the connection 5 Check the eject shaft roll motor for proper operation When performing motor tests ensure that all cover and door interlock switches are overridden 1 Enter the Diagnostics Menu 2 Touch MOTOR TESTS 3 Touch FINISHER MOTOR TESTS 4 Touch Media eject motor forward 5 Touch Media eject motor reverse D...

Страница 291: ...6 Replace connections 9 Check the finisher controller PCBA for proper connection Is the above component properly connected Go to Step 10 Replace the connections 10 POR the machine Does the error continue Replace the finisher controller PCBA Go to Finisher PCBA removal on page 4 356 Problem resolved Step Action and questions Yes No 1 Check the media path Is the media path free of any media fragment...

Страница 292: ... Step 6 Replace the connections 6 POR the machine Does the error continue Replace the finisher controller PCBA Go to Finisher PCBA removal on page 4 356 Problem resolved Step Action and questions Yes No 1 Check the media path Is the media path free of any media fragments Go to step 2 Remove any media or media fragments 2 Check the sensor booklet media entrance for proper operation 1 Enter the Diag...

Страница 293: ...ove component properly connected Replace the booklet entrance motor Go to Booklet media entrance drive motor removal on page 4 332 Replace connections 6 Check the booklet controller card assembly for proper connection Is the above component properly connected Replace the booklet controller card assembly Go to Booklet controller card assembly removal on page 4 325 If the error remains then go to st...

Страница 294: ...or proper operation When performing motor tests ensure that all cover and door interlock switches are overridden 1 Enter the Diagnostics Menu 2 Touch MOTOR TESTS 3 Touch FINISHER MOTOR TESTS 4 Touch Booklet entrance motor Does the above component operate properly Go to step 5 Go to step 4 4 Check the booklet entrance motor for proper connection Is the above component properly connected Replace the...

Страница 295: ...sor is interrupted or blocked Go to Step 4 Go to Step 3 3 Check the sensor booklet compiler media entrance for proper connection Is the above component properly connected Replace the sensor booklet compiler media entrance Go to Sensor booklet compiler media entrance removal on page 4 385 Replace connections 4 Check the booklet controller card assembly for proper connection Is the above component p...

Страница 296: ...ion Is the above component properly connected Replace the sensor booklet media exit Go to Sensor booklet unit media exit removal on page 4 391 Replace connections 4 Check the booklet controller card assembly for proper connection Is the above component properly connected Replace the booklet controller card assembly Go to Booklet controller card assembly removal on page 4 325 If the error remains t...

Страница 297: ...ches are overridden 1 Enter the Diagnostics Menu 2 Touch MOTOR TESTS 3 Touch FINISHER MOTOR TESTS 4 Touch Booklet folding exit motor forward 5 Touch Booklet folding exit motor reverse Does the above component operate properly Go to step 6 Go to step 5 5 Check the booklet folding exit motor for proper connection Is the above component properly connected Replace the booklet folding exit motor Go to ...

Страница 298: ...proper connection Is the above component properly connected Replace the sensor booklet media exit Go to Sensor booklet unit media exit removal on page 4 391 Replace connections 3 Check the booklet folding exit motor for proper operation When performing motor tests ensure that all cover and door interlock switches are overridden 1 Enter the Diagnostics Menu 2 Touch MOTOR TESTS 3 Touch FINISHER MOTO...

Страница 299: ...tion Is the above component properly connected Replace the booklet controller card assembly Go to Booklet controller card assembly removal on page 4 325 If the error remains then go to step 8 Replace the connections 8 Check the finisher controller PCBA for proper connection Is the above component properly connected Go to step 9 Replace the connections 9 POR the machine Does the error continue Repl...

Страница 300: ...ctor of the scanner controller card assembly properly 3 Perform a POR Does the error remain when the power is turned off on Replace the scanner controller PCBA Go to Scanner controller PCBA removal on page 4 241 Go to step 4 Problem resolved 4 Perform a POR Does the error remain when the power is turned off on again Replace the RIP PCBA Go to RIP PCBA removal on page 4 153 Problem resolved Step Ac...

Страница 301: ...perly Go to step 2 Replace the connection 2 Check all connections of the scanner controller PCBA Are the connections of the scanner controller card assembly connected properly Go to step 3 Connect each connector of the scanner controller card assembly properly 3 Perform a POR Does the error remain when the power is turned off on Replace the scanner controller PCBA Go to Scanner controller PCBA rem...

Страница 302: ...em resolved Step Action and questions Yes No 1 Check the scanner interface cable assembly connection between the RIP card assembly and the scanner unit assembly Is the scanner interface cable assembly connected properly Go to step 2 Replace the connection 2 Check all connections of the scanner controller PCBA Are the connections of the scanner controller card assembly connected properly Go to step...

Страница 303: ...esolved 4 Perform a POR Does the error remain when the power is turned off on Replace the scanner controller PCBA Go to Scanner controller PCBA removal on page 4 241 Problem resolved Step Action and questions Yes No 1 Check all connections of the scanner controller card assembly Are the connections of the scanner controller card assembly connected properly Go to step 2 Replace all connections 2 Ch...

Страница 304: ...removal on page 4 206 Problem resolved 4 Perform a POR Does the error remain when the power is turned off on Replace the scanner controller PCBA Go to Scanner controller PCBA removal on page 4 241 Problem resolved Step Action and questions Yes No 1 Check the scanner carriage rails Is there any foreign substance on the scanner rails Clean and lubricate the scanner carriage rails Go to step 2 2 Chec...

Страница 305: ...s of the scanner controller PCBA Are the connectors of the scanner controller card assembly connected properly Go to step 2 Connect each connector of the scanner controller card assembly properly 2 Perform a POR Does the error remain when the power is turned off on Replace the scanner controller PCBA Go to Scanner controller PCBA removal on page 4 241 Problem resolved Step Action and questions Yes...

Страница 306: ...F controller card assembly connected properly Go to step 2 Connect each connector of ADF controller card assembly properly 2 Check the connection of each RIP card assembly connector Are the connectors of the RIP card assembly connected properly Go to step 3 Connect each connector of the RIP card assembly properly 3 Perform a POR Does the error remain when the power is turned off on Replace the ADF...

Страница 307: ... scanner controller card assembly connected properly Go to step 2 Connect each connector of the scanner controller card assembly properly 2 Check the software version for the scanner controller card assembly Is the version of the software of the scanner controller card assembly correct Go to step 3 Upgrade the software of the scanner controller card assembly 3 Perform a POR Does the error remain w...

Страница 308: ...eplace the exposure lamp Go to LED exposure bar removal on page 4 238 Replace the connection 2 Perform a POR Does the error remain when the power is turned off on Replace the scanner controller PCBA Go to Scanner controller PCBA removal on page 4 241 Problem resolved Step Action and questions Yes No 1 Check the large platen glass Is the large platen glass installed properly Go to step 2 Remove and...

Страница 309: ...ns assembly connected properly Go to step 2 Replace the connection 2 Check all the connections on the scanner controller card assembly Are all the connections connected properly Replace the LED CCD lens assembly Replace the connection 3 Perform a POR Does the error remain Replace the scanner controller PCBA Go to Scanner controller PCBA removal on page 4 241 Step Action and questions Yes No 1 Chec...

Страница 310: ... scanner interface cable assembly connected properly Go to step 2 Replace the connection 2 Check all connections of the scanner controller card assembly Are the connections of the scanner controller card assembly connected properly Go to step 3 Connect each connector of the scanner controller card assembly properly 3 Perform a POR Does the error remain when the power is turned off on Replace the s...

Страница 311: ...n width 1 Does the display on the operator panel change every time the sensing area of the above sensor is blocked Go to step 3 Go to step 2 2 Check the sensor ADF scan width 1 for connection Is the above sensor connected properly Replace the sensor ADF scan width 1 Go to Sensor ADF scan width 1 removal on page 4 254 Replace the connection 3 Check the sensor ADF scan width 2 for operation Perform ...

Страница 312: ...cked Go to step 7 Go to step 6 6 Check the sensor ADF scan width 3 for connection Is the above sensor connected properly Replace the sensor ADF scan width 3 Go to Sensor ADF scan width 3 removal on page 4 261 Replace the connection 7 Place an undamaged document in the ADF and perform an ADF test Does the error remain Replace the ADF controller card assembly Go to ADF controller PCBA removal on pag...

Страница 313: ...pen and close the ADF unit assembly Does the display on the operator panel change every time the sensing area of the above sensor is blocked Go to step 5 Go to step 4 4 Check the sensor ADF angle for connection Is the above sensor connected properly Replace the sensor ADF angle Go to Sensor ADF angle removal on page 4 244 Replace the connection 5 Place an undamaged document in the ADF and perform ...

Страница 314: ...3 E mail the text file to your next level of support B Collecting the firmware logs Fwdebug and logs tar gz from the SE menu Notes Make sure your printer is connected to a network or to a print server Some printers are designed to restart automatically after a 9yy error On these printers you can retrieve the secondary crash code information using the SE menu Fwedebugs can also be referred to as LB...

Страница 315: ...here are different types of 900 xx errors that can occur There may be a communication problem Bad cable network connection and so on software issue or a hardware problem with the controller board or ISP Internal solutions port The communication and software aspects should be checked first Determine if the problem is constant or intermittent Use the troubleshooting procedure below to isolate the is...

Страница 316: ...is information about the file being sent to the printer Application used Operating system Driver type File type PCL PostScript XPS etc Go to step 8 Go to step 10 8 Restart the printer to operating mode Send a different print job to the device Does the 900 xx error reoccur Go to step 9 Go to step 10 9 Upgrade the firmware Contact your next level of support for the correct firmware level to use Rest...

Страница 317: ...ccur Go to step 31 Go to step 21 21 Are there any ISP internal solutions port options installed Go to step 22 Problem resolved 22 Reinstall the first ISP option Restart the device Does the 900 xx error reoccur Go to step 24 Go to step 23 23 Run a job to test the option Does the 900 xx error reoccur Go to step 24 Go to step 26 24 Upgrade the firmware Contact your next level of support for the corre...

Страница 318: ...e File Application used If the error is related to specific print file Device Operating System Driver used PCL PS Frequency of the occurrence of the error Step Action and questions Yes No 1 Upgrade the firmware Does the problem persist Go to step 2 Problem resolved 2 POR the machine Does the error continue Replace the upper printer engine PCBA Go to Upper printer engine PCBA removal on page 4 189 ...

Страница 319: ... and replace damaged connections 2 POR the machine Does the error continue Replace the upper printer engine PCBA Go to Upper printer engine PCBA removal on page 4 189 Go to step 3 Problem resolved 3 POR the machine Does the error continue Replace the lower printer engine PCBA Go to Lower engine PCBA removal on page 4 106 Problem resolved Step Action and questions Yes No 1 Check the bridge controll...

Страница 320: ...o to step 2 2 Turn the printer off for 60 seconds Does the error occur when the power is turned off on again Replace the RIP card assembly Go to RIP PCBA removal on page 4 153 Problem solved Step Action and questions Yes No 1 Perform a POR Does the error occur when the power is turned off on Go to step 2 Perform several print tests If the problem remains then go to step 2 2 Turn the printer off fo...

Страница 321: ...ain Replace the RIP PCBA Go to RIP PCBA removal on page 4 153 Problem resolved Step Action and questions Yes No 1 Perform a POR Does the error occur when the power is turned off on Go to step 2 Perform several print tests If the problem remains then go to step 2 2 Turn the printer off for 60 seconds Does the error occur when the power is turned off on again Go to step 3 Problem solved 3 Check the ...

Страница 322: ...2 2 Turn the printer off for 60 seconds Does the error occur when the power is turned off on again Replace the RIP PCBA Go to RIP PCBA removal on page 4 153 Problem solved Step Action and questions Yes No 1 Check the duplex unit for proper installation Remove the duplex unit assembly and reinstall it Perform a 2 sided print test Does the error still occur Go to step 2 Problem solved 2 Check the du...

Страница 323: ...Perform several print tests If the problem remains then go to step 2 2 POR the machine and perform a print test Does the error continue Replace the upper printer engine PCBA Go to Upper printer engine PCBA removal on page 4 189 If the error remains then go to step 3 Problem resolved 3 POR the machine and perform a print test Does the error continue Replace the lower printer engine PCBA Go to Lower...

Страница 324: ... occur when the power is on Go to step 2 Problem resolved 2 Check the finisher controller PCBA Are the connections of the finisher controller card assembly properly connected Replace the finisher controller PCBA Go to Finisher PCBA removal on page 4 356 Problem resolved Step Action and questions Yes No 1 Check the printer and finisher installation Is the finisher installed to the printer properly ...

Страница 325: ...A removal on page 4 189 Go to step 4 Problem resolved 4 POR the machine and perform a print test Does the error continue Replace the lower printer engine PCBA Go to Lower engine PCBA removal on page 4 106 Problem resolved Step Action and questions Yes No 1 Turn the printer off and on several times Does the error still occur when the power is on Go to step 2 Problem resolved 2 Check the finisher co...

Страница 326: ...ly connected Replace the lower printer engine PCBA Go to Lower engine PCBA removal on page 4 106 If the error remains then go to step 5 Problem resolved 5 Check the RIP card assembly connections Are the connections of the RIP card assembly properly connected Replace the RIP card assembly Go to RIP PCBA removal on page 4 153 Problem resolved Step Action and questions Yes No ...

Страница 327: ...ipes process direction Vertical stripes process direction on page 2 284 Horizontal stripes side to side Horizontal stripes side to side direction on page 2 285 Partial lack Partial lack on page 2 287 Spots Spots on page 2 288 After image ghosting After image ghosting on page 2 290 Background fog Background fog on page 2 291 Paper skew Paper skew on page 2 293 Media damage Media damage on page 2 29...

Страница 328: ... Problem solved Replace any empty toner cartridges 3 Check the toner add chutes to ensure that they are not clogged Does the problem remain Go to step 4 Problem solved 4 Check the 2nd transfer roller for contamination and wear Is the 2nd transfer roller free of excess wear and contamination Go to step 5 Replace the 2nd transfer roller Go to 2nd transfer roller removal on page 4 28 5 Check the four...

Страница 329: ...tivity Disconnect and reconnect all appropriate cables Replace the developer HVPS PCBA Go to Developer HVPS PCBA removal on page 4 75 Perform a print test Does the problem remain Go to step 9 Problem resolved 9 Check the transfer roll HVPS PCBA for proper connectivity Disconnect and reconnect all appropriate cables Replace the transfer roll HVPS PCBA Go to Transfer roll HVPS PCBA removal on page 4...

Страница 330: ...transfer roller for contamination and wear Is the 2nd transfer roller free of excess wear and contamination Go to step 3 Replace the 2nd transfer roller Go to 2nd transfer roller removal on page 4 28 3 Check the four PC cartridges for proper installation Check the PC cartridge connections Are the PC cartridge connections free of excess wear and contamination Go to step 4 Correct and clean contamin...

Страница 331: ...main Go to step 8 Problem resolved 8 Check the transfer roll HVPS PCBA for proper connectivity Disconnect and reconnect all appropriate cables Replace the transfer roll HVPS PCBA Go to Transfer roll HVPS PCBA removal on page 4 184 Perform a print test Does the problem remain Go to step 9 Problem resolved 9 Replace the LED printhead assembly Go to LED printhead removal on page 4 105 Does the proble...

Страница 332: ...or 2 Check the charge roll HVPS card PCBA connections Is the above component properly connected Go to step 3 Replace the connection 3 Replace the charge roll HVPS card PCBA Go to Charge roll HVPS PCBA removal on page 4 40 Perform a print test Does the problem remain Go to step 4 Problem resolved 4 Check the upper printer engine PCBA for proper connectivity Disconnect and reconnect all appropriate ...

Страница 333: ...ass window in the LED printhead assembly free of contamination Go to step 4 Remove debris or clean the LED printhead assembly window 4 Check the four PC cartridges for proper installation Check the PC cartridge connections Are the PC cartridge connections free of excess wear and contamination Go to step 5 Correct and clean contaminated pins or replace the appropriate PC cartridge or connector 5 Re...

Страница 334: ...connect all appropriate cables Replace the upper printer engine PCBA Go to Upper printer engine PCBA removal on page 4 189 Perform a print test Does the problem remain Go to step 10 Problem resolved 10 Check the RIP card PCBA for connection Is the component properly connected Replace the RIP card PCBA Go to RIP PCBA removal on page 4 153 Replace the connection Step Check Yes No 1 Check the media c...

Страница 335: ...loper HVPS PCBA for proper connectivity Disconnect and reconnect all appropriate cables Replace the developer HVPS PCBA Go to Developer HVPS PCBA removal on page 4 75 Perform a print test Does the problem remain Go to step 7 Problem resolved 7 Check the transfer roll HVPS PCBA for proper connectivity Disconnect and reconnect all appropriate cables Replace the transfer roll HVPS PCBA Go to Transfer...

Страница 336: ... page 4 28 4 Check the four PC cartridges for proper installation Check the PC cartridge connections Are the PC cartridge connections free of excess wear and contamination Go to step 5 Correct and clean contaminated pins or replace the appropriate PC cartridge or connector 5 Replace the transfer belt cleaner Go to Transfer belt cleaner removal on page 4 181 Does the problem remain Go to step 6 Pro...

Страница 337: ...age Does the problem remain Go to step 2 Problem resolved 2 Check the media transfer route Check the media route for contamination or obstacles Go to step 3 Remove obstacles or contamination 3 Check the four PC cartridges for proper installation Check the PC cartridge connections Are the PC cartridge connections free of excess wear and contamination Go to step 4 Correct and clean contaminated pins...

Страница 338: ...8 Check the transfer roll HVPS PCBA for proper connectivity Disconnect and reconnect all appropriate cables Replace the transfer roll HVPS PCBA Go to Transfer roll HVPS PCBA removal on page 4 184 Perform a print test Does the problem remain Go to step 9 Problem resolved 9 Check the developer HVPS PCBA for proper connectivity Disconnect and reconnect all appropriate cables Replace the developer HVP...

Страница 339: ...windows for contamination Is the LED beam route free of debris and the glass window in the LED printhead assembly free of contamination Go to step 4 Remove debris or clean the LED printhead assembly window 4 Check the 2nd transfer roller for contamination and wear Is the 2nd transfer roller free of excess wear and contamination Go to step 5 Replace the 2nd transfer roller Go to 2nd transfer roller...

Страница 340: ...r engine PCBA for proper connectivity Disconnect and reconnect all appropriate cables Replace the upper printer engine PCBA Go to Upper printer engine PCBA removal on page 4 189 Perform a print test Does the problem remain Problem solved Replace the RIP card PCBA Go to RIP PCBAremoval on page 4 153 Step Check Yes No 1 Check the media condition Load new dry recommended media Reprint the defective i...

Страница 341: ...Fuser assembly removal on page 4 87 Go to step 6 6 Check the 2nd transfer roller for contamination and wear Is the 2nd transfer roller free of excess wear and contamination Go to step 7 Replace the 2nd transfer roller Go to 2nd transfer roller removal on page 4 28 7 Replace the transfer belt assembly Go to Transfer belt assembly removal on page 4 178 Does the problem remain Go to step 8 Problem re...

Страница 342: ...cartridges 3 Check the heat belt and pressure roll in the fuser assembly for scratches or defects CAUTION The fuser assembly might be hot Allow the fuser assembly to cool Remove the fuser assembly Is there contamination or cracks on the heat belt and or pressure roll Replace the fuser assembly Go to Fuser assembly removal on page 4 87 Go to step 4 4 Check the upper printer engine PCBA for proper c...

Страница 343: ...tamination Go to step 4 Correct and clean contaminated pins or replace the appropriate PC cartridge or connector 4 Check the 2nd transfer roller for contamination and wear Is the 2nd transfer roller free of excess wear and contamination Go to step 5 Replace the 2nd transfer roller Go to 2nd transfer roller removal on page 4 28 5 Replace the transfer belt cleaner Go to xxx Does the problem remain G...

Страница 344: ...appropriate cables Replace the transfer roll HVPS PCBA Go to Transfer roll HVPS PCBA removal on page 4 184 Perform a print test Does the problem remain Go to step 9 Problem resolved 9 Check the LED printhead assembly Replace the LED printhead assembly Go to LED printhead removal on page 4 105 Does the problem remain Go to step 10 Problem resolved 10 Check the upper printer engine PCBA for proper c...

Страница 345: ... are set correctly Properly install the media tray assembly into the printer Reprint the defective image Does the problem remain Go to step 3 Problem resolved 3 Check for obstructions in the area of the media feed units Are the media feed unit assembly free from any obstructions Go to step 4 Remove obstructions 4 Is the printer left door assembly properly and evenly closed Go to step 5 Open and th...

Страница 346: ...arities Check for missing printer foot Is the setup surface normal Go to step 2 Correct the installation placement 2 Check the media feed Remove the media tray assembly Properly load media in the media tray assembly Properly install the media tray assembly in the printer Reprint the defective image Does the problem remain Go to step 3 Problem resolved 3 Check the printer media type settings Ensure...

Страница 347: ...e registration transport roller assembly Are all drive rollers on the registration transport roller assembly free of contamination wear and damage Go to step 7 Replace registration transport roller assembly Go to Registration transport roller assembly removal on page 4 152 7 Check the heat belt and pressure roll in the fuser assembly for scratches or defects CAUTION The fuser assembly might be hot...

Страница 348: ... new dry recommended media Reprint the defective image Does the problem remain Go to step 4 Problem resolved 4 Check the heat belt and pressure roll in the fuser assembly for scratches or defects CAUTION The fuser assembly might be hot Allow the fuser assembly to cool Remove the fuser assembly Is there contamination or cracks on the heat belt and or pressure roll Replace the fuser assembly Go to F...

Страница 349: ...Go to Transfer belt assembly removal on page 4 178 Does the error remain Go to step 2 Problem resolved 2 Replace the printhead Go to LED printhead removal on page 4 105 Does the error remain Go to step 3 Problem resolved 3 Check the upper printer engine PCBA for proper connectivity Disconnect and reconnect all appropriate cables Replace the upper printer engine PCBA Go to Upper printer engine PCBA...

Страница 350: ...tridges are properly installed Does the problem remain Go to step 3 Problem resolved 3 Check the 2nd transfer roller for contamination and wear Is the 2nd transfer roller free of excess wear and contamination Go to step 4 Replace the 2nd transfer roller Go to 2nd transfer roller removal on page 4 28 4 POR the machine Does the problem remain Replace the transfer belt assembly Go to Transfer belt as...

Страница 351: ...eloper housing K removal on page 4 55 Developer housing M removal on page 4 61 Developer housing Y removal on page 4 67 and Developer carrier removal and replacement on page 4 46 Does the problem remain Go to step 3 Problem resolved 3 Replace the printhead Go to LED printhead removal on page 4 105 Does the problem remain Go to step 4 Problem resolved 4 Check the upper printer engine PCBA for prope...

Страница 352: ... color Replace the appropriate developer unit housing for the color that is producing the diagonal banding Go to Developer housing C removal on page 4 49 Developer housing K removal on page 4 55 Developer housing M removal on page 4 61 or Developer housing Y removal on page 4 67 Did this fix the problem Problem resolved Contact a higher level of support ...

Страница 353: ...e indicator light is illuminated solid green Sleep button is unilluminated Operating in Sleep Mode The indicator light is illuminated solid green Sleep button is illuminated solid amber Entering or waking from Hibernate Mode The indicator light is illuminated solid green Sleep button is illuminated blinking amber Operating in Hibernate Mode The indicator light is unilluminated Sleep button is blin...

Страница 354: ...igate back to the home screen Icon Button Function Copy Accesses the Copy menus and makes copies E mail Accesses the E mail menus and sends e mails Fax Accesses the Fax menus and sends fax Accesses the printer menus Note These menus are available only when the printer is in the Ready state FTP Accesses the File Transfer Protocol FTP menus and scans documents directly to an FTP server Status messag...

Страница 355: ...onfidential print jobs Profile names Bookmark container or print job names USB container or print job names for supported file types Release Held Fax Accesses the list of held faxes Note This button appears only when there are held faxes with a scheduled hold time previously set Lock Device Opens a password entry screen Enter the correct password to lock the printer control panel Note This button ...

Страница 356: ...izes Custom Bin Names Universal Setup Bin Setup Reports Menu Settings Page Device Statistics Network Setup Page Network x Setup Page Shortcut List Fax Job Log Fax Call Log Copy Shortcuts E mail Shortcuts Fax Shortcuts FTP Shortcuts Profiles List Print Fonts Print Directory Asset Report Settings General Settings Copy Settings Fax Settings E mail Settings FTP Settings Flash Drive Menu Print Settings...

Страница 357: ...ostics Menu Group is active all host interfaces are offline See Diagnostics Menu on page 3 17 for more information Invalid engine mode 1 Turn off the printer 2 Press and hold the 3 4 and 6 buttons simultaneously 3 Turn on the printer 4 Release the buttons after 10 seconds This mode is used if the machine has invalid code and needs the correct code loaded After entering this mode the firmware code ...

Страница 358: ...Color Trapping See Color Trapping on page 3 9 Tray Insert Msg See Tray Insert Message Delay on page 3 15 SIZE SENSING See Size Sensing on page 3 14 Exit Tray 2 See Exit Tray 2 on page 3 10 Panel Menus See Panel Menus on page 3 13 PPDS Emulation See PPDS Emulation on page 3 13 Download Emuls Factory Defaults See Factory Defaults on page 3 10 Energy Conserve See Energy Conserve on page 3 9 Fax Low P...

Страница 359: ...re continuing When set to Continue the device automatically assumes that the user selects Continue every time a change prompt is encountered Likewise when the device is set to Use Current all change prompts will perform as if Use Current was selected by the user Paper Prompts See Paper Prompts on page 3 13 Envelope Prompts See Envelope Prompts on page 3 9 Action for Prompts See Action for prompts ...

Страница 360: ...creens To change this setting 1 From the Configuration Menu navigate to Automatically Display Error Screens 2 Touch or to change the setting 3 Touch Submit to save the setting or touch Back to return to the Configuration Menu without saving any changes Black Only Mode This mode enables a user to force the printer to always print color content in grayscale Turning this setting On is equivalent to s...

Страница 361: ...ay an AIO can continue to function as a print only device even when its scanner is malfunctioning To change this setting 1 From the Configuration Menu navigate to Disable Scanner 2 Touch or to change the setting 3 Touch Submit to save the setting or touch Back to return to the Configuration Menu without saving any changes Disk Encryption This setting controls whether the device encrypts the inform...

Страница 362: ...ts Warning This operation cannot be undone This setting enables a user to restore all of the device s settings to either the network settings on network models only or to the base device settings To restore the Factory Default settings 1 From the Configuration Menu navigate to Factory Defaults 2 Touch Restore Base to restore all non critical base printer NVRAM settings 3 Touch Restore STD Net to r...

Страница 363: ... 24 then all fonts sized 24 points or less will use the high frequency screens The panel displays a numeric keypad interface to allow the user to adjust this setting s value To change this setting 1 From the Configuration Menu navigate to Font Sharpening 2 Touch or to change the value 3 Touch Submit to save the setting or touch Back to return to the Configuration Menu without saving any changes Th...

Страница 364: ...hat exist in a priority queue until that queue is empty thereafter the device resumes printing the jobs in the normal print queue Interrupt is activated by default but may be turned off through the configuration pages The value of this setting determines how much DRAM the device will allot to storing the copy jobs in the priority queue To change this setting 1 From the Configuration Menu navigate ...

Страница 365: ...n Menu navigate to PPDS Emulation 2 Touch or to change the setting 3 Touch Submit to save the setting or touch Back to return to the Configuration Menu without saving any changes Print Quality Pages See PRINT TESTS on page 3 26 Reports This menu contains informational reports that are helpful when servicing a device Menu Settings Page Print the menu settings pages to list the customer settings and...

Страница 366: ...he device The device s default paper feed orientation is long edge fed LEF However in order to support added finishing functionality the MFP also supports printing with paper fed in the short edge SEF orientation If the setting Disabled default is selected letter and A4 paper can only be fed long edge If they are fed short edge a prompt will ask you to use the correct paper size When the setting i...

Страница 367: ...ly This setting will apply to all automatic trays but not to the MP Feeder The MP Feeder can support these paper sizes regardless of the value of this setting Tray Insert Message Delay This setting determines how many seconds the panel will display Tray Insert after a user has inserted a tray into the printer To change this setting 1 From the Configuration Menu navigate to Tray Insert Message Dela...

Страница 368: ...tings The purpose of this setting is to make any sensitive information that may exist on the device s storage completely indecipherable To run this setting 1 From the Configuration Menu navigate to Wipe All Settings 2 The screen displays the following messages Erase all information on the hard disk This will erase all settings solutions and jobs on this device 3 Touch Yes to erase or touch No to c...

Страница 369: ... page 3 30 ADF SCANNER SENSOR TESTS See ADF SCANNER SENSOR TESTS on page 3 31 FINISHER SENSOR TESTS See FINISHER SENSOR TESTS on page 3 31 MOTOR TESTS See MOTOR TESTS on page 3 24 PRINTER MOTOR TESTS See PRINTER MOTOR TESTS on page 3 24 ADF SCANNER MOTOR TESTS See ADF SCANNER MOTOR TESTS on page 3 25 FINISHER MOTOR TESTS See FINISHER MOTOR TESTS on page 3 25 PRINT TESTS See PRINT TESTS on page 3 2...

Страница 370: ... Test See Quick Disk Test on page 3 19 Disk Test Clean See Disk Test Clean on page 3 19 Flash Test See Flash Test on page 3 19 PRINTER SETUP See PRINTER SETUP on page 3 27 Defaults See U S Non U S Defaults on page 3 27 Prt Color Pg Count See Mono and Color Page Count on page 3 27 Prt Mono Pg Count Perm Page Count See Permanent Page Count on page 3 27 Serial Number See Serial Number on page 3 27 Mo...

Страница 371: ...This test performs a non destructive read write on one block per track on the disk Once executed the test cannot be canceled To perform this test 1 From the Diagnostics Menu navigate to DEVICE TESTS Quick Disk Test 2 Quick Disk Test Testing DO NOT POWER OFF appears 3 When the test is complete Quick Disk Test Test Passed or Quick Disk Test Test Failed appears Disk Test Clean Warning This test perfo...

Страница 372: ...stics Menu navigate to DEVICE TESTS Disk Test Clean 2 Contents will be lost Continue appears Touch Yes to continue or touch No to return to DEVICE TESTS 3 Once the test starts it cannot be stopped 4 When the test is complete Disk Test Clean Test Passed or Disk Test Clean Test Failed appears ...

Страница 373: ...gle duplex sheet is printed and the continuous test continues until you press Stop EVENT LOG Diagnostics Menu The Event Log is a diagnostic tool that tracks the occurrence of various critical events in a device s functional history such as paper jams and firmware updates Clear the Event Log Use Clear the Event Log to remove the current information in the Event Log This affects both the viewed log ...

Страница 374: ...en hole punched No information is printed on the feed test pages since the printhead LED isn t engaged during this test Eight sheets of paper are fed and then the pages are hole punched with a 2 hole a 3 hole or a 4 hole pattern depending on the selected punch test Although the source searching algorithm may result in paper being fed from another source media initially is requested from the defaul...

Страница 375: ...the number of times the memory test has passed and finished successfully Initially 000000 displays with the maximum pass count being 999 999 F represents the number of times the memory test has failed and finished with errors Initially 0000 displays with the maximum fail count being 99 999 Initially only four digits appear but additional digits appear as needed To stop this test before completion ...

Страница 376: ...TESTS 3 Select the test from the following options Available printer motor tests Fuser lower redrive 1st transfer retract motor Printer transport motor Registration motor HCF feed lift motor feed Tray 1 feed lift motor feed HCF feed lift motor lift Tray 1 feed lift motor lift HCF transport motor Tray 2 feed lift motor feed KCMY drum transfer belt motor Tray 2 feed lift motor lift Y erase lamp Tray...

Страница 377: ...paddle motor Punch carriage shift motor rearward Exit motor Punch unit motor Finisher diverter gate solenoid upper bin Bridge unit motor Finisher diverter gate solenoid stacker bin Decurler cam clutch Sub paddle solenoid Booklet folding exit motor forward Buffer diverter gate solenoid Booklet folding exit motor reverse Front tamper motor forward Booklet knife solenoid Front tamper motor rearward B...

Страница 378: ... No information is printed on the feed test pages since the printhead LED is not engaged during this test PRINT TESTS This menu s settings enable a user to test the device s ability to generate printed output from each of its installed input sources and to test the device s current print quality Input Source Print Test After a user selects an input source to test the panel displays two testing opt...

Страница 379: ...hange this setting 1 From the Diagnostics Menu navigate to PRINTER SETUP 2 Select Par 1 Strobe Adj 3 Touch or to change the value 4 Touch Submit to save the setting or touch Back to return to the Diagnostics Menu without saving any changes Permanent Page Count The value of this setting indicates the total number of pages that have been printed by the device Reset Color Calibration This setting ena...

Страница 380: ...ics Menu 2 Touch Feed Test You are prompted to select a paper size for the ADF For flatbed scans the full length of the flatbed is traversed The device decides whether to run the flatbed or the ADF according to the following flowchart During the test Running Flatbed xxxxx ADF xxxxx appears on the LCD The Flatbed number increases each time the scanner performs a flatbed scan and the ADF number incr...

Страница 381: ...t of the top and left edges of the digital image produced in step 1 Adjust the scanner and ADF registration by changing the settings below Note Lead refers to the edge of the paper parallel to the scanner carriage Adjusting FLATBED SS REGI ADJUST ADF SIDE1 LEAD REGI ADJUST and ADF SIDE2 LEAD REGI ADJUST changes the left margin settings Adjusting FLATBED FS REGI ADJUST ADF SIDE1 LEAD OFFSET ADJUST ...

Страница 382: ...ages from the ADF places the test page on the flatbed and select Copy Quick Test Copy Quick Test The printer performs a copy using the following value when this this option is selected Content Type text photo Content Source color laser Darkness 5 Background Removal 4 Contrast best for content Shadow Detail 4 Sharpness 3 Deskew false Print Testcase The printer generates a report to use with the Cop...

Страница 383: ...tray 3 media out Sensor standard bin 2 media full Sensor tray 3 media level Sensor printer left door interlock Sensor tray 3 feed out Sensor upper redrive door interlock Sensor tray 3 media size Sensor printer front door interlock Sensor tray 3 pre feed TTM only Sensor duplex door interlock Sensor tray 4 media out Sensor tray module left door interlock Sensor tray 4 media level Sensor waste toner ...

Страница 384: ...r staple low Sensor media eject clamp HP Sensor booklet bin media present Sensor media eject shaft HP Sensor booklet front tamper HP Sensor stacker bin upper limit Sensor booklet media entracne Sensor stacker bin no media Sensor booklet rear tamper HP Sensor stacker bin level encoder Sensor booklet end guide HP Sensor stacker bin level 1 Sensor booklet knife folding Sensor stacker bin level 2 Sens...

Страница 385: ...e Info Displays compile information History Print History Mark History History Mode MAC Set Card Speed Set LAA Keep Alive NVRAM Dump NVRAM Reinit NVRAM NPAP Print Alerts TCP IP netstat r arp a Allow SNMP Set Set MTU Meditech Mode Raw LPR Mode Gather Debug Enable Debug ...

Страница 386: ...ht Make sure the guides in the tray or the multipurpose feeder are properly positioned and are not pressing too tightly against the paper or envelopes Push the tray in firmly after loading paper Paper recommendations Use only recommended paper or specialty media Do not load wrinkled creased damp bent or curled paper Flex and straighten paper before loading it Do not use paper that has been cut or ...

Страница 387: ...emove the jammed paper Open staple door remove the staple cartridge and then remove the jammed staple 3 52 3 56 2 Standard finisher bin 3 Door G 4 Door H 5 Finisher bin 1 6 Finisher bin 2 7 Door C Trays 1 4 24x Open door C and then remove the jammed paper Open each tray and then remove the jammed paper 3 43 8 Multipurpose feeder 250 Remove all paper from the multipurpose feeder and then remove the...

Страница 388: ...remove the jammed paper Open the top cover and then remove the jammed paper Gently move the tray to the left until it stops and then remove the jammed paper 3 45 12 Door B 230 Open door B and then remove the jammed paper 3 40 13 Door A 201 202 231 281 Open door A and then remove the jammed paper Remove all paper from the fuser and then remove the jammed paper 3 36 3 41 3 49 14 Door D 203 Open door...

Страница 389: ...hen gently pull it out Warning Do not touch the center of the fuser unit Doing so will damage the fuser Note Make sure all paper fragments are removed 4 Push the green lever back into place 5 Close door A 6 If necessary touch Continue from the printer control panel CAUTION HOT SURFACE The inside of the printer might be hot To reduce the risk of injury from a hot component allow the surface to cool...

Страница 390: ... visible under the fuser then firmly grasp the paper on each side and then gently pull it out Note Make sure all paper fragments are removed 3 Close door A 4 If necessary touch Continue from the printer control panel CAUTION HOT SURFACE The inside of the printer might be hot To reduce the risk of injury from a hot component allow the surface to cool before touching ...

Страница 391: ...A and then door D by lifting the release latch of each door and lowering the doors 2 Firmly grasp the jammed paper on each side and then gently pull it out Note Make sure all paper fragments are removed 3 Close door D and then close door A 4 If necessary touch Continue from the printer control panel CAUTION HOT SURFACE The inside of the printer might be hot To reduce the risk of injury from a hot ...

Страница 392: ...er jam 1 Lower the multipurpose feeder and then open door B 2 Firmly grasp the jammed paper on each side and then gently pull it out Note Make sure all paper fragments are removed 3 Close door B 4 If necessary touch Continue from the printer control panel 2 1 ...

Страница 393: ...wering the door 2 Pull the green lever down Note Make sure all paper fragments are removed 3 Firmly grasp the jammed paper on each side and then gently pull it out CAUTION HOT SURFACE The inside of the printer might be hot To reduce the risk of injury from a hot component allow the surface to cool before touching 1 2 2 1 ...

Страница 394: ...3 42 Service Manual 7558 xxx Go Back Previous Next 4 Push the green lever back into place 5 Close door A 6 If necessary touch Continue from the printer control panel ...

Страница 395: ...4x paper jam Paper jam in Tray 1 1 Open Tray 1 2 Firmly grasp the jammed paper on each side and then gently pull it out Note Make sure all paper fragments are removed 3 Close Tray 1 4 If necessary touch Continue jam cleared from the printer control panel ...

Страница 396: ...ly grasp the jammed pages and then pull it out Note Make sure all paper fragments are removed 2 Open the specified tray 3 Firmly grasp the jammed paper on each side and then gently pull it out Note Make sure all paper fragments are removed 4 Close the tray 5 If necessary touch Continue jam cleared from the printer control panel ...

Страница 397: ...tray 1 Pull out the tray until it stops 2 Firmly grasp the jammed paper on each side and then gently pull it out 3 Push the tray gently until it stops 4 If necessary touch Continue jam cleared from the printer control panel CAUTION Do not pull out the tray with too much force Doing so may hit and injure your knees ...

Страница 398: ... jam in the tray exit 1 Gently move the tray to the left until it stops 2 Firmly grasp the jammed paper on each side and then gently pull it out 3 Gently put the tray back into position 4 If necessary touch Continue jam cleared from the printer control panel ...

Страница 399: ...Diagnostic aids 3 47 7558 xxx Go Back Previous Next Paper jam in the top cover 1 Gently move the tray to the left until it stops 2 Open the top cover 1 2 2 ...

Страница 400: ...Go Back Previous Next 3 Firmly grasp the jammed paper on each side and then gently pull it out 4 Close the top cover 5 Gently put the tray back into position 6 If necessary touch Continue jam cleared from the printer control panel ...

Страница 401: ...er jam in door A 1 Open door A 2 Determine where the jam is located and then remove it 2 1 If the paper is visible under the fuser then firmly grasp it on each side and pull it out Note Make sure all paper fragments are removed 2 2 If the paper is not visible then you will need to remove the fuser unit CAUTION HOT SURFACE The inside of the printer might be hot To reduce the risk of injury from a h...

Страница 402: ...fuser unit 2 3 Firmly grasp the jammed paper on each side and then gently pull it down and out Notes Make sure all paper fragments are removed If the paper is in the fuser then lower the fuser nip release lever and switch it to envelope mode After removing the jammed paper return the lever to the proper position 2 4 Align the fuser unit using the handles on each side and then place it back into th...

Страница 403: ...Open cover F 2 Firmly grasp the jammed paper on each side and then gently pull it out Note Make sure all paper fragments are removed Note If the paper jam is difficult to remove then rotate the knob counterclockwise 3 Close cover F 4 If necessary touch Continue from the printer control panel ...

Страница 404: ...jam in door H 1 Open door H Note Door H is located between the finisher exit bins 2 Firmly grasp the jammed paper on each side and then gently pull it out Note Make sure all paper fragments are removed 3 Close door H 4 If necessary touch Continue from the printer control panel ...

Страница 405: ...over G1 lever 3 Firmly grasp any jammed paper and then gently pull it out Note Make sure to remove all paper fragments after gently pulling out any jammed paper inside door G Area Cover knob or handle name 1 Cover G1 2 Cover G2 3 Knob G3 4 Cover G4 5 Cover G7 6 Knob G8 7 Handle G9 1 2 3 4 5 6 7 ...

Страница 406: ...clockwise 5 Move cover G4 down and then remove any jammed paper 6 Move cover G7 to the left and then remove any jammed paper 7 Pull handle G9 until the tray is completely open 8 Lift the inside cover If the paper is jammed in the rollers then rotate knob G8 counterclockwise and then remove the jammed paper 9 Close door G 10 If necessary touch Continue from the printer control panel ...

Страница 407: ...Open cover F 2 Firmly grasp the jammed paper on each side and then gently pull it out Note Make sure all paper fragments are removed Note If the paper jam is difficult to remove then rotate the knob counterclockwise 3 Close cover F 4 If necessary touch Continue from the printer control panel ...

Страница 408: ...ous Next 455 staple jam 1 Open door G 2 Press the latch to open the stapler door Note The stapler door is located behind the finisher 3 Lower the latch of the staple cartridge holder and then pull the staple cartridge holder out of the printer ...

Страница 409: ...taple guard and then remove any jammed or loose staples 5 Close the staple guard 6 Press down on the staple guard until it clicks into place 7 Push the staple cartridge holder firmly back into the stapler unit until the staple cartridge holder clicks into place 8 Close the stapler door ...

Страница 410: ... more pages through the ADF 1 Remove all original documents from the ADF Note The message clears when the pages are removed from the ADF 2 Open the ADF cover 3 Firmly grasp the jammed paper on each side and then gently pull it out Note Make sure all paper fragments are removed 4 Close the ADF cover 5 Reload original documents into the ADF straighten the stack and then adjust the paper guide ...

Страница 411: ... setting in the Security Menu To perform a jumper reset operation 1 Power the device off 2 Remove the Kensington lock from the card cage if installed 3 Remove the small yellow jumper that covers a pair of the jumper s pins 4 Replace the small yellow jumper so that it covers the pins adjacent to its original position 5 Replace and secure the Kensington lock on the card cage if installed 6 Power the...

Страница 412: ...espective developer roll and toner is developed on the surface of each photoconductor The four separate color images are then transferred to the transfer belt as it passes under the photoconductors After the image is transferred to the transfer belt the photoconductors are cleaned and recharged The transfer belt carries the four colored image towards the transfer roll Media is picked up from the t...

Страница 413: ... drum causes the surface charge to neutralize The charge roll is a conductive roll that is positioned slightly above the surface of the drum The HVPS supplies the charge roll with two voltages a negative DC charge voltage and an AC discharge voltage that is used for electrically cleaning the drum HVPS VDC VDC Ground Conductive Tube Photoconductive Surface 0V VDC value DRUM Drum Surface Voltage Dru...

Страница 414: ...ata received from the RIP card assembly modulates this scan line turning it on and off according to image information that is received from the host computer and software Through the use of a series of rotating and stationary mirrors within the printhead the scan lines are applied on the negatively charged drum surface Whenever the print controller sends a command to print a black pixel the printh...

Страница 415: ...e motor The toner particles then travel through the toner dispense auger and to the developer housing Inside the developer unit the augers circulate and distribute the toner particles into the magnet roll surface before they reach the photoconductor drum as Toner dispense motor Toner bottle auger Toner dispense auger Developer housing Toner cartridge Augers Magnet roll ...

Страница 416: ...the magnet roll is always in contact with the drum surface When a less negative point on the drum a discharged area comes in contact with the more negative charged toner on the magnet roll toner transfers from the magnet roll to that point on the drum The toner will attract only to the area of the photoconductor drum that was exposed to the printhead LED scan line This process would be similar to ...

Страница 417: ...photoconductors and the transfer belt Service tips Never touch the surface of the transfer belt with your bare hand The oil from your skin will cause a charge differential on the surface and toner will not stick properly The result would be repeating blotches of voids light print on a page To solve this the transfer belt must be replaced Don t use solvents or other cleaners to clean the transfer b...

Страница 418: ...f color has been transferred to the transfer belt from the photoconductors An erase lamp also electrically cleans the drum The drum is discharged by exposure of light from the erase lamp Step 6 2nd Transfer As the paper travels and makes contact with the transfer belt the 2nd transfer roll assembly is charged with negative DC voltage from the HVPS This causes the toner image to transfer from the t...

Страница 419: ...e charge on the paper in order to separate the paper from the belt Step 8 Cleaning Transfer belt 2nd transfer roll Some of the unwanted toner will remain on the 2nd transfer roll To remove these a positive voltage from the HVPS is applied to transfer the unwanted toner to the transfer belt A cleaning blade comes into contact with the transfer belt and scrapes off the remaining toner on the belt su...

Страница 420: ...ill cause feed and transport problems If problems are encountered then the media should always be checked first See Media input size specifications on page 1 7 and Media input type specifications on page 1 9 In addition it is always a good practice to check the printer and driver settings to see if the media being used matches the user s settings It is not uncommon to find a user printing on cards...

Страница 421: ...t Sensor tray4 media level Sensor tray4 media out Sensor media level Sensor MPF media present Sensor MPF feed out Sensor tray 2 feed out Sensor tray 3 feed out Sensor tray 4 feed out Sensor registration Sensor paper on belt Sensor fuser exit Sensor upper redrive exit Sensor duplex wait Sensor tray 1 media size Sensor tray 2 media size Sensor tray 3 media size Sensor tray 4 media size Sensor MPF me...

Страница 422: ...nst the feed roller At the same time the pick roller is also lowered and pressed against the media in preparation for feeding As the paper feed is starting the pick roller rotates to insert the media between the feed roller and the separation roller The separation roller separates the media to make sure that only one sheet at a time is fed Bottom plate Media feed lift motor Pick roll Feed roll Sep...

Страница 423: ...edia to make sure that only one sheet at a time is fed Registration Paper that was fed from the media tray or MPF is picked up by their corresponding transport rolls feeding the sheet to the registration roll assembly The media is pushed against the registration roll putting pressure on the media until its lead edge is properly aligned MPF registration path MPF pick roll motor Feed roll Separation...

Страница 424: ...ady embedded on the transfer belt As the media passes between the transfer belt and the 2nd transfer roll the toner image is also transferred to the media Fusing exit The media with the embedded toner image needs to go through the fuser assembly to permanently bond the toner image to the sheet When the sheet passes between the heat belt and the pressure roll the combination of Registration roll Me...

Страница 425: ...s Next applied heat and pressure fuses the toner image to the media At the same time the fuser assembly rolls also move the media to the redrive rolls which transport the media to the output bin Redrive rolls Fuser assembly Heat belt Pressure roll ...

Страница 426: ...finished printing the exit rolls push the printed sheet towards the output bin 1 Then the upper redrive motor reverses direction pulling the sheet with its trailing edge first towards the opposite direction 2 into the duplexing area DUPLEX Exit rolls Upper redrive motor 2 1 Upper redrive motor ...

Страница 427: ...formed again this time on the other side of the same sheet Scanner theory The duplex ADF enables the user to create duplex scans automatically eliminating the need to stop the scanning process to flip over the media that is being duplicated The ADF uses step motors and a series of sensors to determine the media s size and position in the paper path during the scan process Duplex rolls ...

Страница 428: ...anned sheet is fed to the ADF exit rolls As the trailing edge of the scanned sheet actuates the ADF inverter sensor the inverter gate changes position to reroute the paper path At the same time the exit rolls reverse directions to feed the document through the inverter gate then towards the ADF transport rolls The media is fed again and the scanning cycle repeats this time on the other side of the...

Страница 429: ...aused by environmental conditions paper type lighting conditions or user preference In these instances adjust the Color Balance setting to create a more preferable color Color Balance provides the user with the ability to make subtle adjustments to the amount of toner being used in each color plane Selecting positive or negative values for cyan magenta yellow and black from the Color Balance menu ...

Страница 430: ...ormation and no color conversion is implemented Note The Color Samples pages are not useful if the software program does not specify colors with RGB or CMYK combinations Additionally certain situations exist in which the software program or the computer operating system adjusts the RGB or CMYK combinations specified in the program through color management The resulting printed color may not be an ...

Страница 431: ...ou can View the information on the printer control panel home screen or in the TCP IP section under the Networks Ports menu Print a network setup page or menu settings page and locate the information in the TCP IP section 2 Click Configuration Color Samples Detailed Options 3 Select a color conversion table 4 Enter the RGB or CMYK color number 5 Enter an increment value from 1 255 Note The closer ...

Страница 432: ...ransfer of media from the printer to a specified bin The following figures illustrate layouts front view of sensors rollers and main blocks as well as a layout rear view of the main components Bridge unit assembly paper path Bridge media entrance sensor Transport roll Decurler roll Bridge exit sensor From printer To finisher ...

Страница 433: ... 3 81 7558 xxx Go Back Previous Next Finisher media path Upper Media Bin Stacker Media Bin From Bridge Unit Stapler Unit Punch Unit Booklet Bin Booklet Stapler Unit Knife Folding End Guide Compiler Media Unit Assembly ...

Страница 434: ...olding exit drive motor assembly Booklet fold roll assembly driven by booklet folding exit drive motor assembly Booklet entrance roll driven by booklet media entrance drive motor assembly Main paddle assembly driven by drive motor entrance paddle Buffer Roll Assembly driven by drive motor buffer transport Finisher Media Entrance Roll Assembly driven by drive motor entrance paddle Upper Media Trans...

Страница 435: ...s Sensor upper media Sensor upper media bin full Sensor lower media exit Sensor lower media exit Sensor booklet media exit Sensor booklet bin media present Sensor booklet compiler media in Sensor booklet media entrance Sensor media entrance Sensor buffer path Sensor diverter gate ...

Страница 436: ...t assembly The motor power is transmitted to the two belts between the bridge unit right shaft assembly and the bridge unit left shaft assembly The media fed to the bridge unit assembly is securely held between the transport belts and the pinch rolls and fed to the finisher Drive motor exit Drive motor buffer transport Finisher diverter gate solenoid Buffer diverter solenoid Drive motor entrance p...

Страница 437: ... reverse rotation The media is returned to the punch unit by the upper media transport roll assembly or the buffer roll assembly and is stopped with its end gently pressed against the three punch media stopper assemblies The three punch media stopper assemblies in the punch unit drop to let media pass through when media is fed to the exit while the motor buffer transport is rotating forward but ri...

Страница 438: ...edia eject motor assembly starts reverse rotation to return the media to the compiler unit assembly When the following media reaches the compiler unit assembly the media eject clamp is raised and the media that has passed through the lower media exit roll assembly falls on the compiler unit assembly At this time the three main paddles are rotated by the main paddle shaft assembly to feed the media...

Страница 439: ...d in the stacker media bin After the buffer path is executed for the first media if a second media of a different size comes the first media is fed to the compiler unit assembly but the second one is fed to the compiler unit assembly without the buffer path At this time a certain delay time is provided to prevent the second media from colliding with the first one From compiler unit assembly to sta...

Страница 440: ...it roll assembly top driven by the drive motor exit ejects the media to the upper media bin The upper media exit roll assembly decelerates after a specified period of time from the following trigger events Functions of sensors along the media path Bridge unit assembly Sensor bridge unit media entrance A photo interrupter sensor that detects whether media is fed from the printer to the bridge unit ...

Страница 441: ...e rear tamper motor on the compiler unit assembly This sensor is also used to control on off of the media eject motor assembly Sensor compiler media present A photo interrupter sensor that detects whether media is present or not on the compiler unit assembly While media is present the actuator is outside the sensing area and the sensor turns high 5 V dc light receiving Sensor buffer path A photo i...

Страница 442: ...the motor and move the punch to the rear side until the sensor turns high to determine the home position The punch carriage shift motor assembly is activated to move the punch to the front until the sensor punch unit side registration 1 and the sensor punch unit side registration 2 detects the media edge and then the punch is further moved to the front according to the pulse number determined by t...

Страница 443: ...the punch waste box A sensor is provided to detect punch waste full When punch waste full is detected it is notified to the operator only once Even if punch waste is not removed the finisher can still punch media However it can spread punch waste inside the machine Pin position Home position Sensor punch hole select Sensor punch cam front Sensor punch unit HP Punch unit motor Pin Cam plate 3 hole ...

Страница 444: ...hing pins It turns high 5 V dc when the home position is detected Sensor punch hole select A photo interrupter sensor that detects the rear position of the cam plate It turns high 5 V dc when the rear position is detected This sensor also detects the cam position to switch punch holes 2 hole 3 hole Sensor punch cam front A photo interrupter sensor that detects the front position of the cam plate I...

Страница 445: ...t such improper compiling offsetting is required by shifting the staple position between sets of media Capacity of compiler unit assembly Media volume that can be stacked on the compiler unit assembly is limited as shown in the table below The number of sheets depends on whether media is stapled or not as well as on media size If the number of sheets of one set to be stapled exceeds the limit the ...

Страница 446: ...en media is fed from the punch to the compiler unit assembly tamping is performed to align the media in the media width direction on the compiler unit assembly Tamping is an operation to align media to the specified position on the compiler unit assembly The front tamper or rear tamper is moved to the end of the media by its motor Tamping is executed each time when a sheet of media reaches the com...

Страница 447: ...ollowing cases When executing rear stapling corner When executing dual stapling Position Description 1 Front tamper home position sensor front tamper HP 2 Front tamper size position 3 Front tamper offset position 4 Rear tamper home position sensor rear tamper HP 5 Rear tamper standby position 6 Rear tamper tamping position 7 Rear tamper offset position Sensor front tamper HP Front Sensor rear tamp...

Страница 448: ... position 4 Rear tamper home position sensor rear tamper HP 5 Rear tamper size position 6 Rear tamper offset position Position Description 1 Front tamper home position sensor front tamper HP 2 Front tamper standby position 3 Front tamper tamping position 4 Front tamper offset position 5 Rear tamper home position sensor rear tamper HP Sensor front tamper HP Front Sensor rear tamper HP Rear Front ta...

Страница 449: ...staple corner Shifts stapled sheets using the rear tamper by 20 mm to the front side before ejecting them to the stacker media bin For media with a width of less than 216 mm rear staple straight Shifts stapled sheets using the front tamper by 9 mm to the rear side before ejecting them to the stacker media bin During dual stapling Shifts stapled sheets using the front tamper by 9 mm to the rear sid...

Страница 450: ...rear tamper for tamping Clockwise rotation of this motor moves the rear tamper to the front side Counterclockwise rotation of this motor moves the tamper to the rear side Stapler This section describes the operation of the stapler Stapling operation Sheets of media fed from the punch are tamped on the compiler unit assembly and then stapled at specified positions by the command of the printer Rear...

Страница 451: ...edia to the rear side Rear Staple Straight rear straight This type of stapling is applied for media with a width of less than 216 mm The Stapler staples a set of media in parallel with the media edge after the front tamper aligns the media to the rear side Dual Staple dual The Stapler staples a set of media at fixed positions front rear sides in parallel with the media edge after the front tamper ...

Страница 452: ... bin without being stapled After the forcible ejection of media if the number of following sheets of one set to be stapled exceeds the limit of the compiler unit assembly the exceeding sheets are also ejected forcibly to the stacker media bin without being stapled After that even if the number of following sheets of one set to be stapled falls within the limit the sheets are also ejected forcibly ...

Страница 453: ... Forward clockwise rotation of the motor drives the stapler to staple a set of sheets and returns the stapling unit to the home position If stapling fails the motor rotates reversely counterclockwise to return the stapler unit assembly to the home position When staples become low the low staple sensor detects it and stapling stops automatically displaying an alarm message The message is also displ...

Страница 454: ...turns low 0 V dc light blocking while the stapler unit assembly stays at the home position Stapler unit motor in the stapler unit assembly A DC motor to activate the stapler unit assembly for stapling Clockwise rotation of this motor enables stapling while counterclockwise rotation returns the stapler unit assembly Booklet Operation The booklet media entrance roll assembly driven by the booklet me...

Страница 455: ...ition after one full rotation At the folding position the knife is thrust forward to fold the paper between booklet folding roll and booklet folding nip roll Paper is folded into two halves by the booklet folding roll driven by the booklet folding exit drive motor and is delivered to the booklet media bin by the booklet media exit roll assembly The booklet media bin belt will move at a fixed inter...

Страница 456: ...r booklet knife HP This photo sensor detects the home position stored condition of knife Sensor knife folding This photo sensor detects the fold position protruded condition of knife Booklet staple assembly This booklet stapler consist of two stapler units including stapler low switch and booklet stapler head motor Booklet paddle motor This DC motor drives the paddle at the booklet section Sensor ...

Страница 457: ... bin is inhibited until a full stack is reset Functions of upper media bin sensors Sensor upper media exit A photo interrupter sensor that detects that media has come to the upper media exit roll assembly top at the exit of the upper media bin When media reaches the upper media exit roll assembly top the actuator leaves the sensing area which turns the sensor to high 5 V dc Sensor upper media bin ...

Страница 458: ...cker bin no media is turned On or Off by the actuator attached to the carriage assembly right on the rear side of the finisher In case the stacker media bin abnormally goes up above the sensor stacker bin no media the sensor stacker bin upper limit is installed above the sensor stacker bin no media for protection against abnormal operation If an operator removes media from the stacker media bin du...

Страница 459: ...sets default of stapled media The stacker media bin can continue to stack media until media volume reaches either of the limits above In the mix stacking mode all the sizes are allowed until a media volume of approximately 300 sheets in the stacker media bin is detected The mix stacking mode indicates one of the following cases A larger any size of media sheet of media is stacked on a smaller shee...

Страница 460: ...tor When blocked by media or the tray this sensor turns high deciding that the stacker media bin is above the reference level To the contrary when receiving light this sensor turns low deciding that the stacker media bin is below the reference level Sensor stacker bin no media A photo interrupter sensor that detects that the stacker media bin is at the highest position it also detects no media Whe...

Страница 461: ... rotating power to the media eject shaft assembly Booklet tray Paper is folded into two by the booklet folding roll driven by the booklet Fold Roll Motor and booklet Eject Roll and delivered to the booklet tray Booklet tray is at a position lower than the paper delivery exit Paper delivery belt will move at fixed interval for every set of output When two sets or more are being delivered one set at...

Страница 462: ...ss booklet tray belt switch to move the paper delivery belt to the position for paper removal Power supply and interlock The finisher is equipped with the following interlock switches Switch finisher front door interlock Turns off when the cover assembly front opens shutting off the Interlock 24 V dc line in the finisher Booklet bin drive motor Sensor booklet bin media present ...

Страница 463: ...right side opens shutting off the Interlock 24 V dc line in the finisher Switch eject cover interlock Switch finisher front door interlock AC Printer Finisher LVPS card asm 24 V dc ON OFF Finisher controller card asm 5 V dc 24 V dc Interlock 24 V dc Sensor Switch eject cover interlock Switch finisher front door interlock ...

Страница 464: ...3 112 Service Manual 7558 xxx Go Back Previous Next TTM theory of operations ...

Страница 465: ...des in the media tray assembly to match the media size Rear media guide The rear media guide can be adjusted to different media sizes by moving it to the front or rear The guide comes into contact with the rear edge of the media and holds it in position TRAY 1 TRAY 1 Duplex media transport roll assembly MPF transport roll MPF feed roll MPF pick roll MPF separation roll Feed roll Separation roll Pi...

Страница 466: ...to the media lift shaft assembly through the tray lift gear assembly 3 The bottom plate is lifted up via the rear tray cables front right cable and front left cable by the rotation of the tray lift shaft assembly which causes the supplied media to come into contact with the pick roller The force pushing up the bottom plate of tray 4 is transmitted to the tray lift shaft assembly through the tray l...

Страница 467: ...e three roller assemblies to feed media When the pick roller picks up sheets of media and the remaining media decreases the media level actuator of the sensor media level lowers accordingly Media feed lift motor The media feed lift motor is activated to feed media and to lift the bottom plate While feeding media it rotates forward to drive the pick roller When lifting the bottom plate it rotates i...

Страница 468: ... out sensing area leaves there Thus the light of the sensor is transmitted When the sensing area is blocked media is present the signal turns off Sensor media level This sensor detects by the actuator position whether media in the media tray assembly is lifted When the flag of the actuator leaves the sensor media level sensing area the sensor detects that the media has been lifted Main components ...

Страница 469: ...his motor is used to drive the media transport mechanism in the tray module TTM tray 4 media transport motor This motor is used in the TTM to transport media from the tray 4 towards the tray module left door assembly TTM controller card assembly The TTM controller card assembly which contains a CPU controls media feed in the tandem tray module upon receiving a command from the upper printer engine...

Страница 470: ...states of the switches on the switch TTM media size corresponding to the media sizes of the media tray assembly Note The switches TTM media size are denoted by S W1 and S W3 respectively from the left side Media Size Analog switch S W1 S W3 No Tray Off Off B5L 7 25 x 10 5 L Off On 8 5 x 11 L On Off A4L On On ...

Страница 471: ...Diagnostic aids 3 119 7558 xxx Go Back Previous Next 3TM theory of operations ...

Страница 472: ...necessary to adjust the guide and the end guide in the media tray assembly to match the media size Rear media guide The rear media guide can be adjusted to different media sizes by moving it to the front or rear The guide comes into contact with the rear edge of the media and holds it in position TRAY 1 TRAY 2 TRAY 3 TRAY 4 Duplex media transport roll assembly MPF transport roll MPF feed roll MPF ...

Страница 473: ...ler assemblies to feed media When the pick roller picks up sheets of media and the remaining media decreases the media level actuator of the sensor media level lowers accordingly Media feed lift motor The media feed lift motor is activated to feed media and to lift the bottom plate While feeding media it rotates forward to drive the pick roller When lifting the bottom plate it rotates in reverse t...

Страница 474: ...or media level sensing area the sensor detects that the media has been lifted Main components Switch tray module left door interlock The switch tray module left door interlock detects open close of the tray module left door assembly Sensor tray 2 feed out The sensor tray 2 feed out detects media fed from trays 2 3 or 4 Sensor tray 3 feed out The sensor tray 3 feed out detects media fed from the tr...

Страница 475: ...sport roll assembly feeds media from the tray 3 or tray 4 to the printer Tray module drive motor This motor is used to drive the media transport mechanism in the tray module 3TM controller card assembly The 3TM controller card assembly which contains a CPU controls media feed in the tandem tray module upon receiving a command from the upper printer engine card assembly and sensor switch informatio...

Страница 476: ...f states of the switches on the switch media size corresponding to the media sizes of the media tray assembly Note The switches media size are denoted by S W1 and S W3 respectively from the left side Media Size Analog switch S W1 S W3 No Tray Off Off B5L 7 25 x 10 5 L Off On 8 5 x 11 L On Off A4L On On ...

Страница 477: ...Diagnostic aids 3 125 7558 xxx Go Back Previous Next 1TM theory of operations ...

Страница 478: ...guide The rear media guide can be adjusted to different media sizes by moving it to the front or rear The guide comes into contact with the rear edge of the media and holds it in position Bottom plate The force pushing up the bottom plate is transmitted by the driving force of the motor on the media feed unit assembly The bottom plate is pushed up by the rotation of the lift up shaft which causes ...

Страница 479: ...ransmitted to the three roller assemblies to feed media When the pick roller picks up sheets of media and the remaining media decreases the media level actuator of the sensor media level lowers accordingly Media feed lift motor The media feed lift motor is activated to feed media and to lift the bottom plate While feeding media it rotates forward to drive the pick roller When lifting the bottom pl...

Страница 480: ...ia out actuator that has stayed in the sensor media out sensing area leaves there Thus the light of the sensor is transmitted When the sensing area is blocked media is present the signal turns off Sensor media level This sensor detects by the actuator position whether media in the media tray assembly is lifted When the flag of the actuator leaves the sensor media level sensing area the sensor dete...

Страница 481: ...The tray module transport roll assembly feeds media from the tray 2 Tray module drive motor This motor is used to drive the media transport mechanism in the tray module 1TM controller card assembly The 1TM controller card assembly which contains a CPU controls media feed in the 1TM upon receiving a command from the upper printer engine card assembly and sensor switch information ...

Страница 482: ...f states of the switches on the switch media size corresponding to the media sizes of the media tray assembly Note The switches media size are denoted by S W1 and S W3 respectively from the left side Media Size Analog switch S W1 S W3 No Tray Off Off B5L 7 25 x 10 5 L Off On 8 5 x 11 L On Off A4L On On ...

Страница 483: ...Diagnostic aids 3 131 7558 xxx Go Back Previous Next High capacity feeder theory of operations ...

Страница 484: ...d unit assembly at prescribed timings The media fed by the feed roller and separation roller passes through the sensor pre feed The sensor pre feed detects the presence of media fed from the tray The sensor pre feed controls the HCF media feed lift motor speed and on off operation of the HCF pick solenoid assembly HCF media transport roll assembly This HCF media transport assembly roll transfers m...

Страница 485: ...d after receiving the feed start signal the HCF feed lift motor rotates forward to feed media from the tray to the feed roller side with the pick roller When the end of the media reaches the sensor pre feed and the sensor turns on the pick solenoid is deactivated so that the pick roller separates from the media in the tray The pick solenoid remains activated at a high voltage for a specified time ...

Страница 486: ... the feed start signal from the controller the HCF activates the HCF transport motor at a high speed after a preset time has passed This rotating power of the HCF transport motor is transmitted to the HCF media transport roll assembly and the media from the HCF media feed unit assembly is transferred to the printer When the sensor tray 5 feed out is turned on by the media fed with the HCF media tr...

Страница 487: ... of media feed until the sensor pre feed turns on The HCF pick solenoid is activated when the tray is inserted and when the power is turned on to check the presence of media in the tray Sensor pre feed Detects whether media has been fed from the tray and controls the HCF feed lift motor speed The sensor also becomes a trigger to deactivate the HCF pick solenoid The sensor turns on upon detecting m...

Страница 488: ... as a static jam This detection of media jam is carried out during the start up procedure and at every jam fail detection The status of all relevant sensors are checked during the start up procedure In addition the sensor states are checked constantly for the jam fail detection in order to monitor the variation in sensor levels Interlock detection This function checks the open state of the switch ...

Страница 489: ...s not present is detected before printing starts Functions of sensors used for status monitoring Switch HCF top door interlock Detects open close of the HCF top door The on state of this switch indicates the top door is closed Switch HCF unit docking interlock Detects the docking of the HCF with the printer The off state of this switch indicates that the HCF is separated from the printer In this c...

Страница 490: ...l was change from off to on The media size loaded in the tray is determined when the same media size has been detected a certain number of consecutive times If a sensor level pattern does not match the above table media size cannot be determined In this case though the tray is lifted starting a print job by feeding media from the tray is inhibited Sensor for media size detection Size sensors There...

Страница 491: ...ded in the HCF media tray When media is present the media out actuator in the middle of the HCF is raised as media is lifted and leaves the sensing area of the sensor media out which makes the sensor light receivable The presence of media is detected On the other hand if media out occurs when the HCF media tray is at the feeding position the media out actuator comes inside the sensing area of the ...

Страница 492: ... media volume detection This function determines the media volume remaining in the HCF media tray by using the HCF feed lift motor rotation time and the sensor media level during the tray lifting time The printer notifies operators of remaining media volume as 25 50 75 full or 0 zero If the remaining media volume becomes zero before no media is detected the indication remains at 25 When the sensor...

Страница 493: ...is off when the power is turned on the HCF regards the HCF media tray as having been removed and determines the remaining media volume based on the time from the media feed lift motor forward reverse rotation until the sensor media level comes on Sensor media level Detects the media feeding position in the tray in order to control the media position While this sensor media level is off lifting the...

Страница 494: ...3 142 Service Manual 7558 xxx Go Back Previous Next ...

Страница 495: ...y static electricity in your body to the machine Hold the ESD sensitive part by its edge connector shroud cover do not touch its pins If you are removing a pluggable module use the correct tool Do not place the ESD sensitive part on the machine cover or on a metal table if you need to put down the ESD sensitive part for any reason first put it into its special bag Machine covers and metal tables a...

Страница 496: ...Go Back Previous Next Turning the printer off Note This procedure is performed to preserve the operator panel memory settings 1 Press the sleep button to turn off the operator panel 2 Open the front door and switch off the printer ...

Страница 497: ...y set on a clean smooth and flat surface It should also be protected from light while out of the device Disconnect all external cables from the printer to prevent possible damage during service Unless otherwise stated reinstall the parts in reverse order of removal When reinstalling a part held with several screws start all screws before the final tightening CAUTION Remove the power cord from the ...

Страница 498: ...l on page 4 181 3 Remove the waste toner box 4 Rotate the transfer belt lever counterclockwise to the unlock position 5 Open the printhead retract door 6 Remove the four photoconductor units 7 Remove the four toner supplies 8 Remove the operator panel front cover See Operator panel front cover MFP removal on page 4 8 9 Remove the printhead retract door See Printhead retract door removal on page 4 ...

Страница 499: ...Repair information 4 5 7558 xxx Go Back Previous Next 11 Remove the six screws A from the inner cover 12 Remove the inner cover A ...

Страница 500: ...al 7558 xxx Go Back Previous Next Internal rear cover removal 1 Remove the top cover See Printer top cover removal on page 4 15 2 Remove the two screws A from the internal rear cover 3 Remove the internal rear cover A ...

Страница 501: ... lower cover removal 1 Open the printer left duplex door 2 Remove the two screws A 3 Remove the left rear lower cover Left upper cover removal 1 Open the printer left duplex door 2 Open the upper redrive door 3 Remove the two screws A 4 Remove the left upper cover ...

Страница 502: ...MPF tray feeder removal on page 4 131 Optional 3 Gently detach the MPF top cover from the MPF tray assembly 4 Remove the MPF top cover Operator panel front cover MFP removal 1 Remove the operator panel left cover See Operator panel left cover removal on page 4 10 2 Remove the operator panel right cover See Operator panel right cover removal on page 4 11 3 Remove the rubber screw covers ...

Страница 503: ...Repair information 4 9 7558 xxx Go Back Previous Next 4 Remove the three screws A from the operator panel front cover 5 Remove the operator panel front cover A ...

Страница 504: ...4 10 Service Manual 7558 xxx Go Back Previous Next Operator panel left cover removal 1 Remove the screw A from the operator panel left cover 2 Remove the operator panel left cover A ...

Страница 505: ... 1 Remove the operator panel right cover See Operator panel right cover removal on page 4 11 2 Remove the operator panel left cover See Operator panel left cover removal on page 4 10 3 Remove the operator panel front cover See Operator panel front cover MFP removal on page 4 8 4 Remove the operator panel See Operator panel top cover MFP removal on page 4 11 5 Remove the touch screen See Touch scre...

Страница 506: ...4 12 Service Manual 7558 xxx Go Back Previous Next 6 Remove the operator panel top cover ...

Страница 507: ...xxx Go Back Previous Next Printer front door removal 1 Open the printer front door and position it to an angle approximately 45 degrees from the printer 2 Disengage the two links A connecting the printer front door to the printer A ...

Страница 508: ...door by pushing down on the middle portion and then pull to the right to disengage 4 Remove the printer front door Printer right cover removal 1 Open the printer front door 2 Remove media tray 1 3 Remove the rear upper cover See Rear upper cover removal on page 4 19 4 Remove the rear lower cover See Rear lower cover removal on page 4 17 ...

Страница 509: ...over Printer top cover removal 1 Open the printer front door 2 Remove the operator panel left cover See Operator panel left cover removal on page 4 10 3 Remove the operator panel right cover See Operator panel right cover removal on page 4 11 4 Remove the operator panel front cover See Operator panel front cover MFP removal on page 4 8 A ...

Страница 510: ...4 16 Service Manual 7558 xxx Go Back Previous Next 5 Remove the two screws A from the printer top cover 6 Remove the printer top cover A ...

Страница 511: ...ear lower cover removal 1 Remove the rear upper cover See Rear upper cover removal on page 4 19 2 Remove the input tray interface cover 3 Disconnect all the cables connected from input trays and options 4 Remove the three screws A from the rear lower cover A ...

Страница 512: ...4 18 Service Manual 7558 xxx Go Back Previous Next 5 Remove the rear lower cover ...

Страница 513: ...al 1 Remove the two screws A from the rear upper cover 2 Remove the rear upper cover Scanner left cover removal 1 Remove the operator panel left cover See Operator panel left cover removal on page 4 10 2 Remove the scanner rear cover See Scanner rear cover removal on page 4 20 A ...

Страница 514: ...vious Next 3 Remove the two screws A from the scanner left cover 4 Remove the scanner left cover Scanner rear cover removal 1 Disconnect all cables connected to the ADF 2 Remove the rear upper cover See Rear upper cover removal on page 4 19 A ...

Страница 515: ...two screws A from the scanner rear cover 4 Remove the scanner rear cover Scanner right cover removal 1 Remove the operator panel right cover See Operator panel right cover removal on page 4 11 2 Remove the scanner rear cover See Scanner rear cover removal on page 4 20 A ...

Страница 516: ...cover removal on page 4 10 2 Remove the operator panel right cover See Operator panel right cover removal on page 4 11 3 Remove the scanner rear cover See Scanner rear cover removal on page 4 20 4 Remove the ADF See Automatic document feeder ADF assembly removal on page 4 230 5 Remove the scanner left cover See Scanner left cover removal on page 4 19 6 Remove the scanner right cover See Scanner ri...

Страница 517: ...Repair information 4 23 7558 xxx Go Back Previous Next 7 Remove the three screws A from the scanner top cover 8 Remove the scanner top cover A ...

Страница 518: ...st transfer conductor housing removal 1 Remove the rear upper cover See Rear upper cover removal on page 4 19 2 Remove the rear lower cover See Rear lower cover removal on page 4 17 3 Disconnect the input option cable A 4 Remove the eight screws B securing the PCBA door to the machine ...

Страница 519: ...Next 5 Release the two clamps C to release the harness 6 Swing the PCBA door open 7 Remove the transfer roll HVPS PCBA See Transfer roll HVPS PCBA removal on page 4 184 8 Remove the two screws D securing the bracket to the machine 9 Remove the bracket ...

Страница 520: ...r conductor housing to the machine 11 Remove the 1st transfer conductor housing 1st transfer retract clutch assembly removal 1 Remove the rear upper cover See Rear upper cover removal on page 4 19 2 Remove the rear lower cover See Rear lower cover removal on page 4 17 3 Disconnect the input option cable A ...

Страница 521: ...vious Next 4 Remove the eight screws B securing the PCBA door to the machine 5 Release the two clamps C to release the harness 6 Swing the PCBA door open 7 Remove the three screws D securing the 1st transfer retract clutch assembly to the machine ...

Страница 522: ...mbly 2nd transfer roller removal 1 Open the printer left duplex door assembly 2 Remove the screw A that secures the 2nd transfer roller 3 Push the latch B to release the 2nd transfer roller 4 Remove the 2nd transfer roller Reinstallation note When replacing the 2nd transfer roller ensure that the screw is properly reinstalled ...

Страница 523: ...he waste toner box 4 Remove the four photoconductor units 5 Remove the four toner supplies 6 Remove the operator panel front cover See Operator panel front cover MFP removal on page 4 8 7 Remove the printhead retract door See Printhead retract door removal on page 4 148 8 Remove the inner cover See Inner cover removal on page 4 4 9 Remove the two screws from the ATC sensor PCB bracket A 10 Disconn...

Страница 524: ...er See Transfer belt cleaner removal on page 4 181 3 Remove the waste toner box 4 Remove the four photoconductor units 5 Remove the four toner supplies 6 Remove the operator panel front cover See Operator panel front cover MFP removal on page 4 8 7 Remove the printhead retract door See Printhead retract door removal on page 4 148 8 Remove the inner cover See Inner cover removal on page 4 4 9 Disco...

Страница 525: ...sensor PCB to the machine 11 Remove the ATC sensor PCB Re installation note When replacing the ATC sensor PCB ensure that the five connections are properly reconnected Bridge PCBA removal 1 Remove the rear upper cover See Rear upper cover removal on page 4 19 2 Remove the rear lower cover See Rear lower cover removal on page 4 17 B ...

Страница 526: ...4 32 Service Manual 7558 xxx Go Back Previous Next 3 Disconnect the input option cable A 4 Remove the eight screws B securing the PCBA door to the machine ...

Страница 527: ...Repair information 4 33 7558 xxx Go Back Previous Next 5 Release the two clamps C to release the harness 6 Swing the PCBA door open 7 Remove the RIP PCBA See RIP PCBA removal on page 4 153 ...

Страница 528: ...4 34 Service Manual 7558 xxx Go Back Previous Next 8 Disconnect all the cables from the bridge PCBA ...

Страница 529: ...r See Printer front door removal on page 4 13 2 Remove the transfer belt cleaner See Transfer belt cleaner removal on page 4 181 3 Remove the waste toner box 4 Remove the four photoconductor units 5 Remove the four toner supplies 6 Remove the operator panel front cover See Operator panel front cover MFP removal on page 4 8 7 Remove the printhead retract door See Printhead retract door removal on p...

Страница 530: ... Back Previous Next 10 Lift the plastic gate and push it in to prevent the toner from spilling 11 Squeeze the two latches A to release the upper part of the auger 12 Detach the lower portion B of the auger from the developer unit 1 2 ...

Страница 531: ...Repair information 4 37 7558 xxx Go Back Previous Next Warning The lower portion B of the auger is prone to damage Extra care is required in handling this part A B ...

Страница 532: ... Ensure that the rubber sleeve C is attached properly to prevent toner spillage Charge roll HVPS cooling fan removal 1 Remove the rear upper cover See Rear upper cover removal on page 4 19 2 Remove the rear lower cover See Rear lower cover removal on page 4 17 3 Disconnect the input option cable A C ...

Страница 533: ...The cables do not have to be removed from the main power GFI interface to remove this part Just pull the main power GFI interface out of the machine and swing it out of the way 7 Remove the main power GFI interface or just move it so that you can get to the charge roll HVPS cooling fan See the Main power GFI interface removal on page 4 121 8 Disconnect the cable D from the charge roll HVPS cooling...

Страница 534: ...ess and remove the charge roll HVPS cooling fan Charge roll HVPS PCBA removal 1 Remove the printer right side cover See Printer right cover removal on page 4 14 2 Remove the waste toner sensor guide See Waste toner sensor guide removal on page 4 199 3 Remove the two screws A securing the charge roll HVPS PCBA 4 Remove the connection B from the charge roll HVPS PCBA ...

Страница 535: ...nel front cover MFP removal on page 4 8 2 Remove the top cover See Printer top cover removal on page 4 15 3 Remove the printer front door See Printer front door removal on page 4 13 4 Remove the transfer belt cleaner See Transfer belt cleaner removal on page 4 181 5 Remove the waste toner box 6 Remove the four photoconductor units 7 Remove the four toner supplies 8 Remove the printhead retract doo...

Страница 536: ...crews A securing the CMYK toner dispense auger assembly to the printer 12 Lift the four plastic gates and push them into their corresponding toners to prevent the toner from spilling 13 Gently detach the lower portions B of the four augers from the developer housings A 2 1 ...

Страница 537: ...ower portion B of the augers are prone to damage Extra care is required in handling these parts 14 Disengage the CMYK toner dispense auger assembly and remove Note After removal of the CMYK toner dispense auger assembly be sure to clean up all visible toner spillage B C ...

Страница 538: ...properly to prevent toner spillage Controller cooling fan removal 1 Remove the rear upper cover See Rear upper cover removal on page 4 19 2 Remove the rear lower cover See Rear lower cover removal on page 4 17 3 Disconnect the input option cable A 4 Remove the eight screws B securing the PCBA door to the machine ...

Страница 539: ... clamps C to release the harness 6 Swing the PCBA door open 7 Remove the two screws D securing the controller cooling fan 8 Remove the controller cooling fan from the machine 9 Disconnect the harness from the clamp E 10 Disconnect the cable F from the controller cooling fan ...

Страница 540: ...belt cleaner removal on page 4 181 4 Remove the waste toner box 5 Remove the four photoconductor units 6 Remove the four toner supplies Note When removing the toner supply cartridges ensure that all toner spillage and contamination is completely removed using an approved toner vacuum 7 Remove the operator panel left cover See Operator panel left cover removal on page 4 10 8 Remove the operator pan...

Страница 541: ...n 4 47 7558 xxx Go Back Previous Next 14 Remove the top cover A 15 Completely remove the carrier B from the assembly by dumping it and using a toner vacuum or if installing a new developer unit assembly go to next step ...

Страница 542: ...l 7558 xxx Go Back Previous Next Replacement warning If reusing an existing developer unit assembly ensure that all traces of old carrier B are removed from the developer unit assembly or print quality issues may occur B ...

Страница 543: ...and adjustment Go to Sensor ATC setup on page 4 460 Developer housing C removal 1 Remove the printer front door See Printer front door removal on page 4 13 2 Remove the transfer belt cleaner See Transfer belt cleaner removal on page 4 181 3 Remove the waste toner box 4 Remove the four photoconductor units 5 Remove the four toner supplies 6 Remove the operator panel left cover See Operator panel le...

Страница 544: ...rvice Manual 7558 xxx Go Back Previous Next 14 Lift the appropriate plastic gate and push it in to reduce toner spillage 15 Detach the lower portion A of the auger from the appropriate developer housing 1 2 A ...

Страница 545: ...Repair information 4 51 7558 xxx Go Back Previous Next 16 Swing away the lower portion of the auger to enable access to the two screws 17 Remove the two screws B from the bracket B ...

Страница 546: ...4 52 Service Manual 7558 xxx Go Back Previous Next 18 Move the lever counterclockwise 19 Remove the bracket mounted over the developer housing ...

Страница 547: ...vious Next 20 Remove the developer housing Reinstallation warning When reinstalling the developer housing ensure that the printhead retract levers are in their uppermost position as shown in the following image or damage will occur to the machine ...

Страница 548: ... If the developer housing does not seem to install easily do not force the part into the machine Ensure that the printhead retract lever is in the uppermost position and try to slide it in again Reinstallation notes To complete the re installation do the following a Be sure to attach the lower part of the auger properly to reduce toner spillage b Move the lever clockwise C ...

Страница 549: ...er front door See Printer front door removal on page 4 13 2 Remove the transfer belt cleaner See Transfer belt cleaner removal on page 4 181 3 Remove the waste toner box 4 Remove the four photoconductor units 5 Remove the four toner supplies 6 Remove the operator panel left cover See Operator panel left cover removal on page 4 10 7 Remove the operator panel right cover See Operator panel right cov...

Страница 550: ...nner cover See Inner cover removal on page 4 4 11 Remove the inner plate See Inner plate removal on page 4 101 12 Remove the ATC sensor PCB bracket See ATC sensor PCB bracket removal on page 4 29 13 Remove the waste toner auger chute See Waste toner auger chute removal on page 4 197 14 Lift the appropriate plastic gate and push it in to reduce toner spillage 15 Detach the lower portion A of the au...

Страница 551: ...Repair information 4 57 7558 xxx Go Back Previous Next 16 Swing away the lower portion of the auger to enable access to the two screws 17 Remove the two screws B from the bracket B ...

Страница 552: ...4 58 Service Manual 7558 xxx Go Back Previous Next 18 Move the lever counterclockwise 19 Remove the bracket mounted over the developer housing ...

Страница 553: ...vious Next 20 Remove the developer housing Reinstallation warning When reinstalling the developer housing ensure that the printhead retract levers are in their uppermost position as shown in the following image or damage will occur to the machine ...

Страница 554: ...eloper housing does not seem to install easily do not force the part into the machine Ensure that the printhead retract lever is in the uppermost position and try to slide it in again Reinstallation notes Re installation notes To complete the re installation do the following a Be sure to attach the lower part of the auger properly to reduce toner spillage b Move the lever clockwise C ...

Страница 555: ...ront door See Printer front door removal on page 4 13 2 Remove the transfer belt cleaner See Transfer belt cleaner removal on page 4 181 3 Remove the waste toner box 4 Remove the four photoconductor units 5 Remove the four toner supplies 6 Remove the operator panel left cover See Operator panel left cover removal on page 4 10 7 Remove the operator panel right cover See Operator panel right cover r...

Страница 556: ...nner cover See Inner cover removal on page 4 4 11 Remove the inner plate See Inner plate removal on page 4 101 12 Remove the ATC sensor PCB bracket See ATC sensor PCB bracket removal on page 4 29 13 Remove the waste toner auger chute See Waste toner auger chute removal on page 4 197 14 Lift the appropriate plastic gate and push it in to reduce toner spillage 15 Detach the lower portion A of the au...

Страница 557: ...Repair information 4 63 7558 xxx Go Back Previous Next 16 Swing away the lower portion of the auger to enable access to the two screws 17 Remove the two screws B from the bracket B ...

Страница 558: ...4 64 Service Manual 7558 xxx Go Back Previous Next 18 Move the lever counterclockwise 19 Remove the bracket mounted over the developer housing ...

Страница 559: ...vious Next 20 Remove the developer housing Reinstallation warning When reinstalling the developer housing ensure that the printhead retract levers are in their uppermost position as shown in the following image or damage will occur to the machine ...

Страница 560: ...eloper housing does not seem to install easily do not force the part into the machine Ensure that the printhead retract lever is in the uppermost position and try to slide it in again Reinstallation notes Re installation notes To complete the re installation do the following a Be sure to attach the lower part of the auger properly to reduce toner spillage b Move the lever clockwise C ...

Страница 561: ...er front door See Printer front door removal on page 4 13 2 Remove the transfer belt cleaner See Transfer belt cleaner removal on page 4 181 3 Remove the waste toner box 4 Remove the four photoconductor units 5 Remove the four toner supplies 6 Remove the operator panel left cover See Operator panel left cover removal on page 4 10 7 Remove the operator panel right cover See Operator panel right cov...

Страница 562: ... 4 11 Remove the inner plate See Inner plate removal on page 4 101 12 Remove the ATC sensor PCB bracket See ATC sensor PCB bracket removal on page 4 29 13 Remove the waste toner auger chute See Waste toner auger chute removal on page 4 197 14 Lift the appropriate plastic gate and push it in to reduce toner spillage 15 Detach the lower portion A of the auger from the appropriate developer housing 1...

Страница 563: ...Repair information 4 69 7558 xxx Go Back Previous Next 17 Remove the two screws B from the bracket 18 Move the lever counterclockwise B ...

Страница 564: ...4 70 Service Manual 7558 xxx Go Back Previous Next 19 Remove the bracket mounted over the developer housing 20 Remove the developer housing ...

Страница 565: ...on as shown in the following image or damage will occur to the machine If the developer housing is installed correctly the bracket C can be mounted over the developer housing without difficulty If the developer housing does not seem to install easily do not force the part into the machine Ensure that the printhead retract lever is in the uppermost position and try to slide it in again C ...

Страница 566: ...einstallation notes Re installation notes To complete the re installation do the following a Be sure to attach the lower part of the auger properly to reduce toner spillage b Move the lever clockwise c Pull the gate D and move it to its lowest position D ...

Страница 567: ...or panel right cover removal on page 4 11 3 Remove the operator panel front cover See Operator panel front cover MFP removal on page 4 8 4 Remove the top cover See Printer top cover removal on page 4 15 5 Remove the printer front door See Printer front door removal on page 4 13 6 Remove the transfer belt cleaner See Transfer belt cleaner removal on page 4 181 7 Remove the waste toner box 8 Remove ...

Страница 568: ...ss the plastic tab A on the developer housing rear plunger to release it from the machine 13 While pressing the plastic tab rotate the developer housing rear plunger counterclockwise as shown in the following image 14 Remove the developer housing rear plunger ...

Страница 569: ... HVPS PCBA removal 1 Remove the rear upper cover See Rear upper cover removal on page 4 19 2 Remove the rear lower cover See Rear lower cover removal on page 4 17 3 Disconnect the input option cable A 4 Remove the eight screws B securing the PCBA door to the machine ...

Страница 570: ...x Go Back Previous Next 5 Release the two clamps C to release the harness 6 Swing the PCBA door open 7 Disconnect the cable D from the developer HVPS PCBA 8 Remove the two screws E securing the developer HVPS PCBA to the machine ...

Страница 571: ...Repair information 4 77 7558 xxx Go Back Previous Next 9 Release the two hooks F securing the developer HVPS PCBA to the machine 10 Remove the developer HVPS PCBA ...

Страница 572: ...4 78 Service Manual 7558 xxx Go Back Previous Next Fax card removal 1 Remove the two screws A securing the RIP PCBA to the machine A ...

Страница 573: ...Repair information 4 79 7558 xxx Go Back Previous Next 2 Pull the RIP PCBA to access the fax card then disconnect the fax card cable B B ...

Страница 574: ...val 1 Remove the appropriate feeder unit See Printer tray 1 feeder removal on page 4 147 Tray module media feeder removal on page 4 284 TTM tray 4 media feeder removal on page 4 297 or TTM tray 3 feeder removal on page 4 293 2 Slide the plastic rail to detach the two tabs A securing the feeder slide guide to the assembly C ...

Страница 575: ... page 4 181 3 Remove the waste toner box 4 Remove the four photoconductor units 5 Remove the four toner supplies 6 Remove the operator panel front cover See Operator panel front cover MFP removal on page 4 8 7 Remove the printhead retract door See Printhead retract door removal on page 4 148 8 Remove the inner cover See Inner cover removal on page 4 4 9 Remove the inner plate See Inner plate remov...

Страница 576: ... Previous Next 11 Release the two latches securing the plastic bracket to the machine and remove the plastic bracket 12 Release the clamp A securing the cable connected to the fan 13 Remove the screw B from the front left cooling fan B A ...

Страница 577: ...emoval on page 4 13 2 Remove the transfer belt cleaner See Transfer belt cleaner removal on page 4 181 3 Remove the waste toner box 4 Remove the four photoconductor units 5 Remove the four toner supplies 6 Remove the operator panel front cover See Operator panel front cover MFP removal on page 4 8 7 Remove the printhead retract door See Printhead retract door removal on page 4 148 8 Remove the inn...

Страница 578: ...58 xxx Go Back Previous Next 9 Remove the ATC sensor PCB bracket See ATC sensor PCB bracket removal on page 4 29 10 Remove the screw A from the cooling fan 11 Pull the fan away from the machine and disconnect the cable B A B ...

Страница 579: ...front door removal on page 4 13 2 Remove the transfer belt cleaner See Transfer belt cleaner removal on page 4 181 3 Remove the waste toner box 4 Remove the four photoconductor units 5 Remove the four toner supplies 6 Remove the operator panel front cover See Operator panel front cover MFP removal on page 4 8 7 Remove the printhead retract door See Printhead retract door removal on page 4 148 8 Re...

Страница 580: ...Back Previous Next 9 Remove the inner plate See Inner plate removal on page 4 101 10 Disconnect the cable A 11 Remove the screw B from the front upper cooling fan 12 Slide the front upper cooling fan out of the machine and remove A B ...

Страница 581: ...s 1 Open the printer left duplex door assembly 2 Remove the two thumbscrews A 3 Use the handles B to pull the fuser assembly out of the machine Fuser cooling fan removal 1 Remove the rear upper cover See Rear upper cover removal on page 4 19 2 Remove the rear lower cover See Rear lower cover removal on page 4 17 3 Disconnect the input option cable A ...

Страница 582: ...58 xxx Go Back Previous Next 4 Remove the eight screws B securing the PCBA door to the machine 5 Release the two clamps C to release the harness 6 Swing the PCBA door open 7 Disconnect the cable D from the fuser cooling fan ...

Страница 583: ...ment warning When replacing the fuser cooling fan make sure the fan is properly installed so that air flow is directed away from the machine Fuser driver PCBA cooling fan removal 1 Remove the rear upper cover See Rear upper cover removal on page 4 19 2 Remove the rear lower cover See Rear lower cover removal on page 4 17 ...

Страница 584: ...4 90 Service Manual 7558 xxx Go Back Previous Next 3 Disconnect the input option cable A 4 Remove the eight screws B securing the PCBA door to the machine ...

Страница 585: ... Go Back Previous Next 5 Release the two clamps C to release the harness 6 Swing the PCBA door open 7 Disconnect the four connections A 8 Release the harness from the clamps B 9 Remove the two screws C securing the duct to the machine ...

Страница 586: ...4 92 Service Manual 7558 xxx Go Back Previous Next 10 Remove the duct from the machine 11 Release the two hooks ...

Страница 587: ...emove the fuser driver PCBA cooling fan from the duct Fuser driver PCBA removal 1 Remove the rear upper cover See Rear upper cover removal on page 4 19 2 Remove the rear lower cover See Rear lower cover removal on page 4 17 3 Disconnect the input option cable A ...

Страница 588: ...Go Back Previous Next 4 Remove the eight screws B securing the PCBA door to the machine 5 Release the two clamps C to release the harness 6 Swing the PCBA door open 7 Remove the sub LVPS PCBA See Sub LVPS PCBA removal on page 4 168 ...

Страница 589: ... 95 7558 xxx Go Back Previous Next 8 Remove the four screws D securing the bracket to the machine 9 Remove the bracket from the machine 10 Disconnect the two cables E from the board 11 Release the harness from the clamp F ...

Страница 590: ...3 Remove the four screws H securing the fuser driver PCBA to the machine 14 Remove the fuser driver PCBA Fuser pressure roll retract motor removal 1 Remove the rear upper cover See Rear upper cover removal on page 4 19 2 Remove the rear lower cover See Rear lower cover removal on page 4 17 ...

Страница 591: ...Repair information 4 97 7558 xxx Go Back Previous Next 3 Disconnect the input option cable A 4 Remove the eight screws B securing the PCBA door to the machine ...

Страница 592: ...4 98 Service Manual 7558 xxx Go Back Previous Next 5 Release the two clamps C to release the harness 6 Swing the PCBA door open 7 Disconnect the cable D from the fuser pressure roll retract motor ...

Страница 593: ...screws E securing the fuser pressure roll retract motor to the machine 10 Remove the fuser pressure roll retract motor Fuser lower redrive 1st BTR retract motor removal 1 Remove the rear upper cover See Rear upper cover removal on page 4 19 2 Remove the rear lower cover See Rear lower cover removal on page 4 17 ...

Страница 594: ...4 100 Service Manual 7558 xxx Go Back Previous Next 3 Disconnect the input option cable A 4 Remove the eight screws B securing the PCBA door to the machine ...

Страница 595: ... the release hook is pressed or the connections will be damaged 8 Remove the four screws E securing the fuser lower redrive 1st BTR retract motor to the machine 9 Remove the fuser lower redrive 1st BTR retract motor from the machine Inner plate removal 1 Remove the printer front door See Printer front door removal on page 4 13 2 Remove the transfer belt cleaner See Transfer belt cleaner removal on...

Страница 596: ...4 148 8 Remove the inner cover See Inner cover removal on page 4 4 9 Remove the six screws A from the inner plate 10 Remove the inner plate Re installation note When replacing the inner plate ensure that the posts on the toner augers are properly aligned with the plate or the plate cannot be installed Re installation note When replacing the inner plate ensure that the plastic gates on each of the ...

Страница 597: ...r supplies 6 Remove the operator panel front cover See Operator panel front cover MFP removal on page 4 8 7 Remove the printhead retract door See Printhead retract door removal on page 4 148 8 Remove the inner cover See Inner cover removal on page 4 4 9 Remove the inner plate See Inner plate removal on page 4 101 10 Lift the plastic gate and push it in to prevent the toner from spilling 11 Squeeze...

Страница 598: ...4 104 Service Manual 7558 xxx Go Back Previous Next Warning The lower portion B of the auger is prone to damage Extra care is required in handling this part A B ...

Страница 599: ...ox 4 Remove the four photoconductor units 5 Remove the four toner supplies 6 Remove the operator panel front cover See Operator panel front cover MFP removal on page 4 8 7 Remove the printhead retract door See Printhead retract door removal on page 4 148 8 Remove the inner cover See Inner cover removal on page 4 4 9 Remove the inner plate See Inner plate removal on page 4 101 10 Remove the appropr...

Страница 600: ...crew A from the appropriate printhead 12 Gently pull the printhead out of the machine and remove Lower engine PCBA removal 1 Remove the rear upper cover See Rear upper cover removal on page 4 19 2 Remove the rear lower cover See Rear lower cover removal on page 4 17 A ...

Страница 601: ...Repair information 4 107 7558 xxx Go Back Previous Next 3 Disconnect the input option cable A 4 Disconnect all the cables from the lower engine PCBA 5 Remove the eight screws D ...

Страница 602: ...operly reconnected Lower redrive shift motor assembly removal 1 Remove the left upper cover See Left upper cover removal on page 4 7 2 Remove the upper redrive assembly See Upper redrive assembly removal on page 4 192 3 Remove the fuser See Fuser assembly removal on page 4 87 4 Remove the rear upper cover See Rear upper cover removal on page 4 19 5 Remove the rear lower cover See Rear lower cover ...

Страница 603: ... the eight screws B securing the PCBA door to the machine 8 Release the two clamps C to release the harness 9 Swing the PCBA door open 10 Remove the fuser redrive lower redrive 1st BTR retract motor See Fuser lower redrive 1st BTR retract motor removal on page 4 99 ...

Страница 604: ...xxx Go Back Previous Next 11 Gently pull the belt guide to detach it from the machine 12 Remove the belt guide 13 Detach the drive belt from the pulley 14 Disconnect the three cables D from the lower redrive shift motor assembly ...

Страница 605: ...Repair information 4 111 7558 xxx Go Back Previous Next 15 Release the harness from the clamp E 16 Remove the screw F securing the plastic motor cover ...

Страница 606: ...ual 7558 xxx Go Back Previous Next 17 Remove the plastic motor cover 18 Remove the two screws G securing the lower redrive shift motor assembly Note Move the shaft to its midmost position to provide access to the screws ...

Страница 607: ...ation 4 113 7558 xxx Go Back Previous Next Warning When removing the lower redrive shift motor assembly ensure that the front bushing H does not become damaged 19 Gently remove the lower redrive shift motor assembly ...

Страница 608: ... to the machine This will prevent the drive belt from slipping After you have reattached the lower redrive shift motor assembly to the machine you will need to remove the plastic motor cover to replace both screws and then reattach the motor cover LVPS front fan guide removal 1 Remove the rear upper cover See Rear upper cover removal on page 4 19 2 Remove the rear lower cover See Rear lower cover ...

Страница 609: ...arning Before removing the LVPS PCBA using a permanent marker place unique markings on connections P91 and P92 to ensure that these two cables are properly reconnected or damage will occur to the machine 1 Remove the printer right side cover See Printer right cover removal on page 4 14 2 Remove the LVPS subfan guide See LVPS front fan guide removal on page 4 114 3 Remove the waste toner sensor gui...

Страница 610: ...4 116 Service Manual 7558 xxx Go Back Previous Next 4 Remove the harnesses from the nine clamps A under the LVPS PCBA 5 Disconnect the twelve cables B from the LVPS PCBA ...

Страница 611: ...ecuring the LVPS PCBA to the machine 7 Remove the LVPS Re installation warning When replacing the LVPS PCBA ensure that the connections for P91 and P92 are properly replaced If the cables are not reconnected properly damage will occur to the machine and the machine will not function ...

Страница 612: ...ual 7558 xxx Go Back Previous Next LVPS sub cooling fan removal 1 Remove the printer right cover 2 Remove the two screws A securing the LVPS fan guide to the machine 3 Remove the LVPS fan guide 4 Disconnect the cable B ...

Страница 613: ...belt cleaner See Transfer belt cleaner removal on page 4 181 3 Remove the waste toner box 4 Remove the four photoconductor units 5 Remove the four toner supplies 6 Remove the operator panel front cover See Operator panel front cover MFP removal on page 4 8 7 Remove the printhead retract door See Printhead retract door removal on page 4 148 8 Remove the inner cover See Inner cover removal on page 4...

Страница 614: ... Back Previous Next 10 Lift the plastic gate and push it in to prevent the toner from spilling 11 Squeeze the two latches A to release the upper part of the auger 12 Detach the lower portion B of the auger from the developer unit 1 2 ...

Страница 615: ...red in handling this part 13 Remove the M toner auger Re installation note Ensure that the rubber sleeve C is attached properly to prevent toner spillage Main power GFI interface removal 1 Remove the rear upper cover See Rear upper cover removal on page 4 19 2 Remove the rear lower cover See Rear lower cover removal on page 4 17 A B C ...

Страница 616: ...4 122 Service Manual 7558 xxx Go Back Previous Next 3 Disconnect the input option cable A 4 Remove the eight screws B securing the PCBA door to the machine ...

Страница 617: ... the main power GFI interface to the machine 8 Pull the main power GFI interface out of the machine 9 Disconnect all the cables and remove the main power GFI interface Warning Damage may occur if the main power GFI interface is not re installed correctly Make sure that all cables are properly reconnected Use the following photos as a guide when reconnecting the cables ...

Страница 618: ...Remove the LVPS See LVPS PCBA removal on page 4 115 7 Remove the printer front door See Printer front door removal on page 4 13 8 Remove the transfer belt cleaner See Transfer belt cleaner removal on page 4 181 9 Remove the inner cover Inner cover removal on page 4 4 10 Remove the two screws A securing the main power switch to the machine 11 Remove the main power switch Media feed lift motor remov...

Страница 619: ...Repair information 4 125 7558 xxx Go Back Previous Next 4 Detach the media feed lift motor ...

Страница 620: ...val on page 4 147 Tray module media feeder removal on page 4 284 TTM tray 4 media feeder removal on page 4 297 or TTM tray 3 feeder removal on page 4 293 2 Release the tab A securing the media out actuator to the assembly 3 Remove the media out actuator Media size switch PCB removal 1 Remove the Media tray 1 from the machine 2 Remove the screw A ...

Страница 621: ... the cable B 4 Remove the media size switch PCB Media transport MPF drive motor removal 1 Remove the rear upper cover See Rear upper cover removal on page 4 19 2 Remove the rear lower cover See Rear lower cover removal on page 4 17 3 Disconnect the input option cable A ...

Страница 622: ...4 128 Service Manual 7558 xxx Go Back Previous Next 4 Remove the eight screws B securing the PCBA door to the machine 5 Release the two clamps C to release the harness 6 Swing the PCBA door open ...

Страница 623: ...n 4 129 7558 xxx Go Back Previous Next 7 Disconnect the cable from the media transport MPF drive motor 8 Release the clamp securing the harness to the machine Note The lower right screw is obscured by the large harness ...

Страница 624: ...media transport MPF drive motor from the machine Replacement warning When replacing the media transport MPF drive motor ensure that the shaft gears and bushing are properly aligned or damage may occur MPF roller removal 1 Remove the left rear lower cover See Left rear lower cover removal on page 4 7 2 Remove the MPF tray feeder See MPF tray feeder removal on page 4 131 3 Remove the MPF top cover S...

Страница 625: ...h MPF feed roller 6 Remove the MPF feed rollers MPF tray feeder removal 1 Remove the left rear lower cover See Left rear lower cover removal on page 4 7 2 Open the printer left duplex door 3 Release the harness A from the clamps 4 Close the printer left duplex door 5 Disconnect the cable B ...

Страница 626: ...After you replace one component perform a POR on the device before replacing a second component If you replace the components simultaneously the printer will be rendered inoperable 1 Remove the operator panel right cover See Operator panel right cover removal on page 4 11 2 Remove the operator panel left cover See Operator panel left cover removal on page 4 10 3 Remove the operator panel front cov...

Страница 627: ...Repair information 4 133 7558 xxx Go Back Previous Next 5 Remove the operator panel assembly from the machine 6 Remove the screw B securing the ground wire to the machine ...

Страница 628: ...ore replacing a second component If you replace the components simultaneously the printer will be rendered inoperable 1 Remove the operator panel right cover See Operator panel right cover removal on page 4 11 2 Remove the operator panel left cover See Operator panel left cover removal on page 4 10 3 Remove the operator panel front cover See Operator panel front cover MFP removal on page 4 8 4 Rem...

Страница 629: ...1 Remove the operator panel right cover See Operator panel right cover removal on page 4 11 2 Remove the operator panel left cover See Operator panel left cover removal on page 4 10 3 Remove the operator panel front cover See Operator panel front cover MFP removal on page 4 8 4 Remove the operator panel See Operator panel top cover MFP removal on page 4 11 ...

Страница 630: ...4 136 Service Manual 7558 xxx Go Back Previous Next 5 Remove the three screws A securing the bracket to the machine 6 Remove the bracket ...

Страница 631: ...ransfer belt cleaner removal on page 4 181 3 Remove the waste toner box 4 Remove the four photoconductor units 5 Remove the four toner supplies 6 Remove the operator panel front cover See Operator panel front cover MFP removal on page 4 8 7 Remove the printhead retract door See Printhead retract door removal on page 4 148 8 Remove the inner cover See Inner cover removal on page 4 4 9 Remove the in...

Страница 632: ...4 138 Service Manual 7558 xxx Go Back Previous Next 10 Using a flat blade screwdriver pry the plastic cover off the socket and remove 11 Pull the PC smart chip socket and remove 1 2 ...

Страница 633: ...e motor cooling fan removal 1 Remove the rear upper cover See Rear upper cover removal on page 4 19 2 Remove the rear lower cover See Rear lower cover removal on page 4 17 3 Disconnect the input option cable A 4 Remove the eight screws B securing the PCBA door to the machine ...

Страница 634: ...r HVPS PCBA removal on page 4 75 8 Remove the two screws D securing the PC developer drive motor cooling fan to the machine 9 Disconnect the cable E 10 Remove the PC developer drive motor cooling fan PC developer drive motor removal 1 Remove the rear upper cover See Rear upper cover removal on page 4 19 2 Remove the rear lower cover See Rear lower cover removal on page 4 17 ...

Страница 635: ...Repair information 4 141 7558 xxx Go Back Previous Next 3 Disconnect the input option cable A 4 Remove the eight screws B securing the PCBA door to the machine ...

Страница 636: ...e Transfer roll HVPS PCBA removal on page 4 184 section 8 Remove the developer HVPS PCBA See the Developer HVPS PCBA removal on page 4 75 section 9 Remove the two screws D securing the bracket to the machine 10 Remove the bracket Warning When disconnecting the two wire harnesses from the motors make sure that the release hook is pressed or the connections will be damaged ...

Страница 637: ...nformation 4 143 7558 xxx Go Back Previous Next 11 Disconnect the ten cables E 12 Release the two latches securing the two harness guides to the machine 13 Move the two harness guides away from main drive motor ...

Страница 638: ... PC developer drive motor from the machine Pick roller removal 1 Remove the appropriate feeder unit See Printer tray 1 feeder removal on page 4 147 Tray module media feeder removal on page 4 284 TTM tray 4 media feeder removal on page 4 297 or TTM tray 3 feeder removal on page 4 293 2 Slide the plastic media guide toward the front of the machine ...

Страница 639: ...emoval on page 4 7 2 Remove the MPF tray feeder See MPF tray feeder removal on page 4 131 3 Remove the e clip securing the rear plastic support strap to the printer left duplex door assembly 4 Remove the rear plastic support strap 5 Rotate the front plastic support strap 90 degrees and remove it from the machine 6 Disconnect the harness from the clamps A 7 Disconnect the cable B 8 Lift the printer...

Страница 640: ...sembly Printer media turn guide removal 1 Remove the left rear lower cover See Left rear lower cover removal on page 4 7 2 Remove the MPF tray feeder See MPF tray feeder removal on page 4 131 3 Open the printer left duplex door 4 Loosen the screw A on the front of the printer media turn guide ...

Страница 641: ... from the machine 2 Remove the left rear lower cover See Left rear lower cover removal on page 4 7 3 Remove the MPF tray feeder See MPF tray feeder removal on page 4 131 4 Remove the printer media turn guide See Printer media turn guide removal on page 4 146 5 Remove the registration transport roller See Registration transport roller assembly removal on page 4 152 6 Disconnect the cable A 7 Releas...

Страница 642: ... Service Manual 7558 xxx Go Back Previous Next 9 Remove the printer tray 1 feeder Printhead retract door removal 1 Open the front door 2 Rotate the transfer belt lever counterclockwise to the unlock position ...

Страница 643: ...Repair information 4 149 7558 xxx Go Back Previous Next 3 Remove the two screws A from the printhead retract door 4 Press the latch to release the door A ...

Страница 644: ...t 5 Remove the printhead retract door Registration drive motor removal 1 Remove the rear upper cover See Rear upper cover removal on page 4 19 2 Remove the rear lower cover See Rear lower cover removal on page 4 17 3 Disconnect the input option cable A ...

Страница 645: ...ext 4 Remove the eight screws B securing the PCBA door to the machine 5 Release the two clamps C to release the harness 6 Swing the PCBA door open 7 Remove the media transport MPF drive motor See the Media transport MPF drive motor removal on page 4 127 ...

Страница 646: ...sembly removal 1 Remove the left rear lower cover See Left rear lower cover removal on page 4 7 2 Remove the MPF tray feeder See MPF tray feeder removal on page 4 131 3 Open the printer left duplex door assembly 4 Remove the e clip securing the rear plastic support strap to the printer left duplex door assembly 5 Remove the rear plastic support strap 6 Rotate the front plastic support strap 90 deg...

Страница 647: ...er assembly RIP PCBA removal Before you replace the RIP PCBA make sure you back up the eSF solutions and settings See eSF solutions backup on page 4 155 Warning If you are replacing the RIP PCBA in addition to the operator panel or the operator panel PCBA you must replace one component at a time After you replace one component perform a POR on the ...

Страница 648: ...7558 xxx Go Back Previous Next device before replacing a second component If you replace the components simultaneously the printer will be rendered inoperable 1 Remove the two screws A securing the RIP PCBA to the machine A ...

Страница 649: ...technician needs to replace the RIP PCBA the steps below should be taken to back up the eSF solutions and settings 1 POR the printer into invalid engine code mode 2 Open a Web browser and navigate to the printer s Web page 3 Navigate to Settings and click the link 4 Navigate to Solutions and click the link 5 Navigate to Embedded Solutions and click the link 6 On the Embedded Solutions page select ...

Страница 650: ...the exported file Sensor image calibration removal 1 Remove the printer front door See Printer front door removal on page 4 13 2 Remove the transfer belt cleaner See Transfer belt cleaner removal on page 4 181 3 Remove the waste toner box 4 Remove the four photoconductor units 5 Remove the four toner supplies 6 Remove the operator panel front cover See Operator panel front cover MFP removal on pag...

Страница 651: ...val procedure applies to trays 1 4 1 Remove the appropriate feeder unit See Printer tray 1 feeder removal on page 4 147 Tray module media feeder removal on page 4 284 TTM tray 4 media feeder removal on page 4 297 or TTM tray 3 feeder removal on page 4 293 2 Release the tabs A securing the sensor media level to the assembly 3 Remove the sensor media level ...

Страница 652: ...ice Manual 7558 xxx Go Back Previous Next 4 Disconnect the harness B Sensor media on belt removal 1 Open the printer left duplex door assembly 2 Remove the screw A securing the sensor media on belt to the machine ...

Страница 653: ...e appropriate feeder unit See Printer tray 1 feeder removal on page 4 147 Tray module media feeder removal on page 4 284 TTM tray 4 media feeder removal on page 4 297 or TTM tray 3 feeder removal on page 4 293 2 Remove the media out actuator See Media out actuator removal on page 4 126 3 Release the tab A securing the sensor media out to the assembly ...

Страница 654: ...xt 4 Remove the sensor media out 5 Disconnect the cable B Sensor printer left duplex door interlock removal 1 Remove the rear upper cover See Rear upper cover removal on page 4 19 2 Remove the rear lower cover See Rear lower cover removal on page 4 17 ...

Страница 655: ...Repair information 4 161 7558 xxx Go Back Previous Next 3 Disconnect the input option cable A 4 Remove the eight screws B securing the PCBA door to the machine ...

Страница 656: ...162 Service Manual 7558 xxx Go Back Previous Next 5 Release the two clamps C to release the harness 6 Swing the PCBA door open 7 Remove the screw D securing the bracket to the machine 8 Remove the bracket ...

Страница 657: ... door interlock removal 1 Remove the printer front door See Printer front door removal on page 4 13 2 Remove the transfer belt cleaner See Transfer belt cleaner removal on page 4 181 3 Remove the waste toner box 4 Remove the four photoconductor units 5 Remove the four toner supplies 6 Remove the operator panel front cover See Operator panel front cover MFP removal on page 4 8 7 Remove the printhea...

Страница 658: ... Go Back Previous Next 9 Using a flat blade screwdriver release the two latches A securing the sensor printer left front door interlock 10 Pull out the sensor printer left front door interlock B and disconnect the sensor cable A B ...

Страница 659: ... right front door interlock removal 1 Remove the printer right side cover See Printer right cover removal on page 4 14 2 Remove the LVPS subfan guide See LVPS front fan guide removal on page 4 114 3 Remove the LVPS See LVPS PCBA removal on page 4 115 4 Disconnect the cable A from the sensor printer right front door interlock ...

Страница 660: ...sor printer right front door interlock to the machine 6 Remove the sensor printer right front door interlock Sensor tray 1 pre feed removal 1 Remove the feeder slide guide See Feeder slide guide removal on page 4 80 2 Release the hook A securing the sensor printer tray 1 prefeed to the assembly ...

Страница 661: ...ight cover See Operator panel right cover removal on page 4 11 2 Remove the operator panel left cover See Operator panel left cover removal on page 4 10 3 Remove the operator panel front cover See Operator panel front cover MFP removal on page 4 8 4 Remove the operator panel See Operator panel top cover MFP removal on page 4 11 5 Remove the screw A securing the part to the machine ...

Страница 662: ... Remove the standard bin LED 7 Disconnect the cable Sub LVPS PCBA removal 1 Remove the rear upper cover See Rear upper cover removal on page 4 19 2 Remove the rear lower cover See Rear lower cover removal on page 4 17 3 Disconnect the input option cable A ...

Страница 663: ...Repair information 4 169 7558 xxx Go Back Previous Next 4 Remove the eight screws B securing the PCBA door to the machine 5 Release the two clamps C to release the harness 6 Swing the PCBA door open ...

Страница 664: ...ur cables D 8 Remove the three screws E securing the sub LVPS PCBA to the machine 9 Remove the sub LVPS PCBA Suction fan removal 1 Remove the rear upper cover See Rear upper cover removal on page 4 19 2 Remove the rear lower cover See Rear lower cover removal on page 4 17 ...

Страница 665: ...Repair information 4 171 7558 xxx Go Back Previous Next 3 Disconnect the input option cable A 4 Remove the eight screws B securing the PCBA door to the machine ...

Страница 666: ... Back Previous Next 5 Release the two clamps C to release the harness 6 Swing the PCBA door open 7 Disconnect the cable D from the suction fan 8 Remove the two screws E securing the suction fan to the machine 9 Remove the suction fan ...

Страница 667: ...Remove the top cover See Printer top cover removal on page 4 15 5 Remove the printer front door See Printer front door removal on page 4 13 6 Remove the transfer belt cleaner See Transfer belt cleaner removal on page 4 181 7 Remove the waste toner box 8 Remove the four photoconductor units 9 Remove the four toner supplies 10 Remove the printhead retract door See Printhead retract door removal on p...

Страница 668: ...4 174 Service Manual 7558 xxx Go Back Previous Next 14 Remove the five screws A from the toner dispense motor 15 Disconnect the four toner dispense motor cables B A B ...

Страница 669: ...pair information 4 175 7558 xxx Go Back Previous Next 16 Disconnect the four cable clamps C from the motor and remove the cable harness 17 Disconnect the four cables D from the front side of the printer C ...

Страница 670: ...t 18 From the rear side of the printer disengage the toner dispense motor and remove Toner smart chip PCB removal 1 Remove the top cover See Printer top cover removal on page 4 15 2 Remove the cable A from the toner smart chip PCB that will be removed ...

Страница 671: ...move the operator panel left cover See Operator panel left cover removal on page 4 10 3 Remove the operator panel front cover See Operator panel front cover MFP removal on page 4 8 4 Remove the operator panel See Printer front door removal on page 4 13 5 Remove the operator panel PCBA See Operator panel PCBA MFP removal on page 4 134 6 Remove the seven screws A securing the shield to the assembly ...

Страница 672: ...nsfer belt lever counterclockwise to the unlock position 4 Open the printhead retract door Warning After the photoconductor units are removed ensure that they are properly covered so that they are not exposed to light 5 Remove the four photoconductor units 6 Remove the transfer belt lever See Transfer belt lever removal on page 4 183 7 Open the printer left duplex door assembly 8 Remove the fuser ...

Страница 673: ... Previous Next 9 Remove the e clip A securing the rear plastic support strap to the printer left duplex door assembly 10 Remove the rear plastic support strap 11 Rotate the front plastic support strap 90 degrees and release it from the machine ...

Страница 674: ...o Back Previous Next 12 Remove the screw B securing the rear belt retaining bracket 13 Remove the rear belt retaining bracket 14 Remove the screw C securing the front belt retaining bracket 15 Remove the front belt retaining bracket ...

Страница 675: ...om the machine do not touch the belt surface or damage will occur Warning When removing the transfer belt assembly make sure the belt s surface does not come into contact with the printer left duplex door assembly 17 Carefully remove the transfer belt assembly from the machine Transfer belt cleaner removal 1 Open the front door 2 Rotate the handle clockwise to access the knob A ...

Страница 676: ...4 182 Service Manual 7558 xxx Go Back Previous Next 3 Unscrew the knob A 4 Pull out the transfer belt cleaner and remove A ...

Страница 677: ...tion 4 183 7558 xxx Go Back Previous Next Transfer belt lever removal 1 Open the front door 2 Rotate the transfer belt lever counterclockwise to the unlock position 3 Remove the screw A from the transfer belt lever A ...

Страница 678: ...ext 4 Remove the transfer belt lever Transfer roll HVPS PCBA removal 1 Remove the rear upper cover See Rear upper cover removal on page 4 19 2 Remove the rear lower cover See Rear lower cover removal on page 4 17 3 Disconnect the input option cable A ...

Страница 679: ...Repair information 4 185 7558 xxx Go Back Previous Next 4 Remove the eight screws B securing the PCBA door to the machine 5 Release the two clamps C to release the harness 6 Swing the PCBA door open ...

Страница 680: ...4 186 Service Manual 7558 xxx Go Back Previous Next 7 Disconnect the cable D 8 Remove the four screws E securing the transfer roll HVPS PCBA to the machine ...

Страница 681: ...g the transfer roll HVPS PCBA to the machine 10 Remove the transfer roll HVPS PCBA from the machine Upper exhaust cooling fan removal 1 Remove the rear upper cover See Rear upper cover removal on page 4 19 2 Remove the rear lower cover See Rear lower cover removal on page 4 17 3 Disconnect the input option cable A ...

Страница 682: ...4 188 Service Manual 7558 xxx Go Back Previous Next 4 Remove the eight screws B securing the PCBA door to the machine 5 Release the two clamps C to release the harness 6 Swing the PCBA door open ...

Страница 683: ...the air flow is directed away from the machine Upper printer engine PCBA removal 1 Remove the rear upper cover See Rear upper cover removal on page 4 19 2 Remove the rear lower cover See Rear lower cover removal on page 4 17 WARNING Ensure that the NVM EPROM is removed from the defective PCBA and installed to the new PCBA or damage to the machine may occur For more details go to Upper engine PCBA ...

Страница 684: ...xxx Go Back Previous Next 3 Disconnect the input option cable A 4 Remove the lower engine PCBA See Lower engine PCBA removal on page 4 106 5 Disconnect all the cables from the upper printer engine PCBA 6 Remove the six screws B ...

Страница 685: ...he replacement PCBA 1 1 Remove the NVM EPROM from the defective PCBA using a chip puller Hold the chip on the touch positions shown then gently pull the chip away from the board Warning The chip must be pulled away in the direction perpendicular to the PCBA The pins may get deformed if the chip is not pulled straight and evenly WARNING Failure to perform this procedure correctly may cause damage t...

Страница 686: ...PCBA to the machine Warning Ensure that the cables are properly reconnected or damage will occur 3 Turn on the machine 4 An error will occur on the system To clear the error press the power button on the operator panel to put the machine in hibernate mode Warning Shutting down using the operator panel button is required to update the memory settings from the old NVM EPROM and save it to the curren...

Страница 687: ...ove the four screws A 4 Remove the upper redrive assembly 5 Disconnect the cables B Waste toner agitator motor removal 1 Remove the rear upper cover See Rear upper cover removal on page 4 19 2 Remove the rear lower cover See Rear lower cover removal on page 4 17 ...

Страница 688: ...4 194 Service Manual 7558 xxx Go Back Previous Next 3 Disconnect the input option cable A 4 Remove the eight screws B securing the PCBA door to the machine ...

Страница 689: ...in power GFI interface removal on page 4 121 Note The cables do not have to be removed from the main power GFI interface to remove this part 8 Remove the PC developer drive motor See the PC developer drive motor removal on page 4 140 9 Disconnect the cable D from the waste toner agitator motor 10 Release the harness from the clamp E 11 Remove the two screws F securing the motor cover to the machin...

Страница 690: ...4 196 Service Manual 7558 xxx Go Back Previous Next 13 Remove the e clip 14 Remove the actuator gear 15 Remove the plastic bushing G ...

Страница 691: ...toconductor units 5 Remove the four toner supplies 6 Remove the operator panel left cover See Operator panel left cover removal on page 4 10 7 Remove the operator panel right cover See Operator panel right cover removal on page 4 11 8 Remove the operator panel front cover See Operator panel front cover MFP removal on page 4 8 9 Remove the printhead retract door See Printhead retract door removal o...

Страница 692: ...ed position or damage will occur to the foam gaskets on the waste toner auger chute Re installation warning When replacing the waste toner auger chute ensure that the four developer housing harnesses are properly routed and do not become pinched Re installation warning After the waste toner auger chute has bee re installed ensure that the four plastic gates are moved to the open position or the in...

Страница 693: ...he printer right side cover See Printer right cover removal on page 4 14 2 Remove the four screws A securing the bracket to the machine 3 Remove the bracket 4 Remove the four screws B securing the waste toner sensor guide to the machine 5 Disconnect the two cables C from the waste toner sensor guide ...

Страница 694: ...ve the inner cover See Inner cover removal on page 4 4 9 Remove the ATC sensor PCB bracket See ATC sensor PCB bracket removal on page 4 29 10 Remove the waste toner add chute See the Waste toner auger chute removal on page 4 197 11 Remove the printer right side cover See Printer right cover removal on page 4 14 12 Remove the LVPS subfan guide See LVPS front fan guide removal on page 4 114 13 Remov...

Страница 695: ...evious Next 18 Lift the tab securing the plastic cover to the machine 19 Swing the plastic cover out of the machine and allow it to hang by the harness 20 Remove the e clip A securing the 31T gear B 21 Remove the 31T gear 22 Remove the 29T gear C ...

Страница 696: ...oner gear bracket 26 Remove the waste toner shaft gate Y toner auger removal 1 Remove the printer front door See Printer front door removal on page 4 13 2 Remove the transfer belt cleaner See Transfer belt cleaner removal on page 4 181 3 Remove the waste toner box 4 Remove the four photoconductor units 5 Remove the four toner supplies 6 Remove the operator panel front cover See Operator panel fron...

Страница 697: ...page 4 4 9 Remove the inner plate See Inner plate removal on page 4 101 10 Lift the plastic gate and push it in to prevent the toner from spilling 11 Release the two latches A connecting the upper portion of the auger 12 Detach the lower portion B of the auger from the developer unit Warning The lower portion of the auger is prone to damage Extra care is required in handling this part 1 2 A B ...

Страница 698: ...4 204 Service Manual 7558 xxx Go Back Previous Next 13 Remove the Y toner auger Re installation note Ensure that the rubber sleeve C is attached properly to prevent toner spillage C ...

Страница 699: ...oval procedures ADF angle actuator removal 1 Remove the scanner rear cover See Scanner rear cover removal on page 4 20 2 Remove the scanner left cover See Scanner left cover removal on page 4 19 3 Remove the screw A securing the ADF angle actuator 4 Remove the ADF angle actuator ...

Страница 700: ...ext ADF controller PCBA removal 1 Remove the ADF rear cover See ADF rear cover removal on page 4 221 2 Remove the screw A securing the plastic shield to the machine 3 Remove the plastic shield 4 Disconnect all the cables from the ADF controller PCBA ...

Страница 701: ...ext 5 Remove the four screws B 6 Remove the ADF controller PCBA from the base ADF diverter gate solenoid removal 1 Remove the ADF main drive sub assembly See ADF main drive sub assembly removal on page 4 218 2 Remove the screw A 3 Disconnect the cable B ...

Страница 702: ...unger will become detached 5 Remove the ADF diverter gate solenoid Reinstallation note When replacing the ADF diverter gate solenoid ensure that the pin on the plunger is properly reattached ADF document tray removal 1 Open the ADF top door 2 Remove the ADF rear cover See ADF rear cover removal on page 4 221 3 Disconnect the cable from the ADF controller PCBA ...

Страница 703: ...xxx Go Back Previous Next 4 Remove the harness from the four clamps A 5 Remove the ADF front cover See ADF front cover removal on page 4 216 6 Remove the screw B securing the LED to the machine 7 Disconnect the cable C from the LED ...

Страница 704: ...4 210 Service Manual 7558 xxx Go Back Previous Next 8 Remove the LED ...

Страница 705: ...ront of the ADF document tray from the base Note When removing the ADF document tray ensure that the tray is in its full upright position as shown in the previous image Note When removing the ADF document tray make sure the plastic washer D does not fall off Wording 10 Remove the ADF document tray ...

Страница 706: ... Next ADF feed motor removal 1 Remove the ADF main drive sub assembly See ADF main drive sub assembly removal on page 4 218 2 Remove the tension spring A 3 Remove the two screws B securing the ADF feed motor to the assembly 4 Disconnect the cable C ...

Страница 707: ...hed 5 Remove the ADF feed motor Reinstallation note To correctly set the ADF feed motor belt drive tension install the ADF feed motor and the ADF feed motor tension spring before completely tightening the two screws ADF feed pick roller assembly removal 1 Open the ADF top door assembly 2 Release the tab securing the inner cover ...

Страница 708: ...4 214 Service Manual 7558 xxx Go Back Previous Next 3 Lower the inner cover 4 Detach the bottom portion of the retaining clip ...

Страница 709: ...achine 6 Remove the two rollers from the machine Reinstallation warning Before reinstalling make sure you do not touch the rubber surface of the pick roller Reinstallation warning When reinstalling the ADF feed pick roller assemblies ensure that they are installed as shown in the following image ...

Страница 710: ...ecuring the ADF front cover to the machine 3 Lift the ADF to its uppermost position 4 Loosen the three screws B 5 Remove the ADF front cover ADF left hinge removal 1 Remove the ADF main drive sub assembly See ADF main drive sub assembly removal on page 4 218 2 Remove the two screws A securing the ADF left hinge to the base ...

Страница 711: ...r information 4 217 7558 xxx Go Back Previous Next 3 Remove the three screws B securing the metal bracket to the base 4 Gently lift the bracket from the metal base and remove the ADF left hinge from the base ...

Страница 712: ...al 1 Remove the ADF rear cover See ADF rear cover removal on page 4 221 2 Disconnect the five cables A from the ADF controller PCBA 3 Remove the screw B securing the grounding wire to the ADF main drive sub assembly 4 Remove the ADF front cover See ADF front cover removal on page 4 216 ...

Страница 713: ...ve sub assembly to the base 6 Remove the ADF main drive sub assembly from the base ADF nip release solenoid removal 1 Remove the ADF main drive sub assembly See ADF main drive sub assembly removal on page 4 218 2 Remove the ADF diverter gate solenoid See ADF diverter gate solenoid removal on page 4 207 ...

Страница 714: ...e B 5 Release the harness C from the clamps Note When removing the ADF nip release solenoid the spring and plunger will become detached 6 Remove the ADF nip release solenoid Reinstallation note When replacing the ADF nip release solenoid ensure that the pin on the plunger is properly reattached ...

Страница 715: ...ion 2 Remove the two screws A securing the ADF rear cover to the machine 3 Remove the ADF rear cover ADF registration motor removal 1 Remove the ADF main drive sub assembly See ADF main drive sub assembly removal on page 4 218 2 Remove the tension spring 3 Remove the two screws A securing the ADF registration motor to the assembly ...

Страница 716: ...Reinstallation note To correctly set the ADF registration motor belt drive tension install the ADF registration motor and the ADF registration motor tension spring before completely tightening the two screws ADF right hinge removal 1 Remove the ADF from the machine See Automatic document feeder ADF assembly removal on page 4 230 2 Remove the ADF rear cover See ADF rear cover removal on page 4 221 ...

Страница 717: ...Repair information 4 223 7558 xxx Go Back Previous Next 3 Remove the three screws A 4 Remove the ADF right hinge from the base ...

Страница 718: ...he ADF to its uppermost position 2 Gently pull the ADF scan pad as shown in the following picture Reinstallation note When replacing the ADF scan pad place it on the platen glass as shown in the following picture Then lower the ADF assembly to attach the ADF scan pad work on wording ...

Страница 719: ...Repair information 4 225 7558 xxx Go Back Previous Next ADF sensor actuator guide removal 1 Open the ADF top door 2 Remove the two screws A 3 Remove the ADF sensor actuator guide ...

Страница 720: ...4 226 Service Manual 7558 xxx Go Back Previous Next ADF separation roller guide removal 1 Open the ADF top door assembly 2 Raise the ADF separation roller guide as shown in the following image ...

Страница 721: ...ller guide 4 Remove the ADF separation roller guide from the machine Reinstallation note When reinstalling the ADF separation roller guide place the rear hinge point of the ADF separation roller guide over the rear boss and then gently press the front hinge point into the front boss until it snaps in place ...

Страница 722: ...ce Manual 7558 xxx Go Back Previous Next ADF top door removal 1 Remove the ADF front cover See ADF front cover removal on page 4 216 2 Remove the screw A securing the retainer to the machine 3 Remove the retainer ...

Страница 723: ... See Large platen glass removal on page 4 237 2 Remove the sensor FB platen length See Sensor FB platen length removal on page 4 266 3 Remove the FB CCD sensor assembly See FB CCD sensor assembly removal on page 4 230 4 Disconnect the two ribbon cables A from the authentication PCBA 5 Remove the four screws B 6 Remove the authentication PCBA ...

Страница 724: ...bly up and away from the flatbed scanner assembly 3 Gently press a tool against the plastic tab B as shown in the following image 4 Lift the ADF assembly and remove it from the machine FB CCD sensor assembly removal 1 Remove the large platen glass See Large platen glass removal on page 4 237 2 Remove the sensor FB platen length See Sensor FB platen length removal on page 4 266 ...

Страница 725: ... Go Back Previous Next 3 Release the two harnesses from the clamp A Warning Do not loosen or remove the red adjusting screws B on the FB CCD sensor assembly Warning Do not adjust the two clocking screws C on the FB CCD sensor assembly ...

Страница 726: ...s D securing the FB CCD sensor assembly to the machine 5 Disconnect the CCD ribbon cable from the FB CCD sensor assembly Warning When disconnecting the CCD ribbon cable from the FB CCD sensor assembly make sure that the release hook is pressed or the connection will be damaged ...

Страница 727: ...See Scanner rear cover removal on page 4 20 4 Remove the operator panel left cover See Operator panel left cover removal on page 4 10 5 Remove the operator panel right cover See Operator panel right cover removal on page 4 11 6 Remove the scanner right cover See Scanner right cover removal on page 4 21 7 Remove the scanner left cover See Scanner left cover removal on page 4 19 8 Remove the operato...

Страница 728: ...l 7558 xxx Go Back Previous Next 10 Remove the screw B from the front side of the printer 11 Remove the three screws C from the rear side of the printer 12 Disconnect the two cables D from the rear side of the printer B C ...

Страница 729: ...epair information 4 235 7558 xxx Go Back Previous Next Warning The data connection cable is prone to damage Extra care is required in handling this part 13 Release the cables from the cable holders E D E ...

Страница 730: ...4 236 Service Manual 7558 xxx Go Back Previous Next 14 Remove the flatbed scanner assembly ...

Страница 731: ...Repair information 4 237 7558 xxx Go Back Previous Next Large platen glass removal 1 Remove the two screws A securing the large platen retainer to the machine 2 Remove the large platen retainer ...

Страница 732: ...ous Next 3 Remove the large platen glass Reinstallation note Ensure that both sides of the glass are properly cleaned LED exposure bar removal 1 Remove the large platen glass See Large platen glass removal on page 4 237 2 Remove the two screws A ...

Страница 733: ...rriage motor removal 1 Remove the rear upper cover See Rear upper cover removal on page 4 19 2 Remove the scanner rear cover See Scanner rear cover removal on page 4 20 3 Remove the scanner top cover See Scanner top cover removal on page 4 22 4 Release the clamp A from the machine Note Make sure the release hook is pressed or the connection will be damaged ...

Страница 734: ...4 240 Service Manual 7558 xxx Go Back Previous Next 5 Disconnect the cable B 6 Remove the tension spring C ...

Страница 735: ...e scanner carriage motor assembly and the scanner carriage motor tension spring before completely tightening the three screws Scanner controller PCBA removal 1 Remove the scanner rear cover See Scanner rear cover removal on page 4 20 2 Remove the two connector screws A 3 Remove the screw B securing the scanner controller PCBA to the machine 4 Remove the large platen glass See Large platen glass re...

Страница 736: ...to the machine 6 Move the optics shield to the right and lift it to remove 7 Move the scanner carriage to the position as shown in the following image to provide access to the screws 8 Remove the four screws C securing the controller shield to the machine 9 Move the scanner carriage as far left as possible ...

Страница 737: ...ir information 4 243 7558 xxx Go Back Previous Next 10 Move the controller shield toward the front of the machine and remove it from the machine 11 Detach the four cables D from the scanner controller PCBA ...

Страница 738: ...Remove the scanner rear cover See Scanner rear cover removal on page 4 20 2 Remove the scanner left cover See Scanner left cover removal on page 4 19 3 Remove the ADF angle actuator See ADF angle actuator removal on page 4 205 Note The hooks for the sensor can be accessed more easily by removing the large platen glass 4 Release the hooks A securing the sensor ADF angle to the machine 5 Remove the ...

Страница 739: ...operator panel assembly See Scanner controller PCBA removal on page 4 241 2 Remove the screw A 3 Release the harness B from the clamp 4 Disconnect cable C to remove the sensor ADF closed interlock Sensor ADF document set removal 1 Remove the ADF rear cover ADF main drive sub assembly removal on page 4 218 2 Disconnect the cable A ...

Страница 740: ...nsor ADF document set to the machine 4 Remove the sensor ADF document set Sensor ADF feedout removal 1 Remove the ADF rear cover ADF rear cover removal on page 4 221 2 Disconnect the cable A 3 Release the hooks securing the sensor ADF feedout to the machine 4 Remove the sensor ADF feedout ...

Страница 741: ...elease the hook securing the sensor ADF inverter 3 Remove the sensor ADF inverter Sensor ADF pre registration removal 1 Open the ADF top door 2 Remove the ADF front cover See ADF front cover removal on page 4 216 3 Remove the three screws A securing the grounding plate to the machine 4 Remove the grounding plate ...

Страница 742: ...4 248 Service Manual 7558 xxx Go Back Previous Next 5 Remove the e clip B securing the roller to the machine 6 Remove the plastic bushing ...

Страница 743: ...o Back Previous Next 7 Release the hook securing the sensor ADF inverter to the machine Note You do not have to disconnect the cable from the sensor ADF inverter 8 Remove the four screws B securing the two sensor brackets to the machine ...

Страница 744: ...he ADF sensors as shown in the following image 10 Move the brackets out from under the ADF feed roller 11 Release the hooks securing the sensor ADF pre registration C 12 Remove sensor ADF pre registration Sensor ADF registration removal 1 Open the ADF top door 2 Remove the ADF front cover See ADF front cover removal on page 4 216 ...

Страница 745: ... information 4 251 7558 xxx Go Back Previous Next 3 Remove the three screws A securing the grounding plate to the machine 4 Remove the grounding plate 5 Remove the e clip B securing the roller to the machine ...

Страница 746: ...ice Manual 7558 xxx Go Back Previous Next 6 Remove the plastic bushing 7 Release the hook securing the sensor ADF inverter to the machine Note You do not have to disconnect the cable from the sensor ADF inverter ...

Страница 747: ...t 8 Remove the four screws B securing the two sensor brackets to the machine 9 Position the ADF feed roller in its uppermost position to allow access to the ADF sensors as shown in the following image 10 Move the brackets out from under the ADF feed roller ...

Страница 748: ...sensor ADF registration C 12 Remove sensor ADF registration Sensor ADF scan width 1 removal 1 Open the ADF top door 2 Remove the ADF front cover See ADF front cover removal on page 4 216 3 Remove the three screws A securing the grounding plate to the machine 4 Remove the grounding plate ...

Страница 749: ...Repair information 4 255 7558 xxx Go Back Previous Next 5 Remove the e clip B securing the roller to the machine 6 Remove the plastic bushing ...

Страница 750: ...Back Previous Next 7 Release the hook securing the sensor ADF inverter to the machine Note You do not have to disconnect the cable from the sensor ADF inverter 8 Remove the four screws B securing the two sensor brackets to the machine ...

Страница 751: ...s to the ADF sensors as shown in the following image 10 Move the brackets out from under the ADF feed roller 11 Release the hooks securing the sensor ADF scan width 1 C 12 Remove sensor ADF scan width 1 Sensor ADF scan width 2 removal 1 Open the ADF top door 2 Remove the ADF front cover See ADF front cover removal on page 4 216 ...

Страница 752: ...8 Service Manual 7558 xxx Go Back Previous Next 3 Remove the three screws A securing the grounding plate to the machine 4 Remove the grounding plate 5 Remove the e clip B securing the roller to the machine ...

Страница 753: ...mation 4 259 7558 xxx Go Back Previous Next 6 Remove the plastic bushing 7 Release the hook securing the sensor ADF inverter to the machine Note You do not have to disconnect the cable from the sensor ADF inverter ...

Страница 754: ...8 Remove the four screws B securing the two sensor brackets to the machine 9 Position the ADF feed roller in its uppermost position to allow access to the ADF sensors as shown in the following image 10 Move the brackets out from under the ADF feed roller ...

Страница 755: ...e sensor ADF scan width 2 C 12 Remove sensor ADF scan width 2 Sensor ADF scan width 3 removal 1 Open the ADF top door 2 Remove the ADF front cover See ADF front cover removal on page 4 216 3 Remove the three screws A securing the grounding plate to the machine 4 Remove the grounding plate ...

Страница 756: ...4 262 Service Manual 7558 xxx Go Back Previous Next 5 Remove the e clip B securing the roller to the machine 6 Remove the plastic bushing ...

Страница 757: ...o Back Previous Next 7 Release the hook securing the sensor ADF inverter to the machine Note You do not have to disconnect the cable from the sensor ADF inverter 8 Remove the four screws B securing the two sensor brackets to the machine ...

Страница 758: ...s Next 9 Position the ADF feed roller in its uppermost position to allow access to the ADF sensors as shown in the following image 10 Move the brackets out from under the ADF feed roller 11 Release the hooks securing the sensor ADF scan width 3 C ...

Страница 759: ...us Next Sensor ADF top door interlock removal 1 Remove the ADF rear cover ADF main drive sub assembly removal on page 4 218 2 Remove the screw A 3 Disconnect the cable 4 Remove the harness from the clamps B 5 Remove the sensor ADF top door interlock ...

Страница 760: ... removal 1 Remove the large platen glass See Large platen glass removal on page 4 237 2 Loosen the six screws A securing the optics shield to the machine 3 Move the optics shield to the right and lift it to remove 4 Disconnect the two cables B from the sensor FB platen length ...

Страница 761: ... 267 7558 xxx Go Back Previous Next 5 Remove the screw C 6 Remove the sensor FB platen length Reinstallation warning Ensure that the blue cable is connected to the rearmost sensor or the scanner will not operate correctly ...

Страница 762: ...Release the two harnesses from the clamp A 4 Remove the screw B 5 Remove the sensor FB scanner HP from the machine 6 Disconnect the cable 7 Remove sensor FB scanner HP Small platen glass removal 1 Remove the operator panel assembly See Scanner controller PCBA removal on page 4 241 2 Remove the scanner rear cover See Scanner rear cover removal on page 4 20 3 Remove the scanner left cover See Scanne...

Страница 763: ...Repair information 4 269 7558 xxx Go Back Previous Next 4 Remove the screw A securing the small platen front retainer 5 Remove the small platen front retainer ...

Страница 764: ...4 270 Service Manual 7558 xxx Go Back Previous Next 6 Remove the screw B securing the small platen rear retainer 7 Remove the small platen rear retainer ...

Страница 765: ...8 xxx Go Back Previous Next 8 Remove the small platen glass Reinstallation note Make sure both sides of the glass are properly cleaned Reinstallation note Make sure the small platen glass is replaced as seen in the previous photo ...

Страница 766: ...val procedure applies to TTM 3TM and 1TM devices 3TM left door removal 1 Remove the tray module rear cover See Tray module right cover removal on page 4 287 2 Remove the tray module left cover See Tray module left cover removal on page 4 282 3 Remove the metal clip 4 Lift the 3TM left door and remove it from the machine ...

Страница 767: ... securing the sensor media level to the assembly 3 Remove the sensor media level 4 Disconnect the harness B Sensor media out removal This removal procedure applies to trays 1 4 1 Remove the appropriate feeder unit See Printer tray 1 feeder removal on page 4 147 Tray module media feeder removal on page 4 284 TTM tray 4 media feeder removal on page 4 297 or TTM tray 3 feeder removal on page 4 293 2 ...

Страница 768: ...r media present removal This removal procedure applies to trays 1 4 1 Remove the left rear lower cover See Left rear lower cover removal on page 4 7 2 Remove the MPF tray feeder See MPF tray feeder removal on page 4 131 3 Remove the MPF top cover See MPF top cover removal on page 4 8 ...

Страница 769: ...hooks A securing the sensor MPF media present to the MPF tray feeder 6 Disconnect the cable B from the sensor MPF media present 7 Remove the sensor MPF media present Reinstallation note Ensure that the access cover is properly reinstalled so that it is flush with the machine or media jamming might occur ...

Страница 770: ...s to all three tray modules 1 Open the left door 2 Remove the two screws A securing the metal guide to the machine 3 Remove the metal guide 4 Remove the tray module upper media transport roller See the Tray module transport rollers removal on page 4 289 5 Remove the screw B securing the plastic bracket to the machine ...

Страница 771: ...s C securing the sensor tray module feedout to the machine 8 Remove the sensor 9 Disconnect the cable D 10 Remove the sensor tray module feedout Sensor tray module left door interlock removal 1 Remove the left cover 2 Open the left door 3 Remove the two screws A securing the plastic cover to the machine ...

Страница 772: ...nect the cable B from the sensor tray module left door interlock 5 Remove the plastic cover 6 Disconnect the cable C 7 Release the hooks securing the sensor tray module left door interlock to the plastic cover 8 Remove the sensor tray module left door interlock ...

Страница 773: ...ay 3 media tray or TTM tray 4 media tray 1 Pull the appropriate TTM media tray from the machine 2 Remove the screw A 3 Disconnect the cable B 4 Remove the sensor TTM media size Sensor TTM tray 3 feedout removal 1 Open the left door 2 Remove the lower tray module media transport roller See Tray module transport rollers removal on page 4 289 ...

Страница 774: ...ush the plastic media guide slightly toward the rear and pull it out from the machine 5 Release the hooks securing the sensor TTM tray 3 feedout to the machine 6 Disconnect the cable B Sensor TTM tray 4 feedout removal 1 Remove the TTM tray 4 media feeder See TTM tray 4 media feeder removal on page 4 297 2 Disconnect the cable A ...

Страница 775: ...vious Next 3 Release the hooks B 4 Remove the sensor TTM tray 4 feedout Tray module bottom cover removal 1 Remove the media tray 4 2 Remove the two screws A securing the tray module bottom cover to the machine 3 Remove the tray module bottom cover ...

Страница 776: ...e rear cover See Tray module rear cover removal on page 4 287 2 Remove the six screws A 3 Disconnect all the cables from the tray module controller PCBA 4 Remove the tray module controller PCBA Tray module left cover removal 1 Remove the tray module rear cover See Tray module rear cover removal on page 4 287 2 Remove the screw A securing the foot cover to the machine ...

Страница 777: ... door will help you remove the tray module left cover 5 Remove the tray module left cover Tray module lower transport motor removal This removal procedure is not applicable to TTM tray modules 1 Remove the tray module rear cover See Tray module rear cover removal on page 4 287 2 Disconnect the cable A 3 Release the harness from the clamp B ...

Страница 778: ...ve the tray module lower transport motor Tray module media feeder removal This removal procedure can be used for the following trays 1TM tray module 3TM tray module tray 2 3TM tray module tray 3 3TM tray module tray 4 TTM tray module tray 2 1 Remove the media tray 2 2 Open the left door ...

Страница 779: ... 4 285 7558 xxx Go Back Previous Next 3 Remove the screw A securing the bracket to the machine 4 Remove the two screws B securing the tray module media feeder to the machine 5 Disconnect the two cables C from the machine ...

Страница 780: ...4 286 Service Manual 7558 xxx Go Back Previous Next 6 Remove the two harnesses from the clamps D 7 Remove the tray module media feeder ...

Страница 781: ...oval 1 Remove the five screws A securing the tray module rear cover 2 Remove the tray module rear cover Tray module right cover removal 1 Remove the tray module rear cover See Tray module rear cover removal on page 4 287 2 Remove the two screws A 3 Remove the tray module right cover ...

Страница 782: ... Previous Next Tray module top cover removal This removal procedure applies to all three tray modules 1 Remove the media tray 2 2 Remove the two screws A securing the tray module top cover to the machine 3 Remove the tray module top cover ...

Страница 783: ...t rollers removal This removal procedure applies to all three tray modules 1 Open the left door 2 Remove the e clip A 3 Move the tray module transport roller toward the rear of the machine and detach it from the machine 4 Remove the tray module transport roller from the machine ...

Страница 784: ...of the tray module 2 media turn guide 3 Remove the tray module 2 media turn guide from the machine Tray module upper transport motor removal This removal procedure is not applicable to TTM tray modules 1 Remove the tray module rear cover See Tray module rear cover removal on page 4 287 2 Disconnect the cable A 3 Release the harness from the clamp B ...

Страница 785: ... xxx Go Back Previous Next 4 Remove the two screws C 5 Remove the tray module upper transport motor TTM left door removal 1 Remove the tray module left cover See Tray module left cover removal on page 4 282 2 Open the TTM left door ...

Страница 786: ... metal clip from the hinge 4 Lift the TTM left door and remove it from the machine TTM lower transport motor removal 1 Remove the tray module rear cover See Tray module rear cover removal on page 4 287 2 Disconnect the cable A 3 Release the harness from the clamp B ...

Страница 787: ... the TTM lower transport motor Reinstallation note To correctly set the drive belt tension install the TTM lower transport motor and the TTM lower transport motor tension spring before completely tightening the three screws TTM tray 3 feeder removal 1 Remove the TTM tray 3 media tray out from the machine See TTM tray 3 media tray removal on page 4 296 2 Pull open but do not remove the TTM tray 4 m...

Страница 788: ... Go Back Previous Next 4 Remove the two screws A from the inside of the tray module securing the TTM tray 3 feeder to the machine 5 Remove the two screws B securing the TTM tray 3 feeder to the machine 6 Disconnect the two cables C ...

Страница 789: ...ack Previous Next 7 Release the two harnesses from the clamps D 8 Remove the TTM tray 3 feeder Reinstallation note When replacing the TTM tray 3 feeder ensure that the rear metal bracket is removed and installed on the new TTM tray 3 feeder ...

Страница 790: ...xt TTM tray 3 media tray removal 1 Pull the TTM tray 3 media tray from the machine 2 Remove the screw A securing the lock bracket to the machine 3 Remove the bracket from the machine 4 Gently lift and remove the TTM tray 3 media tray from the machine ...

Страница 791: ...ide removal 1 Open the left door 2 Gently press the lower edges of the tray module 3 media turn guide 3 Remove tray module 3 media turn guide from the machine TTM tray 4 media feeder removal 1 Remove the tray 2 from the machine 2 Pull the TTM tray 4 media tray out from the machine ...

Страница 792: ...4 298 Service Manual 7558 xxx Go Back Previous Next 3 Remove the three screws A from inside the tray module 4 Disconnect the two cables B ...

Страница 793: ...to the machine 6 Remove the bracket 7 Remove the TTM tray 4 media feeder Reinstallation note When replacing the TTM tray 4 media feeder ensure that the following parts are removed and installed on the new TTM tray 4 media feeder Rear metal bracket TTM tray 4 lower guide TTM tray 4 feeder upper guide ...

Страница 794: ...us Next TTM tray 4 media transport removal 1 Pull the TTM tray 4 media tray from the machine 2 Remove the two screws A securing the TTM tray 4 media transport to the machine 3 Slide the TTM tray 4 media transport out of the machine and remove it ...

Страница 795: ... media tray removal 1 Remove the TTM tray 4 media transport See TTM tray 4 media transport removal on page 4 300 2 Remove the screw A securing the lock bracket to the machine 3 Remove the lock bracket 4 Gently lift and remove the TTM tray 4 media tray from the machine ...

Страница 796: ... Gently press the lower edges of the tray module 4 media turn guide 3 Remove the tray module 4 media turn guide from the machine TTM upper transport motor removal 1 Remove the tray module rear cover See Tray module rear cover removal on page 4 287 2 Disconnect the cable A 3 Release the harness from the clamp B ...

Страница 797: ...Repair information 4 303 7558 xxx Go Back Previous Next 4 Remove the two screws C securing the TTM upper transport motor to the machine 5 Remove the TTM upper transport motor ...

Страница 798: ...nit removal procedures Bridge decurler rear cover removal 1 Remove the bridge unit assembly See Bridge unit assembly removal on page 4 308 2 Remove the three screws A securing the bridge decurler rear cover to the machine 3 Remove the bridge decurler rear cover ...

Страница 799: ...ove the two screws A securing the bridge decurler right cover to the machine 3 Remove the bridge decurler right cover Bridge decurler top cover removal 1 Remove the bridge unit assembly See Bridge unit assembly removal on page 4 308 2 Remove the bridge decurler rear cover See Bridge decurler rear cover removal on page 4 304 3 Raise the bridge top door to its uppermost position ...

Страница 800: ...ver Bridge drive motor removal 1 Remove the bridge unit assembly See Bridge unit assembly removal on page 4 308 2 Remove the bridge decurler rear cover See Bridge decurler rear cover removal on page 4 304 3 Remove the bridge unit right cover See Bridge decurler right cover removal on page 4 305 4 Remove the four screws A securing the bridge drive motor to the machine ...

Страница 801: ...Repair information 4 307 7558 xxx Go Back Previous Next 5 Disconnect the cable B 6 Remove the bridge drive motor ...

Страница 802: ...ok securing the bridge unit hookup cover A to the finisher 2 Remove the bridge unit hookup cover A 3 Remove the finisher from the printer 4 Remove the two screws securing the bridge unit assembly B to the printer 5 Remove the bridge unit assembly B from the printer B Grounding strap Grounding strap ...

Страница 803: ...assembly removal on page 4 308 2 Remove the two screws A securing the bridge unit rear cover to the machine 3 Remove the bridge unit rear cover Bridge unit top door removal 1 Remove the bridge unit assembly See Bridge unit assembly removal on page 4 308 2 Remove the bridge unit rear cover See Bridge unit rear cover removal on page 4 309 ...

Страница 804: ... unit top door to the machine 4 Raise the bridge unit top door to an upright position 5 Remove the bridge unit top door Bridge unit top door spring removal 1 Remove the bridge unit top door See Bridge unit top door removal on page 4 309 2 Place the bridge unit top door upside down on the work surface ...

Страница 805: ... 7558 xxx Go Back Previous Next 3 Remove the two screws A securing the two hold down brackets to the machine 4 Remove the two hold down brackets Note When removing the inner guide the inner guide springs might become detached ...

Страница 806: ...4 312 Service Manual 7558 xxx Go Back Previous Next 5 Detach the inner guide from the machine 6 Remove the two screws B securing the bridge unit top door spring you want to remove ...

Страница 807: ...erly reinstalled Decurler clutch removal 1 Remove the bridge unit assembly See Bridge unit assembly removal on page 4 308 2 Remove the bridge decurler rear cover See Sensor decurler cover interlock removal on page 4 322 3 Release the hooks A securing the sensor flag to the machine 4 Remove the sensor flag 5 Remove the screw B securing the bracket to the machine ...

Страница 808: ...4 314 Service Manual 7558 xxx Go Back Previous Next 6 Remove the bracket from the machine 7 Release the harness from the clamps C 8 Disconnect the cable D ...

Страница 809: ... clutch away from the machine and remove it Reinstallation note When replacing the decurler clutch ensure that the hook on the decurler clutch is captured by the boss on the bracket Sensor bridge media entrance removal 1 Remove the bridge unit assembly See Bridge unit assembly removal on page 4 308 2 Place the bridge unit assembly upside down ...

Страница 810: ...4 316 Service Manual 7558 xxx Go Back Previous Next 3 Remove the screw A securing the bracket to the bridge unit assembly 4 Remove the bracket from the machine 5 Release the hooks B ...

Страница 811: ...bridge media exit removal 1 Remove the bridge unit assembly See Bridge unit assembly removal on page 4 308 2 Remove the bridge de curler top cover See Bridge decurler top cover removal on page 4 305 3 Remove the three screws A securing the long metal bracket to the machine Note When detaching the long metal bracket you do not have to remove the harness from the clamps ...

Страница 812: ...4 318 Service Manual 7558 xxx Go Back Previous Next 4 Detach the long metal bracket from the machine 5 Remove the screw B securing the bracket to the machine 6 Remove the bracket from the machine ...

Страница 813: ...e the screw C securing the sensor to the bracket 8 Remove the sensor bridge media exit Sensor bridge top door interlock removal 1 Remove the bridge unit assembly See Bridge unit assembly removal on page 4 308 2 Place the bridge unit upside down on the work surface ...

Страница 814: ... Previous Next 3 Remove the screws A securing the bracket to the machine 4 Remove the bracket from the machine 5 Release the hooks B securing the sensor bridge top door interlock to the bracket 6 Remove the sensor bridge top door interlock ...

Страница 815: ... HP removal 1 Remove the bridge unit assembly See Bridge unit assembly removal on page 4 308 2 Remove the bridge decurler rear cover See Sensor decurler cover interlock removal on page 4 322 3 Release the hook A securing the sensor flag to the machine 4 Remove the sensor flag ...

Страница 816: ...rler cam HP to the machine 6 Remove the sensor decurler cam HP 7 Disconnect the cable C Sensor decurler cover interlock removal 1 Remove the bridge unit assembly See Bridge unit assembly removal on page 4 308 2 Remove the bridge decurler top cover See Bridge decurler top cover removal on page 4 305 ...

Страница 817: ...Repair information 4 323 7558 xxx Go Back Previous Next 3 Release the hooks A securing the sensor decurler cover interlock to the bracket 4 Remove the sensor decurler cover interlock ...

Страница 818: ...bin assembly A to the finisher 3 Remove booklet bin assembly A Booklet bin hookup cable assembly removal 1 Disconnect booklet hookup cable assembly from the booklet bin assembly 2 Remove rear lower cover See Upper media bin front cover removal on page 4 426 3 Disconnect the booklet bin hookup cable assembly from the rear of the finisher 4 Release the clamps securing the booklet bin hookup cable as...

Страница 819: ...ings sheet located in the tray 1 settings sheet compartment To enter replacement settings or if the setting sheet is not available refer to booklet maker setup and adjustment located in chapter 4 See High capacity feeder HCF removal procedures on page 4 432 1 Remove the rear lower cover Upper media bin front cover removal on page 4 426 2 Loosen the four screws securing the plate to the finisher 3 ...

Страница 820: ...ller card assembly A Booklet diverter gate removal 1 Remove the rear upper cover See Rear upper cover removal on page 4 383 2 Remove the two screws securing the booklet diverter gate A to the machine 3 Remove the booklet diverter gate A 4 Release the harness from the clamp A Rear ...

Страница 821: ...ssembly See Booklet unit chassis removal on page 4 338 2 Remove the booklet unit assembly left cover See Booklet unit assembly left cover removal on page 4 337 3 Disconnect the connectors from the sensor booklet end guide drive motor 4 Remove the two screws securing the booklet end guide drive motor A from the compiler frame 5 Remove the booklet end guide drive motor A Connector A ...

Страница 822: ...five screws securing the booklet gear train frame from the booklet unit chassis 6 Remove the two e clips from shaft X Y 7 Remove the two bushings from shaft X Y 8 Remove the folding solenoid frame A Booklet fold solenoid removal 1 Remove the booklet unit chassis See Booklet unit chassis removal on page 4 338 2 Remove the booklet unit motor assembly See Booklet folding exit drive motor assembly rem...

Страница 823: ... assembly A 3 Remove the five screws securing the booklet folding exit drive motor assembly A from the booklet gear train frame 4 Remove the booklet folding exit drive motor assembly A Booklet front tamper guide removal 1 Remove the booklet unit assembly See Booklet unit chassis removal on page 4 338 2 Remove booklet unit assembly left cover See Booklet unit assembly left cover removal on page 4 3...

Страница 824: ...et unit assembly See Booklet unit chassis removal on page 4 338 2 Remove the booklet unit assembly left cover See Booklet unit assembly left cover removal on page 4 337 3 Disconnect the connector from the booklet front tamper motor 4 Remove the two screws securing the booklet front tamper motor from the tamper frame assembly Right B A Left ...

Страница 825: ...r 42T removal 1 Remove the booklet unit assembly See Booklet unit chassis removal on page 4 338 2 Remove the booklet unit motor assembly See Booklet folding exit drive motor assembly removal on page 4 329 3 Remove the knife solenoid frame See Booklet fold solenoid frame removal on page 4 328 4 Remove the e clip Left Connector A ...

Страница 826: ...embly See Booklet unit chassis removal on page 4 338 2 Remove the screws securing the booklet media entrance drive motor cover from the booklet unit 3 Remove the booklet media entrance drive motor cover 4 Disconnect the connectors from the booklet media entrance drive motor A 5 Remove the two screws securing the booklet media transport from the knife solenoid frame B A Rear ...

Страница 827: ... 432 3 Remove the four screws securing the frame X from the booklet unit chassis 4 Release the cable harness from the frame X 5 Remove the four screws securing the booklet media pinch roll assembly A from the booklet unit chassis 6 Remove the booklet media pinch roll assembly A Booklet paddle drive motor assembly removal 1 Remove the booklet unit assembly See Booklet unit chassis removal on page 4...

Страница 828: ...ld solenoid frame removal on page 4 328 4 Remove the booklet media entrance drive motor See Booklet media entrance drive motor removal on page 4 332 5 Remove the booklet knife sector drive gear 42T See Booklet knife sector drive gear 42T removal on page 4 331 6 Remove booklet unit gear train frame See Booklet unit gear train frame removal on page 4 339 7 Remove the booklet unit assembly left cover...

Страница 829: ...booklet unit assembly See Booklet unit chassis removal on page 4 338 2 Remove the booklet unit assembly left cover See Booklet unit assembly left cover removal on page 4 337 3 Disconnect the connector from the booklet rear tamper motor A 4 Remove the two screws securing the booklet rear tamper motor A from the tamper frame assembly B C D Right A ...

Страница 830: ...l 1 Open the finisher front door assembly 2 Pull the booklet stapler unit out of the machine 3 Release the hook securing the right ball bearing slide A 4 Pull the booklet stapler unit assembly B from the machine 5 Remove the two screws securing the booklet stapler unit assembly B to the left ball bearing slide C Connector Left A ...

Страница 831: ...B Booklet unit assembly left cover removal 1 Remove the booklet unit assembly See Booklet unit chassis removal on page 4 338 2 Remove the top screws securing the left cover to the booklet unit assembly 3 Loosen the two screws securing the left cover to the booklet unit assembly Clear plastic tab B A ...

Страница 832: ...sembly left cover A Booklet unit chassis removal 1 Open the finisher front door assembly 2 Slide the booklet unit out 3 Remove the two screws that are securing the retainer to the machine 4 Remove the retainer 5 Release the two latches securing the booklet unit A from the guides A ...

Страница 833: ...drive motor assembly removal on page 4 329 3 Remove the knife solenoid frame See Booklet fold solenoid frame removal on page 4 328 4 Remove the booklet media entrance drive motor See Booklet media entrance drive motor removal on page 4 332 5 Remove the booklet knife sector drive gear 42T See Booklet knife sector drive gear 42T removal on page 4 331 6 Remove the gear 18T 7 Remove the three screws s...

Страница 834: ...A Buffer diverter gate removal 1 Open the finisher front door assembly 2 Move the lower pinch guide assembly A to the right 3 Remove the rear upper cover See Rear upper cover removal on page 4 383 4 Remove the buffer diverter gate solenoid See Buffer diverter gate solenoid removal on page 4 341 A ...

Страница 835: ...n forward as shown 7 Remove the buffer diverter gate C Buffer diverter gate solenoid removal 1 Open the finisher front door assembly 2 Remove the rear upper cover See Rear upper cover removal on page 4 383 3 Disconnect the connector from the buffer diverter gate solenoid A 4 Release the harness from the clamp Buffer diverter gate A B Rear C A ...

Страница 836: ...me detached See Buffer diverter gate removal on page 4 340 Buffer pinch guide assembly removal 1 Remove the finisher front door assembly See Finisher front door assembly removal on page 4 351 2 Remove the rear upper cover See Rear upper cover removal on page 4 383 3 Remove the rear lower cover See Upper media bin front cover removal on page 4 426 4 Remove the stapler unit frame See Stapler unit fr...

Страница 837: ...in the finisher Clamp drive motor removal 1 Remove the rear upper cover See Rear upper cover removal on page 4 383 2 Remove the upper media bin assembly See Upper media bin assembly removal on page 4 425 3 Remove the two media eject unit springs A attached to the media eject unit assembly B by pushing them downward Hole in rear frame Boss A Right A B ...

Страница 838: ...r media eject clamp HP D 8 Remove the two screws securing the media eject clamp motor to the bracket E 9 Remove the media eject clamp motor C Reinstallation note When replacing the bracket turn the media eject clamp gear 70T F so that it interacts with the sensor media eject clamp HP Clamp paddle removal 1 Remove the finisher front door assembly See Finisher front door assembly removal on page 4 3...

Страница 839: ...ront door assembly See Finisher front door assembly removal on page 4 351 2 Remove the rear upper cover See Rear upper cover removal on page 4 383 3 Move the slip clutch gear 24T A toward the rear as shown to disengage the stacker bin B 4 Move the stacker bin down as shown to its lowest position after it is disengaged Note Make sure the stacker bin is at its lowest position before continuing 5 Rem...

Страница 840: ...eject roll shaft E 9 Remove the media eject shaft gear 39T D 10 Remove the 6 mm bushing F 11 Use a prying tool to remove the e clip securing the eject roll shaft E to the rear of the finisher 12 Remove the 8 mm bushing G 13 Remove the two e clips securing the eject roll shaft E to the front of the finisher 14 Remove the 6 mm bushing F and the 8 mm bushing G 15 Move the eject roll shaft toward the ...

Страница 841: ...cover A Reinstallation note Make sure to put the power cord B into the notch on the finisher bottom cover A Finisher buffer roll assembly removal 1 Remove the rear upper cover See Rear upper cover removal on page 4 383 2 Open the finisher front door assembly 3 Remove the stapler unit cartridge 4 Move the stapler unit assembly by hand as far to the rear as it will go 5 Lower the buffer pinch guide ...

Страница 842: ...ition 8 Use a prying tool to remove the e clip securing the buffer roll assembly C to the front of the finisher 9 Remove the 6 mm bushing D 10 Remove the finisher diverter gate solenoid See Finisher diverter gate solenoid removal on page 4 350 11 Loosen the two screws securing the belt tensioner bracket E to the finisher and move it downward as shown Front A B Front E clip D C B ...

Страница 843: ...ve gear 46T H 17 Remove the 6 mm bushing D 18 Remove the buffer roll assembly C from inside the finisher Note When removing the buffer roll assembly C do not touch the rubber surface Replacement notes Make sure the flat spot on the end of the buffer roll assembly C is installed to the rear When replacing the buffer roll assembly do not touch the rubber surface The tension of the belt buffer transp...

Страница 844: ...e rear to the right and forward as shown 8 Remove the finisher diverter gate D Finisher diverter gate solenoid removal 1 Open the finisher front door assembly 2 Remove the rear upper cover See Rear upper cover removal on page 4 383 3 Disconnect the connector from the finisher diverter gate solenoid A 4 Release the harness from the clamp 5 Remove the two screws securing the bracket B to the finishe...

Страница 845: ... into the finisher 8 Remove the link Note When the link is removed the finisher diverter gate may become detached See Finisher diverter gate removal on page 4 350 Finisher front door assembly removal 1 Open the finisher front door assembly A 2 Remove the three screws securing the finisher front door assembly A C B Clamp C Clamp Connector ...

Страница 846: ... finisher front door interlock B The two magnetic catches C should properly engage the finisher Finisher left carrage belt assembly removal 1 Remove the rear upper cover See Rear upper cover removal on page 4 383 2 Remove the finisher front door assembly See Finisher front door assembly removal on page 4 351 3 Move the slip clutch gear 24T A toward the rear to disengage the stacker bin B A C C B B...

Страница 847: ...ft carriage lift assembly 7 Remove the screw securing the upper belt clamp F to the left carriage bracket D 8 Remove the upper belt clamp F 9 Remove the left carriage bracket with the finisher left carriage belt assembly G from the finisher 10 Release the hook securing the finisher left carriage belt assembly G to the lower belt clamp H 11 Remove the finisher left carriage belt assembly G Reinstal...

Страница 848: ...g Finisher LVPS PCBA removal 1 Remove the right lower cover See Upper media bin front cover removal on page 4 426 2 Disconnect all the connectors from the finisher LVPS PCBA A 3 Remove the two screws securing the finisher LVPS PCBA A to the finisher 4 Remove the finisher LVPS PCBA A Front G F E D C H Rear A ...

Страница 849: ...tensioner bracket D to the finisher and move it upward in the direction of the arrow 9 Remove the belt entrance paddle E from the entrance drive pulley 20T F 10 Release the hook securing the entrance drive gear 23T G to the media entrance roll assembly H 11 Remove the entrance drive gear 23T G 12 Remove the entrance drive pulley 20T F 13 Remove the bushing I 14 Remove the e clip securing the media...

Страница 850: ... entrance paddle E is automatically adjusted to the force of the spring attached to the belt tensioner bracket D Tighten the two screws in the order shown Finisher PCBA removal 1 Remove the rear upper cover See Rear upper cover removal on page 4 383 2 Remove the rear lower cover See Upper media bin front cover removal on page 4 426 3 Loosen the four screws securing the plate A to the finisher 4 Mo...

Страница 851: ...us Next 6 Disconnect the connectors from the finisher PCBA 7 Remove the six screws securing the finisher PCBA B 8 Remove the finisher PCBA B Rear B P8304 P8308 P8389 P8306 P8307 P8300 P8301 P8310 P8316 P8314 P8313 P8315 P8317 P8311 P8302 P8305 P8309 ...

Страница 852: ...finisher connection cable from the rear of the printer 2 Release the hook securing the bridge unit hookup cover A to the finisher 3 Remove the bridge unit hookup cover A 4 Disconnect the bridge unit connection from the finisher 5 Open the finisher front door assembly B on the front of the finisher Right Rear A Hook ...

Страница 853: ...ext 6 Pull the finisher docking latch assembly C outward in the direction of the arrow and pull the finisher away from the printer 7 Close the finisher front door assembly 8 Remove the two screws securing the finisher docking bracket D to the printer C B ...

Страница 854: ...e finisher should be firmly locked into position Finisher right carriage belt removal 1 Remove the rear upper cover See Rear upper cover removal on page 4 383 2 Remove the finisher front door assembly See Finisher front door assembly removal on page 4 351 3 Move the slip clutch gear 24T A toward the rear to disengage the stacker bin B 4 Move the stacker bin B to its lowest position Note Make sure ...

Страница 855: ...emove the upper belt clamp F 9 Remove the right carriage bracket D with the finisher right carriage belt assembly G from the finisher 10 Release the hook securing the finisher right carriage belt assembly G to the lower belt clamp H 11 Remove the finisher right carriage belt assembly G Reinstallation notes Make sure the finisher right carriage belt assembly G is inserted into the upper belt clamp ...

Страница 856: ...362 Service Manual 7558 xxx Go Back Previous Next Left lower cover removal 1 Open the finisher front door assembly 2 Remove the two screws securing the left lower cover A 3 Remove the left lower cover A A ...

Страница 857: ...ssembly See Upper media bin assembly removal on page 4 425 8 Remove the upper media bin vertical cover See Right eject cover removal on page 4 384 9 Remove the stapler unit frame See Stapler unit frame removal on page 4 415 10 Remove the media eject clamp motor assembly See Clamp drive motor removal on page 4 343 11 Remove the media eject unit assembly See Media eject unit assembly removal on page...

Страница 858: ...4 364 Service Manual 7558 xxx Go Back Previous Next 18 Remove the belt exit B from the lower exit roll drive pulley 20T C A B Rear C A Tighten first Tighten second ...

Страница 859: ...on 4 365 7558 xxx Go Back Previous Next 19 Release the hook of the lower exit roll drive pulley 20T C from the lower media exit roll assembly F 20 Remove the lower exit roll drive pulley 20T C D E Front view Rear view ...

Страница 860: ...ce Manual 7558 xxx Go Back Previous Next 21 Remove the 6 mm ball bearing G 22 Use a prying tool to remove the e clip on the front of the finisher securing the lower media exit roll assembly F to the finisher F G C ...

Страница 861: ...ly F towards the rear and outward as shown 25 Remove the lower media exit roll assembly F Lower pinch guide assembly removal 1 Open the finisher front door assembly 2 Open the lower pinch guide assembly A by lifting it upward 3 Remove the screw securing the lower pinch guide assembly A to the finisher Front E clip H G G Rear ...

Страница 862: ...r removal on page 4 426 4 Remove the upper media bin assembly See Upper media bin assembly removal on page 4 425 5 Remove the upper media bin vertical cover See Right eject cover removal on page 4 384 6 Remove the stapler unit frame See Stapler unit frame removal on page 4 415 7 Remove the media eject clamp motor assembly See Clamp drive motor removal on page 4 343 8 Remove the media eject unit as...

Страница 863: ...xxx Go Back Previous Next 11 Move the plate to the right and outward 12 Remove the plate 13 Disconnect the connector P8309 from the finisher controller card assembly B 14 Release the harness from the clamps A Rear B Rear P8309 Clamp ...

Страница 864: ...4 370 Service Manual 7558 xxx Go Back Previous Next 15 Remove the screw securing the media compiler unit assembly C to the finisher This screw is found inside the finisher Inside view ...

Страница 865: ...sembly through the inside of the finisher and out the front Media eject clamp clutch removal 1 Remove the rear upper cover See Rear upper cover removal on page 4 383 2 Disconnect the connector from the sensor media eject shaft HP A 3 Release the harness from the clamp 4 Disconnect the connector from the media eject clutch B 5 Release the harness from the clamp 6 Release the hook securing the media...

Страница 866: ...ake sure the hook on the media eject clamp clutch is placed in the notch of the bracket Media eject motor assembly removal 1 Remove the rear upper cover See Rear upper cover removal on page 4 383 2 Remove the media eject clutch See Media eject clamp clutch removal on page 4 371 3 Disconnect the connector from the media eject motor assembly A 4 Disconnect the connector from the sensor media bin lev...

Страница 867: ...t door assembly removal on page 4 351 2 Remove the rear upper cover See Rear upper cover removal on page 4 383 3 Remove the upper media bin assembly See Upper media bin assembly removal on page 4 425 4 Remove the upper media bin vertical cover See Right eject cover removal on page 4 384 5 Remove the two media eject unit springs A by pushing them downward 6 Disconnect the connector from the eject u...

Страница 868: ...sembly C from the shaft D on the rear of the finisher 9 Remove the eject clamp lever assembly C 10 Remove the e clip securing the shaft D to the rear of the finisher 11 Remove the 8 mm bushing E on the rear side 12 Remove the e clip securing the shaft F to the front of the finisher Rear C Screw E clip E D ...

Страница 869: ... followed by the right side Note Do not force the media eject unit assembly out of the finisher Remove the left side before the right side Note Tilting the media eject unit assembly slightly may make the removal easier 15 Remove the media eject unit assembly Do not force the media eject unit assembly into the finisher Insert the right side before the left side Front E clip E F Right G ...

Страница 870: ...ower cover See Left lower cover removal on page 4 362 4 Remove the left upper cover See Left upper cover removal on page 4 363 5 Remove the screw securing the cover A to the media entrance pinch guide assembly B 6 Remove the cover A 7 Disconnect the connector from the sensor finisher media entrance C 8 Release the harness from the clamps 9 Remove the three screws securing the media entrance pinch ...

Страница 871: ...emove the one e clip securing the paddle shaft B 7 Remove the bushing C 8 Loosen the two screws securing the belt tensioner bracket D to the rear of the finisher 9 Release the hook of the sub paddle drive gear 23T E from the paddle shaft B 10 Remove the sub paddle drive gear 23T E 11 Remove the e clip and the 6 mm bushing C 12 Move the paddle shaft B toward the rear of the finisher and outward 13 ...

Страница 872: ...nnector from the sensor punch carriage shift HP A 5 Remove the top cover See Top cover removal on page 4 424 6 Release the harness from the punch carriage assembly B 7 Remove the connector from the punch carriage shift motor assembly C 8 Release the two punch unit assembly harnesses from the three clamps on the rear of the finisher 9 Disconnect the two punch unit assembly harnesses from the main h...

Страница 873: ...r information 4 379 7558 xxx Go Back Previous Next 11 Remove the two screws on the rear securing the punch carriage assembly B to the finisher A B E D Rear Clamp Clamp Clamp C Connectors Connector Connector ...

Страница 874: ...mage will occur Do not force the punch unit into the finisher Be sure to hold the punch carriage assembly firmly to avoid dropping it Make sure all harnesses are properly clamped Make sure the harnesses do not come into contact with any rotating mechanisms Punch carriage shift motor assembly removal 1 Open the finisher front door assembly 2 Remove the upper media bin assembly See Upper media bin a...

Страница 875: ...ee Rear upper cover removal on page 4 383 3 Remove the upper media bin assembly See Upper media bin assembly removal on page 4 425 4 Remove the connector from the sensor punch carriage shift HP A 5 Remove the top cover See Top cover removal on page 4 424 6 Remove the punch carriage assembly See Punch carriage assembly removal on page 4 378 7 Disconnect the connector from the punch unit motor assem...

Страница 876: ...82 Service Manual 7558 xxx Go Back Previous Next 10 Remove the two screws securing the punch unit motor assembly A to the punch unit assembly C 11 Remove the punch unit motor assembly B A Clamp C Connector ...

Страница 877: ... cover See Rear upper cover removal on page 4 383 2 Remove the four screws securing the rear lower cover A to the finisher 3 Remove the rear lower cover A Rear upper cover removal 1 Release the hook of the bridge unit hookup cover A to the finisher 2 Disconnect the bridge unit harness from the finisher A ...

Страница 878: ...uring the rear upper cover B to the finisher 4 Remove the rear upper cover B Right eject cover removal 1 Remove the finisher front door assembly See Finisher front door assembly removal on page 4 351 2 Remove the rear upper cover See Rear upper cover removal on page 4 383 A B Hook ...

Страница 879: ...val on page 4 338 2 Remove the booklet unit assembly left cover See Booklet unit assembly left cover removal on page 4 337 3 Disconnect the connector from the sensor booklet compiler media entrance A 4 Remove the screw securing the sensor booklet compiler media entrance bracket from the booklet unit chassis 5 Remove the screw securing the sensor booklet compiler media entrance A from the bracket 6...

Страница 880: ...HP A 4 Release the hooks securing the sensor booklet end guide HP A from the booklet unit 5 Remove sensor booklet end guide HP A Sensor booklet front tamper HP removal 1 Remove the booklet unit assembly See Booklet unit chassis removal on page 4 338 2 Remove the booklet unit assembly left cover See Booklet unit assembly left cover removal on page 4 337 3 Disconnect the connector from the booklet f...

Страница 881: ... on page 4 338 1 Remove the Complete booklet unit assembly left cover See Booklet unit assembly left cover removal on page 4 337 2 Rotate knife sector gear clockwise until the flag is in the folding sensor position 3 Remove one screw securing the sensor knife HP sensor knife folding sensor from the knife frame assembly 4 Disconnect the connector from the sensor booklet knife folding A A Left Conne...

Страница 882: ...338 2 Remove the booklet unit assembly left cover See Booklet unit assembly left cover removal on page 4 337 3 Rotate knife sector gear clockwise until the flag is in the folding sensor position 4 Remove one screw securing the sensor knife HP sensor Knife folding sensor from the knife frame assembly 5 Disconnect the connector from the sensor booklet knife HP and booklet knife folding Connector A L...

Страница 883: ...See Booklet unit chassis removal on page 4 338 2 Disconnect the connectors from the sensor booklet media entrace A 3 Remove the screw securing the sensor booklet media entrace bracket from the pinch roll frame 4 Remove the screw securing the sensor booklet media entrace A from the bracket 5 Remove sensor booklet media entrace A Connector A Left Connector A Right ...

Страница 884: ...ct the connector from the booklet left tamper sensor 4 Remove the screw securing the sensor booklet rear tamper HP bracket from the booklet unit assembly 5 Remove sensor booklet rear tamper HP A Sensor booklet unit interlock removal 1 Open the finisher front door assembly 2 Pull the booklet unit assembly out of the finisher 3 Remove rear lower cover See Upper media bin front cover removal on page ...

Страница 885: ... removal on page 4 338 2 Remove the booklet unit assembly left cover See Booklet unit assembly left cover removal on page 4 337 3 Remove the screw securing the Sensor booklet unit media exit bracket from the booklet unit assembly 4 Disconnect the connector from the Sensor booklet unit media exit A 5 Remove the screw securing the Sensor booklet unit media exit A from the bracket Connector A Rear ...

Страница 886: ...e Top cover removal on page 4 424 5 Remove the left lower cover See Left lower cover removal on page 4 362 6 Remove the left upper cover See Left upper cover removal on page 4 363 7 Remove the punch carriage assembly See Punch carriage assembly removal on page 4 378 8 Disconnect the connector from the sensor buffer path A 9 Remove the screw securing the bracket B to the finisher 10 Remove the brac...

Страница 887: ...eject motor assembly See Media eject motor assembly removal on page 4 372 10 Remove the media compiler unit assembly See Media compiler unit assembly removal on page 4 368 11 Disconnect the connector from the sensor compiler media present A 12 Release the hooks securing the sensor compiler media present A to the compiler unit assembly B 13 Move the compiler media present actuator C downward as sho...

Страница 888: ...ance removal 1 Open the front door assembly 2 Remove the rear upper cover See Rear upper cover removal on page 4 383 3 Remove the upper media bin assembly See Upper media bin assembly removal on page 4 425 4 Remove the top cover See Top cover removal on page 4 424 5 Remove the left lower cover See Left lower cover removal on page 4 362 6 Remove the left upper cover See Left upper cover removal on ...

Страница 889: ...per media bin assembly removal on page 4 425 5 Remove the upper media bin vertical cover See Right eject cover removal on page 4 384 6 Remove the stapler unit frame See Stapler unit frame removal on page 4 415 7 Remove the media eject clamp motor assembly See Clamp drive motor removal on page 4 343 8 Remove the media eject unit assembly See Media eject unit assembly removal on page 4 373 9 Remove ...

Страница 890: ...are identical Sensor lower media exit removal 1 Open the finisher front door assembly 2 Remove the upper media bin assembly See Upper media bin assembly removal on page 4 425 3 Disconnect the connector from the sensor lower media exit A 4 Remove the harness from the clamps C A B C A Connector ...

Страница 891: ...s easier as shown 6 Remove the bracket B 7 Release the hooks securing the sensor lower media exit A to the bracket 8 Remove the sensor lower media exit A Sensor media eject clamp HP removal 1 Remove the rear upper cover See Rear upper cover removal on page 4 383 2 Remove the upper media bin assembly See Upper media bin assembly removal on page 4 425 A B Front Clamp Connector Right B A Access slots...

Страница 892: ...emoval on page 4 343 5 Release the hooks of the sensor media eject clamp HP A from the bracket B 6 Remove the sensor media eject clamp HP A Sensor media eject shaft HP removal 1 Remove the rear upper cover See Rear upper cover removal on page 4 383 2 Disconnect the connector from the sensor media eject shaft HP A 3 Rotate the media eject clutch actuator B by hand so it clears the sensor media ejec...

Страница 893: ...media eject shaft HP A Sensor punch carriage shift HP removal 1 Open the finisher front door assembly 2 Remove the rear upper cover See Rear upper cover removal on page 4 383 3 Remove the punch carriage assembly See Punch carriage assembly removal on page 4 378 4 Remove the one screw securing the bracket A to the punch carriage unit B Rear B A C Connector ...

Страница 894: ...shift HP C Sensor punch hole select sensor punch cam front and sensor punch unit HP removal 1 Open the finisher front door assembly 2 Remove the rear upper cover See Rear upper cover removal on page 4 383 3 Remove the punch carriage assembly See Punch carriage assembly removal on page 4 378 4 Remove the screw securing the bracket A to the punch unit assembly B A B C A B ...

Страница 895: ...or encoder removal 1 Open the finisher front door assembly 2 Remove the rear upper cover See Rear upper cover removal on page 4 383 3 Remove the upper media bin assembly See Upper media bin assembly removal on page 4 425 4 Remove the top cover See Top cover removal on page 4 424 5 Remove the punch carriage assembly See Punch carriage assembly removal on page 4 378 6 Disconnect the connector from t...

Страница 896: ...ation pair with bracket removal 1 Open the finisher front door assembly 2 Remove the rear upper cover See Rear upper cover removal on page 4 383 3 Remove the upper media bin assembly See Upper media bin assembly removal on page 4 425 4 Remove the top cover See Top cover removal on page 4 424 5 Remove the punch carriage assembly See Punch carriage assembly removal on page 4 378 6 Remove the screw s...

Страница 897: ...de C 11 Remove the bracket D 12 Remove the two connectors from the sensor punch unit side registration pair E 13 Release the hooks securing the sensors punch unit side registration pair E to the bracket D 14 Remove the sensor punch unit side registration pair E Note The two sensors are identical Sensor punch waste box set removal 1 Open the finisher front door assembly 2 Pull the punch waste box 3...

Страница 898: ...el F removal 1 Remove the finisher front door assembly See Finisher front door assembly removal on page 4 351 2 Remove the rear upper cover See Rear upper cover removal on page 4 383 3 Disconnect the connector from the sensor stacker bin level F A 4 Remove the screw securing the sensor stacker bin level F A to the finisher 5 Remove the sensor stacker bin level F A A Connector Front A Connector ...

Страница 899: ...t tray height sensor stacker bin level R A 4 Remove the screw securing the sensor stacker bin level R A 5 Remove the sensor stacker bin level R A Sensor stacker bin level encoder removal 1 Remove the rear upper cover See Rear upper cover removal on page 4 383 2 Disconnect the connector from the sensor stacker bin level encoder A 3 Release the harness from the clamp 4 Remove the screw securing the ...

Страница 900: ...ower cover See Upper media bin front cover removal on page 4 426 3 Remove the stacker media bin assembly See High capacity feeder HCF removal procedures on page 4 432 4 Remove the stacker bin lift motor assembly See Stacker bin lift motor assembly removal on page 4 410 5 Remove the four screws securing the metal cover A to the finisher 6 Remove the metal cover A 7 Disconnect the connector from the...

Страница 901: ...sembly See Finisher front door assembly removal on page 4 351 2 Remove the staple cartridge 3 Remove the rear upper cover See Rear upper cover removal on page 4 383 4 Remove the rear lower cover See Upper media bin front cover removal on page 4 426 5 Remove the stapler unit frame See Stapler unit frame removal on page 4 415 6 Remove the stapler unit assembly See Stapler unit assembly removal on pa...

Страница 902: ... assembly B 8 Remove the sensor stapler carriage HP A Sensor upper media bin full removal 1 Open the finisher front door assembly 2 Remove the screw securing the bracket A to the upper media bin vertical cover B 3 Move the bracket frontward and downward to gain access to the harness and connector 4 Release the harness from the clamp A B ...

Страница 903: ... bin full C 7 Disconnect the connector from the sensor upper media bin full C Sensor upper media exit removal 1 Open the finisher front door assembly 2 Remove the rear upper cover See Rear upper cover removal on page 4 383 3 Remove the upper media bin assembly See Upper media bin assembly removal on page 4 425 4 Remove the top cover See Top cover removal on page 4 424 Front C Harness clamp A Front...

Страница 904: ...A to the finisher 7 Remove the sensor upper media exit A Stacker bin lift motor assembly removal 1 Remove the rear upper cover See Rear upper cover removal on page 4 383 2 Remove the rear lower cover See Upper media bin front cover removal on page 4 426 3 Loosen the four screws securing the plate A 4 Move the plate A toward the right as shown Rear Left A Connector A Rear ...

Страница 905: ...west position Note Make sure the stacker bin C is at the lowest position before continuing 8 Disconnect the connector from the sensor stacker bin level encoder D 9 Release the harness from the clamps 10 Disconnect the connector P8305 from the finisher controller card assembly E 11 Remove the screw securing the bracket F to the stacker bin lift motor assembly G C B Rear Clamp Clamp D P8305 E ...

Страница 906: ...et F 13 Release the hook securing the encoder H to the stacker bin lift motor assembly G 14 Remove the encoder 15 Remove the three screws securing the stacker bin lift motor assembly G to the finisher 16 Remove the stacker bin lift motor assembly G G F Clamp Connector G H ...

Страница 907: ...ve the stacker media bin assembly A Stapler unit assembly removal 1 Remove the finisher front door assembly See Finisher front door assembly removal on page 4 351 2 Remove the staple cartridge 3 Remove the rear upper cover See Rear upper cover removal on page 4 383 4 Remove the rear lower cover See Upper media bin front cover removal on page 4 426 5 Remove the stapler unit frame See Stapler unit f...

Страница 908: ...pler carriage motor assembly C to the stapler carriage assembly D 10 Remove the stapler carriage motor assembly C 11 Remove the screw securing the stapler cover E to the stapler unit assembly F 12 Remove the stapler cover E 13 Disconnect the two connectors from the stapler unit assembly F 14 Disconnect the connector from the sensor stapler carriage HP G 15 Remove the two screws securing the bracke...

Страница 909: ...arriage assembly D and the stapler carriage motor assembly C move freely without binding Stapler unit frame removal 1 Remove the finisher front door assembly See Finisher front door assembly removal on page 4 351 2 Remove the staple cartridge 3 Remove the rear upper cover See Rear upper cover removal on page 4 383 4 Remove the rear lower cover See Upper media bin front cover removal on page 4 426 ...

Страница 910: ...w securing the ground wire C to the finisher 10 Release the harness from the clamp 11 Remove the media stacker bin lift motor assembly See High capacity feeder HCF removal procedures on page 4 432 12 Disconnect the white connector and the yellow connector from the sensor stacker bin upper limit and the sensor stacker bin no media 13 Remove the four screws securing the stapler unit frame D to the f...

Страница 911: ...g the stapler unit frame Be sure to replace the grounding wire Ensure that the white connector and the yellow connector are properly replaced Stepper motor buffer transport and belt buffer transport removal 1 Remove the rear upper cover See Rear upper cover removal on page 4 383 2 Remove the two screws securing the bracket A on the rear of the finisher 3 Move the bracket slightly Note It is not ne...

Страница 912: ...ews securing the bracket E to the finisher 8 Remove the bracket 9 Remove the two screws securing the stepper motor buffer transport to the bracket 10 Remove the stepper motor buffer transport 11 Remove the belt buffer transport D Reinstallation notes The tension of the belt buffer transport D is automatically adjusted by the force of the spring attached to the belt tensioner bracket C A D C C Seco...

Страница 913: ...val 1 Remove the rear upper cover See Rear upper cover removal on page 4 383 2 Loosen the two screws securing the belt tensioner bracket A to the finisher and move upward as shown 3 Remove the belt entrance paddle B from the stepper motor entrance paddle C 4 Disconnect the connector from the stepper motor entrance paddle C E B Connector B A Second First A C ...

Страница 914: ...dle B Reinstallation notes The tension of the belt entrance paddle B is automatically adjusted by the force of the spring attached to the belt tensioner bracket A Tighten the two screws in the order shown Stepper motor exit assembly and belt exit removal 1 Remove the rear upper cover See Rear upper cover removal on page 4 383 2 Loosen the two screws securing the belt tensioner bracket A to the fin...

Страница 915: ...isher 6 Remove the bracket D 7 Remove the two screws securing the stepper motor exit to the bracket D 8 Remove the stepper motor exit C Replacement notes The tension of the belt exit B is automatically adjusted by the force of the spring attached to the belt tensioner bracket A Tighten the two screws in the order shown A B C A Rear Second First Connector D C Connector ...

Страница 916: ...roperly installed as shown in the figure The paddles must not come in contact with the media eject unit assembly C Switch eject cover interlock removal 1 Remove the upper media bin assembly See Upper media bin assembly removal on page 4 425 2 Disconnect the connector from the switch eject cover interlock A 3 Release the harness from the two clamps 4 Remove the screw securing the bracket B to the f...

Страница 917: ...ates the switch media eject interlock A without binding Switch finisher front door interlock removal 1 Open the finisher front door assembly 2 Remove the rear upper cover See Rear upper cover removal on page 4 383 3 Remove the punch waste box A 4 Remove the three screws in the front securing the punch waste chute B 5 Gently pull down the punch waste chute B to gain better access to the switch fini...

Страница 918: ...uring the switch finisher front door interlock C to the finisher 8 Remove the switch finisher front door interlock C Top cover removal 1 Open the finisher front door assembly 2 Remove the rear upper cover See Rear upper cover removal on page 4 383 3 Remove the upper media bin assembly See Upper media bin assembly removal on page 4 425 B A C Connector ...

Страница 919: ...ur screws securing the top cover A to the finisher 5 Remove the top cover A Upper media bin assembly removal 1 Loosen the two screws securing the upper media bin assembly A to the finisher 2 Lift the upper media bin assembly A upward in the direction of the arrow A A Right ...

Страница 920: ...e Upper media bin assembly removal on page 4 425 3 Remove the two screws securing the upper media bin front cover A 4 Remove the upper media bin front cover A Upper media exit pinch roll assembly removal 1 Open the finisher front door assembly 2 Remove the rear upper cover See Rear upper cover removal on page 4 383 3 Remove the upper media bin assembly See Upper media bin assembly removal on page ...

Страница 921: ... upper cover removal on page 4 383 3 Remove the upper media bin assembly See Upper media bin assembly removal on page 4 425 4 Remove the top cover See Top cover removal on page 4 424 5 Remove the drive motor exit See Stepper motor exit assembly and belt exit removal on page 4 420 6 Disconnect the connector from the sensor upper media exit A 7 Release the harness from the clamps 8 Remove the two fr...

Страница 922: ...finisher 11 Remove the bracket C 12 Release the hook from the upper media exit roll drive gear 20T D 13 Remove the upper media exit roll drive gear 20T 14 Remove the 6 mm bushing 15 Use a prying tool to remove the e clip securing the upper media exit roll assembly F to the front of the finisher 16 Remove the 6 mm bushing E Rear Front B C ...

Страница 923: ...embly F do not touch the rubber surface Upper pinch guide assembly removal 1 Open the finisher front door assembly 2 Remove the rear upper cover See Rear upper cover removal on page 4 383 3 Remove the drive motor buffer transport See Stepper motor buffer transport and belt buffer transport removal on page 4 417 4 Remove the three screws securing the hinge of the upper pinch guide assembly A on the...

Страница 924: ...on page 4 378 7 Open the upper pinch guide assembly A toward the right 8 Remove the two screws securing the bracket B on the rear of the finisher 9 Move the bracket B slightly toward the exit side of the finisher Note It is not necessary to remove the bracket from the finisher it should only be slightly moved to provide better access to the two upper media transport roll assemblies C for removal 1...

Страница 925: ...ool remove the e clip securing the appropriate upper transport roll C to the front of the finisher 17 Remove the appropriate 6 mm bushing I 18 Move the appropriate upper transport roll C toward the front and outward 19 Remove the appropriate upper transport roll C Note When removing the upper transport roll C do not touch the rubber surface Replacement notes Make sure the flat spot on the upper tr...

Страница 926: ...ine so the HCF left cover faces down 3 Remove the three screws securing the HCF caster A to the unit 4 Remove the HCF caster A HCF controller card PCBA removal 1 Remove the HCF rear cover See HCF rear cover removal on page 4 444 2 Disconnect all connectors from the HCF controller card PCBA A 3 Remove the four screws securing the HCF controller card PCBA A to the unit A ...

Страница 927: ...he HCF feed lift motor See HCF feed lift motor removal on page 4 433 4 Remove the three screws securing the HCF feed lift gear bracket A to the media feed unit assembly B 5 Remove the HCF feed lift gear bracket A 6 Remove the gear lift gear 24T C from the HCF media feed unit assembly HCF feed lift motor removal 1 Remove the HCF media tray assembly See HCF media tray assembly removal on page 4 439 ...

Страница 928: ...oll assembly removal 1 Open the HCF top door 2 Open the HCF feed unit assembly 3 Push the two ends of the HCF feed roll assembly A inward and move it upward in the direction of the arrow to release it from the HCF media feed unit assembly B 4 Remove the HCF feed roll assembly A Note When removing the HCF feed roll assembly A do not touch the rubber surface Note Before re installing the HCF feed ro...

Страница 929: ...ws securing the media feed unit assembly A on the front side 3 Pull the media feed unit assembly A out of the machine in the direction of the arrow Note More force to remove the media feed unit A may be required due to the electrical connector inside the machine HCF left cover removal 1 Remove the five screws securing the HCF left cover A to the unit 2 Remove the HCF left cover A A Front Guide sha...

Страница 930: ...it from the tray 6 Move the tray lift shaft assembly B outward in the direction of the arrow 2 to remove it from the tray 7 Move the tray lift shaft pulley C inward in the direction of the arrow 3 to detach the rear cables D 8 Detach the rear cables D from the tray lift shaft assembly B 9 Remove the two e clips securing the small cable pulleys E on the top rear of the HCF media tray 10 Remove the ...

Страница 931: ...guides F and the two small pulleys E 20 Remove the e clip securing the large pulley G to the frame assembly 21 Remove the large guide H and the large pulley G 22 Remove the two front cables K from the bottom plate I Note Before re installing It is recommended that all four cables be replaced together When fitting the cables D and K ensure they are not twisted or kinked Route the cables properly as...

Страница 932: ...HCF media tray 4 Remove the media long edge guide assembly A Note With the media long edge guide assembly A removed the wave washer B becomes detached HCF media out actuator removal 1 Open the HCF top door 2 Open the HCF feed unit assembly 3 Remove the e clip securing the media out actuator A to the HCF media feed unit assembly B E clip B A ...

Страница 933: ... the media out actuator A HCF media tray assembly removal 1 Pull out the HCF media tray assembly A from the unit 2 Release the two bearing slides B by inserting a prying tool into the two holes while pulling the HCF media tray A from the frame assembly B A B E clip ...

Страница 934: ... unit Note Before re installing the HCF media tray A ensure the two bearing slides B are properly installed into the frame assembly Note Extra force is required to re install the HCF media tray A to the unit HCF media tray front cover removal 1 Pull out the HCF media tray 2 Remove the five screws securing the HCF media tray front cover A to the HCF media tray B A Hole A B Hole ...

Страница 935: ... C HCF media tray lift coupling assembly removal 1 Remove the HCF media tray assembly from the printer See HCF media tray assembly removal on page 4 439 2 Remove the HCF media feed unit assembly See HCF feed unit removal on page 4 435 3 Remove the HCF feed lift motor See HCF feed lift motor removal on page 4 433 4 Use a prying tool to remove the e clip securing the HCF tray lift coupling D to the ...

Страница 936: ... roll assembly A do not touch the rubber surface Note Before re installing the HCF pick roll assembly A do not touch the rubber surface HCF pick roll shaft assembly removal 1 Open the HCF top door 2 Open the HCF feed unit assembly 3 Remove the HCF pick roll assembly See HCF pick roll assembly removal on page 4 442 4 Use a prying tool to remove the e clip securing the HCF pick roll shaft assembly A...

Страница 937: ...Repair information 4 443 7558 xxx Go Back Previous Next 7 Remove the HCF pick roll shaft assembly A B D C E ring A Front ...

Страница 938: ...edia size L and the HCF sensor media size R 1 Remove the HCF media tray See HCF media tray assembly removal on page 4 439 2 Remove the HCF top cover See HCF top cover removal on page 4 449 3 Remove the HCF rear cover See HCF rear cover removal on page 4 444 4 Disconnect the connector from the sensor HCF media size R A or the sensor HCF media size L B 5 Release the hooks securing the sensor HCF med...

Страница 939: ...dia tray set removal 1 Pull out the HCF media tray 2 Remove the HCF left cover See HCF left cover removal on page 4 435 3 Remove the HCF rear cover See HCF rear cover removal on page 4 444 4 Disconnect the connector from the sensor HCF media tray set A 5 Release the hooks securing the sensor HCF media tray set A to the unit A B Front Connectors ...

Страница 940: ...out removal 1 Remove the HCF unit from the printer 2 Open the HCF top door assembly 3 Remove the two screws securing the bracket B to the unit 4 Remove the bracket B 5 Disconnect the connector from the sensor tray 5 feedout A 6 Release the hooks securing the sensor tray 5 feedout A to the bracket B A Front Connector ...

Страница 941: ...CF feed unit removal on page 4 435 3 Remove the HCF feed lift motor See HCF feed lift motor removal on page 4 433 4 Remove the HCF lift feed gear bracket See HCF feed lift gear bracket removal on page 4 433 5 Remove the shaft A from the HCF lift feed gear bracket B Note Bearing C may become detached 6 Use a prying tool to remove the e clip securing the separation gear 19 tooth D to shaft A 7 Remov...

Страница 942: ...ends of the HCF separation roll assembly A inward and move it upward in the direction of the arrow to release it from the HCF media feed unit assembly B 4 Remove the HCF separation roll assembly A Note When removing the HCF separation roll assembly A do not touch the rubber surface Note Before re installing the HCF separation roll assembly A do not touch the rubber surface E clip A B C D E F Front...

Страница 943: ...page 4 433 5 Remove the HCF separation roll assembly See HCF separation roll assembly removal on page 4 448 6 Remove the four screws securing the separation roll shaft assembly A to the media feed unit assembly B 7 Remove the separation roll shaft assembly A Note The HCF media feed unit assembly B becomes detached from the separation roll shaft assembly A at the hinge point Note Before re installi...

Страница 944: ...ssembly removal 1 Remove the HCF unit from the printer 2 Remove the HCF top cover See HCF top cover removal on page 4 449 3 Remove the HCF rear cover See HCF rear cover removal on page 4 444 4 Open the HCF top door assembly 5 Remove the two screws securing the bracket A to the frame assembly B B ...

Страница 945: ...ed to the top door assembly 7 Lift the HCF top door E and remove the shaft C from the hole in the frame assembly B 8 Remove the HCF top door spring L F from the slot in the frame assembly B 9 Remove the HCF top door assembly 10 Remove the shaft C 11 Remove the top door spring R D 12 Remove the top door spring L F D E A E C F Slot D shaped hole B F Rear view A D shaft ...

Страница 946: ...the connector from the HCF transport motor A 4 Release the harness from the clamp 5 Remove the three screws securing the HCF transport motor A to the unit 6 Remove the HCF transport motor A HCF transport roller kit removal 1 Remove the HCF unit from the printer 2 Use needle nose pliers to remove the e clip on the front side securing the HCF transport roller kit A to the unit A Harness clamp Connec...

Страница 947: ...Before re installing the HCF transport roller kit A do not touch the rubber surface HCF tray lift gear bracket removal 1 Remove the HCF media tray assembly See HCF media tray assembly removal on page 4 439 2 Remove the two e clips with a prying tool securing the plastic retainer A 3 Remove the plastic retainer A 4 Remove the media tray lift shaft gear 51T B 5 Remove the media tray lift gear 25 40 ...

Страница 948: ...moothly without binding If necessary loosen the three screws and adjust the HCF tray lift gear bracket D Sensor HCF docking interlock removal 1 Remove the HCF media tray 2 Disconnect the connector from the sensor HCF unit docking interlock A 3 Release the hooks securing the sensor HCF unit docking interlock A to the unit A B C D ...

Страница 949: ...emoval 1 Remove the HCF unit to the printer 2 Open the HCF top door assembly 3 Disconnect the connector from the sensor HCF top door interlock A 4 Remove the two screws securing the bracket B to the unit 5 Remove the bracket B 6 Release the hooks securing the sensor HCF top door interlock A to the bracket B Hook A Front Hook Connectors ...

Страница 950: ...door interlock A Sensor tray 5 media level removal 1 Open the HCF top door 2 Open the HCF feed unit assembly 3 Disconnect the connector from the sensor tray 5 media level A 4 Release the hooks securing the sensor tray 5 media level A from the HCF feed unit assembly B A B Connector ...

Страница 951: ...ray 5 media level A Sensor tray 5 media out removal 1 Open the HCF top door 2 Open the HCF feed unit assembly 3 Remove the connector from the sensor tray 5 media out A 4 Release the hooks securing the sensor tray 5 media out A to the HCF feed unit assembly B A B Front Connector ...

Страница 952: ...provide access Sensor tray 5 pre feed removal 1 Open the HCF top door 2 Open the HCF feed unit assembly 3 Remove the three screws securing the upper guide A to the HCF feed unit assembly B 4 Remove the upper guide A 5 Remove the connector from the sensor tray 5 pre feed C 6 Remove the one screw securing the sensor tray 5 pre feed C to the HCF feed unit assembly B A C Front B Connector ...

Страница 953: ...Repair information 4 459 7558 xxx Go Back Previous Next 7 Remove sensor tray 5 pre feed C A C B Connector ...

Страница 954: ... the barcode number located on the sensor ATC for all new developer housings to be installed Example 2 From the Diagnostics menu navigate to Engine Adjust ATC Sensor Adjust Values Enter the values recorded in step 1 to its applicable settings ATC SENSOR BARCODE_NO Y ATC SENSOR BARCODE_NO M ATC SENSOR BARCODE_NO C ATC SENSOR BARCODE_NO K Touch Submit to save the settings 3 Without exiting Diagnosti...

Страница 955: ...rom the compartment 1 in the media tray 1 Using the the same Coefficient and Offset NVM values taken from step 2 overwrite the following settings found on the birth certificate ATC Setup Coefficient for Y ATC Setup Coefficient for M ATC Setup Coefficient for C ATC Setup Coefficient for K ATC Setup Offset for Y ATC Setup Offset for M ATC Setup Offset for C ATC Setup Offset for K Return the birth ce...

Страница 956: ...et Value 00 1638 266 01 1462 181 02 1321 133 03 1204 56 04 1107 9 05 1024 31 06 952 66 07 890 96 08 835 123 09 787 146 10 1638 276 11 1462 190 12 1321 121 13 1204 63 14 1107 16 15 1024 25 16 952 60 17 890 91 18 835 118 19 787 141 20 1638 286 21 1462 199 22 1321 129 23 1204 71 24 1107 23 25 1024 19 26 952 54 27 890 85 28 835 112 29 787 136 30 1638 296 ...

Страница 957: ...132 40 1638 306 41 1462 217 42 1321 145 43 1204 85 44 1107 36 45 1024 6 46 952 43 47 890 74 48 835 102 49 787 127 50 1638 316 51 1462 225 52 1321 153 53 1204 93 54 1107 43 55 1024 0 56 952 37 57 890 69 58 835 97 59 787 122 60 1638 326 61 1462 234 ATC value conversion chart Barcode number last 2 digits ATC Setup Coefficient Value ATC Setup Offset Value ...

Страница 958: ...71 1462 243 72 1321 169 73 1204 107 74 1107 56 75 1024 12 76 952 26 77 890 58 78 835 87 79 787 112 80 1638 346 81 1462 252 82 1321 177 83 1204 114 84 1107 63 85 1024 19 86 952 20 87 890 53 88 835 82 89 787 108 90 1638 356 91 1462 261 92 1321 185 ATC value conversion chart Barcode number last 2 digits ATC Setup Coefficient Value ATC Setup Offset Value ...

Страница 959: ... 4 465 7558 xxx Go Back Previous Next 93 1204 122 94 1107 70 95 1024 25 96 952 14 97 890 47 98 835 77 99 787 103 ATC value conversion chart Barcode number last 2 digits ATC Setup Coefficient Value ATC Setup Offset Value ...

Страница 960: ...isher 3 Loosen the screw securing the end guide skew lever 4 Adjust the end guide skew lever by moving it either forward or rearward 1 step on the scale 1 mm shift 5 Once the adjustment is made tighten the screw Print a 2 sheet booklet using the booklet maker Do the booklet sheet edges appear skewed as shown in the graphic below Repeat step 2 until the end guide precision skew is in spec Problem s...

Страница 961: ...et fold staple position fine adjustment Step Check Yes No 1 Print a 2 sheet booklet using the booklet maker Does the booklet sheet edges appear overlapped as shown in the graphic below Go to step 2 The 2 sheet fold position fine adjustment is in spec Go to step 3 ...

Страница 962: ...red fold position value adjustments according to the media size as shown in the graphic below 1 step 1 mm shift Target amount to be adjusted is half the amount of the total Fold Misalignment 6 Touch Submit Print a 2 page booklet using the booklet maker Do the booklet sheet edges appear overlapped as shown in the graphic below Repeat step 2 until the 2 sheet fold position fine adjustment is in spec...

Страница 963: ...Next 3 Print a 2 sheet stapled booklet using the booklet maker Does the staple position fine adjustment appear to be offset from the fold as shown in the graphic below Go to step 4 The 2 sheet staple position fine adjustment is in spec Step Check Yes No ...

Страница 964: ...oklet fold adjust 4 Touch Booklet 2 sheet 5 Make required staple position adjustments according to media size 1 step 1 mm shift 6 Touch Submit Print a 2 page booklet using the booklet maker Does the staple position fine adjustment appear to be offset from the fold as shown in the graphic below Repeat step 2 until the 2 sheet staple position fine adjustment is in spec Problem solved Step Check Yes ...

Страница 965: ...osition fine adjustment Step Check Yes No 1 Print a 15 sheet stapled booklet using the booklet maker Does the staple position fine adjustment appear to be offset from the fold as shown in the graphic below Go to step 2 The 15 sheet staple position fine adjustment is in spec ...

Страница 966: ...klet fold adjust 4 Touch Booklet 15 sheet 5 Make required staple position adjustments according to media size 1 step 1 mm shift 6 Touch Submit Print a 15 page booklet using the booklet maker Does the staple position fine adjustment appear to be offset from the fold as shown in the graphic below Repeat step 2 until the 15 sheet staple position fine adjustment is in spec Problem solved Step Check Ye...

Страница 967: ...nt depending on the amount of sheets that compose the booklet and the size of the media Volume 1 3 sheets Volume 2 4 sheets Volume 3 5 7 sheets Volume 4 8 15 sheets S media B4 L B4 media or Print the appropriate booklet using the booklet maker Do the booklet sheet edges appear overlapped as shown in the graphic below Go to step 2 The booklet fold position fine adjustment is in spec ...

Страница 968: ... fine adj 5 Make required adjustments according to media size 1 step 1 mm shift Target amount to be adjusted is half the amount of the total Fold Misalignment 6 Touch Submit Enter the user mode and print the appropriate booklet using the booklet maker Do the booklet sheet edges appear overlapped as shown in the graphic below Repeat step 2 until the Booklet fold position fine adjustment is in spec ...

Страница 969: ...t is different depending on the amount of sheets that compose the booklet Volume 1 3 sheets Volume 2 4 sheets Volume 3 5 7 sheets Volume 4 8 14 sheets Print the appropriate booklet using the booklet maker Does the staple position fine adjustment appear to be offset from the fold as shown in the graphic below Go to step 2 The booklet staple position fine adjustment is in spec ...

Страница 970: ...j 5 Make required adjustments according to media size 1 step 1 mm shift Target amount to be adjusted is half the amount of the total Fold Misalignment 6 Touch Submit Enter user mode and print the appropriate booklet using the booklet maker Does the staple position fine adjustment appear to be offset from the fold as shown in the graphic below Repeat step 2 until the Booklet staple position fine ad...

Страница 971: ...Next 5 Connector locations Locations Configurations Base machine Callout Part name 1 Automatic Document Feeder ADF 2 ADF input tray 3 ADF exit bin 4 Printer control panel 5 Standard exit bin 6 Standard 520 sheet tray 7 Multipurpose feeder 1 2 3 4 5 6 7 ...

Страница 972: ...Exit tray 2 Note Exit tray 2 is applicable to any configurations except when a finisher is installed 2 Optional 520 sheet tray Tray 2 3 Optional 520 sheet tray Tray 2 4 Optional 520 sheet tray Tray 2 5 Optional 2 000 sheet tandem tray module 850 sheet tray Tray 3 1 150 sheet tray Tray 4 1 2 3 4 5 ...

Страница 973: ...k Previous Next Full configuration Callout Part name 1 Finisher bin The finisher bin can either be one of the following two options Standard finisher Punch Stapler Booklet finisher Punch Stapler Booklet 2 2 000 sheet high capacity feeder 1 2 ...

Страница 974: ...ine PCBA P J124 11 ATC sensor Y ATC sensor PCB P J125 14 ATC sensor M ATC sensor PCB P J126 15 ATC sensor C ATC sensor PCB P J127 16 ATC sensor K ATC sensor PCB P J210 9 Erase lamp Y Upper engine PCBA P J211 7 Erase lamp M Upper engine PCBA P J212 5 Erase lamp C Upper engine PCBA P J213 3 Erase lamp K Upper engine PCBA P J228 12 Front right cooling fan Lower engine PCBA P J238 2 Front left cooling...

Страница 975: ...ack Callout Plug jack description Connects to P J12 6 Main power switch LVPS PCBA P J13 3 Main power switch LVPS PCBA P J14 5 Main power switch LVPS PCBA P J15 4 Main power switch LVPS PCBA P J101 1 Sensor printer right front door interlock Lower engine PCBA P J615 2 Main power switch Upper engine PCBA ...

Страница 976: ... Y Upper engine PCBA P J121 3 Toner smart chip PCB M Upper engine PCBA P J122 2 Toner smart chip PCB C Upper engine PCBA P J123 1 Toner smart chip PCB K Upper engine PCBA P J232 7 N A N A P J236 6 Front upper cooling fan Upper engine PCBA P J619 5 Front upper cooling fan Upper engine PCBA P J236 6 P J123 1 P J122 2 P J121 3 P J120 4 P J232 7 P J236 6 P J619 5 ...

Страница 977: ...ects to P J150 2 Sensor image calibration Upper engine PCBA P J151 6 Sensor image calibration Upper engine PCBA P J153 5 Sensor image calibration Upper engine PCBA P J154 4 Sensor image calibration Upper engine PCBA P J182 3 Sensor image calibration Upper engine PCBA P J610 1 Sensor image calibration Upper engine PCBA ...

Страница 978: ...BA P J193 1 Fuser assembly Upper engine PCBA P J194 7 Fuser assembly Upper engine PCBA P J195 9 Fuser assembly Upper engine PCBA P J198 6 Fuser assembly Upper engine PCBA P J567 8 Fuser assembly Upper engine PCBA P600A DJ600A 3 Fuser assembly Upper engine PCBA P600B DJ600B 2 Fuser assembly Upper engine PCBA P600 4 Fuser assembly Upper engine PCBA ...

Страница 979: ...PCBA P J165 2 Upper redrive assembly Lower engine PCBA P J166 12 P J168 5 Upper redrive assembly Lower engine PCBA P J169 8 Upper redrive assembly Lower engine PCBA P J262 6 Upper redrive assembly Lower engine PCBA P J263 3 Upper redrive assembly Lower engine PCBA P J265 7 Upper redrive assembly Lower engine PCBA P J266 4 Upper redrive assembly Lower engine PCBA P J271 9 Lower redrive shift motor ...

Страница 980: ...P J217 7 Printer left duplex fan 2 Printer left duplex fan PCBA P J218 8 Printer left duplex fan 3 Printer left duplex fan PCBA P J275 10 Printer left duplex door assembly Lower engine PCBA P J280 2 Printer left duplex door assembly Lower engine PCBA P J450 4 Printer left duplex door assembly Lower engine PCBA P J453 6 Printer left duplex fan PCBA Printer left duplex fan 1 P J454 5 Printer left du...

Страница 981: ...r Lower engine PCBA P J177 7 Tray 1 media level sensor Lower engine PCBA P J178 6 Tray 1 media out sensor Lower engine PCBA P J253 14 Media transport MPF drive motor Lower engine PCBA P J260 3 Registration transport roller assembly Lower engine PCBA P J261 2 N A N A P J268 8 Media feed lift motor Lower engine PCBA P J611 9 Tray 1 media level sensor Lower engine PCBA P J618 11 Tray 1 pre feed senso...

Страница 982: ... to P J172 5 MPF tray feeder Lower engine PCBA P J173 3 MPF tray feeder Lower engine PCBA P J179 4 MPF tray feeder Lower engine PCBA P J183 6 MPF tray feeder Lower engine PCBA P J269 2 MPF tray feeder Lower engine PCBA P J616 1 MPF tray feeder Lower engine PCBA P J617 7 MPF tray feeder Lower engine PCBA ...

Страница 983: ... Charge roll HVPS PCBA P J414 13 Upper engine PCBA Transfer roll HVPS PCBA Fuser driver PCBA Upper exhaust fan P J415 5 Upper engine PCBA Sensor image calibration P J416 3 Upper engine PCBA Front door sensor Front left cooling fan Front upper cooling fan P J417 12 Upper engine PCBA Media size switch PCB 1st transfer retract clutch assembly Waste toner sensor guide Suction fan Charge roll HVPS cool...

Страница 984: ...smart chip socket ATC sensor PCB P J529 31 Lower engine PCBA Media transport MPF drive motor Toner dispense motor Waste toner agitator motor Center exhaust fan Fuser driver PCBA cooling fan LVPS sub cooling fan P J532 24 Lower engine PCBA Printhead interface contact P J534 22 Lower engine PCBA Sensor printer left duplex door interlock P J535 35 Lower engine PCBA Registration drive motor Fuser driv...

Страница 985: ... Plug jack description Connects to P J233 1 Bridge PCBA Controller cooling fan P J300 2 P J309 9 P J310 13 P J311 28 P J313 3 Bridge PCBA Controller cooling fan J316 7 P J321 24 J330 15 J331 16 J332 10 P J334 11 P J335 12 P J336 5 Bridge PCBA Scanner controller PCBA P J340 21 P J342 19 ...

Страница 986: ...0 25 P J351 22 P J352 23 P J384 14 J390 8 Bridge PCBA Scanner controller PCBA P J390 26 Bridge PCBA Scanner controller PCBA P451 J460 6 Bridge PCBA Upper engine PCBA P J1312 27 P J1343 4 Bridge PCBA Lower engine PCBA Plug Jack Callout Plug jack description Connects to ...

Страница 987: ... J243 7 Fuser motor Lower engine PCBA P J244 9 Registration drive motor Lower engine PCBA P J245 10 Registration drive motor Lower engine PCBA P J246 14 PC developer drive motor assembly Lower engine PCBA P J247 15 PC developer drive motor assembly Lower engine PCBA P J248 16 PC developer drive motor assembly Lower engine PCBA P J249 17 PC developer drive motor assembly Lower engine PCBA P J250 2 ...

Страница 988: ...558 xxx Go Back Previous Next Developer drive motor Plug Jack Callout Plug jack description Connects to P J74 2 P J75 1 P J251 4 PC developer drive motor Lower engine PCBA P J252 3 PC developer drive motor Lower engine PCBA ...

Страница 989: ... GFI interface LVPS PCBA P83 14 Main power GFI interface LVPS PCBA P85 12 Main power GFI interface LVPS PCBA P86 11 Main power GFI interface LVPS PCBA P87 13 Main power GFI interface LVPS PCBA P90 10 Main power GFI interface GND P J220 1 Toner dispense motor Lower engine PCBA P J221 4 Toner dispense motor Lower engine PCBA P J222 2 Toner dispense motor Lower engine PCBA P J223 3 Toner dispense mot...

Страница 990: ...gine PCBA P J553 7 Printhead interface contact Lower engine PCBA P J558 6 Printhead interface contact Upper engine PCBA P J559 6 Printhead interface contact Upper engine PCBA P J560 6 Printhead interface contact Upper engine PCBA P J561 6 Printhead interface contact Upper engine PCBA P J562 5 Printhead interface contact LED printhead P J563 5 Printhead interface contact LED printhead P J564 5 Prin...

Страница 991: ...rinthead interface contact P J573 3 LED printhead Printhead interface contact P J574 2 LED printhead Printhead interface contact P J575 2 LED printhead Printhead interface contact P J576 2 LED printhead Printhead interface contact P J577 2 LED printhead Printhead interface contact P J578 1 Printhead interface contact LED printhead P J579 1 Printhead interface contact LED printhead P J580 1 Printhe...

Страница 992: ... GFI interface P J6 11 LVPS PCBA Fuser driver PCBA Sub LVPS PCBA P J7 10 LVPS PCBA Main power GFI interface P J91 7 P J92 6 P J110 17 Waste toner sensor guide Upper engine PCBA P J111 16 Waste toner sensor guide Upper engine PCBA P J130 19 P J215 15 Waste toner agitator motor Lower engine PCBA P J235 14 Charge roll HVPS cooling fan Upper engine PCBA P J236 2 LVPS Fan P J239 21 LVPS sub cooling fan...

Страница 993: ...2 3 LVPS PCBA Lower engine PCBA P J503 5 LVPS PCBA Lower engine PCBA P J510 1 LVPS PCBA Lower engine PCBA P J513 20 Charge roll HVPS cooling fan Upper engine PCBA P J514 13 Developer HVPS PCBA Upper engine PCBA Plug Jack Callout Plug jack description Connects to ...

Страница 994: ...ller PCBA Sub LVPS PCBA P J722 2 Scanner controller PCBA Scanner carriage motor Sensor FB scanner HP Sensor ADF closed interlock P J723 7 Scanner controller PCBA LED exposure bar P J731 18 P J750 6 Scanner controller PCBA ADF controller PCBA P J771 13 Sensor FB platen length assembly Scanner controller PCBA P J772 12 P J773 14 Sensor FB scanner HP Scanner controller PCBA P J774 15 Sensor ADF angle...

Страница 995: ...ions 5 25 7558 xxx Go Back Previous Next P930 J71 20 P J931 19 P J932 16 P J7191 5 Scanner controller PCBA Bridge PCBA P J7192 4 Scanner controller PCBA Bridge PCBA Plug Jack Callout Plug jack description Connects to ...

Страница 996: ...roller PCBA ADF diverter gate solenoid ADF feed motor ADF registration motor ADF nip release solenoid P J755 9 P J756 3 ADF controller PCBA ADF document set LED Sensor document tray length 2 Sensor ADF document tray width 3 P J757 1 ADF controller PCBA Sensor ADF document set Sensor ADF feed out Sensor ADF registration P J758 2 ADF controller PCBA Sensor ADF scan width 1 Sensor ADF scan width 2 Se...

Страница 997: ...7558 xxx Go Back Previous Next P J772 6 Sensor ADF feed out ADF controller PCBA P J776 8 ADF feed motor ADF controller PCBA P J777 7 ADF registration motor ADF controller PCBA Plug Jack Callout Plug jack description Connects to ...

Страница 998: ...BA ADF diverter gate solenoid ADF feed motor ADF registration motor ADF nip release solenoid P J755 9 P J756 3 ADF controller PCBA ADF document set LED Sensor document tray length 2 Sensor ADF document tray width 3 P J757 1 ADF controller PCBA Sensor ADF document set Sensor ADF feed out Sensor ADF registration Sensor ADF pre registration P J758 2 ADF controller PCBA Sensor ADF scan width 1 Sensor ...

Страница 999: ...7558 xxx Go Back Previous Next P J772 6 Sensor ADF feed out ADF controller PCBA P J776 8 ADF feed motor ADF controller PCBA P J777 7 ADF registration motor ADF controller PCBA Plug Jack Callout Plug jack description Connects to ...

Страница 1000: ...J107 2 Tray 2 media level sensor Tray module controller PCBA P J108 4 Sensor tray module feed out Tray module controller PCBA P J110 3 Tray 3 media out sensor Tray module controller PCBA P J111 2 Tray 3 media level sensor Tray module controller PCBA P J112 10 Sensor tray module feed out Tray module controller PCBA P J114 3 Tray 4 media out sensor Tray module controller PCBA P J115 2 Tray 4 media l...

Страница 1001: ...rlock Tray module controller PCBA P J669 18 Tray 2 media level sensor Tray 2 media out sensor Tray module controller PCBA P J671 15 Tray 3 media level sensor Tray 3 media out sensor Tray module controller PCBA P J672 17 Sensor tray module feed out Tray module controller PCBA P J673 12 Tray 4 media level sensor Tray 4 media out sensor Tray module controller PCBA P J674 14 Sensor tray module feed ou...

Страница 1002: ...LVPS PCBA P J225 12 Upper exhaust fan Upper engine PCBA P J226 9 Fuser driver PCBA cooling fan Lower engine PCBA P J227 11 Front upper cooling fan Lower engine PCBA P J504 4 Sub LVPS PCBA Lower engine PCBA P J505 5 Sub LVPS PCBA Scanner controller PCBA P J506 2 Sub LVPS PCBA Lower engine PCBA P507 3 P J530 8 Fuser driver PCBA Upper engine PCBA P J634 10 Fuser assembly Fuser driver PCBA ...

Страница 1003: ... P J548 8 Tray module controller PCBA Tray 3 media level sensor Tray 3 media out sensor Tray 4 media level sensor Tray 4 media out sensor Sensor tray module feed out P J549 10 Tray module controller PCBA Media size switch PCB Tray 2 media level sensor Tray 2 media out sensor Sensor tray module feed out Sensor tray module left door interlock P J550 14 Tray module controller PCBA Media feed lift mot...

Страница 1004: ...5 34 Service Manual 7558 xxx Go Back Previous Next P J675 2 P J676 3 P904 15 Plug Jack Callout Plug jack description Connects to ...

Страница 1005: ...PCBA P J112 1 Sensor tray module feed out Tray module controller PCBA P J661 8 Media feed lift motor Tray module controller PCBA P J662 6 Media feed lift motor Tray module controller PCBA P J668 4 Sensor tray module left door interlock Tray module controller PCBA P J669 9 Tray 2 media level sensor Tray module controller PCBA P J671 5 Tray 3 media level sensor Tray module controller PCBA P J672 7 S...

Страница 1006: ...sor Tray module controller PCBA P J113 4 P J114 3 Tray 4 media out sensor Tray module controller PCBA P J115 2 Tray 4 media level sensor Tray module controller PCBA P J116 5 Sensor tray module feed out Tray module controller PCBA P J221 8 Media feed lift motor Tray module controller PCBA P J222 11 Media feed lift motor Tray module controller PCBA P J223 1 Media feed lift motor Tray module controll...

Страница 1007: ...M tray 2 3 4 media size sensor Plug Jack Callout Plug jack description Connects to P J101 1 Media size switch PCB Tray module controller PCBA P J102 3 Media size switch PCB Tray module controller PCBA P J103 2 Media size switch PCB Tray module controller PCBA ...

Страница 1008: ... finisher media entrance Finisher controller PCBA P J8321 3 Sensor upper media exit Finisher controller PCBA P J8322 4 Sensor upper media bin full Finisher controller PCBA P J8365 5 Sensor finisher front door interlock Eject cover interlock switch Finisher controller PCBA P J8432 2 Sensor diverter gate Finisher controller PCBA P J8652 1 ...

Страница 1009: ...ack description Connects to P J8320 1 Sensor lower media exit Finisher controller PCBA P J8340 2 Sub paddle solenoid Finisher controller PCBA P J8364 3 Eject cover interlock switch Finisher controller PCBA P J8392 4 Sensor buffer path Finisher controller PCBA 1 2 3 4 P J8320 P J8340 P J8364 P J8392 ...

Страница 1010: ...g Jack Callout Plug jack description Connects to P J8354 3 Complete stapler Finisher controller PCBA P J8356 1 Stapler unit assembly Finisher controller PCBA P J8357 4 Stapler unit assembly Finisher controller PCBA P J8358 2 Stapler transport motor Finisher controller PCBA ...

Страница 1011: ...Media compiler guide Finisher controller PCBA P J8361 1 Media compiler guide Finisher controller PCBA P J8362A 5 Media compiler guide Finisher controller PCBA P J8362B 5 Media compiler guide Finisher controller PCBA P J8363A 4 Media compiler guide Finisher controller PCBA P J8363B 4 Media compiler guide Finisher controller PCBA 1 2 3 5 4 P J8361 P J8359 P J8360 P J8362A P J8362B P J8363A P J8363B ...

Страница 1012: ...ler PCBA P J8347 7 Punch unit frame Finisher controller PCBA P J8348 1 Punch unit frame Finisher controller PCBA P J8350 5 Sensor punch unit side reg 1 Finisher controller PCBA P J8351 4 Sensor punch unit side reg 2 Finisher controller PCBA P J8352 2 Punch unit frame Finisher controller PCBA P J8353 6 Punch waste box bottle Finisher controller PCBA 1 2 3 4 5 6 7 8 P J8348 P J8352 P J8344 P J8351 P...

Страница 1013: ...ia eject shaft HP Finisher controller PCBA P J8328 21 Sensor stacker encoder Finisher controller PCBA P J8332 17 Punch unit motor Finisher controller PCBA P J8333 14 Finisher controller PCBA Punch unit frame Sensor punch unit side reg 1 Sensor punch unit motor encoder P J8334 5 Stepper motor Finisher controller PCBA P J8335 4 Stepper motor Finisher controller PCBA P J8339 P J8385A P J8385B P J8608...

Страница 1014: ...91A 27 Sensor lower media exit Finisher controller PCBA P J8391B 27 Sensor lower media exit Finisher controller PCBA P J8393A 28 Sensor upper media bin full Finisher controller PCBA P J8393B 28 Sensor upper media bin full Finisher controller PCBA P J8394 6 Buffer solenoid Finisher controller PCBA P J8409 9 Booklet gate solenoid Booklet controller card assembly P J8434A 7 Sensor diverter gate Finis...

Страница 1015: ...oller PCBA P J8326 4 Sensor stacker bin no media Finisher controller PCBA P J8327 3 Sensor stacker bin upper limit Finisher controller PCBA P J8330 1 Sensor stacker bin level F Finisher controller PCBA P J8331 2 Sensor stacker bin level R Finisher controller PCBA P J8371 6 Bridge PCBA Finisher controller PCBA P J8372 14 P J8373 15 P8390 16 P J8331 2 P J8327 3 4 P J8326 13 P J8500 14 P J8372 P J839...

Страница 1016: ...rler cam HP P8444 17 Bridge PCBA Sensor bridge top door interlock Bridge drive motor Sensor bridge media entrance Decurler clutch Sensor decurler cam HP P J8460 12 Booklet output tray Booklet controller card assembly P J8461A 7 Finisher controller PCBA Media compiler guide P J8461B 7 Finisher controller PCBA Media compiler guide P J8500 13 Plug Jack Callout Plug jack description Connects to ...

Страница 1017: ...ect shaft HP Sensor stacker bin level R Sensor stacker bin level encoder P J8304 1 Finisher controller PCBA Stepper motor Diverter solenoid Buffer diverter solenoid Clamp drive motor Media eject motor assembly P J8305 17 Finisher controller PCBA Stacker bin lift motor P J8306 4 Finisher controller PCBA Punch carriage shift motor Punch unit motor P J8304 1 P J8308 2 P J8389 3 P J8306 4 P J8307 5 P ...

Страница 1018: ...mpiler guide Sensor compiler media present Sensor front tamper HP Sensor rear tamper HP P J8310 8 Finisher controller PCBA Bridge PCBA P8311 14 P J8313 11 Finisher controller PCBA Eject cover interlock switch Sensor finisher front door interlock P J8314 10 Finisher controller PCBA Sensor finisher front door interlock P J8315 12 Finisher controller PCBA Finisher LVPS PCBA P J8316 9 Finisher control...

Страница 1019: ... drive motor Booklet controller card assembly P J8188 13 Booklet folding exit motor Booklet controller card assembly P J8190A 3 Booklet front tamper motor Booklet controller card assembly P J8190B 3 Booklet front tamper motor Booklet controller card assembly P J8191A 1 Booklet rear tamper motor Booklet controller card assembly P J8191B 1 Booklet rear tamper motor Booklet controller card assembly P...

Страница 1020: ... Booklet stapler unit assembly Booklet controller card assembly P8201 3 Booklet stapler unit assembly Booklet controller card assembly J8201 9 Booklet stapler unit assembly Booklet controller card assembly P8202 7 Booklet controller card assembly Booklet fold solenoid Sensor booklet knife HP Sensor booklet knife folding Booklet folding exit motor Sensor booklet media exit Sensor booklet media entr...

Страница 1021: ...motor Sensor booklet media exit Sensor booklet media entrance Sensor booklet rear tamper HP Sensor booklet front tamper HP Sensor booklet end guide HP J8203 7 Booklet controller card assembly Booklet stapler unit assembly P J8377 3 Booklet controller card assembly Finisher controller PCBA P J8378 2 Booklet controller card assembly Finisher controller PCBA Rear P J8411A P J8411B 1 P J8378 2 P J8377...

Страница 1022: ...klet folding exit motor Booklet rear tamper motor Booklet front tamper motor Booklet end guide drive motor Booklet paddle drive motor assembly Booklet stapler unit assembly P J8407 9 Booklet controller card assembly Booklet folding exit motor Booklet stapler unit assembly P J8408 8 Booklet controller card assembly Booklet output tray Booklet diverter gate solenoid P J8411A 1 Booklet controller car...

Страница 1023: ...k Previous Next Finisher booklet output tray Plug Jack Callout Plug jack description Connects to P J8217 1 Booklet output tray Booklet controller card assembly P J8218 2 Booklet output tray Booklet controller card assembly P J8217 1 P J8218 2 ...

Страница 1024: ...ridge Plug Jack Callout Plug jack description Connects to J8444 7 Bridge PCBA Bridge drive motor Sensor bridge media entrance Bridge decurler cam clutch Sensor bridge top door interlock Sensor decurler cam HP P J8653 8 Sensor bridge top door interlock Bridge PCBA ...

Страница 1025: ... Sensor tray 5 media level Sensor tray 5 pre feed PF JF58 1 HCF feed lift motor HCF controller card PCBA PF JF60 7 Sensor tray 5 media out HCF controller card PCBA PF JF61 5 Sensor tray 5 pre feed HCF controller card PCBA PF JF62 6 Sensor tray 5 media level HCF controller card PCBA PF JF67 4 Sensor tray 5 feed out HCF controller card PCBA FS001 3 Sensor HCF top door interlock HCF controller card P...

Страница 1026: ...er card PCBA Lower engine PCBA Upper engine PCBA PF JF04 7 HCF controller card PCBA Base printer PF JF05 8 HCF controller card PCBA Sensor HCF top door interlock PF JF06 9 HCF controller card PCBA HCF feed lift motor HCF transport motor PF JF08 3 HCF controller card PCBA Sensor HCF unit docking interlock PF JF51 2 HCF controller card PCBA Sensor HCF media size PF FJ52 1 HCF controller card PCBA Se...

Страница 1027: ...edia side guides Inspect Inspect Inspect Inspect Check for correct positioning Media end guide Inspect Inspect Inspect Inspect Check for correct positioning Separation pad Inspect Clean Clean Clean Damp cloth Tray lift gear assembly Inspect Inspect Inspect MEDIA FEEDERS ALL Feed roller Inspect Replace Replace Replace Verify page count before replacing Pick roller Inspect Replace Replace Replace Ve...

Страница 1028: ...an Blower brush DUPLEX Duplex media transport roll 2 Inspect Inspect Clean Water or alcohol FLATBED SCANNER Mirrors 3 Inspect Clean Clean Clean Glass cleaner Lens Inspect Clean Clean Clean Glass cleaner Small platen glass Clean Clean Clean Clean Glass cleaner Large platen glass Clean Clean Clean Clean Glass cleaner Lexmark X950 X952 X954 EVERY SERVICE CALL EVERY 200K NOTES ADF Feed pick roller ass...

Страница 1029: ...l P N 1280443 Approved equivalents Mobil DTE27 Shell Tellus 100 Fuchs Renolin MR30 IBM no 23 grease Approved equivalent Shell Darina 1 and grease P N 99A0394 to lubricate appropriate areas Use Nyogel type 774 to lubricate the Fuser Drive Assembly and Nyogel 744 to lubricate the ITU and Cartridge Drive assemblies ADF feedout roller Inspect Replace Water or alcohol ADF exit roller assembly Clean Wat...

Страница 1030: ... of the printer The replacement media feed roller kit can be located in the media tray 1 beneath the plastic cover as shown in the following image The parts are available as a maintenance kit with the following part numbers Kit Contents 40X7540 160K Maintenance Kit Transfer belt cleaner 2nd transfer roller Suction filter Media feed roller kit 12 40X7550 320K Maintenance Kit 110V Fuser 110V Transfe...

Страница 1031: ...ly 2 2 Turn on the printer 2 3 Release the buttons after 10 seconds The Configuration Menu appears on the LCD 3 Touch Reset Maintenance Counter from the Configuration Menu 4 From the options displayed select the maintenance kit to reset 5 Touch Yes to reset the maintenance counter value Touch No or Back to return to the previous menu The maintenance count resets to zero and the LCD returns to the ...

Страница 1032: ...he standard exit bin Warning Do not use household cleaners or detergents as they may damage the finish of the printer 5 Make sure the paper support and standard exit bin are dry before beginning a new print job Cleaning the scanner glass Clean the scanner glass if print quality problems such as streaks on copied or scanned images are encountered 1 Slightly dampen a soft lint free cloth or paper to...

Страница 1033: ...58 xxx Go Back Previous Next 3 Wipe the areas shown below and let them dry 4 Close the scanner cover Callout Description 1 White underside of the ADF cover 2 White underside of the scanner cover 3 Scanner glass 4 ADF glass 1 2 3 4 ...

Страница 1034: ...anual 7558 xxx Go Back Previous Next Cleaning the printhead lenses Clean the printhead lenses when you encounter print quality problems 1 Open the front door 2 Slide the release lever to the left to unlock the cover ...

Страница 1035: ...ntive maintenance 6 9 7558 xxx Go Back Previous Next 3 Open the cover Warning To avoid overexposing the photoconductor unit do not leave the cover open for more than 10 minutes 4 Locate the printhead wipers ...

Страница 1036: ...6 10 Service Manual 7558 xxx Go Back Previous Next 5 Gently pull the printhead wipers out until it stops and then slowly slide them back into place 6 Close the cover 3x 3x 3x ...

Страница 1037: ...Preventive maintenance 6 11 7558 xxx Go Back Previous Next 7 Slide the release lever to the right to lock the cover 8 Close the front door ...

Страница 1038: ...6 12 Service Manual 7558 xxx Go Back Previous Next ...

Страница 1039: ...FRU Refers to the number of units packaged together and identified by the part number NS Not shown in the Asm Index column indicates that the part is procurable but is not pictured in the illustration PP Parts Packet in the parts description column indicates the part is contained in a parts packet Model information used in the parts catalog Asm index Part number Units mach OR Units option Units FR...

Страница 1040: ...number Units mach Units FRU Description 1 1 40X6551 1 1 Scanner top cover 2 40X6550 1 1 Scanner right cover 3 40X6553 4 1 Scanner blind cover 4 40X6092 1 1 Scanner left cover 5 40X6554 1 1 Flatbed scanner assembly 6 40X6552 1 1 Scanner rear cover NS 40X7461 Rubber screw caps 1 2 3 3 4 3 3 6 5 ...

Страница 1041: ...glass Asm index Part number Units mach Units FRU Description 2 1 40X6711 1 1 Small platen rear retainer 2 40X2214 1 1 Small platen glass 3 40X6727 1 1 Small platen front retainer 4 40X6577 1 1 Large platen glass 5 40X6592 1 1 Large platen retainer Left Front 1 2 3 4 5 ...

Страница 1042: ...ion 3 1 40X6555 2 1 Sensor FB platen length assembly 2 40X6556 1 1 FB CCD sensor assembly 3 40X6768 1 1 Sensor ADF closed interlock 4 40X6557 1 1 Rear scanner ribbon cable 5 40X6558 1 1 ADF angle actuator 6 40X2223 1 1 Sensor ADF angle 7 40X6564 1 1 Authentication PCBA 8 40X7531 1 1 Front scanner ribbon cable 1 2 3 4 5 6 8 7 ...

Страница 1043: ...ck Previous Next Assembly 4 Carriage drive Asm index Part number Units mach Units FRU Description 4 1 40X6560 1 1 Sensor FB scanner HP 2 40X6559 1 1 Spring 3 40X3868 1 1 Scanner carriage motor 4 40X2226 1 1 Scanner drive belt 1 2 3 4 ...

Страница 1044: ... Scanner optics Asm index Part number Units mach Units FRU Description 5 1 40X6561 6 1 Mirror retainer clip 2 40X2232 2 1 Number 2 3 mirror 3 40X6563 1 1 LED exposure bar 4 40X6562 1 1 Exposure lamp flat cable 5 40X2234 1 1 Number 1 mirror 1 1 2 1 1 2 4 1 5 1 3 ...

Страница 1045: ...arts catalog 7 7 7558 xxx Go Back Previous Next Assembly 6 Scanner controller board Asm index Part number Units mach Units FRU Description 6 1 40X7559 1 1 Scanner controller PCBA 2 40X2217 2 1 Screw 1 2 ...

Страница 1046: ...scription 7 1 40X6989 1 1 Operator panel right cover MFP 2 40X6985 1 1 X950 model bezel 2 40X7900 1 1 X952 model bezel 2 40X7064 1 1 X954 model bezel 3 40X6987 1 1 Operator panel front cover MFP 3 40X7458 1 1 Operator panel front cover with slot MFP 4 40X6988 1 1 Operator panel left cover MFP 5 40X6986 1 1 Operator panel MFP 1 3 4 5 2 ...

Страница 1047: ...housing MFP 5 40X7097 1 1 Operator panel housing MFP 6 40X4602 1 1 Card reader assembly 3121 contact 6 40X4603 1 1 Card reader assembly 5121 contact RFID 6 40X4604 1 1 Card reader assembly 5125 contact HID 7 40X7331 1 5 MFP operator panel cable kit includes Cable front USB to operator panel PCBA Cable RIP PCBA to operator panel PCBA Cable RIP PCBA USB to operator panel PCBA Cable card reader to op...

Страница 1048: ...anual 7558 xxx Go Back Previous Next Assembly 9 Operator panel MFP Asm index Part number Units mach Units FRU Description 9 1 40X6999 1 1 Operator panel top cover MFP 2 40X9241 1 1 Control panel board and display kit ...

Страница 1049: ... Back Previous Next Assembly 10 Printhead 1 Asm index Part number Units mach Units FRU Description 10 1 40X6565 4 1 Printhead rear block 2 40X6566 4 1 LED printhead 3 40X6567 1 1 Printhead retract door 3 Right Front 1 1 1 1 2 2 2 2 ...

Страница 1050: ...nual 7558 xxx Go Back Previous Next Assembly 11 Printhead 2 Asm index Part number Units mach Units FRU Description 11 1 40X6569 4 1 Printhead interface contact 2 40X6568 1 1 Printhead flat data cable P Ri ghtRear 1 2 ...

Страница 1051: ...nits mach Units FRU Description 12 1 40X6574 1 1 Fuser drive lower redrive 1st BTR retract motor 2 40X6575 1 1 Gear 40T 23T belt 3 40X6572 1 1 Fuser drive release link 4 40X6573 1 1 Fuser release link spring 5 40X6570 1 1 Fuser drive release bracket 6 40X6571 1 1 Spring Lef t Fr ont 1 2 3 4 6 5 ...

Страница 1052: ...ual 7558 xxx Go Back Previous Next Assembly 13 Drive 2 Asm index Part number Units mach Units FRU Description 13 1 40X6584 1 1 1st transfer retract clutch assembly 2 40X6585 1 1 Registration drive motor Ri ghtRear 1 2 ...

Страница 1053: ...catalog 7 15 7558 xxx Go Back Previous Next Assembly 14 Drive 3 Asm index Part number Units mach Units FRU Description 14 1 40X6587 4 1 Coupler 2 40X6586 1 1 PC developer drive motor assembly Ri ghtRear 1 1 2 ...

Страница 1054: ...15 Cooling fans 1 Asm index Part number Units mach Units FRU Description 15 1 40X6588 1 1 Fuser cooling fan 2 40X6590 1 1 Fuser fan duct 3 40X6591 1 1 Fuser driver PCBA cooling fan 4 40X6589 1 1 LVPS sub cooling fan 5 40X6770 1 1 LVPS sub cooling duct 3 1 2 4 5 ...

Страница 1055: ...x Go Back Previous Next Assembly 16 Cooling fans 2 Asm index Part number Units mach Units FRU Description 16 1 40X6593 1 1 Front upper cooling fan 2 40X6595 1 1 Front right cooling fan 3 40X6594 1 1 Front left cooling fan 1 2 3 ...

Страница 1056: ...index Part number Units mach Units FRU Description 17 1 40X6599 1 1 Suction filter 2 40X6596 1 1 PC developer drive motor cooling fan 3 40X6771 1 1 Rear center duct 4 40X6597 1 1 Charge roll HVPS cooling fan 5 40X6598 1 1 Upper exhaust fan 6 40X6600 1 1 Center exhaust fan 6 5 4 3 2 1 ...

Страница 1057: ...nits mach Units FRU Description 18 1 40X6601 1 1 Toner dispense motor 2 40X6602 4 1 Toner smart chip PCB 3 40X6603 1 1 Y toner drop auger 4 40X6604 1 1 M toner drop auger 5 40X6605 1 1 C toner drop auger 6 40X6606 1 1 K toner drop auger 7 40X6607 1 1 CMYK toner dispense auger assembly 1 2 6 5 4 3 7 ...

Страница 1058: ...1 40X7332 4 1 Developer housing rear plunger 2 40X6614 1 1 ATC sensor PCB bracket 3 40X6613 1 1 ATC sensor PCB 4 40X6615 1 1 Developer housing 5 40X6609 1 1 K developer carrier 6 40X6610 1 1 C developer carrier 7 40X6612 1 1 Y developer carrier 8 40X6611 1 1 M developer carrier 9 40X6608 4 1 Developer bracket 1 2 3 9 6 7 5 8 4 4 4 4 ...

Страница 1059: ...Parts catalog 7 21 7558 xxx Go Back Previous Next Assembly 20 HVPS Asm index Part number Units mach Units FRU Description 20 1 40X6619 1 1 Developer HVPS PCBA 1 ...

Страница 1060: ... index Part number Units mach Units FRU Description 21 1 40X6623 1 1 Transfer belt cleaning assembly 2 40X6622 1 1 Transfer belt lever 3 40X6624 1 1 Transfer belt assembly 4 40X6620 1 1 Front transfer belt retaining bracket 5 40X6621 1 1 Rear transfer belt retaining bracket 1 2 3 5 4 ...

Страница 1061: ...r belt 2 Asm index Part number Units mach Units FRU Description 22 1 40X6625 1 1 Front transfer belt guide 2 40X6627 1 1 Rear transfer belt guide 3 40X6626 1 1 Belt removal actuator 4 40X7333 1st transfer conductor housing 5 40X6628 1 1 Transfer roll HVPS PCBA 1 2 3 5 4 ...

Страница 1062: ...user Asm index Part number Units mach Units FRU Description 23 1 40X7532 1 1 Fuser assembly 100V 1 40X6629 1 1 Fuser assembly 110V 1 40X6630 1 1 Fuser assembly 220V 2 40X6632 1 1 Fuser pressure roll retract gear 3 40X6631 1 1 Fuser pressure roll retract motor 1 2 3 ...

Страница 1063: ... FRU Description 24 1 40X6636 4 1 Erase lamp 2 40X6634 4 1 PC smart chip cover 3 40X6633 4 1 PC smart chip holder 4 40X6635 4 1 PC smart chip socket 5 40X6640 1 1 Torsion spring 6 40X6638 1 1 Belt lever lock 7 40X6639 1 1 Belt lock bracket 8 40X6641 1 1 Plate spring 9 40X6637 1 1 Inner plate 1 4 2 3 3 3 3 7 6 5 8 9 ...

Страница 1064: ... 2 40X6648 1 1 Actuator gear 3 40X0880 1 1 Plastic bushing 4 40X6643 1 1 Waste toner agitator motor 5 40X6646 1 1 Waste toner gear 31T 6 40X6645 1 1 Waste toner gear 29T 7 40X6647 1 1 Waste toner shaft gate 8 40X3820 Waste toner bottle present sensor 9 40X6650 1 1 Waste toner sensor guide 10 40X6642 1 1 Waste toner auger chute 11 40X6644 1 1 Waste toner gear bracket ...

Страница 1065: ...dia tray right roller 2 40X6654 1 1 Printer media tray 1 3 40X6655 1 1 Media tray compartment cover 4 40X0580 2 3 Media tray lift gear kit includes Tray lift coupling gear 13T Tray lift gear 13 60T Tray lift sector gear 12T 5 40X6652 1 1 Media tray left roller 6 40X6651 1 1 Media tray stop 7 40X7533 6 1 Media size switch PCB 1 5 6 7 Front Left 3 2 4 ...

Страница 1066: ...vice Manual 7558 xxx Go Back Previous Next Assembly 27 Media feed 2 Asm index Part number Units mach Units FRU Description 27 1 40X6656 1 1 Printer tray 1 media feeder 2 40X6657 1 1 Printer media turn guide 1 2 ...

Страница 1067: ...588 1 1 Tray 1 media out sensor 2 40X0588 1 1 Tray 2 media level sensor 2 40X0588 1 1 Tray 2 media out sensor 2 40X0588 1 1 Tray 3 media level sensor 2 40X0588 1 1 Tray 3 media out sensor 2 40X0588 1 1 Tray 4 media level sensor 2 40X0588 1 1 Tray 4 media out sensor 3 40X0587 8 1 Media out actuator 4 40X0589 2 1 Tray 1 pre feed sensor 5 40X6659 8 1 Feeder slide guide 6 40X6773 8 1 Feeder unit slide...

Страница 1068: ...ext Assembly 29 Media feed 4 Asm index Part number Units mach Units FRU Description 29 1 40X6660 8 1 Separation limiter clutch 2 40X6661 8 1 Separation spacer 3 40X6805 7 3 Pick roller kit includes Pick rollers Feed rollers Separation rollers 2 1 3 ...

Страница 1069: ...Units FRU Description 30 1 40X7533 6 1 Media size switch PCB 2 40X0580 2 3 Media tray lift gear kit includes Tray lift coupling gear 13T Tray lift gear 13 60T Tray lift sector gear 12T 3 40X6665 3 1 Tray module media tray 4 40X6662 3 1 Tray module media feeder 5 40X6663 3 1 Tray module tray 2 media turn guide 5 4 1 3 2 ...

Страница 1070: ...its FRU Description 31 1 40X6668 1 1 3TM 34T gear 2 40X6674 2 1 Tray module upper transport motor 3 40X6669 2 1 3TM TTM 39T gear 4 40X6670 1 1 Tray module lower transport motor 5 40X6673 1 1 3TM interface cable 6 40X6672 1 1 3TM motor cable 7 40X6671 1 1 3TM sensor cable 8 40X6667 3 1 Tray module controller PCBA 1 2 3 4 5 7 8 6 ...

Страница 1071: ... Back Previous Next Assembly 32 Tray module media transport 2 Asm index Part number Units mach Units FRU Description 32 1 40X3915 7 1 Bearing 2 40X6675 1 1 Sensor tray module feed out 3 40X6677 6 1 Tray module transport roller 3 1 2 ...

Страница 1072: ...revious Next Assembly 33 Tray module covers 1 Asm index Part number Units mach Units FRU Description 33 1 40X6678 1 1 3TM left door 2 40X6701 1 1 Tray module left door sensor cable 3 40X6700 2 1 Sensor tray module left door interlock 1 2 3 ...

Страница 1073: ... 4 40X6690 3 1 Tray module left cover 5 40X6685 6 1 1TM TTM 3TM locking caster 6 40X6583 12 1 1TM TTM 3TM caster screw 7 40X6681 3 1 1TM TTM 3TM foot side cover 8 40X6680 6 1 1TM TTM 3TM adjuster foot 9 40X6686 6 1 1TM TTM 3TM non locking caster 10 40X6682 3 1 1TM TTM 3TM foot rear cover 11 40X6687 3 1 Tray module rear cover 12 40X6691 3 1 Tray module right cover 13 40X6684 3 1 1TM TTM 3TM docking...

Страница 1074: ...5 1 40X6665 3 1 Tray module media tray 2 40X6698 1 1 TTM tray 4 media tray 3 40X6693 1 1 TTM tray 4 media tray cover 4 40X6694 1 1 TTM tray 3 media tray 5 40X6695 1 1 TTM tray 3 media tray cover 6 40X0580 2 3 Media tray lift gear kit includes Tray lift coupling gear 13T Tray lift gear 13 60T Tray lift sector gear 12T 2 3 4 5 1 6 ...

Страница 1075: ...Description 36 1 40X6696 1 1 TTM tray 4 media feeder 2 40X6834 1 1 TTM tray 4 feeder lower guide 3 40X0727 1 1 Sensor TTM tray 4 feedout 4 40X6871 1 1 TTM tray 4 feeder upper guide 5 40X6883 1 1 TTM tray 4 feeder sensor cable 6 40X6896 1 1 TTM tray 4 feeder motor cable 7 40X6697 1 1 TTM tray 4 media transport 7 1 2 3 4 5 6 ...

Страница 1076: ...7 38 Service Manual 7558 xxx Go Back Previous Next Assembly 37 TTM media feed 2 ...

Страница 1077: ...TTM tray 2 feed out 2 40X7334 1 1 TTM Tray 2 feed out guide 3 40X3915 7 1 Bearing 4 40X7341 1 1 TTM tray 4 media turn guide 5 40X7340 1 1 TTM tray 3 feeder 6 40X6699 1 1 TTM tray 3 media turn guide 7 40X6663 3 1 1TM 3TM TTM media turn guide 8 40X6662 3 1 3TM TTM media feeder 9 40X6677 6 1 Tray module transport roller 10 40X6676 1 1 Sensor Tray module feedout ...

Страница 1078: ...ck Previous Next Assembly 38 TTM left door Asm index Part number Units mach Units FRU Description 38 1 40X6702 1 1 TTM left door 2 40X6701 1 1 Tray module left door sensor cable 3 40X6700 2 1 Sensor tray module left door interlock 2 3 1 ...

Страница 1079: ...art number Units mach Units FRU Description 39 1 40X7342 1 1 TTM tray spacer 2 40X7344 4 1 TTM tray side roller 3 40X7347 1 1 TTM tray 4 lock 4 40X7343 4 1 TTM tray 3 4 tray roller 5 40X7348 2 1 TTM tray 3 4 stopper 6 40X7346 1 1 TTM tray 3 lock 7 40X7345 1 1 TTM upper stopper 1 3 4 2 6 7 5 ...

Страница 1080: ...sm index Part number Units mach Units FRU Description 40 1 40X7350 2 1 TTM gear 17T 50T 2 40X7351 2 1 TTM gear 16T 48T 3 40X7352 1 1 TTM gear 57T 4 40X7533 6 1 Media size switch PCB 5 40X7349 2 1 Sensor TTM media size 6 40X7353 2 1 Coupler 7 40X7354 1 TTM gear 51T 1 3 5 7 2 4 6 ...

Страница 1081: ...0X6704 1 1 TTM upper transport motor 2 40X7355 1 1 TTM gear 52T 3 40X7361 1 1 TTM tension bracket 4 40X7357 1 1 TTM drive gear 5 40X7359 1 1 TTM drive belt 6 40X7358 1 1 TTM idler pulley 7 40X7356 1 1 TTM drive flange 8 40X6703 1 1 TTM lower transport motor 9 40X7360 1 1 Spring 10 40X7363 1 1 TTM tray 4 drive gear 1 2 9 5 6 10 8 7 3 4 ...

Страница 1082: ...Previous Next Assembly 42 TTM cables Asm index Part number Units mach Units FRU Description 42 1 40X7366 1 1 TTM interface cable 2 40X7364 1 1 TTM sensor cable 3 40X7365 1 1 TTM motor cable 4 40X6667 3 1 1TM 3TM TTM controller PCBA 1 2 3 4 ...

Страница 1083: ...dule left cover 4 40X6685 6 1 1TM TTM 3TM locking caster 5 40X6583 12 1 1TM TTM 3TM caster screw 6 40X6681 3 1 1TM TTM 3TM foot side cover 7 40X6686 6 1 1TM TTM 3TM non locking caster 8 40X6680 6 1 1TM TTM 3TM adjuster foot 9 40X6682 3 1 1TM TTM 3TM foot rear cover 10 40X6687 3 1 Tray module rear cover 11 40X6691 3 1 Tray module right cover 12 40X6684 3 1 1TM TTM 3TM docking bracket 2 1 3 6 5 8 9 ...

Страница 1084: ...7 46 Service Manual 7558 xxx Go Back Previous Next Assembly 44 1TM front cover Asm index Part number Units mach Units FRU Description 44 1 40X7367 1 1 1TM front cover 51201LEX 1 ...

Страница 1085: ...index Part number Units mach Units FRU Description 45 1 40X6668 1 1 3TM 34T gear 2 40X6674 2 1 Tray module upper transport motor 3 40X7370 1 1 1TM interface cable 4 40X7369 1 1 1TM motor cable 5 40X7368 1 1 1TTM sensor cable 6 40X6667 3 1 1TM 3TM TTM controller PCBA 3 4 5 1 2 6 ...

Страница 1086: ...7 48 Service Manual 7558 xxx Go Back Previous Next Assembly 46 1TM left door Asm index Part number Units mach Units FRU Description 46 1 40X7371 1 1 1TM left door 1 ...

Страница 1087: ...X6690 3 1 Tray module left cover 5 40X6685 6 1 1TM TTM 3TM locking caster 6 40X6583 12 1 1TM TTM 3TM caster screw 7 40X6681 3 1 1TM TTM 3TM foot side cover 8 40X6680 6 1 1TM TTM 3TM adjuster foot 9 40X6686 6 1 1TM TTM 3TM non locking caster 10 40X6682 3 1 1TM TTM 3TM foot rear cover 11 40X6687 3 1 Tray module rear cover 12 40X6691 3 1 Tray module right cover 13 40X6684 3 1 1TM TTM 3TM docking brac...

Страница 1088: ...8 MPF Asm index Part number Units mach Units FRU Description 48 1 40X6707 1 1 MPF tray feeder 2 40X6708 1 1 MPF top cover 3 40X6709 1 1 MPF media present actuator 4 40X7534 1 1 MPF roller kit includes MPF pick roller MPF feed roller MPF separation roller 3 2 1 4 ...

Страница 1089: ...xx Go Back Previous Next Assembly 49 Printer left duplex door Asm index Part number Units mach Units FRU Description 49 1 40X7372 1 1 Printer left duplex door assembly 2 40X6710 1 1 Sensor printer left duplex door interlock 2 1 ...

Страница 1090: ... Service Manual 7558 xxx Go Back Previous Next Assembly 50 2nd transfer roller Asm index Part number Units mach Units FRU Description 50 1 40X3703 Sensor media on belt 2 40X6712 1 1 2nd transfer roller 2 1 ...

Страница 1091: ...Units mach Units FRU Description 51 1 40X6716 1 1 Media transport MPF drive motor 2 40X6718 1 1 Transport 29T gear 3 40X6717 1 1 Rear bushing 4 40X6719 1 1 Transport 60T gear 5 40X6713 1 1 Registration 40T gear 6 40X6714 1 1 Front bushing 7 40X6715 1 1 Registration transport roller assembly 6 5 4 2 1 3 7 ...

Страница 1092: ...52 1 40X8361 1 1 Media bail upper internal bin 2 40X6723 1 1 Upper redrive assembly 3 40X6722 1 1 Media bail standard bin 4 40X6724 1 1 Lower redrive guard 5 40X6721 1 1 Lower redrive front bushing 6 40X7373 1 1 Plastic motor cover 7 40X6720 1 1 Lower redrive 19T gear 8 40X0588 17 1 Sensor lower redrive shift HP 6 5 4 8 7 3 1 2 ...

Страница 1093: ...g 7 55 7558 xxx Go Back Previous Next Assembly 53 Redrive 2 Asm index Part number Units mach Units FRU Description 53 1 40X7472 1 1 Lower redrive shaft assembly 2 40X6725 1 1 Lower redrive shift motor assembly 1 2 ...

Страница 1094: ...7 56 Service Manual 7558 xxx Go Back Previous Next Assembly 54 Scanner interface cable Asm index Part number Units mach Units FRU Description 54 1 40X7468 1 1 Scanner interface cable 1 ...

Страница 1095: ...2 1 1 HCF interface contact 5 40X6730 1 1 Upper printer engine PCBA Warning Upon replacement ensure that the NVM EPROM is removed from the defective PCBA and installed to the new PCBA or damage to the machine may occur For more details go to Upper engine PCBA reinstallation on page 4 191 6 40X6731 1 1 Lower engine PCBA 7 40X6091 1 1 NVRAM card 8 40X7500 1 1 RIP card PCBA MFP 9 40X6726 1 1 Bridge P...

Страница 1096: ...s mach Units FRU Description 56 1 40X6736 1 1 Fuser power contact 110V 1 40X7376 1 1 Fuser power contact 220V 2 40X6735 1 1 Fuser driver PCBA 110V 2 40X7375 1 1 Fuser driver PCBA 220V 3 40X6737 1 1 Sub LVPS PCBA 4 40X6734 1 1 Main power GFI interface 110V 4 40X7374 Main power GFI interface 220V 2 1 3 4 ...

Страница 1097: ...ndex Part number Units mach Units FRU Description 57 1 40X6739 1 1 LVPS front fan guide 2 40X6762 1 1 LVPS PCBA 3 40X6738 1 1 Main power switch 4 40X6710 1 1 Sensor printer right front door interlock 5 40X6740 1 1 Sensor Image calibration 6 40X6761 1 1 Front door sensor 6 4 5 1 2 3 ...

Страница 1098: ...7 60 Service Manual 7558 xxx Go Back Previous Next Assembly 58 Electrical 4 Asm index Part number Units mach Units FRU Description 58 1 40X6763 1 1 Charge roll HVPS PCBA 1 ...

Страница 1099: ...xt Assembly 59 Base wiring cables Asm index Part number Units mach Units FRU Description 59 1 40X6766 1 1 Base wiring top cable 2 40X6764 1 1 Base left wiring cable 3 40X6765 1 1 Base right wiring cable 4 40X6767 1 1 Base wiring bottom cable 1 2 3 4 ...

Страница 1100: ...vious Next Assembly 60 Printer covers 1 Asm index Part number Units mach Units FRU Description 60 1 40X7377 2 1 Magnetic catch 2 40X7381 1 1 Inner cover 3 40X7378 2 1 Printer front door support strap 4 40X7379 1 1 Printer front door 1 2 3 4 3 ...

Страница 1101: ...h Units FRU Description 61 1 40X6772 1 1 Standard bin insert 2 40X6774 1 1 Printer top cover 3 40X6779 1 1 Internal top cover MFP 4 40X6777 1 1 Left upper cover MFP 5 40X6776 1 1 Left rear lower cover 6 40X6775 1 1 Left rear upper cover MFP 7 40X7764 1 1 Upper internal bin 8 40X6780 1 1 Internal rear cover MFP ...

Страница 1102: ...U Description 62 1 40X6784 1 1 Filter cover MFP 2 40X6783 1 1 Rear upper cover MFP 3 40X7535 1 1 Rear lower cover 4 40X6785 1 1 Input tray interface cover 5 40X7387 1 1 EPSV cover 6 40X6786 1 1 Controller box cover MFP 7 40X6787 1 1 Cable interface door 8 40X6782 1 1 Right rear cover MFP 9 40X6781 1 1 Printer right cover ...

Страница 1103: ...idge top door assembly 3 40X6836 1 1 Bridge decurler top cover 4 40X6833 1 1 Bridge decurler rear cover 5 40X7405 1 1 Connector cover 6 40X6830 1 1 Bridge unit small belt 7 40X6835 1 1 Bridge decurler right cover 8 40X6837 1 1 Bridge interface cable 9 40X6829 1 1 Bridge media exit transport 10 40X6827 1 1 Clutch knob 11 40X6831 1 1 Bridge front cover 3 4 5 6 7 8 11 9 10 12 13 14 2 1 ...

Страница 1104: ...s Next Assembly 63 continued Finisher bridge unit Asm index Part number Units mach Units FRU Description 12 40X7404 1 1 Bridge unit base assembly 13 40X6828 1 1 Bridge entry guide 14 40X6832 1 1 Bridge rear cover 3 4 5 6 7 8 11 9 10 12 13 14 2 1 ...

Страница 1105: ...558 xxx Go Back Previous Next Assembly 64 Finisher bridge top door assembly Asm index Part number Units mach Units FRU Description 64 1 40X0918 6 1 Upper media exit pinch roll 2 40X6839 4 1 Bridge unit top door spring 2 1 ...

Страница 1106: ...0X6845 1 1 Recoil spring 4 40X6840 1 1 Bridge idler pulley 5 40X3963 2 1 Retainer 6 40X3962 2 1 Torque limiter 7 40X6841 1 1 Bridge drive pulley 8 40X7408 1 1 Bridge large drive belt 9 40X6842 3 1 Bridge drive pulley 10 40X7406 3 1 Bushing 11 40X0880 3 1 Plastic bushing 12 40X7409 1 1 Power switch cover 13 40X6843 1 1 Sensor bridge media entrance 14 40X0824 2 1 Magnetic catch 14 1 4 5 6 9 7 8 10 1...

Страница 1107: ...40X6847 1 1 Bridge decurler cam 2 40X6848 1 1 Bridge decurler cam clutch 3 40X3917 1 1 Sensor flag 4 40X0825 3 1 A Sensor decurler cam HP B Sensor decurler cover interlock 5 40X1388 1 1 Bearing 6 40X6111 1 1 Bridge one way gear 7 40X6850 1 1 Bridge gear 18T 8 40X6851 1 1 Bridge gear 16T 9 40X6849 1 1 Bridge knob gear 18T 1 9 8 7 6 2 3 5 B A 4 ...

Страница 1108: ... 18T 3 40X6858 1 1 Bridge gear 24T 20T 4 40X7413 1 1 Bridge upper drive belt 5 40X7410 1 1 Bridge drive retainer 6 40X6853 2 1 Bridge decurler arm 7 40X1388 2 1 Bushing 8 40X6856 1 1 Bridge gear 16T 9 40X6852 1 1 Bridge gear 36T 18T 10 40X6860 1 1 Bridge drive motor 11 40X7412 1 1 Bridge lower drive belt 12 40X6857 1 1 Bridge gear 18T 36T 13 40X6855 1 1 Sensor bridge media exit 1 3 4 5 6 7 8 9 10 ...

Страница 1109: ...nits mach Units FRU Description 68 1 40X7415 1 1 Finisher front door assembly 2 40X7414 1 1 Upper media bin front cover 3 40X0840 1 1 Sensor finisher front door interlock 4 40X7470 1 1 Spring 5 40X3932 1 1 Finisher dock plate 6 40X7475 1 1 Finisher grounding plate 7 40X7474 2 1 Finisher docking bracket 1 2 3 5 4 6 7 ...

Страница 1110: ...2 40X7476 1 1 Upper media bin 3 40X7416 1 1 Right eject cover 4 40X7465 1 1 Stacker media bin 5 40X7417 1 1 Finisher bottom cover 6 40X4405 1 1 Adjustable caster 7 40X6664 1 1 Non adjusting caster 8 40X7418 1 1 Finisher rear lower cover 9 40X7405 1 1 Connector cover 10 40X6864 1 1 Finisher rear upper cover 11 40X7420 1 1 Finisher left upper cover 1 2 3 4 5 6 7 8 10 11 9 ...

Страница 1111: ... assembly 2 40X4040 1 1 Finisher left lift carriage assembly 3 40X8663 2 1 Sensor stacker bin level F 3 40X8663 2 1 Sensor stacker bin level R 4 40X0849 5 1 Stacker slip clutch pulley kit includes Pulley 18T 3 Slip clutch pulley 18T Slip clutch gear 24T Spring Washer 5 40X0852 1 1 Bearing 6 40X0850 3 1 Sensor stacker bin level encoder 7 40X7477 1 1 Stacker bin lift motor 1 2 4 3 5 6 7 ...

Страница 1112: ...7 74 Service Manual 7558 xxx Go Back Previous Next Assembly 71 Finisher punch 8 4 3 10 11 ...

Страница 1113: ...eg 2 3 40X0862 1 1 Punch waste box 4 40X7537 1 1 Punch waste box bottle 5 40X0859 1 1 Punch unit stopper 6 40X7438 1 1 Sensor punch unit motor encoder 7 40X3943 1 1 Punch unit motor 8 40X6865 1 1 3 hole punch unit assembly 8 40X3937 1 1 2 hole punch unit assembly 8 40X7536 1 1 4 hole punch unit assembly 9 40X0857 1 1 2 3 punch hammer sub assembly 9 40X0858 1 1 2 4 punch hammer sub assembly 10 40X7...

Страница 1114: ...h Units FRU Description 72 1 40X7561 1 1 Complete stapler 2 40X6867 1 1 Stapler harness 3 40X4050 1 1 Stapler carriage 4 40X7339 1 1 Stapler transport motor 5 40X0872 1 1 Stapler carriage rack gear 6 40X7423 1 1 Stapler unit cover 7 40X0866 1 1 Staple cartridge 8 40X0867 1 1 Stapler unit assembly 2 8 7 5 6 3 4 1 ...

Страница 1115: ... 40X0882 1 1 Eject cover interlock switch 4 40X7746 1 1 Knob 5 40X0888 5 1 Bushing 6 40X6868 2 1 Gear 23T 7 40X0877 1 1 Eject clamp lever assembly 8 40X6869 1 1 Cam pulley 9 40X6870 1 1 Drive pulley 10 40X7362 1 1 Paddle shaft 11 40X7425 1 1 Clamp drive belt 12 40X7426 1 1 Clamp drive motor 13 40X4147 1 1 Spring 14 40X0874 1 1 Sub paddle 15 40X4120 1 1 Sub paddle solenoid 1 13 14 15 2 9 11 10 8 6 ...

Страница 1116: ... compiler guide 2 40X6881 1 1 Eject shaft paddle 3 40X6880 1 1 Eject shaft roll 4 40X1388 1 1 Bearing 5 40X0888 5 1 Bushing 6 40X0889 1 1 Media eject gear 7 40X4062 2 1 Media eject clamp clutch 8 40X6884 1 1 Eject shaft actuator 9 40X0825 3 1 Sensor media eject shaft HP 9 40X0825 3 1 Sensor media eject clamp HP 10 40X6885 1 1 Eject shaft roll motor 1 2 8 7 6 10 3 4 4 9 5 5 ...

Страница 1117: ...rive pulley gear 44 20T 5 40X3959 1 1 Gear 23T 6 40X0898 2 1 Lower exit roll drive pulley kit includes lower exit roll drive pulley 20T idler pulley 20T 7 40X4066 1 1 Gear 23T 8 40X0913 2 1 Ball bearing 6mm 9 40X4128 1 1 Idler pulley 10 40X4106 1 1 Main paddle shaft drive pulley 17T 11 40X6887 1 1 Main paddle shaft 12 40X6890 1 1 Lower exit pinch roll 13 40X7427 1 1 Lower exit sensor cable 14 40X0...

Страница 1118: ...upper exit nip roll 3 40X0893 2 1 Sensor upper media exit 4 40X6892 1 1 Upper exit sensor cable 5 40X0926 1 1 Upper media transport roll drive pulley gear 20 20T 6 40X0927 1 1 Upper media exit roll drive gear 20T 7 40X7429 1 1 Finisher upper bin vertical cover 8 40X0908 1 1 Sensor upper media bin full 9 40X7428 1 1 Upper bin full sensor cable 10 40X6891 1 1 Upper media exit roll 1 2 4 10 5 6 8 9 7...

Страница 1119: ...diverter gate 3 40X0893 2 1 Sensor buffer path 4 40X7430 1 1 Buffer path sensor cable 5 40X0905 1 1 Buffer roll 6 40X6875 1 1 Buffer pinch guide assembly 7 40X0909 1 1 Finisher media entrance roll 8 40X7478 1 1 Finisher entrance sensor cable 9 40X0908 1 1 Sensor finisher media entrance 10 40X6895 1 1 Media entrance pinch guide 11 40X0910 1 1 Stepper motor 1 2 21 23 20 22 15 19 17 16 13 14 12 11 9 ...

Страница 1120: ... 1 Bushing 14 40X0911 1 1 Belt entrance paddle 31 6 cm 15 40X6897 1 1 Diverter solenoid 16 40X0914 1 1 Media entrance roll drive pulley 20T 17 40X0913 2 1 Ball bearing 6 mm 18 40X0888 5 1 Bushing 19 40X0915 1 1 Buffer roll drive gear 46T 20 40X4083 1 1 Diverter solenoid link 21 40X7522 1 1 Finisher diverter gate 22 40X4070 1 1 Buffer solenoid link 23 40X6898 1 1 Buffer solenoid 1 2 21 23 20 22 15 ...

Страница 1121: ...r motor 2 40X0925 1 1 Upper media transport roll drive pulley 20T 3 40X0888 5 1 Bushing 4 40X6900 1 1 Upper pinch guide 5 40X0921 1 1 Sensor diverter gate 6 40X7480 1 1 Diverter gate sensor cable 7 40X6901 1 1 Upper transport roll 8 40X0924 1 1 Buffer roll drive pulley gear 53 23T 9 40X0928 1 1 Belt buffer transport 19 8 cm 10 40X0929 1 1 Belt exit 27 7 cm 10 9 2 6 5 7 8 4 1 3 3 3 ...

Страница 1122: ...e PCBA 2 40X3970 1 1 Bridge unit connect cable assembly 3 40X0933 1 1 Bridge interface card cable 4 40X6902 1 1 Finisher controller PCBA 5 40X4412 1 1 Finisher interface cable 6 40X7481 1 1 Booklet controller card assembly 7 40X6904 1 1 Finisher AC filter PCBA 8 40X0935 1 1 Finisher power cable 9 40X7521 1 1 Finisher LVPS PCBA 10 40X7431 1 1 Finisher LVPS cable ...

Страница 1123: ...bly 80 Finisher cables Asm index Part number Units mach Units FRU Description 80 1 40X6906 1 1 Finisher motor cable 2 40X6907 1 1 Punch drive motor 3 40X6909 1 1 Interlock cable 4 40X6908 1 1 Punch sensor cable 5 40X6905 1 1 Finisher sensor cable 3 1 2 4 5 ...

Страница 1124: ...558 xxx Go Back Previous Next Assembly 81 Booklet maker 1 Asm index Part number Units mach Units FRU Description 81 1 40X7479 1 1 Booklet diverter gate 2 40X6899 1 1 Booklet path roll 3 40X7519 1 1 Booklet pinch guide 1 3 2 ...

Страница 1125: ...t output tray 2 40X7482 1 1 Booklet right glide 3 40X6915 1 1 Booklet unit chassis 4 40X7483 1 1 Booklet left glide 5 40X3988 1 1 Booklet unit catch 6 40X6913 1 1 Booklet unit cable 7 40X6912 1 1 Booklet diverter cable 8 40X6911 1 1 Booklet controller power cable 9 40X6914 1 1 Booklet unit interface contact 10 40X3987 1 1 Booklet bin hookup cable assembly ...

Страница 1126: ...let maker 3 Asm index Part number Units mach Units FRU Description 83 1 40X7486 1 1 Booklet stapler unit assembly 2 40X7488 1 1 Pulley 3 40X7485 1 1 Booklet knob 4 40X7484 1 1 Belt flange 5 40X7432 1 1 Booklet front drive belt 6 40X6916 1 1 Booklet gear 31T 1 2 6 5 4 3 ...

Страница 1127: ...ber Units mach Units FRU Description 84 1 40X0825 3 1 Sensor booklet end guide HP 2 40X7489 1 1 Booklet end guide drive motor 3 40X3993 1 1 Gear pulley 40 20T 4 40X3994 1 1 Booklet end guide drive belt 5 40X6917 1 1 Booklet paddle roll 6 40X7490 1 1 Booklet paddle drive motor assembly 5 2 3 4 6 1 ...

Страница 1128: ... index Part number Units mach Units FRU Description 85 1 40X7491 1 1 Booklet knife HP sensor cable assembly 2 40X0825 3 1 A Sensor booklet knife folding B Sensor booklet knife HP 3 40X3999 1 1 Booklet knife sector drive gear 42T 4 40X0921 1 1 Sensor booklet media entrance 3 1 A B 4 2 ...

Страница 1129: ... number Units mach Units FRU Description 1 40X7433 1 1 Booklet front tamper guide 2 40X0825 3 1 A Sensor booklet front tamper HP B Sensor booklet rear tamper HP 3 40X7492 1 1 Booklet rear tamper motor 3 40X7492 1 1 Booklet front tamper motor 4 40X7434 1 1 Booklet rear tamper guide 3 4 1 2B 2A ...

Страница 1130: ...x Part number Units mach Units FRU Description 87 1 40X4008 1 1 Gear 18T 2 40X4006 1 1 Gear 16T 3 40X4007 1 1 Booklet folding roll drive gear 38 18T 4 40X7523 1 1 Gear 16T 5 40X4010 1 1 Gear 37T 6 40X4004 1 1 Gear pulley 20 25T 7 40X4005 1 1 Booklet exit roll drive belt 2 1 7 6 5 4 3 1 2 ...

Страница 1131: ... 88 1 40X7565 1 1 Booklet media pinch roll assembly 2 40X7436 1 1 Booklet front pulley 3 40X7523 1 1 Gear 16T 4 40X7435 1 1 Booklet entrance drive pulley 5 40X4011 Booklet media exit pinch roller 6 40X7494 1 1 Media exit sensor cable assembly 7 40X0921 1 1 A Sensor booklet media entrance B Sensor booklet media exit 2 3 4 6 5 7B 7A 1 ...

Страница 1132: ...id 2 40X7524 1 1 Booklet rear gear bracket 3 40X4019 1 1 Booklet gear 27 34T 4 40X4024 1 1 Gear 18 39T 5 40X4015 1 1 Booklet gear 45T 6 40X4017 1 1 Booklet gear 16 44T 7 40X7501 1 1 Booklet sensor interface cable assembly 8 40X7499 1 1 Booklet motor interface cable assembly 9 40X7498 1 1 Booklet stapler interface cable assembly 10 40X4020 1 1 Spring 6 5 4 1 10 3 9 8 7 2 ...

Страница 1133: ... Go Back Previous Next Assembly 90 ADF assembly Asm index Part number Units mach Units FRU Description 90 1 40X6795 1 1 Automatic document feeder assembly 2 40X6794 1 1 ADF platen pad 3 40X6554 1 1 Flatbed scanner assembly 1 2 3 ...

Страница 1134: ...components 1 Asm index Part number Units mach Units FRU Description 91 1 40X6797 1 1 ADF rear cover 2 40X6799 1 1 ADF interface cable 3 40X6800 1 1 ADF controller PCBA 4 40X6801 1 1 ADF media stop 5 40X6798 1 1 ADF front cover 6 40X6796 1 1 ADF main drive sub assembly 1 6 2 3 4 5 ...

Страница 1135: ...xxx Go Back Previous Next Assembly 92 ADF covers and components 2 Asm index Part number Units mach Units FRU Description 92 1 40X6806 1 1 ADF document tray 2 40X6808 1 1 ADF left door retainer 3 40X6807 1 1 ADF top door 1 2 3 ...

Страница 1136: ...ce Manual 7558 xxx Go Back Previous Next Assembly 93 ADF base Asm index Part number Units mach Units FRU Description 93 1 40X6804 1 1 ADF scan pad 2 40X6802 1 1 ADF left hinge 3 40X6803 1 1 ADF right hinge 1 3 2 ...

Страница 1137: ...h Units FRU Description 94 1 40X6813 1 1 ADF sensor 1 cable 2 40X6815 1 1 ADF sensor 2 cable 3 40X2348 1 1 Spring 4 40X6811 1 1 ADF registration motor 5 40X6812 1 1 ADF feed motor spring 6 40X6810 1 1 ADF feed motor 7 40X6809 1 1 Sensor ADF top door interlock 8 40X6814 1 1 ADF motor cable 1 2 8 7 3 5 4 6 ...

Страница 1138: ...its FRU Description 95 1 40X7403 1 1 A Sensor ADF document set B Sensor ADF feed out 2 40X7401 1 1 ADF document set solenoid 3 40X7400 1 1 ADF nip release lever 4 40X6818 1 1 Spring 5 40X7402 1 1 ADF nip release link 6 40X6817 1 1 ADF nip release solenoid 7 40X6816 1 1 ADF diverter gate solenoid B 2 7 6 4 3 5 A 1 ...

Страница 1139: ...ADF sensors 2 Asm index Part number Units mach Units FRU Description 96 1 40X7403 1 Sensor ADF pre registration 2 40X7403 1 Sensor ADF scan width 2 3 40X7403 1 Sensor ADF scan width 3 4 40X7403 1 Sensor ADF scan width 1 5 40X7403 1 Sensor ADF registration 2 3 1 4 5 ...

Страница 1140: ...sm index Part number Units mach Units FRU Description 97 1 40X3892 Sensor document tray length 2 2 40X3892 Sensor document tray length 1 3 40X7403 1 Sensor ADF document tray width 1 4 40X7403 1 Sensor ADF document tray width 2 5 40X7403 1 Sensor ADF document tray width 3 3 5 4 1 2 ...

Страница 1141: ...Parts catalog 7 103 7558 xxx Go Back Previous Next Assembly 98 ADF LED PCB Asm index Part number Units mach Units FRU Description 98 1 40X6819 1 1 ADF LED PCB 1 ...

Страница 1142: ...Back Previous Next Assembly 99 ADF media guide Asm index Part number Units mach Units FRU Description 99 1 40X6822 1 1 ADF sensor actuator guide 2 40X6821 1 1 ADF separation roller guide 3 40X6820 1 1 ADF registration turn guide 1 2 3 ...

Страница 1143: ...8 xxx Go Back Previous Next Assembly 100 ADF left door Asm index Part number Units mach Units FRU Description 100 1 40X6825 1 1 Spring 2 40X6824 1 1 ADF feed pick roller assembly 3 40X6823 1 1 ADF left door inner cover 1 2 3 ...

Страница 1144: ...7 106 Service Manual 7558 xxx Go Back Previous Next Assembly 101 High capacity feed HCF covers and media tray 1 2 4 9 10 5 8 6 7 3 ...

Страница 1145: ...X0745 1 3 HCF docking bracket kit includes HCF docking bracket HCF docking bracket screw 2 3 40X2238 1 1 Mounting screw 4 40X7395 1 1 HCF inner front cover 5 40X7398 1 1 HCF tray 5 feeder assembly 6 40X6789 1 1 HCF media tray assembly 7 40X0741 4 1 Caster 8 40X7396 1 1 HCF left cover 9 40X0739 1 1 Senser HCF media tray set Sensor HCF media size L Sensor HCF media size R 10 40X7397 1 1 HCF rear cov...

Страница 1146: ...us Next Assembly 102 High capacity feed HCF media tray Asm index Part number Units mach Units FRU Description 102 1 40X7399 1 1 HCF media tray front cover 2 40X0749 1 2 HCF media long edge guide kit includes Media long edge guide Wave washer 1 2 ...

Страница 1147: ...eed HCF media tray lift Asm index Part number Units mach Units FRU Description 103 1 40X0750 1 2 HCF rear media guide kit includes HCF rear media guide Screw 2 40X0751 1 2 HCF front media guide kit includes HCF front media guide Screw 3 40X0752 1 1 HCF separation pad 2 1 4 6 7 5 3 ...

Страница 1148: ...7 110 Service Manual 7558 xxx Go Back Previous Next Assembly 103 continued High capacity feed HCF media tray lift 2 1 4 6 7 5 3 ...

Страница 1149: ...ift cable pulley 4 Lift cable guide 4 5 40X0754 1 7 HCF media tray lift shaft kit includes Bushing 8 mm front HCF media tray lift shaft Bushing 8 mm rear Washer HCF media tray lift shaft cable pulley HCF media tray lift shaft gear 10T HCF media tray lift shaft gear 51T 6 40X0756 2 2 HCF lift cable large pulley kit includes HCF lift cable large pulley HCF lift cable large guide 7 40X0753 1 1 HCF me...

Страница 1150: ...7 112 Service Manual 7558 xxx Go Back Previous Next Assembly 104 High capacity feed HCF media feed unit 1 4 3 5 6 7 2 1 ...

Страница 1151: ... 1 1 HCF feed lift gear bracket 3 40X0913 1 1 Ball bearing 6 mm 4 40X0761 1 3 HCF separation drive gear kit includes HCF separation drive gear 25T Bushing 6 mm HCF separation drive gear 19T 5 40X6790 HCF pick roller raise lever 6 40X0763 1 3 HCF media tray lift coupling kit includes HCF media tray lift coupling gear 40T Spring HCF media tray lift coupling 7 40X0771 1 1 HCF separation roller shaft ...

Страница 1152: ...7 114 Service Manual 7558 xxx Go Back Previous Next Assembly 105 High capacity feed HCF media feed unit 2 1 2 3 4 7 6 5 ...

Страница 1153: ...ing HCF feed unit latch shaft HCF feed unit latch cover 2 40X0765 1 1 HCF pick roller idler gear 3 40X0768 1 1 Sensor tray 5 media out 3 40X0768 1 1 Sensor tray 5 media level 4 40X0767 1 1 HCF media out actuator 5 40X0770 1 3 HCF feed unit roller kit includes Feed roller Pick roller Separation roller 6 40X0769 1 2 HCF pick roller shaft kit includes HCF pick roller shaft assembly Bushing 6mm 7 40X0...

Страница 1154: ...X7471 HCF top door 2 40X7440 HCF top door rear spring 3 40X7450 HCF top door front spring 4 40X0553 1 1 Sensor HCF top door interlock 5 40X0774 1 1 Sensor tray 5 feed out 6 40X0775 1 2 HCF media transport roller kit includes HCF media transport roller assembly 8mm ball bearing 7 40X0777 1 1 Sensor HCF unit docking interlock 8 40X0776 1 1 HCF transport motor 2 3 4 5 6 7 8 1 ...

Страница 1155: ... Asm index Part number Units mach Units FRU Description 107 1 40X0776 1 1 HCF transport motor 2 40X0777 1 1 Sensor HCF unit docking interlock 3 40X6792 1 1 HCF rack gear 4 40X6793 1 1 HCF sliding damper 5 40X0741 1 1 HCF caster 6 40X0779 1 1 HCF main cable 7 40X6791 1 1 HCF controller card PCBA 1 2 7 6 3 4 5 ...

Страница 1156: ...hernet print server NS 40X4827 1 MarkNet N8130 fiber ethernet print server NS 40X7062 1 MarkNet N8250 802 11b g n wireless print server US Americas NS 40X7063 1 MarkNet N8250 802 11b g n wireless print server rest of the world NS 40X4819 1 RS 232C serial interface card NS 40X4823 1 Parallel 1284 B interface card NS 40X1367 1 10 Foot parallel printer cable NS 40X1368 1 2 meter USB printer cable NS ...

Страница 1157: ...Spain 8ft straight power cord NS 40X4596 1 Brazil power cord NS 40X0273 1 Chile Uruguay power cord NS 40X0275 1 Israel power cord NS 40X1773 1 South Africa power cord NS 40X1772 1 Switzerland power cord NS 40X6306 1 UICC to display cable NS 40X6963 1 CAC card reader NS 40X6964 1 Small CAC card reader case NS 40X6965 1 Large CAC card reader case ...

Страница 1158: ...7 120 Service Manual 7558 xxx Go Back Previous Next ...

Страница 1159: ...4 228 ATC sensor PCB 4 30 ATC sensor PCB bracket 4 29 authentication PCBA 4 229 automatic document feeder assembly 4 230 B booklet bin 4 324 booklet bin hookup cable assembly 4 324 booklet controller card assembly 4 325 booklet diverter gate 4 326 booklet fold solenoid 4 328 booklet front tamper guide 4 329 booklet knife sector drive gear 42T 4 331 booklet media pinch roll assembly 4 333 booklet p...

Страница 1160: ...S 3 24 OUTPUT BIN TESTS 3 26 PRINT TESTS 3 26 PRINTER SETUP 3 27 REPORTS 3 28 SCANNER TESTS 3 28 SENSOR TESTS 3 30 dimensions specifications 1 5 diverter solenoid 4 350 duplex texts 3 21 E eject shaft roll 4 345 electronics specifications 1 2 environment specifications 1 6 error codes 1xx service error codes 2 12 2xx service error codes 2 21 3xx service error codes 2 27 4xx service error codes 2 3...

Страница 1161: ...color misregistration 2 297 deletions 2 298 faint print low contrast 2 276 high frequency bands 2 299 horizontal stripes side to side 2 285 horizontal white stripes or bands side to side 2 282 image quality 2 276 media damage 2 294 no fuse 2 296 partial lack 2 287 skew 2 293 solid black 2 280 spots 2 288 troubleshooting 2 275 vertical lines and bands 2 281 vertical stripes 2 284 inner cover 4 4 in...

Страница 1162: ...ator panel right cover 4 11 operator panel speaker 4 135 operator panel top cover MFP 4 11 operator panel understanding 3 1 options 1 1 options and features finisher stapler 3 98 upper media bin 3 105 high capacity feed 3 131 HCF media feed unit assembly operation 3 133 HCF media feed unit assembly sensor motor func tions 3 135 HCF media transport roll assembly operation 3 134 media feeding 3 132 ...

Страница 1163: ...her bottom cover 4 347 finisher buffer roll assembly 4 347 finisher diverter gate 4 350 finisher diverter gate solenoid 4 350 finisher front door assembly 4 351 finisher left carriage belt assembly 4 352 finisher LVPS PCBA 4 354 finisher media entrance roll assembly 4 355 finisher PCBA 4 356 finisher right carriage belt 4 360 left lower cover 4 362 left upper cover 4 363 lower media exit roll asse...

Страница 1164: ...nd transfer roller 4 28 ATC sensor PCB 4 30 ATC sensor PCB bracket 4 29 bridge PCBA 4 31 C toner auger 4 35 charge roll HVPS cooling fan 4 38 charge roll HVPS PCBA 4 40 CMYK toner dispense auger assembly 4 41 controller cooling fan 4 44 developer carrier 4 46 developer housing C 4 49 developer housing K 4 55 developer housing M 4 61 developer housing Y 4 67 developer housing rear plunger 4 73 deve...

Страница 1165: ...ssembly 4 230 flatbed scanner assembly 4 233 large platen glass 4 237 LED exposure bar 4 238 scanner carriage motor 4 239 scanner controller PCBA 4 241 sensor ADF angle 4 244 sensor ADF closed interlock 4 245 sensor ADF document set 4 245 sensor ADF feedout 4 246 sensor ADF inverter 4 247 sensor ADF pre registration 4 247 sensor ADF registration 4 250 sensor ADF scan width 1 4 254 sensor ADF scan ...

Страница 1166: ...evel R 4 405 stacker bin no media 4 406 stapler carriage HP 4 407 tray 1 media level 4 273 tray 1 media out 4 273 tray 1 pre feed 4 166 tray 2 media level 4 273 tray 2 media out 4 273 tray 3 media level 4 273 tray 3 media out 4 273 tray 4 media level 4 273 tray 4 media out 4 273 tray 5 feed out 4 446 tray 5 media level 4 456 tray 5 media out 4 457 tray module feedout 4 276 TTM media size 4 279 TTM...

Страница 1167: ...ray module transport roller 4 289 tray module tray 2 media turn guide 4 290 tray module upper transport motor 4 290 TTM left door 4 291 TTM paper path 3 113 TTM theory 3 112 main components 3 116 media transport 3 113 media tray assembly 3 113 TTM media feed units 3 115 TTM tray 3 feeder 4 293 TTM tray 3 media tray 4 296 TTM tray 3 media turn guide 4 297 TTM tray 4 media feeder 4 297 TTM tray 4 me...

Страница 1168: ...I 10 Service Manual 7558 xxx Go Back Previous Next ...

Страница 1169: ...king bracket kit 7 107 40X0749 HCF media long edge guide kit 7 108 40X0750 HCF rear media guide kit 7 109 40X0751 HCF front media guide kit 7 109 40X0752 HCF separation pad 7 109 40X0753 HCF media tray lift gear bracket 7 111 40X0754 HCF media tray lift shaft kit 7 111 40X0756 HCF lift cable large pulley kit 7 111 40X0757 HCF lift cable kit 7 111 40X0759 HCF feed lift motor 7 113 40X0760 HCF feed ...

Страница 1170: ...7 81 40X0893 Sensor lower media exit 7 79 40X0893 Sensor upper media exit 7 80 40X0894 Static eliminator brush 7 79 40X0895 Lower media exit roll 7 79 40X0898 Lower exit roll drive pulley kit 7 79 40X0900 Main paddle drive pulley gear 44 20T 7 79 40X0905 Buffer roll 7 81 40X0908 Sensor finisher media entrance 7 81 40X0908 Sensor upper media bin full 7 80 40X0909 Finisher media entrance roll 7 81 4...

Страница 1171: ...1 40X3937 2 hole punch unit frame 7 75 40X3943 Punch unit motor 7 75 40X3959 Gear 23T 7 79 40X3962 Torque limiter 7 68 40X3963 Retainer 7 68 40X3969 Bridge PCBA 7 84 40X3970 Bridge unit connect cable assembly 7 84 40X3987 Booklet bin hookup cable assembly 7 87 40X3988 Booklet unit catch 7 87 40X3993 Gear pulley 40 20T 7 89 40X3994 Booklet end guide drive belt 7 89 40X3999 Booklet knife sector driv...

Страница 1172: ...CC to display cable 7 119 40X6337 Arabic font card 7 118 40X6550 Scanner right cover 7 2 40X6551 Scanner top cover 7 2 40X6552 Scanner rear cover 7 2 40X6553 Scanner blind cover 7 2 40X6554 Flatbed scanner assembly 7 2 7 95 40X6555 Sensor FB platen length assembly 7 4 40X6556 FB CCD sensor assembly 7 4 40X6557 Rear scanner ribbon cable 7 4 40X6558 ADF angle actuator 7 4 40X6559 Spring 7 5 40X6560 ...

Страница 1173: ...20 40X6614 ATC sensor PCB bracket 7 20 40X6615 Developer housing 7 20 40X6619 Developer HVPS PCBA 7 21 40X6620 Front transfer belt retaining bracket 7 22 40X6621 Rear transfer belt retaining bracket 7 22 40X6622 Transfer belt lever 7 22 40X6623 Transfer belt cleaner 7 22 40X6624 Transfer belt assembly 7 22 40X6625 Front transfer belt guide 7 23 40X6626 Belt removal actuator 7 23 40X6627 Rear trans...

Страница 1174: ...Sensor Tray module feedout 7 39 40X6677 Tray module transport roller 7 33 7 39 40X6678 3TM left door 7 34 40X6680 1TM TTM 3TM adjuster foot 7 35 7 45 7 49 40X6681 1TM TTM 3TM foot side cover 7 35 7 45 7 49 40X6682 1TM TTM 3TM foot rear cover 7 35 7 45 7 49 40X6683 Docking screw 7 35 7 45 7 49 40X6684 1TM TTM 3TM docking bracket 7 35 7 45 7 49 40X6685 1TM TTM 3TM locking caster 7 35 7 45 7 49 40X66...

Страница 1175: ...35 Fuser driver PCBA 110V 7 58 40X6736 Fuser power contact 110V 7 58 40X6737 Sub LVPS PCBA 7 58 40X6738 Main power switch 7 59 40X6739 LVPS front fan guide 7 59 40X6740 Sensor Image calibration 7 59 40X6761 Front door sensor 7 59 40X6762 LVPS PCBA 7 59 40X6763 Charge roll HVPS PCBA 7 60 40X6764 Base left wiring cable 7 61 40X6765 Base right wiring cable 7 61 40X6766 Base wiring top cable 7 61 40X6...

Страница 1176: ...40X6819 ADF LED PCB 7 103 40X6820 ADF registration turn guide 7 104 40X6821 ADF separation roller guide 7 104 40X6822 ADF sensor actuator guide 7 104 40X6823 ADF left door inner cover 7 105 40X6824 ADF feed pick roller assembly 7 105 40X6825 Spring 7 105 40X6826 Bridge unit 7 65 40X6827 Clutch knob 7 65 40X6828 Bridge entry guide 7 66 40X6829 Bridge media exit transport 7 65 40X6830 Bridge unit sm...

Страница 1177: ...it roll 7 80 40X6892 Upper exit sensor cable 7 80 40X6893 Left upper exit nip roll 7 80 40X6894 Right upper exit nip roll 7 80 40X6895 Media entrance pinch guide 7 81 40X6896 TTM tray 4 feeder motor cable 7 37 40X6897 Diverter solenoid 7 82 40X6898 Buffer solenoid 7 82 40X6899 Booklet path roll 7 86 40X6900 Upper pinch guide 7 83 40X6901 Upper transport roll 7 83 40X6902 Finisher controller PCBA 7...

Страница 1178: ...TM tray side roller 7 41 40X7345 TTM upper stopper 7 41 40X7346 TTM tray 3 lock 7 41 40X7347 TTM tray 4 lock 7 41 40X7348 TTM tray 3 4 stopper 7 41 40X7349 Sensor TTM media size 7 42 40X7350 TTM gear 17T 50T 7 42 40X7351 TTM gear 16T 48T 7 42 40X7352 TTM gear 57T 7 42 40X7353 Coupler 7 42 40X7354 TTM gear 51T 7 42 40X7355 TTM gear 52T 7 43 40X7356 TTM drive flange 7 43 40X7357 TTM drive gear 7 43 ...

Страница 1179: ... 70 40X7413 Bridge upper drive belt 7 70 40X7414 Upper media bin front cover 7 71 40X7415 Finisher front door assembly 7 71 40X7416 Right eject cover 7 72 40X7417 Finisher bottom cover 7 72 40X7418 Finisher rear lower cover 7 72 40X7420 Finisher left upper cover 7 72 40X7422 Punch unit main cable 7 75 40X7423 Stapler unit cover 7 76 40X7424 Media eject unit frame 7 77 40X7425 Clamp drive belt 7 77...

Страница 1180: ...r interface cable assembly 7 94 40X7509 PRESCRIBE card assembly Lexmark X95x 7 118 40X7512 IPDS card assembly Lexmark X95x 7 118 40X7515 Bar code card assembly Lexmark X95x 7 118 40X7519 Booklet pinch guide 7 86 40X7521 Finisher LVPS PCBA 7 84 40X7522 Finisher diverter gate 7 82 40X7523 Gear 16T 7 93 40X7523 Gear 16T 7 92 40X7524 Booklet rear gear bracket 7 94 40X7530 200K maintenance ADF kit 7 11...

Страница 1181: ... NUDGER MOTOR FRONT COVER INTERLOCK SWITCH PRINTER LEFT DOOR INTERLOCK SENSOR MAIN LVPS P5 P6 P7 P4 P1 P3 P510 P502 P501 P503 MAIN POWER SWITCH MAIN POWER CONNECTS TO FUSER PCB J30 CONNECTS TO CONTROLLER CARD P501 CONNECTS TO FUSER ASSEMBLY P J600 CONNECTS TO SUB LVPS P8 CONNECTS TO MAIN LVPS P6 CONNECTS TO CONTROLLER CARD PSW OUTLET PSW OUTLET GFI ACCESSOR Y J153 J154 J151 J150 J182 IMAGE CALIBRA...

Страница 1182: ...T PCBA P J8377 P J8405 P J8408 P J8406 J8176 J8177 J8178 P J 8196 J8179 J8180 J8182 P J819 J8183 J8185 J8353 SENSOR BOOKLET SET SENSOR BOOKLET TRAY NO PAPER P J8355 P J8333 J8347 J8346 J8353 J8352 J8351 J8350 J8349 J8348 P J8203 J8201 BOOKLET STAPLER ASSEMBLY P J8189 J8334 J8335 J8336 J8342 FINISHER EXIT MOTOR FINISHER REGI MOTOR EJECT MOTOR FINISHER TRANSPORT MOTOR J8340 J8341 J8394 J8338 SUBPADD...

Отзывы: