background image

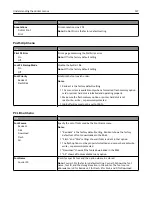
Use

To

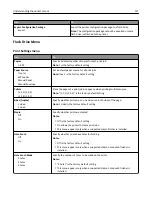
Margin Size

8–255 mm

Set the page margin for HTML documents.

Notes:

19 mm is the factory default setting.

Margin size can be increased in 1

mm increments.

Backgrounds

Do Not Print
Print

Specify whether to print backgrounds on HTML documents.

Note: 

Print is the factory default setting.

Image menu

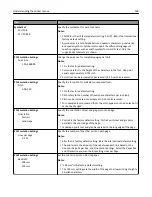
Use

To

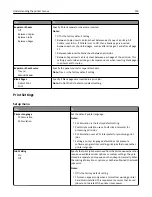
Auto Fit

On
Off

Select the optimal paper size, scaling, and orientation.

Note: 

On is the factory default setting. It overrides scaling and orientation settings

for some images.

Invert

On
Off

Invert bitonal monochrome images.

Notes:

Off is the factory default setting.

This setting does not apply to GIF or JPEG images.

Scaling

Anchor Top Left
Best Fit
Anchor Center
Fit Height/Width
Fit Height
Fit Width

Scale the image to fit the selected paper size.

Notes:

Best Fit is the factory default setting.

When Auto Fit is set to On, Scaling is automatically set to Best Fit.

Orientation

Portrait
Landscape
Reverse Portrait
Reverse Landscape

Set the image orientation.

Note: 

Portrait is the factory default setting.

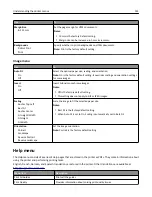
Help menu

The Help menu consists of a series of Help pages that are stored in the printer as PDFs. They contain information about
using the printer and performing printing tasks.

English, French, German, and Spanish translations are stored in the printer. Other translations are available at

http://support.lexmark.com

.

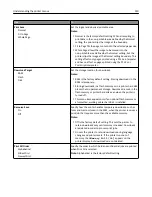
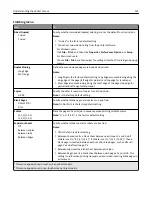
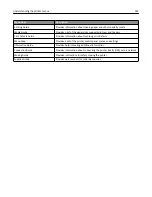
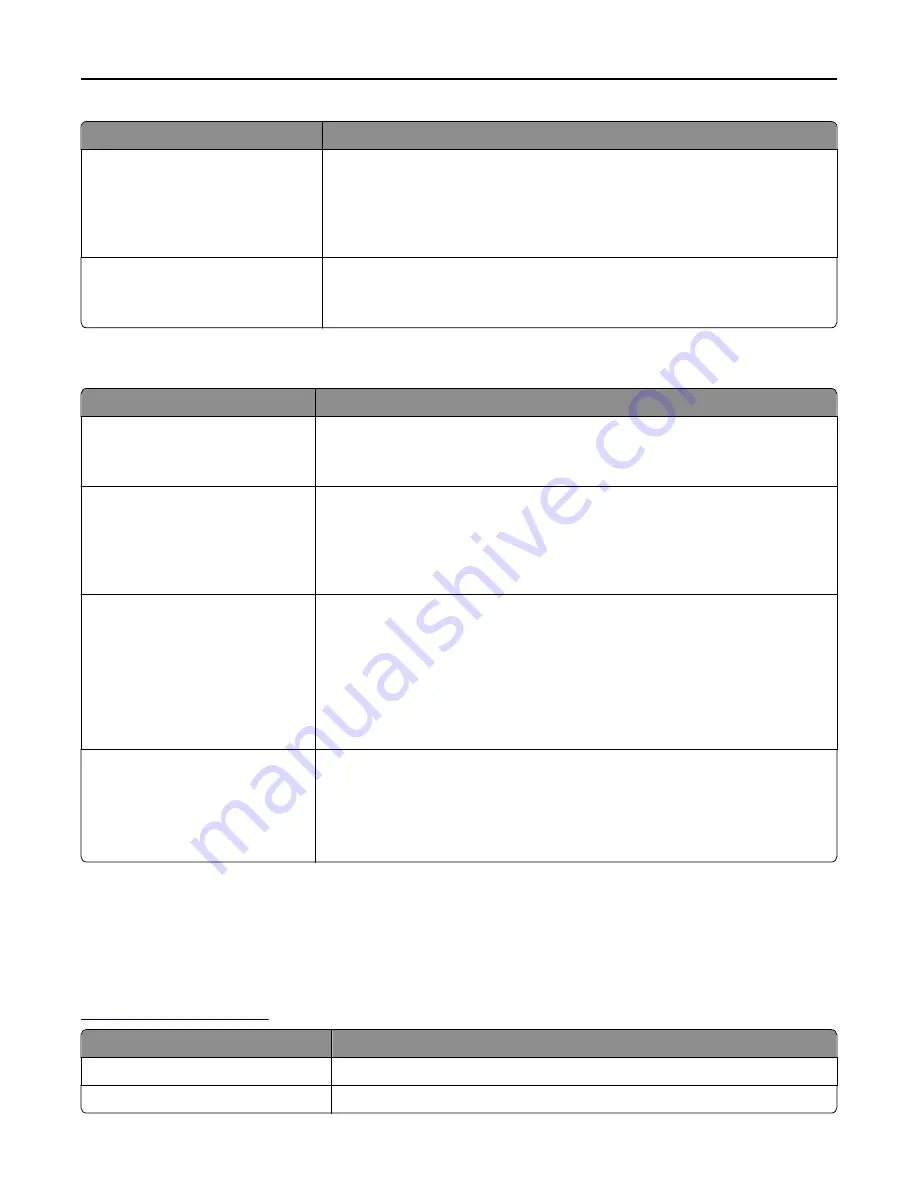
Menu item

Description

Print All Guides

Prints all the guides

Print Quality

Provides information about solving print quality issues

Understanding the printer menus

131

Содержание M5163dn

Страница 1: ...M5163dn User s Guide April 2014 www lexmark com Machine type s 4063 Model s 490 ...

Страница 2: ...inter software 36 Networking 37 Verifying printer setup 41 Loading paper and specialty media 43 Setting the paper size and type 43 Configuring Universal paper settings 43 Loading the 250 or 550 sheet tray 43 Loading the 2100 sheet tray 50 Loading the multipurpose feeder 56 Linking and unlinking trays 61 Paper and specialty media guide 63 Using specialty media 63 Paper guidelines 64 Supported paper...

Страница 3: ...e memory 139 Erasing non volatile memory 139 Erasing printer hard disk memory 140 Configuring printer hard disk encryption 140 Finding printer security information 141 Maintaining the printer 142 Cleaning printer parts 142 Checking the status of parts and supplies 143 Ordering supplies 144 Storing supplies 146 Replacing supplies 147 Moving the printer 153 Managing the printer 156 Finding advanced ...

Страница 4: ...clear manual feeder 250 171 x page jam remove paper open stapler door Leave paper in bin 455 457 172 x page jam remove paper open finisher rear door Leave paper in bin 451 175 x page jam remove paper open expander rear door Leave paper in bin 41y xx 176 x page jam remove paper open mailbox rear door Leave paper in bin 43y xx 177 Troubleshooting 179 Understanding the printer messages 179 Solving pr...

Страница 5: ... manufacturer s instructions and local regulations CAUTION HOT SURFACE The inside of the printer might be hot To reduce the risk of injury from a hot component allow the surface to cool before touching CAUTION POTENTIAL INJURY To reduce the risk of equipment instability load each tray separately Keep all other trays closed until needed CAUTION POTENTIAL INJURY The printer weight is greater than 18...

Страница 6: ...nufacturer is not responsible for the use of other replacement parts CAUTION POTENTIAL INJURY Do not cut twist bind crush or place heavy objects on the power cord Do not subject the power cord to abrasion or stress Do not pinch the power cord between objects such as furniture and walls If any of these things happen a risk of fire or electrical shock results Inspect the power cord regularly for sig...

Страница 7: ...ining the printer Troubleshooting and solving problems User s Guide and Quick Reference Guide The guides are available on the Documentation CD For more information visit http support lexmark com Instructions for Connecting the printer to an Ethernet network Troubleshooting printer connection problems Networking Guide Open the Software CD and then navigate to Documentation User s Guide and other pu...

Страница 8: ...ies and regions See the printed warranty that came with your printer Selecting a location for the printer CAUTION POTENTIAL INJURY The printer weight is greater than 18 kg 40 lb and requires two or more trained personnel to lift it safely When selecting a location for the printer leave enough room to open trays covers and doors If you plan to install any options then leave enough room for them als...

Страница 9: ...t 508 mm 20 in 3 Left side 152 mm 6 in 4 Rear 152 mm 6 in 5 Top 115 mm 4 5 in Printer configurations Basic model 1 2 4 3 1 Standard bin 2 Printer control panel 3 Multipurpose feeder 4 Standard 550 sheet tray Tray 1 Learning about the printer 9 ...

Страница 10: ...ion shows the maximum number of optional finishers and trays that are supported by the printer For more information on other configurations visit www lexmark com multifunctionprinters 6 1 2 7 8 5 4 3 Hardware option Alternative hardware option 1 Staple finisher Output expander 4 bin mailbox Staple hole punch finisher 2 4 bin mailbox Staple finisher Staple hole punch finisher Output expander 3 Cast...

Страница 11: ...rays may be configured with the printer The optional 250 and 550 sheet trays may be installed in any order Using the printer control panel 1 2 3 4 5 6 7 8 9 10 Use the To 1 Display View the printer status Set up and operate the printer 2 Select button Submit changes made in the printer settings 3 Arrow buttons Scroll up and down or left and right 4 Keypad Enter numbers letters or symbols 5 Sleep b...

Страница 12: ...atusorcondition Indicator light Printer status Off The printer is off or in Hibernate mode Blinking green The printer is warming up processing data or printing Solid green The printer is on but idle Blinking red The printer requires user intervention Sleep button light Printer status Off The printer is off idle or in Ready state Solid amber The printer is in Sleep mode Blinking amber The printer i...

Страница 13: ...o the printer Warning Potential Damage Controller board electronic components are easily damaged by static electricity Touch a metal surface on the printer before touching any controller board electronic components or connectors Available internal options Memory card DDR3 DIMM Flash memory Fonts Firmware cards Forms and Bar Code PRESCRIBE IPDS Printer hard disk LexmarkTM Internal Solutions Ports I...

Страница 14: ...n the printer off and unplug the power cord from the electrical outlet before continuing If you have any other devices attached to the printer then turn them off as well and unplug any cables going into the printer 1 Remove the controller board access cover 1 2 2 Using a screwdriver loosen the screws on the controller board shield Additional printer setup 14 ...

Страница 15: ... board electronic components are easily damaged by static electricity Touch a metal surface on the printer first before touching any controller board electronic component or connector 1 3 2 1 Lexmark Internal Solutions Port or printer hard disk connector 2 Option card connector 3 Memory card connector Additional printer setup 15 ...

Страница 16: ...5 Align the screws with the holes on the shield and then reattach the shield 2 1 6 Tighten the screws on the shield Additional printer setup 16 ...

Страница 17: ...Potential Damage Controller board electronic components are easily damaged by static electricity Touch something metal on the printer first before touching any controller board electronic components or connectors An optional memory card can be purchased separately and attached to the controller board 1 Access the controller board For more information see Accessing the controller board on page 13 2...

Страница 18: ...inter then turn the printer off and unplug the power cord from the electrical outlet before continuing If you have any other devices attached to the printer then turn them off as well and unplug any cables going into the printer Warning Potential Damage Controller board electronic components are easily damaged by static electricity Touch something metal on the printer first before touching any con...

Страница 19: ...plastic bracket to the ISP 3 Screws for attaching the ISP mounting bracket to the controller board shield 4 Plastic bracket 4 Remove the metal cover from the ISP opening a Loosen the screw b Lift the metal cover and then pull it out completely Additional printer setup 19 ...

Страница 20: ...controller board cage until it clicks into place Make sure the cables are neatly tucked under the plastic bracket 6 Install the ISP on the plastic bracket Note Hold the ISP at an angle over the plastic bracket so that any overhanging connectors will pass through the ISP opening in the controller board cage Additional printer setup 20 ...

Страница 21: ...ISP is seated between the guides of the plastic bracket 8 Use the provided thumbscrew for the ISP to attach the plastic bracket to the ISP Note Turn the screw clockwise enough to hold the ISP in place but do not tighten it yet Additional printer setup 21 ...

Страница 22: ... board shield 10 Tighten the thumbscrew that is attached to the ISP Warning Potential Damage Do not screw it on too tightly 11 Connect the ISP solution interface cable into the receptacle of the controller board Note The plugs and receptacles are color coded Additional printer setup 22 ...

Страница 23: ...y damaged by static electricity Touch a metal surface on the printer before touching any controller board electronic components or connectors 1 Access the controller board For more information see Accessing the controller board on page 13 2 Unpack the optional card Warning Potential Damage Avoid touching the connection points along the edge of the card 3 Holding the card by its sides align the pla...

Страница 24: ... accessing the controller board or installing optional hardware or memory devices sometime after setting up the printer then turn the printer off and unplug the power cord from the electrical outlet before continuing If you have any other devices attached to the printer then turn them off as well and unplug any cables going into the printer Warning Potential Damage Controller board electronic comp...

Страница 25: ...3 Locate the appropriate connector on the controller board cage Note If an optional ISP is currently installed then the printer hard disk must be installed onto the ISP Additional printer setup 25 ...

Страница 26: ... ISP and then press the printer hard disk down until the standoffs are in place Installation warning Hold only the edges of the printed circuit board assembly Do not touch or press on the center of the printer hard disk Doing so may cause damage c Insert the plug of the printer hard disk interface cable into the receptacle of the ISP Note The plugs and receptacles are color coded Additional printe...

Страница 27: ... only the edges of the printed circuit board assembly Do not touch or press on the center of the printer hard disk Doing so may cause damage Note Make sure the cables are neatly tucked under the printer hard disk 5 Insert the plug of the printer hard disk interface cable into the receptacle of the controller board Note The plugs and receptacles are color coded Additional printer setup 27 ...

Страница 28: ...d or installing optional hardware or memory devices sometime after setting up the printer then turn the printer off and unplug the power cord from the electrical outlet before continuing If you have any other devices attached to the printer then turn them off as well and unplug any cables going into the printer Additional printer setup 28 ...

Страница 29: ...the controller board For more information see Accessing the controller board on page 13 2 Unplug the printer hard disk interface cable from the controller board leaving the cable attached to the printer hard disk To unplug the cable squeeze the paddle at the plug of the interface cable to disengage the latch before pulling out the cable 3 Remove the screws holding the printer hard disk in place Ad...

Страница 30: ... turn them off as well and unplug any cables going into the printer CAUTION TIPPING HAZARD Floor mounted configurations require additional furniture for stability You must use either a printer stand or printer base if you are using multiple input options If you purchased a printer with a similar configuration then you may need additional furniture For more information see www lexmark com multifunc...

Страница 31: ...ations require additional furniture for stability You must use either a printer stand or printer base if you are using multiple input options If you purchased a printer with a similar configuration then you may need additional furniture For more information see www lexmark com multifunctionprinters 1 Turn off the printer using the power switch and then unplug the power cord from the electrical out...

Страница 32: ...8 Align the printer with the tray and then slowly lower the printer into place Note Optional trays lock together when stacked Additional printer setup 32 ...

Страница 33: ...9 Connect the power cord to the printer then to a properly grounded electrical outlet and then turn on the printer Additional printer setup 33 ...

Страница 34: ...icks into place and then remove stacked trays one at a time from the top to the bottom Attaching cables CAUTION POTENTIAL INJURY Do not set up this product or make any electrical or cabling connections such as a power cord a fax feature or USB cable during a lightning storm Connect the printer to the computer using a USB cable or Ethernet cable Make sure to match the following The USB symbol on th...

Страница 35: ...lock that will secure the controller board 6 Printer power cord socket Connect the printer to a properly grounded electrical outlet Warning Potential Damage Do not touch the USB cable any wireless network adapter or the printer in the area shown while actively printing Loss of data or a malfunction can occur Note This feature is available only if you purchase optional trays and a caster base After...

Страница 36: ... on the computer screen 3 For Macintosh users add the printer Note Obtain the printer IP address from the TCP IP section in the Network Ports menu Adding available options in the print driver For Windows users 1 Open the printers folder In Windows 8 From the Search charm type run and then navigate to Run type control printers OK Additional printer setup 36 ...

Страница 37: ...ier SSID is a name assigned to a wireless network Wired Equivalent Privacy WEP Wi Fi Protected Access WPA WPA2 and 802 1X RADIUS are types of security used on a network Preparing to set up the printer on an Ethernet network To configure your printer to connect to an Ethernet network organize the following information before you begin Note If your network automatically assigns IP addresses to compu...

Страница 38: ...r WPA2 preshared key or passphrase WPA includes encryption as an additional layer of security The choices are AES or TKIP Encryption must be set for the same type on the router and on the printer or the printer will not be able to communicate on the network 802 1X RADIUS If you are installing the printer on an 802 1X network then you may need the following Authentication type Inner authentication ...

Страница 39: ...unsecured SSIDs Enter a network name Manually type the SSID Note Make sure to type the correct SSID Wi Fi Protected Setup Connect the printer to a wireless network using Wi Fi Protected Setup 3 Press and then follow the instructions on the printer display Connecting the printer to a wireless network using Wi Fi Protected Setup Before you begin make sure that The access point wireless router is Wi ...

Страница 40: ...ork A wireless network adapter is installed in your printer and working properly For more information see the instruction sheet that came with the wireless network adapter 1 Open a Web browser and then type the printer IP address in the address field Notes View the printer IP address on the printer control panel The IP address appears as four sets of numbers separated by periods such as 123 123 12...

Страница 41: ... then select IP 2 Type the IP address in the address field 3 Apply the changes Setting up serial printing Windows only After installing the serial or communication COM port configure the printer and the computer Note Serial printing reduces print speed 1 Set the parameters in the printer a From the control panel navigate to the menu for the port settings b Locate the menu for the serial port setti...

Страница 42: ...ting a network setup page If the printer is attached to a network then print a network setup page to verify the network connection This page also provides important information that aids network printing configuration 1 From the printer control panel navigate to Settings Reports Network Setup Page 2 Check the first section of the network setup page and then confirm that the status is Connected If ...

Страница 43: ... 127 mm 2 76 x 5 inches for one sided printing and 105 x 148 mm 4 13 x 5 83 inches for two sided duplex printing The largest supported Universal size is 216 x 356 mm 8 5 x 14 inches for one sided and two sided printing When printing on paper less than 210 mm 8 3 inches wide the printer may print at a reduced speed after a period of time to ensure the best print performance If you regularly print l...

Страница 44: ...a job prints or while Busy appears on the display Doing so may cause a jam 2 Squeeze and slide the width guide to the correct position for the size of the paper being loaded until it clicks into place 2 1 Note Use the paper size indicators at the bottom of the tray to help position the guides Loading paper and specialty media 44 ...

Страница 45: ...ide the guide to the correct position for the size of the paper being loaded 3 1 2 Notes Lock the length guide for all paper sizes Use the paper size indicators at the bottom of the tray to help position the guides Loading paper and specialty media 45 ...

Страница 46: ...tack with the printable side facedown Note Make sure the paper or envelope is loaded properly There are different ways of loading letterhead depending on whether an optional staple finisher is installed or not Without an optional staple finisher With an optional staple finisher ABC One sided printing One sided printing Loading paper and specialty media 46 ...

Страница 47: ...the staple finisher then make sure the holes on the long edge of the paper are on the right side of the tray One sided printing Two sided printing A B C Note If the holes on the long edge of the paper are on the left side of the tray then a jam may occur Do not slide the paper into the tray Load paper as shown in the illustration Loading paper and specialty media 47 ...

Страница 48: ... side is facing up and the envelopes are on the left side of the tray Make sure the paper is below the solid line which is the maximum paper fill indicator Warning Potential Damage Overfilling the tray can cause paper jams Loading paper and specialty media 48 ...

Страница 49: ...rsal size paper adjust the paper guides to lightly touch the sides of the stack and then lock the length guide 7 Insert the tray 8 From the printer control panel set the paper size and paper type in the Paper menu to match the paper loaded in the tray Note Set the correct paper size and type to avoid paper jams and print quality problems Loading paper and specialty media 49 ...

Страница 50: ...ray separately Keep all other trays closed until needed 1 Pull out the tray 2 Adjust the width and length guides Loading A5 size paper a Pull up and slide the width guide to the position for A5 LGL OFC FOLIO LTR A4 A5 1 LGL OFC FOLIO LTR A 4 A 5 2 LGL OFC FOLIO LTR A 4 A 5 Loading paper and specialty media 50 ...

Страница 51: ... position for A5 until it clicks into place 1 2 c Remove the A5 length guide from its holder 1 2 d Insert the A5 length guide into its designated slot Note Press the A5 length guide until it clicks into place Loading paper and specialty media 51 ...

Страница 52: ...n for the size of the paper being loaded LGL OFC FOLIO LTR A4 A5 1 LGL OFC FOLIO LTR A 4 A 5 2 LGL OFC FOLIO LTR A 4 A 5 b If the A5 length guide is still attached to the length guide then remove it from its place If the A5 length guide is not attached then proceed to step d Loading paper and specialty media 52 ...

Страница 53: ...gth guide in its holder 2 1 d Squeeze the length guide and slide it to the correct position for the size of the paper being loaded until it clicks into place LGL OFC FOLIO LTR A4 A5 Loading paper and specialty media 53 ...

Страница 54: ...ys for loading letterhead depending on whether an optional staple finisher is installed or not Without an optional staple finisher With an optional staple finisher ABC One sided printing A B C One sided printing ABC Two sided printing A B C Two sided printing If you are loading prepunched paper for use with the staple finisher then make sure the holes on the long edge of the paper are on the right...

Страница 55: ...er are on the left side of the tray then a jam may occur Make sure the paper is below the maximum paper fill indicator Warning Potential Damage Overfilling the tray can cause paper jams 5 Insert the tray Note Press the paper stack down while inserting the tray Loading paper and specialty media 55 ...

Страница 56: ...er loaded in the tray Note Set the correct paper size and type to avoid paper jams and print quality problems Loading the multipurpose feeder 1 Pull down the multipurpose feeder door Note Do not load or close the multipurpose feeder while a job is printing B5 EX EC A4 A5 L TR Loading paper and specialty media 56 ...

Страница 57: ...so that the multipurpose feeder is fully extended and open 3 Slide the width guide to the correct position for the size of the paper being loaded B 5 E X E C A 4 A 5 L T R Note Use the paper size indicators on the bottom of tray to help position the guides Loading paper and specialty media 57 ...

Страница 58: ...ng the printable side of the transparencies Be careful not to scratch them Flex the stack of envelopes back and forth to loosen them and then fan them Straighten the edges on a level surface 5 Load the paper or specialty media Note Slide the stack gently into the multipurpose feeder until it comes to a stop Load only one size and type of paper or specialty media at a time Make sure the paper fits ...

Страница 59: ... B C One sided printing A B C Two sided printing A B C Two sided printing If you are loading prepunched paper for use with the staple finisher then make sure the holes on the long edge of the paper are on the right side of the tray One sided printing Two sided printing A B C Note If the holes on the long edge of the paper are on the left side of the tray then a jam may occur Loading paper and spec...

Страница 60: ...er or specialty media is below the maximum paper fill indicator Warning Potential Damage Overfilling the feeder can cause paper jams 6 For custom or Universal size paper adjust the width guides to lightly touch the sides of the stack 7 From the Paper menu on the printer control panel set the paper size and type in the Paper menu to match the paper loaded in the tray Note Set the correct paper size...

Страница 61: ... that of the other tray 4 Click Submit Note You can also change the paper size and type settings using the printer control panel For more information see Setting the paper size and type on page 43 Warning Potential Damage Paper loaded in the tray should match the paper type name assigned in the printer The temperature of the fuser varies according to the specified paper type Printing issues may oc...

Страница 62: ...ork Ports menu The IP address appears as four sets of numbers separated by periods such as 123 123 123 123 If you are using a proxy server then temporarily disable it to load the Web page correctly 2 Click Settings Paper Menu Custom Types 3 Select a custom paper type name and then select a paper type Note Paper is the factory default paper type for all user defined custom names 4 Click Submit Usin...

Страница 63: ...tch the paper loaded in the tray Preprinting perforation and creasing may significantly affect the print quality and cause jams or other paper feed problems Before loading the card stock on the tray flex and fan the card stock to loosen them Straighten the edges on a level surface Tips on using envelopes From the printer control panel set the paper size type texture and weight in the Paper menu to...

Страница 64: ...ding labels on the tray flex and fan labels to loosen them Straighten the edges on a level surface Note Vinyl and polyester labels are supported only in the MS710 Series printer models Tips on using transparencies From the printer control panel set the paper size type texture and weight in the Paper menu to match the transparencies loaded in the tray Print a test page on the transparencies being c...

Страница 65: ...e paper correctly Leave paper in its original wrapper until it is time to use it This limits the exposure of paper to moisture changes that can degrade its performance Store paper in its original wrapper in the same environment as the printer for 24 to 48 hours before printing Extend the time several days if the storage or transportation environment is very different from the printer environment T...

Страница 66: ...ontent Business papers should have low moisture 4 5 Bending resistance and proper stiffness means optimum feeding through the printer Thickness impacts how much can be loaded into a tray Surface roughness measured in Sheffield units impacts print clarity and how well toner fuses to the paper Surface friction determines how easily sheets can be separated Grain and formation impacts curling which al...

Страница 67: ...Preprinted papers that can be affected by the temperature in the printer fuser Preprinted papers that require a registration the precise location on the page greater than 2 3 mm 0 9 in such as optical character recognition OCR forms In some cases registration can be adjusted with a software application to successfully print on these forms Coated papers erasable bond synthetic papers thermal papers...

Страница 68: ...en printing on paper less than 210 mm 8 3 inches wide the printer may print at a reduced speed after a period of time to ensure the best print performance Paper size1 Dimensions Standard or optional 250 or 550 sheet tray Optional 2100 sheet tray Multipurpose feeder Duplex A4 210 x 297 mm 8 3 x 11 7 in A5 148 x 210 mm 5 8 x 8 3 in 2 A6 105 x 148 mm 4 1 x 5 8 in X 1 If your preferred default paper s...

Страница 69: ...9 x 8 9 in X X 10 Envelope 105 x 241 mm 4 1 x 9 5 in X X DL Envelope 110 x 220 mm 4 3 x 8 7 in X X C5 Envelope 162 x 229 mm 6 38 x 9 01 in X X B5 Envelope 176 x 250 mm 6 93 x 9 84 in X X 1 If your preferred default paper size cannot be set in the printer control panel then you may select common paper sizes that correspond to the position of the length guide in the tray from the Paper Size Type men...

Страница 70: ...l is supported in duplex mode only if the width is from 105 mm 4 13 in to 216 mm 8 5 in and the length is from 148 mm 5 83 in to 356 mm 14 in Paper sizes types and weights supported by the output options Supported paper sizes Paper size 4 bin mailbox Output expander and high capacity output expander Staple finisher Staple hole punch finisher A6 X X A5 1 1 3 JIS B5 2 2 Executive 2 2 Letter A4 Legal...

Страница 71: ...0 90 g m2 16 24 lb bond Paper labels 180 g m2 48 Ib bond X X X Dual web and Integrated 180 g m2 48 Ib bond X X X Bond 90 176 g m2 24 47 lb bond X X X 60 90 g m2 16 24 lb bond Envelope 105 g m2 28 Ib bond X X X Rough Envelope 105 g m2 28 Ib bond X X X Letterhead 90 176 g m2 24 47 lb bond X X X 60 90 g m2 16 24 lb bond 1 The finisher stacks the paper but does not staple or punch holes in it 2 Print ...

Страница 72: ...d X X X 60 90 g m2 16 24 lb bond Heavy paper 90 176 g m2 24 47 lb bond X X X 60 90 g m2 16 24 lb bond Rough cotton 90 176 g m2 24 47 lb bond X X X 60 90 g m2 16 24 lb bond Custom type x 90 176 g m2 24 47 lb bond X X X 60 90 g m2 16 24 lb bond 1 The finisher stacks the paper but does not staple or punch holes in it 2 Print on transparencies by batches of only up to 20 to prevent them from sticking ...

Страница 73: ...choose File Print If necessary click the disclosure triangle to see more options 2 From the Print dialog and pop up menus adjust the settings if necessary Note To print on a specific paper type adjust the paper type setting to match the paper loaded or select the appropriate tray or feeder 3 Click Print Adjusting toner darkness Using the Embedded Web Server 1 Open a Web browser and then type the I...

Страница 74: ... USB port Notes A flash drive icon appears on the printer control panel and in the held jobs icon when a flash drive is installed If you insert the flash drive when the printer requires attention such as when a jam has occurred then the printer ignores the flash drive If you insert the flash drive while the printer is processing other print jobs then Busy appears After these print jobs are process...

Страница 75: ...ntrol panel to print files from the flash drive Supported flash drives and file types Notes High speed USB flash drives must support the full speed standard Low speed USB devices are not supported USB flash drives must support the File Allocation Table FAT system Devices formatted with New Technology File System NTFS or any other file system are not supported Recommended flash drives File type Lex...

Страница 76: ...m the computer It must be four digits using the numbers 0 9 Repeat Job Expiration Lets you print and store print jobs in the printer memory for reprinting Verify Job Expiration Lets you print one copy of a print job while the printer holds the remaining copies It allows you to examine if the first copy is satisfactory The print job is automatically deleted from the printer memory once all copies a...

Страница 77: ...t your user name select the print job specify the number of copies Print For Macintosh users 1 With a document open choose File Print If necessary click the disclosure triangle to see more options 2 From the print options or Copies Pages pop up menu choose Job Routing 3 Select the print job type Confidential Repeat Reserve or Verify and then assign a user name For a confidential print job also ent...

Страница 78: ...nter control panel 1 From the printer control panel press 2 When a list of print jobs appears select the job to cancel and then press 3 Press to go back to the home screen Canceling a print job from the computer For Windows users 1 Open the printers folder and then select your printer 2 From the print queue select the print job you want to cancel and then delete it For Macintosh users 1 From Syste...

Страница 79: ...curity Settings Help Edit Security Setups 4 Miscellaneous Security Settings 3 Confidential Print Erase Temporary Data Files Security Audit Log Set Date and Time General Settings Flash Drive Menu Print Settings Print All Guides Print Quality Printing Guide Print Defects Guide Information Guide Supplies Guide 1 Depending on the printer setup this menu item appears as Network Setup Page or Network x ...

Страница 80: ...ppears only in non touch screen printer models Paper Size Type menu Use To Tray x Size A4 A5 A6 JIS B5 Letter Legal Executive Oficio Mexico Folio Statement Universal 7 3 4 Envelope 9 Envelope 10 Envelope DL Envelope C5 Envelope B5 Envelope Other Envelope Specify the paper size loaded in each tray Notes Letter is the U S factory default setting A4 is the international factory default setting If two...

Страница 81: ...ure automatic tray linking MP Feeder Size A4 A5 A6 JIS B5 Letter Legal Executive Oficio Mexico Folio Statement Universal 7 3 4 Envelope 9 Envelope 10 Envelope DL Envelope C5 Envelope B5 Envelope Other Envelope Specify the paper size loaded in the multipurpose feeder Notes Letter is the U S factory default setting A4 is the international factory default setting From the Paper menu set Configure MP ...

Страница 82: ...xecutive Oficio Mexico Folio Statement Universal Specify the paper size being manually loaded Note Letter is the U S factory default setting A4 is the international factory default setting Manual Paper Type Plain Paper Card Stock Transparency Recycled Labels Bond Letterhead Preprinted Colored Paper Light Paper Heavy Paper Rough Cotton Custom Type x Specify the paper type being manually loaded Note...

Страница 83: ...Determine when the printer selects paper from the multipurpose feeder Notes Cassette is the factory default setting Cassette configures the multipurpose feeder as the automatic paper source Manual sets the multipurpose feeder only for manual feed print jobs First configures the multipurpose feeder as the primary paper source Substitute Size menu Use To Substitute Size Off Statement A5 Letter A4 Al...

Страница 84: ...th Normal Rough Specify the relative texture of the labels loaded in a specific tray Note Normal is the factory default setting Vinyl Labels Texture Smooth Normal Rough Specify the relative texture of the vinyl labels loaded in a specific tray Note Normal is the factory default setting Bond Texture Smooth Normal Rough Specify the relative texture of the bond paper loaded in a specific tray Note Ro...

Страница 85: ... relative texture of the rough or cotton paper loaded in a specific tray Note Rough is the factory default setting Custom x Texture Smooth Normal Rough Specify the relative texture of the custom paper loaded in a specific tray Note Normal is the factory default setting Paper Weight menu Use To Plain Weight Light Normal Heavy Specify the relative weight of the plain paper loaded Note Normal is the ...

Страница 86: ...the rough envelope loaded Note Normal is the factory default setting Letterhead Weight Light Normal Heavy Specify the relative weight of the letterhead loaded Note Normal is the factory default setting Preprinted Weight Light Normal Heavy Specify the relative weight of the preprinted paper loaded Note Normal is the factory default setting Colored Weight Light Normal Heavy Specify the relative weig...

Страница 87: ...ls as the paper type Bond Loading Duplex Off Determine and set two sided printing for all print jobs with Bond as the paper type Letterhead Loading Duplex Off Determineandsettwo sidedprintingforallprintjobswithLetterhead as the paper type Preprinted Loading Duplex Off Determineandsettwo sided printingfor all printjobswithPreprinted as the paper type Colored Loading Duplex Off Determine and set two...

Страница 88: ...he print dialog depending on your operating system Custom Types menu Use To Custom Type x Paper Card Stock Transparency Rough Cotton Labels Vinyl Labels Envelope Associate a paper or specialty media type with a factory default custom type name or a user defined custom name created from the Embedded Web Server or from MarkVisionTM Professional Notes Paper is the factory default setting The custom m...

Страница 89: ...t height Notes If the height exceeds the maximum then the printer uses the maximum height allowed 14 inches is the U S factory default setting You can increase the height in 0 01 inch increments 356 mm is the international factory default setting You can increase the height in 1 mm increments Feed Direction Short Edge Long Edge Specify the feed direction if the paper can be loaded in either direct...

Страница 90: ...designated bin is full Notes Standard Bin is the factory default setting If multiple bins are assigned the same name then the name only appears once in the bin list x can be any number between 1 and 12 if the appropriate optional bins are installed Assign Type Bin Plain Paper Bin Card Stock Bin Transparency Bin Recycled Bin Labels Bin Vinyl Labels Bin Bond Bin Envelope Bin Rough Envelope Bin Lette...

Страница 91: ...rmation about the network printer settings such as the TCP IP address information Notes This menu item is available only when more than one network option is installed This menu item appears only in network printers or in printers connected to print servers Profiles List Print a list of profiles stored in the printer Note This menu item appears only when LDSS is enabled Print Fonts PCL Fonts PostS...

Страница 92: ...examine incoming data and it uses the default printer language specified in the Setup menu PS SmartSwitch On Off Set the printer to automatically switch to PS emulation when a print job requires it regardless of the default printer language Notes On is the factory default setting If PS SmartSwitch is disabled then the printer does not examine incoming data and it uses the default printer language ...

Страница 93: ...rd disk Auto buffers print jobs only when the printer is busy processing data from another input port Changing this setting from the printer control panel and then exiting the menus causes the printer to restart The menu selection is then updated Mac Binary PS On Off Auto Set the printer to process Macintosh binary PostScript print jobs Notes Auto is the factory default setting Off filters print j...

Страница 94: ...low the printer to print a banner page Note Off is the factory default setting TCP IP menu To access the menu navigate to either of the following Network Ports Standard Network Standard Network Setup TCP IP Network Ports Network x Network x Setup TCP IP Note This menu is available only in network printers or printers attached to print servers Use To Set Hostname Set the current TCP IP host name No...

Страница 95: ... setting WINS Server Address View or change the current WINS server address Enable DDNS Yes No View or change the current DDNS setting Note Yes is the factory default setting Enable mDNS Yes No View or change the current mDNS setting Note Yes is the factory default setting DNS Server Address View or change the current DNS server address Backup DNS Server Address View or change the backup DNS serve...

Страница 96: ...less network and enable network security Notes Start Push Button Method connects the printer to a wireless network when buttons on both the printer and the access point wireless router are pressed within a given period of time Start PIN Method connects the printer to a wireless network when a PIN on the printer is entered into the wireless settings of the access point Enable Disable WPS Auto detec...

Страница 97: ...Note The AppleTalk name can be changed only from the Embedded Web Server View Address Show the assigned AppleTalk address Note The AppleTalk address can be changed only from the Embedded Web Server Set Zone list ofzonesavailableon thenetwork Provide a list of AppleTalk zones available on the network Note The default zone for the network is the factory default setting Standard USB menu Use To PCL S...

Страница 98: ...ng Any jobs already buffered on the printer hard disk are printed before normal processing resumes The USB buffer size value can be changed in 1 K increments The maximum size allowed depends on the amount of memory in the printer the size of the other link buffers and whether Resource Save is set to On or Off To increase the maximum size range for the USB Buffer disable or reduce the size of the p...

Страница 99: ... On is the factory default setting When set to Off the printer does not examine incoming data The printer uses PostScript emulation if PS SmartSwitch is set to On It uses the default printer language specified in the Setup menu if PS SmartSwitch is set to Off PS SmartSwitch On Off Set the printer to automatically switch to PS emulation when a print job received through a serial port requires it re...

Страница 100: ...rs print jobs only if the printer is busy processing data from another input port Changing this setting from the printer control panel and then exiting the menus causes the printer to restart The menu selection is then updated Advanced Status On Off Enable bidirectional communication through the parallel port Notes On is the factory default setting Off disables parallel port negotiation Protocol S...

Страница 101: ...h the USB port Serial x menu Note This menu appears only when an optional serial card is installed Use To PCL SmartSwitch On Off Set the printer to automatically switch to PCL emulation when a print job received through a serial port requires it regardless of the default printer language Notes On is the factory default setting When set to Off the printer does not examine incoming data The printer ...

Страница 102: ...the size of the other link buffers and whether Resource Save is set to On or Off To increase the maximum size range for the Serial Buffer disable or reduce the size of the parallel serial and network buffers Changing this setting from the printer control panel and then exiting the menus causes the printer to restart The menu selection is then updated Job Buffering Off On Auto Temporarily store pri...

Страница 103: ...s sent in each transmission frame Note 8 is the factory default setting Parity Even Odd None Ignore Set the parity for serial input and output data frames Note None is the factory default setting Honor DSR On Off Determine whether the printer uses the DSR Signal Notes Off is the factory default setting DSR is a handshaking signal used by most serial cables The serial port uses DSR to distinguish d...

Страница 104: ...hentication required for scan to e mail privileges Note No authentication required is the factory default setting Device Initiated E mail None Use Device SMTP Credentials Specify what credentials will be used when communicating to the SMTP server Notes None is the factory default setting for Device Initiated E mail Device Userid and Device Password are used to log in to the SMTP server when Use De...

Страница 105: ...t jobs Verify Job Expiration Off 1 hour 4 hours 24 hours 1 week Set a time limit on how long the printer stores print jobs needing verification Reserve Job Expiration Off 1 hour 4 hours 24 hours 1 week Set a time limit on how long the printer stores print jobs for printing at a later time Note Off is the factory default setting Erase Temporary Data Files menu Erase Temporary Data Files deletes onl...

Страница 106: ... factory default setting Configure Log Enable Audit Yes No Enable Remote Syslog No Yes Remote Syslog Facility 0 23 Severity of events to log 0 7 Specify how and whether or not audit logs are created Notes Enable Audit determines if events are recorded in the secure audit log and remote syslog No is the factory default setting Enable Remote Syslog determines if logs are sent to a remote server No i...

Страница 107: ...chronizes the clocks of devices on a network Notes On is the factory default setting The setting is turned off if you manually set the date and time Settings menu General Settings menu Use To Display Language English Francais Deutsch Italiano Espanol Dansk Norsk Nederlands Svenska Portuguese Suomi Russian Polski Greek Magyar Turkce Cesky Simplified Chinese Traditional Chinese Korean Japanese Set t...

Страница 108: ...he use of power and of paper and specialty media Paper minimizes the amount of paper and specialty media needed for a print job Performance may be affected but print quality is not Quiet Mode Off On Reduce the amount of noise produced by the printer Notes For touch screen printer models touch Quiet Mode and then select from the options Off is the factory default setting This setting supports the p...

Страница 109: ...om key information for the control panel keyboard The additional tabs enable access to accent marks and symbols from the keypad on the control panel Notes This menu appears only in touch screen printer models Custom Key 2 appears only in select touch screen printer models Paper Sizes US Metric Specify the unit of measurement for paper sizes Notes US is the factory default setting The initial setti...

Страница 110: ...for Right side Displayed Information continued Custom Text x Customize displayed information that will appear on the upper left and right corners of the control panel Note This menu appears only in touch screen printer models Displayed Information continued Black Toner Customize the displayed information for Black Toner Select from the following options When to display Do not display Display Messa...

Страница 111: ...ptions Display Do not display Notes Profiles and Apps appears only in touch screen printer models Display is the factory default setting for Search Held Jobs Held jobs and USB Drive Do not display is the factory default setting for Change Language Profiles and Apps Bookmarks and Jobs by user Home screen customization Forms and Favorites Background and Idle Screen Eco Settings Change the icons and ...

Страница 112: ...dback Button Feedback On Off Volume 1 10 Specify whether icons and buttons have audio feedback Notes This menu appears only in touch screen printer models On is the factory default setting for Button Feedback 5 is the factory default setting for Volume Show Bookmarks Yes No Specify whether bookmarks are displayed from the Held Jobs area Notes This menu appears only in touch screen printer models Y...

Страница 113: ...0 Specify the number of minutes of inactivity before the printer enters a lower power state Notes Standby Mode appears only in touch screen printer models 15 is the factory default setting Timeouts Sleep Mode Disabled 1 120 Settheamountoftimetheprinterwaitsafterajobisprintedbefore it goes into a reduced power state Notes 20 is the factory default setting Disabled appears only when Energy Conserve ...

Страница 114: ...n when the Screen Timeout timer expires Notes Prolong Screen Timeout appears only in touch screen printer models On allows the user to reset the Screen Timeout timer instead of returning to ready state Off follows the normal Screen Timeout value Off is the factory default setting Timeouts Print Timeout Disabled 1 255 sec Set the amount of time in seconds the printer waits to receive an end of job ...

Страница 115: ...ber of automatic reboots that the printer can perform Notes 5 is the factory default setting If the printer performs a number of automatic reboots that is the same as the menu setting within a certain amount of time then the printer displays the applicable error instead of rebooting Print Recovery Auto Continue Disabled 5 255 Let the printer automatically continue printing from certain offline sit...

Страница 116: ...ernate Determine how the printer while in idle state reacts to a short press of the Sleep button Note Sleep is the factory default setting Press and Hold Sleep Button Do nothing Sleep Hibernate Determine how the printer while in idle state reacts when you press and hold the Sleep button Note Do nothing is the factory default setting Factory Defaults Do Not Restore Restore Now Restore the printer s...

Страница 117: ...2 2 is the factory default setting Sides Duplex 1 sided 2 sided Specify whether prints are on one side or on both sides of the page Note 1 sided is the factory default setting Staple Off On Specify whether prints are stapled Notes Off is the factory default setting On allows the printer to staple print jobs This menu appears only when a supported staple finisher is installed Hole Punch Off On Spec...

Страница 118: ...that multiple page images be printed on one side of a paper Notes Off is the factory default setting The number selected is the number of page images that will print per side Paper Saver Border None Solid Print a border on each page image when using N Up pages per side Notes None is the factory default setting This setting affects jobs if the value of the Paper Saver setting in the same menu is no...

Страница 119: ...nserted in a print job Note Do Not Print is the factory default setting Print Settings Setup menu Use To Printer Language PCL Emulation PS Emulation Set the default printer language Notes PCL Emulation is the factory default setting PostScript emulation uses a PostScript interpreter for processing print jobs PCL Emulation uses a PCL interpreter for processing print jobs Setting a printer language ...

Страница 120: ... hard disk places them in permanent storage Downloads remain in the flash memory or printer hard disk even when the printer is turned off This menu item appears only if an optional flash memory or a formatted working printer hard disk is installed Resource Save On Off Specify how the printer handles temporary downloads such as fonts and macros stored in the RAM when the printer receives a print jo...

Страница 121: ...fault setting Blank Pages Do Not Print Print Specify whether blank pages are inserted in a print job Note Do Not Print is the factory default setting Collate 1 1 1 2 2 2 1 2 3 1 2 3 Stack the pages of a print job in sequence when printing multiple copies Note 1 1 1 2 2 2 is the factory default setting Separator Sheets Off Between Copies Between Jobs Between Pages Specify whether blank separator sh...

Страница 122: ...on Auto Landscape Portrait Specify the orientation of a multiple page document Note Auto is the factory default setting The printer chooses between portrait and landscape Paper Saver Border None Solid Print a border when using Paper Saver Note None is the factory default setting Staple Job Off On Specify whether printed output is stapled Notes Off is the factory default setting This menu appears o...

Страница 123: ...and after all page 2 s Between Jobs sets the same offset position for the entire print job regardless of the number of copies printed This menu appears only when a supported staple finisher is installed 1 This menu appears only in touch screen printer models 2 This menu appears only in non touch screen printer models Quality menu Use To Print Resolution 300 dpi 600 dpi 1200 dpi 1200 Image Q 2400 I...

Страница 124: ...ars only when a formatted non defective printer hard disk is installed Make sure the printer hard disk is not read write or write protected Use To Job Accounting Log Off On Determine and set if the printer creates a log of the print jobs it receives Note Off is the factory default setting Job Accounting Utilities Print and delete log files or export them to a flash drive Accounting Log Frequency W...

Страница 125: ...responds when disk usage reaches the maximum limit 100MB Note None is the factory default setting URL to Post Logs Determine and set where the printer posts job accounting logs E mail to Send Logs Specify the e mail address to which the printer sends job accounting logs Log File Prefix Specify the prefix you want for the log file name Note The current host name defined in the TCP IP menu is used a...

Страница 126: ...urn to the originating screen after the deletion Do Not Delete sets the printer display to return to the main Utilities menu Activate Hex Trace Assist in isolating the source of a print job problem Notes When activated all data sent to the printer is printed in hexadecimal and character representation and control codes are not executed To exit or deactivate Hex Trace turn off the printer Coverage ...

Страница 127: ...rd protected Job Buffer Size must not be set to 100 PCL Emul menu Use To Font Source Resident Disk Download Flash All Specify the set of fonts used by the Font Name menu Notes Resident is the factory default setting Resident shows the factory default set of fonts downloaded in the RAM Flash and Disk settings show all fonts resident in that option The flash option must be properly formatted and can...

Страница 128: ...aracters per inch cpi Pitch can be increased or decreased in 0 01 cpi increments For nonscalable monospaced fonts the pitch appears on the display but it cannot be changed PCL Emulation Settings Orientation Portrait Landscape Specify the orientation of text and graphics on the page Notes Portrait is the factory default setting Portrait prints text and graphics parallel to the short edge of the pag...

Страница 129: ...al Env Off None 0 199 Configure the printer to work with printer software or programs that use different source assignments for trays and feeders Notes Off is the factory default setting None ignores the Select Paper Feed command This option appears only when it is selected by the PCL 5 interpreter 0 199 allows a custom setting to be assigned Tray Renumber View Factory Defaults MPF Default 8 T1 De...

Страница 130: ...rs Zapf Chancery NewSansMTJA NewSansMTCS NewSansMTCT NewSansMTKO Set the default font for HTML documents Note The Times font is used in HTML documents that do not specify a font Use To Font Size 1 255 pt Set the default font size for HTML documents Notes 12 pt is the factory default setting Font size can be increased in 1 point increments Scale 1 400 Scale the default font for HTML documents Notes...

Страница 131: ... Best Fit Anchor Center Fit Height Width Fit Height Fit Width Scale the image to fit the selected paper size Notes Best Fit is the factory default setting When Auto Fit is set to On Scaling is automatically set to Best Fit Orientation Portrait Landscape Reverse Portrait Reverse Landscape Set the image orientation Note Portrait is the factory default setting Help menu The Help menu consists of a se...

Страница 132: ...about resolving print defects Menu Map Provides a list of the printer control panel menus and settings Information Guide Provides help in locating additional information Connection Guide Provides information about connecting the printer locally USB or to a network Moving Guide Provides instructions for safely moving the printer Supplies Guide Provides part numbers for ordering supplies Understandi...

Страница 133: ...printing multiple pages on one side of a single sheet of paper Using recycled paper As an environmentally conscious company Lexmark supports the use of recycled office paper produced specifically for use in laser printers For more information on recycled papers that work well with your printer see Using recycled paper and other office papers on page 66 Conserving supplies Use both sides of the pap...

Страница 134: ...ed are reset to the factory default settings Off supports the performance specifications of the printer Energy Reduce energy use especially when the printer is idle Notes Printer engine motors do not start until a document is ready to print You may notice a short delay before the first page is printed The printer enters Sleep mode after one minute of inactivity The printer display is turned off wh...

Страница 135: ...de Using the Embedded Web Server 1 Open a Web browser and then type the printer IP address in the address field Notes View the printer IP address in the TCP IP section in the Network Ports menu The IP address appears as four sets of numbers separated by periods such as 123 123 123 123 If you are using a proxy server then temporarily disable it to load the Web page correctly 2 Navigate to Settings ...

Страница 136: ...ts brightness settings Using the Embedded Web Server 1 Open a Web browser and then type the printer IP address in the address field Notes View the printer IP address in the TCP IP section in the Network Ports menu The IP address appears as four sets of numbers separated by periods such as 123 123 123 123 If you are using a proxy server then temporarily disable it to load the Web page correctly 2 C...

Страница 137: ...ities may not exist in your area The foam used in Lexmark packaging is recyclable where foam recycling facilities exist Facilities may not exist in your area When you return a cartridge to Lexmark you can reuse the box that the cartridge came in Lexmark will recycle the box Returning Lexmark cartridges for reuse or recycling Lexmark Cartridge Collection Program diverts millions of Lexmark cartridg...

Страница 138: ...emporarily buffer user data during simple print jobs Non volatile memory Your printer may use two forms of non volatile memory EEPROM and NAND flash memory Both types are used to store the operating system device settings network information bookmark settings and embedded solutions Hard disk memory Some printers have a hard disk drive installed The printer harddiskisdesignedfordevice specificfunct...

Страница 139: ...o physically destroy each hard disk where data is stored Erasing volatile memory Thevolatilememory RAM installedinyourprinterrequires apowersourcetoretaininformation Toerasethebuffered data turn off the printer Erasing non volatile memory Erase individual settings device and network settings security settings and embedded solutions by following these steps 1 Turn off the printer 2 Hold down 2 and ...

Страница 140: ...fication pass A secure overwrite is compliant with the DoD 5220 22 M standard for securely erasing data from a hard disk Highly confidential information should be wiped using this method 4 Press the up or down arrow button until Yes appears and then proceed with disk wiping Notes A status bar will indicate the progress of the disk wiping task Disk wiping can take from several minutes to more than ...

Страница 141: ...inter hard disk 4 Select Yes to proceed with disk wiping Notes Do not turn off the printer during the encryption process Doing so may result in loss of data Disk encryption can take from several minutes to more than an hour during which the printer will be unavailable for other user tasks A status bar will indicate the progress of the disk wiping task After the disk has been encrypted the printer ...

Страница 142: ...power cord from the electrical outlet and disconnect all cables from the printer before proceeding 2 Remove paper from the standard bin and multipurpose feeder 3 Remove any dust lint and pieces of paper around the printer using a soft brush or vacuum 4 Dampen a clean lint free cloth with water and use it to wipe the outside of the printer Warning Potential Damage Do not use household cleaners or d...

Страница 143: ...n temporarily disable it to load the Web page correctly 2 Click Device Status More Details Configuring supply notifications from the Embedded Web Server You can determine how you would like to be notified when supplies run nearly low low very low or reach their end of life by setting the selectable alerts Notes Selectable alerts can be set on the toner cartridge imaging unit and maintenance kit Al...

Страница 144: ...In other countries or regions go to www lexmark com or contact the place where you purchased the printer Using genuine Lexmark parts and supplies Your Lexmark printer is designed to function best with genuine Lexmark supplies and parts Use of third party supplies or parts may affect the performance reliability or life of the printer and its imaging components Use of third party supplies or parts c...

Страница 145: ... type view the label on the fuser Do either of the following Remove the toner cartridge and imaging unit The two digit fuser type code such as 00 or 01 can be seen on the front of the fuser Warning Potential Damage Do not expose the imaging unit to direct light for more than 10 minutes Extended exposure to light may cause print quality problems Pull down the printer rear door The two digit fuser t...

Страница 146: ...Part number M5100 Series regular fuser maintenance kit type 05 40X8425 M5100 Series regular fuser maintenance kit type 06 40X8426 M5100 Series regular fuser maintenance kit type 07 40X8427 M5100 Series regular fuser maintenance kit type 08 40X8428 M5100 Series regular fuser maintenance kit type 09 40X8429 Lexmark roller kit Part number M5100 Series roller kit 40X7706 Storing supplies Choose a cool...

Страница 147: ...lacing supplies Replacing the toner cartridge 1 Lift the front cover and then pull down the multipurpose feeder door 2 1 2 Pull the cartridge out of the printer using the handle Maintaining the printer 147 ...

Страница 148: ...cartridge with the arrows on the side rails inside the printer Note Make sure the cartridge is fully pushed in Warning Potential Damage When replacing a toner cartridge do not leave the imaging unit exposed to direct light for an extended period of time Extended exposure to light may cause print quality problems 5 Close the multipurpose feeder door and the front cover 2 1 Maintaining the printer 1...

Страница 149: ...e front cover and then pull down the multipurpose feeder door 2 1 2 Pull out the toner cartridge from the printer using the handle 3 Lift the green handle and then pull out the imaging unit from the printer 1 2 Maintaining the printer 149 ...

Страница 150: ... than 10 minutes Extended exposure to light may cause print quality problems Warning Potential Damage Do not touch the photoconductor drum Doing so may affect the print quality of future print jobs 6 Insert the imaging unit into the printer by aligning the arrows on the side rails of the imaging unit with the arrows on the side rails inside the printer Maintaining the printer 150 ...

Страница 151: ...ner cartridge into the printer by aligning the side rails of the cartridge with the arrows on the side rails inside the printer 8 Close the multipurpose feeder door and the front cover 2 1 Maintaining the printer 151 ...

Страница 152: ...oor 2 Pull down the latch of the staple cartridge holder and then pull the holder out of the finisher 3 Squeeze both sides of the empty staple case with your fingers and then remove the staple case from the cartridge 1 1 2 Maintaining the printer 152 ...

Страница 153: ... safely Before moving the printer CAUTION POTENTIAL INJURY Before moving the printer follow these guidelines to avoid personal injury or printer damage Turn off the printer and then unplug the power cord from the electrical outlet Disconnect all cords and cables from the printer If two or more optional finishers are installed then remove the finishers individually from the printer Notes Make sure ...

Страница 154: ...ard the front of the tray until it clicks into place Use the handholds located on both sides of the printer to lift it Make sure your fingers are not under the printer when you set it down Make sure there is adequate clearance around the printer Use only the power cord provided with this product or the manufacturer s authorized replacement Maintaining the printer 154 ...

Страница 155: ...autions Any cart used to move the printer must have a surface able to support the full footprint of the printer Any cart used to move the hardware options must have a surface able to support the dimensions of the hardware options Keep the printer in an upright position Avoid severe jarring movements Shipping the printer When shipping the printer use the original packaging or call the place of purc...

Страница 156: ...nfidential print settings Note This feature is available only in network printers or printers connected to print servers 1 Open a Web browser and then type the printer IP address in the address field Notes View the printer IP address in the TCP IP section in the Network Ports menu The IP address appears as four sets of numbers separated by periods such as 123 123 123 123 If you are using a proxy s...

Страница 157: ... you want to keep a list of the current menu settings for reference then print a menu settings page before restoring the factory default settings For more information see Printing a menu settings page on page 41 If you want a more comprehensive method of restoring the printer factory default settings then perform the Wipe All Settings option For more information see Erasing non volatile memory on ...

Страница 158: ... jam Doing so could permanently damage the fuser Avoiding jams Load paper properly Make sure paper lies flat in the tray Correct loading of paper Incorrect loading of paper Do not remove a tray while the printer is printing Do not load a tray while the printer is printing Load it before printing or wait for a prompt to load it Do not load too much paper Make sure the stack height is below the maxi...

Страница 159: ...ser s Guide Allow the paper to enter the optional mailbox bins properly Make sure to adjust the bin extender so that the paper size indicators match the size of the paper used Notes If the bin extender is shorter than the size of the paper you are printing on then the paper causes a jam in the mailbox bin For example if you are printing on a legal size paper and the bin extender is set to letter s...

Страница 160: ...d type are set correctly on the computer or printer control panel Store paper per manufacturer recommendations Understanding jam messages and locations When a jam occurs a message indicating the jam location and information to clear the jam appears on the printer display Open the doors covers and trays indicated on the display to remove the jam Notes When Jam Assist is set to On Discarding pages a...

Страница 161: ...unit and then remove the jammed paper 4 Multipurpose feeder x page jam clear manual feeder 250 Remove all paper from the multipurpose feeder and then remove the jammed paper 5 Duplex area x page jam remove tray 1 to clear duplex 235 239 Pull out tray 1 completely then push down the front duplex flap and then remove the jammed paper 6 Trays x page jam open tray x 24x Pull out the indicated tray and...

Страница 162: ...f the mailbox and then remove the jammed paper 11 Staple finisher rear door x page jam remove paper open finisher rear door Leave paper in bin 451 Open the rear door of the staple finisher and then remove the jammed paper x page jam lift front cover to remove cartridge 200 201 CAUTION HOT SURFACE The inside of the printer might be hot To reduce the risk of injury from a hot component allow the sur...

Страница 163: ... surface Warning Potential Damage Do not expose the imaging unit to direct light for more than 10 minutes Extended exposure to light may cause print quality problems Warning Potential Damage Do not touch the photoconductor drum Doing so may affect the print quality of future print jobs 6 Pull the jammed paper gently to the right and then remove it from the printer Note Make sure all paper fragment...

Страница 164: ...l the imaging unit Note Use the arrows on the side of the printer as a guide 8 Insert the cartridge into the printer and then push the green handle back into place Notes Align the arrows on the guides of the toner cartridge with the arrows in the printer Make sure the cartridge is fully pushed in Clearing jams 164 ...

Страница 165: ...age jam open upper rear door 202 CAUTION HOT SURFACE The inside of the printer might be hot To reduce the risk of injury from a hot component allow the surface to cool before touching 1 Pull down the rear door 2 Firmly grasp the jammed paper on each side and then gently pull it out Note Make sure all paper fragments are removed Clearing jams 165 ...

Страница 166: ...r rear door 231 234 CAUTION HOT SURFACE The inside of the printer might be hot To reduce the risk of injury from a hot component allow the surface to cool before touching 1 Pull down the rear door 2 Firmly grasp the jammed paper on each side and then gently pull it out Note Make sure all paper fragments are removed Clearing jams 166 ...

Страница 167: ...ear door 4 Push the back of the standard tray 5 Press down the rear duplex flap then firmly grasp the jammed paper and then gently pull the paper out Note Make sure all paper fragments are removed Clearing jams 167 ...

Страница 168: ...Next Clear the jam press OK x page jam remove standard bin jam 203 1 Firmly grasp the jammed paper on each side and then gently pull it out Note Make sure all paper fragments are removed 2 To clear the message and continue printing select Next Clear the jam press OK Clearing jams 168 ...

Страница 169: ...y 1 2 3 2 Push down the front duplex flap then firmly grasp the jammed paper and then gently pull the paper to the right and out of the printer Note Make sure all paper fragments are removed 1 2 3 Insert the tray 4 To clear the message and continue printing select Next Clear the jam press OK Clearing jams 169 ...

Страница 170: ...nter display and then pull the tray 2 Firmly grasp the jammed paper on each side and then gently pull it out Note Make sure all paper fragments are removed 3 Insert the tray 4 To clear the message and continue printing select Next Clear the jam press OK Clearing jams 170 ...

Страница 171: ...ts are removed 2 Flex the sheets back and forth to loosen them and then fan them Do not fold or crease the paper Straighten the edges on a level surface 3 Reload paper into the multipurpose feeder 4 Slide the paper guide until it lightly rests against the edge of the paper 5 To clear the message and continue printing select Next Clear the jam press OK Clearing jams 171 ...

Страница 172: ...om the stapler bin firmly grasp the jammed paper on each side and then gently pull it out Note Make sure all paper fragments are removed 2 Open the stapler door 3 Pull down the latch of the staple cartridge holder and then pull the holder out of the printer Clearing jams 172 ...

Страница 173: ...4 Use the metal tab to lift the staple guard and then remove any loose staples 5 Press down the staple guard until it clicks into place Clearing jams 173 ...

Страница 174: ... near the metal bracket Warning Potential Damage Do not tap the cartridge on a hard surface This could damage the cartridge 7 Push the cartridge holder firmly back into the stapler unit until the cartridge holder clicks into place 8 Close the stapler door 9 To clear the message and continue printing select Next Clear the jam press OK Clearing jams 174 ...

Страница 175: ...the rear staple finisher door 2 Firmly grasp the jammed paper on each side and then gently pull it out Note Make sure all paper fragments are removed 3 Close the staple finisher door 4 To clear the message and continue printing select Next Clear the jam press OK Clearing jams 175 ...

Страница 176: ...he output expander rear door 2 Firmly grasp the jammed paper on each side and then gently pull it out Note Make sure all paper fragments are removed 3 Close the output expander rear door 4 To clear the message and continue printing select Next Clear the jam press OK Clearing jams 176 ...

Страница 177: ...box rear door Leave paper in bin 43y xx 1 Open the mailbox rear door 2 Firmly grasp the jammed paper on each side and then gently pull it out Note Make sure all paper fragments are removed 3 Close the mailbox rear door Clearing jams 177 ...

Страница 178: ...he mailbox bin then firmly grasp the jammed paper and then gently pull it out Note Make sure all paper fragments are removed 5 To clear the message and continue printing select Next Clear the jam press OK Clearing jams 178 ...

Страница 179: ...the printer control panel to clear the message and continue printing Cartridge nearly low 88 xy If necessary press on the printer control panel to clear the message and continue printing Cartridge very low x estimated pages remain 88 xy You may need to replace a toner cartridge very soon For more information see the Replacing supplies section of the User s Guide If necessary press on the printer c...

Страница 180: ...orientation Try one or more of the following Load the correct size and type of paper in the tray and then press on the printer control panel Note Make sure the paper size and type settings are specified in the Paper menu on the printer control panel Cancel the print job Check tray x connection Try one or more of the following Turn off the printer and then turn it back on If the error occurs a seco...

Страница 181: ...ditional printer memory Configuration change some held jobs were not restored 57 Held jobs are unavailable because of any of the following possible changes in the printer The printer firmware has been updated The tray for the print job is removed The print job is sent from a flash drive that is no longer attached to the USB port The printer hard disk contains print jobs that were stored when the h...

Страница 182: ...ter hard disk Install a printer hard disk with higher capacity Empty the hole punch box 1 Empty the hole punch box For more information see the Cleaning the printer section of the User s Guide 2 Reinsert the hole punch box into the finisher and then press on the printer control panel to clear the message Error reading USB drive Remove USB An unsupported USB device is inserted Remove the USB device...

Страница 183: ...rom the printer control panel press to clear the message and print using a different tray Check the tray length and width guides and make sure the paper is loaded properly in the tray Make sure the correct paper size and type are specified in Print Properties or in the Print dialog Make sure the paper size and type settings are specified in the Paper menu on the printer control panel Make sure the...

Страница 184: ...he electrical outlet 3 Install the specified tray 4 Connect the power cord to a properly grounded electrical outlet 5 Turn the printer back on Cancel the print job Reset the active bin Insufficient memory for Flash Memory Defragment operation 37 Try one or more of the following From the printer control panel press to stop the defragmentation and continue printing Delete fonts macros and other data...

Страница 185: ...Install additional printer memory Load staples Try one or more of the following Replace or insert the specified staple cartridge in the finisher For more information see the Replacing supplies section of the User s Guide From the printer control panel press to clear the message and continue printing Cancel the print job Load paper source with custom string orientation Try one or more of the follow...

Страница 186: ...nnot find a tray that has the correct size of paper then it prints from the default paper source Cancel the current job Load paper source with paper type paper size orientation Try one or more of the following Load the tray or feeder with the correct size and type of paper From the printer control panel press to clear the message and continue printing Note If the printer finds a tray that has the ...

Страница 187: ...Manual Feeder with paper type paper size orientation Try one or more of the following Load the feeder with the correct size and type of paper From the printer control panel press to clear the message and continue printing Note If no paper is loaded in the feeder then the printer manually overrides the request and then prints from an automatically selected tray Cancel the current job Maintenance ki...

Страница 188: ... Lexmark supply or part installed in the printer Your Lexmark printer is designed to function best with genuine Lexmark supplies and parts Use of third party supplies or parts may affect the performance reliability or life of the printer and its imaging components All life indicators are designed to function with Lexmark supplies and parts and may deliver unpredictable results if third party suppl...

Страница 189: ...rrent supplies to continue printing using the paper loaded in the tray Cancel the current print job Printer had to restart Last job may be incomplete From the printer control panel select Continue to clear the message and continue printing For more information visit http support lexmark com or contact customer support Parallel port x disabled 56 Do either of the following From the printer control ...

Страница 190: ...a properly grounded electrical outlet 6 Turn the printer back on Remove the specified bins 1 Turn off the printer 2 Unplug the power cord from the electrical outlet 3 Remove the specified bins 4 Contact customer support From the printer control panel press to clear the message and print without using the specified bins Reinstall missing or unresponsive cartridge 31 xy Try one or more of the follow...

Страница 191: ...ly then the imaging unit is defective Replace the imaging unit Remove defective disk 61 Remove and replace the defective printer hard disk Remove packaging material area name 1 Remove any remaining packaging material from the specified location 2 From the printer control panel press to clear the message and continue printing Remove paper from all bins Remove paper from all bins to clear the messag...

Страница 192: ...egion 0 Global 1 United States Canada 2 European Economic Area EEA Switzerland 3 Asia Pacific Australia New Zealand 4 Latin America 5 Africa Middle East rest of Europe 9 Invalid Notes The x and y values are the xy of the error code shown on the printer control panel The x and y values must match for printing to continue Replace imaging unit 0 estimated pages remain 84 xy Replace the imaging unit t...

Страница 193: ...stall a supported one to clear the message and continue printing For more information see the instruction sheet that came with the supply or see the Replacing supplies section of the User s Guide Note If you do not have a replacement imaging unit then see the Ordering supplies section of the User s Guide or visit www lexmark com Replace wiper 1 Replace the fuser wiper For more information see the ...

Страница 194: ...r control panel press to clear the message and continue printing Note The printer discards any data received through the USB port From the printer control panel set USB Buffer to Auto Supply needed to complete job Try one or more of the following From the printer control panel select Prompt for supplies to view all error messages that indicate what supplies are needed to continue processing the cu...

Страница 195: ...nter 2 Unplug the power cord from the electrical outlet 3 Remove the extra trays 4 Connect the power cord to a properly grounded electrical outlet 5 Turn the printer back on Tray x paper size unsupported The paper size in the specified tray is unsupported Replace it with a supported paper size Unformatted flash detected 53 Try one or more of the following From the printer control panel press to st...

Страница 196: ...lving printer problems Basic printer problems on page 196 Hardware and internal option problems on page 199 Paper feed problems on page 203 Basic printer problems The printer is not responding Action Yes No Step 1 Make sure the printer is turned on Is the printer turned on Go to step 2 Turn on the printer Step 2 Check if the printer is in Sleep mode or Hibernate mode Is the printer in Sleep mode o...

Страница 197: ...or extension cords Is the printer plugged into any surge protectors uninterruptible power supplies or extension cords Connect the printer power cord directly to a properly grounded electrical outlet Go to step 8 Step 8 Check if one end of the printer cable is plugged into a port on the printer and the other to the computer print server option or other network device Is the printer cable securely a...

Страница 198: ...The problem is solved Contact customer support Printer display is blank Action Yes No Step 1 Press the Sleep button on the printer control panel Does Ready appear on the printer display The problem is solved Go to step 2 Step 2 Turn off the printer then wait for about 10 seconds and then turn the printer back on Do Please wait and Ready appear on the printer display The problem is solved Turn off ...

Страница 199: ...y operate properly The problem is solved Go to step 3 Step 3 Print a menu settings page and then check if the tray is listed in the Installed Features list Note If the tray is listed in the menu settings page but paper jams when it enters or exits the tray then it may not be properly installed Is the tray listed in the menu settings page Go to step 4 For more information see the setup sheet that c...

Страница 200: ... the internal option listed in the menu settings page Go to step 4 Reinstall the internal option Step 4 a Check if the internal option is selected It may be necessary to manually add the internal option in the printer driver to make it available for print jobs For more information see Adding available options in the print driver on page 36 b Resend the print job Does the internal option operate co...

Страница 201: ...b Check if the tray closes properly Is the tray working The problem is solved Go to step 2 Step 2 a Turn off the printer then wait about 10 seconds and then turn the printer back on b Resend the print job Is the tray working The problem is solved Go to step 3 Step 3 Check if the tray is installed and recognized by the printer Print a menu settings page and then check if the tray is listed in the I...

Страница 202: ...s the Internal Solutions Port operate correctly The problem is solved Contact customer support USB parallel interface card does not operate correctly Action Yes No Step 1 Make sure the USB or parallel interface card is installed a Install the USB or parallel interface card For more information see Installing an Internal Solutions Port on page 18 b Print a menu settings page and then check if the U...

Страница 203: ...gned against the edges of the paper Make sure the paper is below the maximum paper fill indicator Check if you are printing on a recommended paper size and type b Insert the tray properly If jam recovery is enabled then the print jobs will reprint automatically Do paper jams still occur frequently Go to step 2 The problem is solved Step 2 a Load paper from a fresh package Note Paper absorbs moistu...

Страница 204: ...n verify that your print job is listed b Resend the print job For more information see Printing confidential and other held jobs on page 77 Did the jobs print The problem is solved Go to step 2 Step 2 Do one or more of the following Delete the print job and then resend it If you are printing PDF files then generate a new file and then print it again Did the jobs print The problem is solved Go to s...

Страница 205: ... The problem is solved Step 4 Check if the flash drive is supported For more information on tested and approved USB flash drives see Supported flash drives and file types on page 75 Does the error message still appear Go to step 5 The problem is solved Step 5 Check if the USB port is disabled by the system support person Does the error message still appear Contact customer support The problem is s...

Страница 206: ... the paper type b Resend the print job Did the job print from the correct tray or on the correct paper The problem is solved Go to step 4 Step 4 a Check if the trays are not linked b Resend the print job Did the job print from the correct tray or on the correct paper The problem is solved Contact customer support Large jobs do not collate Action Yes No Step 1 a From the Finishing menu on the print...

Страница 207: ...mage OK OK Do the files print The problem is solved Contact customer support Print job takes longer than expected Action Yes No Step 1 Change the environmental settings of the printer a From the printer control panel navigate to Settings General Settings b Select Eco Mode or Quiet Mode and then select Off Note Disabling Eco Mode or Quiet Mode may increase the consumption of energy or supplies or b...

Страница 208: ...e printer for each document that you want to print b Resend the print job Do the jobs print The problem is solved Go to step 2 Step 2 a Check if the printer is plugged in and turned on and if Ready appears on the printer display b Resend the print job Do the jobs print The problem is solved Go to step 3 Step 3 Ifanerrormessageappearsontheprinterdisplay thenclearthemessage Note The printer continue...

Страница 209: ... The printer speed may be reduced when printing for long periods of time or printing at elevated temperatures Action Yes No Step 1 a Make sure the size of the paper loaded in the tray matches the fuser type Note To identify the fuser type view the label on the fuser b Resend the print job Does the print speed increase The problem is solved Go to step 2 Step 2 a Replace the fuser For more informati...

Страница 210: ...the paper loaded in the trays to be linked Note The paper size and type must match for trays to be linked b Resend the print job Do the trays link correctly The problem is solved Contact customer support Unexpected page breaks occur Action Yes No Step 1 Adjust the print timeout settings a From the printer control panel navigate to Settings General Settings Timeouts Print Timeout b Select a higher ...

Страница 211: ...ter Go to step 2 Select a font that is supported by the printer Step 2 Check if the fonts installed on the computer are supported by the printer Are the fonts installed on the computer supported by the printer The problem is solved Contact customer support Clipped pages or images Leading edge Trailing edge ABCDE ABCDE ABCDE Action Yes No Step 1 a Move the width and length guides in the tray to the...

Страница 212: ... the page or image clipped Go to step 4 The problem is solved Step 4 a Reinstall the imaging unit 1 Remove the toner cartridge 2 Remove the imaging unit Warning Potential Damage Do not expose the imaging unit to direct light for more than 10 minutes Extended exposure to light may cause print quality problems 3 Install the imaging unit and then the cartridge b Resend the print job Is the page or im...

Страница 213: ...gray background disappear from the prints The problem is solved Go to step 2 Step 2 Reinstall the imaging unit and the toner cartridge a Remove the toner cartridge b Remove the imaging unit Warning Potential Damage Do not expose the imaging unit to direct light for more than 10 minutes Extended exposure to light can cause print quality problems c Install the imaging unit and then the cartridge d R...

Страница 214: ...ved Step 3 a Redistribute the toner in the imaging unit 1 Remove the toner cartridge and then the imaging unit 2 Firmly shake the imaging unit Warning Potential Damage Do not expose the imaging unit to direct light for more than 10 minutes Extended exposure to light may cause print quality problems 3 Reinstall the imaging unit and then the cartridge b Resend the print job Do horizontal voids appea...

Страница 215: ...e paper loaded in the tray Does the paper size match the paper loaded in the tray Go to step 3 Do one or more of the following Specify the paper size from the tray settings to match the paper loaded in the tray Change the paper loaded in the tray to match the paper size specified in the tray settings Step 3 a Depending on your operating system specify the paper size from Printing Preferences or fr...

Страница 216: ...tch the paper loaded in the tray Step 3 a Depending on your operating system specify the paper type and weight from Printing Preferences or from the Print dialog b Resend the print job Is the paper still curled Go to step 4 The problem is solved Step 4 a Remove the paper from the tray and then turn it over b Resend the print job Is the paper still curled Go to step 5 The problem is solved Step 5 a...

Страница 217: ...Preferences or from the Print dialog b Resend the print job Do print irregularities still appear Go to step 4 The problem is solved Step 4 Check if the paper loaded in the tray has texture or rough finishes Are you printing on textured or rough paper From the printer control panel set the paper texture in the Paper menu to match the paper loaded in the tray Go to step 5 Step 5 a Load paper from a ...

Страница 218: ...ollowing Specify the paper type texture and weight from the tray settings to match the paper loaded in the tray Change the paper loaded in the tray to match the paper type texture and weight specified in the tray settings Step 3 a Depending on your operating system specify the paper type texture and weight from Printing Preferences or from the Print dialog b Resend the print job Is the print still...

Страница 219: ...asethetoner darkness Note 8 is the factory default setting b Resend the print job Is the print still too light Go to step 2 The problem is solved Step 2 From the printer control panel set the paper type texture and weight in the Paper menu to match the paper loaded in the tray Is the tray set to the type texture and weight of the paper loaded Go to step 3 Change the paper type texture and weight t...

Страница 220: ...Go to step 6 The problem is solved Step 6 a Redistribute the toner in the imaging unit 1 Remove the toner cartridge and then the imaging unit 2 Firmly shake the imaging unit Warning Potential Damage Do not expose the imaging unit to direct light for more than 10 minutes Extended exposure to light may cause print quality problems 3 Install the imaging unit and then the cartridge b Resend the print ...

Страница 221: ...tep 2 The problem is solved Step 2 a Redistribute the toner in the imaging unit 1 Remove the toner cartridge and then the imaging unit 2 Firmly shake the imaging unit Warning Potential Damage Do not expose the imaging unit to direct light for more than 10 minutes Extended exposure to light may cause print quality problems 3 Reinstall the imaging unit and then the cartridge b Resend the print job I...

Страница 222: ...t job Is the printer printing solid black pages Contact customer support The problem is solved Repeating defects appear on prints Action Yes No Step 1 a Replace the imaging unit if the distance between the defects is equal to any of the following 47 8 mm 1 88 in 96 8 mm 3 81 in 28 5 mm 1 12 in b Resend the print job Do repeating defects still appear on prints Go to step 2 The problem is solved Ste...

Страница 223: ...d in the tray Is the tray set to the type and weight of the paper loaded Go to step 3 Change the paper loaded in the tray to match the paper type and weight specified in the tray settings Step 3 a Depending on your operating system specify the paper type and weight from Printing Preferences or from the Print dialog b Resend the print job Do shadow images still appear on prints Go to step 4 The pro...

Страница 224: ...ay or feeder from Printing Preferences or the Print dialog b Resend the print job Do streaked horizontal lines appear on prints Go to step 2 The problem is solved Step 2 From the printer control panel set the paper type and weight in the Paper menu to match the paper loaded in the tray Do the paper type and weight match the type and weight of the paper in the tray Go to step 3 Change the paper typ...

Страница 225: ...nes appear on prints ABCDE ABCDE ABCDE Leading edge Trailing edge Action Yes No Step 1 a Depending on your operating system specify the paper type texture and weight from Printing Preferences or from the Print dialog b Resend the print job Do streaked vertical lines appear on prints Go to step 2 The problem is solved Step 2 From the printer control panel set the paper texture type and weight in th...

Страница 226: ...light may cause print quality problems 2 Install the imaging unit and then the cartridge b Resend the print job Do streaked vertical lines appear on prints Go to step 5 The problem is solved Step 5 Replace the imaging unit and then resend the print job Do streaked vertical lines appear on prints Contact customer support at http support lexmar k com or your service representative The problem is sol...

Страница 227: ... 2 Replace the imaging unit and then resend the print job Did the toner fog or background shading disappear from the prints The problem is solved Contact customer support Toner rubs off Leading edge Trailing edge ABC DEF Action Yes No Step 1 From the Paper menu on the printer control panel check the paper type texture and weight Do the paper type texture and weight match the paper loaded in the tr...

Страница 228: ...y b Resend the print job Is the print quality still poor Contact customer support The problem is solved Uneven print density Action Yes No Replace the imaging unit and then resend the print job Is the print density uneven Contact customer support The problem is solved Vertical voids appear on prints Leading edge Trailing edge Action Yes No Step 1 a Make sure your software program is using a correc...

Страница 229: ...all the imaging unit and then the cartridge b Resend the print job Do vertical voids appear on prints Go to step 5 The problem is solved Step 5 Replace the imaging unit and then resend the print job Do vertical voids appear on prints Contact customer support The problem is solved Embedded Web Server does not open Action Yes No Step 1 Make sure the printer IP address is correct View the printer IP ...

Страница 230: ...lneedtobeabletodescribetheproblemyouareexperiencing themessage on the printer display and the troubleshooting steps you have already taken to find a solution You need to know your printer model type and serial number For more information see the label at the back of the printer The serial number is also listed on the menu settings page Lexmark has various ways to help you solve your printing probl...

Страница 231: ...Telephone support is also available In the U S or Canada call 1 800 539 6275 For other countries or regions visit http support lexmark com Troubleshooting 231 ...

Страница 232: ...nce to a product program or service is not intended to state or imply that only that product program or service may be used Any functionally equivalent product program or service that does not infringe any existing intellectual property right may be used instead Evaluation and verification of operation in conjunction with other products programs or services except those expressly designated by the...

Страница 233: ...ions corresponding to the commands The following terms are trademarks or registered trademarks of these companies Albertus The Monotype Corporation plc Antique Olive Monsieur Marcel OLIVE Apple Chancery Apple Computer Inc Arial The Monotype Corporation plc CG Times Based on Times New Roman under license from The Monotype Corporation plc is a product of Agfa Corporation Chicago Apple Computer Inc C...

Страница 234: ... meter average sound pressure dBA Printing 57 Ready 32 Values are subject to change See www lexmark com for current values Waste from Electrical and Electronic Equipment WEEE directive The WEEE logo signifies specific recycling programs and procedures for electronic products in countries of the European Union We encourage the recycling of our products If you have further questions about recycling ...

Страница 235: ...5 C 34 to 95 F 8 to 80 RH Laser notice The printer is certified in the U S to conform to the requirements of DHHS 21 CFR Chapter I Subchapter J for Class I 1 laser products and elsewhere is certified as a Class I laser product conforming to the requirements of IEC 60825 1 Class I laser products are not considered to be hazardous The printer contains internally a Class IIIb 3b laser that is nominal...

Страница 236: ...ng når kassettene tas ut og sperren er satt ut av spill Unngå eksponering for laserstrålen NIEBEZPIECZEŃSTWO niewidzialne promieniowanie laserowe podczas usuwania kaset i blokady Należy unikać naświetlenia promieniem lasera ОПАСНО Невидимое лазерное излучение при извлеченных картриджах и снятии блокировки Избегайте воздействия лазерных лучей Pozor Nebezpečenstvo neviditeľného laserového žiarenia p...

Страница 237: ...ing the Hibernate Timeout Using the Schedule Power modes Using the Sleep Hibernate button Factory default Hibernate Timeout for this product in all countries or regions 3 days The amount of time the printer waits after a job is printed before it enters Hibernate mode can be modified between one hour and one month Off mode If this product has an off mode which still consumes a small amount of power...

Страница 238: ...receiver Connect the equipment into an outlet on a circuit different from that to which the receiver is connected Consult your point of purchase or service representative for additional suggestions The manufacturer is not responsible for radio or television interference caused by using other than recommended cables or by unauthorized changes or modifications to this equipment Unauthorized changes ...

Страница 239: ...Representative This product satisfies the Class B limits of EN 55022 and safety requirements of EN 60950 Regulatory notices for wireless products This section contains the following regulatory information pertaining to wireless products that contain transmitters for example but not limited to wireless network cards or proximity card readers Exposure to radio frequency radiation Theradiatedoutput p...

Страница 240: ...tion optimale Si le matériel ou son antenne d émission est installé à l extérieur il doit faire l objet d une licence L installateur de cet équipement radio doit veiller à ce que l antenne soit implantée et dirigée de manière à n émettre aucun champ HF dépassant les limites fixées pour l ensemble de la population par Santé Canada Reportez vous au Code de sécurité 6 que vous pouvez consulter sur le...

Страница 241: ...c tímto prohlašuje že výrobek tento výrobek je ve shodě se základními požadavky a dalšími příslušnými ustanoveními směrnice 1999 5 ES Dansk LexmarkInternational Inc erklærerherved atdetteproduktoverholderdevæsentligekravogøvrigerelevante krav i direktiv 1999 5 EF Deutsch Hiermit erklärt Lexmark International Inc dass sich das Gerät dieses Gerät in Übereinstimmung mit den grundlegenden Anforderunge...

Страница 242: ...Lexmark International Inc oświadcza że niniejszy produkt jest zgodny z zasadniczymi wymogami oraz pozostałymi stosownymi postanowieniami Dyrektywy 1999 5 EC Português A Lexmark International Inc declara que este este produto está conforme com os requisitos essenciais e outras disposições da Diretiva 1999 5 CE Slovensky Lexmark International Inc týmto vyhlasuje že tento produkt spĺňa základné požia...

Страница 243: ...s the exchange of a product or part the item replaced becomes the property of the Remarketer or Lexmark The replacement may be a new or repaired item The replacement item assumes the remaining warranty period of the original product Replacement is not available to you if the product you present for exchange is defaced altered in need of a repair not included in warranty service damaged beyond repa...

Страница 244: ...ch Lexmark is legally liable IN NO EVENT WILL LEXMARK BE LIABLE FOR ANY LOST PROFITS LOST SAVINGS INCIDENTAL DAMAGE OR OTHER ECONOMIC OR CONSEQUENTIAL DAMAGES This is true even if you advise Lexmark or a Remarketer of the possibility of such damages Lexmark is not liable for any claim by you based on a third party claim This limitation of remedies also applies to claims against any Suppliers and R...

Страница 245: ...t to the reasonable non discriminatory terms in the Intellectual Property Rights IPR Disclosure of Certicom Corp at the IETF for IKE and IKEv2 Authentication Using the Eliptic Curve Digital Signature Algorithm ECDSA implemented in the product or service The use of this product or service is subject to the reasonable non discriminatory terms in the Intellectual Property Rights IPR Disclosure of Cer...

Страница 246: ...ustom string load orientation 179 Change paper source to custom type name load orientation 180 Change paper source to paper size load orientation 180 Change paper source to paper type paper size load orientation 180 Check tray x connection 180 checking an unresponsive printer 196 checking status of parts and supplies 143 checking the status of parts and supplies 143 checking the virtual display us...

Страница 247: ...pting the printer hard disk 140 envelopes loading 56 tips on using 63 environmental settings conserving supplies 133 Eco Mode 134 Hibernate mode 136 printer display brightness adjusting 136 Quiet mode 134 Sleep mode 135 Erase Temporary Data Files menu 105 erasing hard disk memory 140 erasing non volatile memory 139 erasing volatile memory 139 Error reading USB drive Remove USB 182 Error reading US...

Страница 248: ... size orientation 186 Load paper source with paper type paper size orientation 186 Load Manual Feeder with custom string orientation 186 Load Manual Feeder with custom type name orientation 187 Load Manual Feeder with paper size orientation 187 Load Manual Feeder with paper type paper size orientation 187 Load staples 185 loading 2100 sheet tray 50 card stock 56 envelopes 56 letterhead in 2100 she...

Страница 249: ...6 in duplex area 169 in finisher rear door 175 in mailbox rear door 177 in multipurpose feeder 171 in rear expander door 176 in standard bin 168 in staple finisher 172 in the tray 170 inside the printer 162 Paper Loading menu 87 Paper Size Type menu 80 paper sizes supported 68 Paper Texture menu 84 paper types supported 68 Paper Weight menu 85 paper weights supported 68 Parallel x menu 99 Parallel...

Страница 250: ...apler door Leave paper in bin 455 457 172 x page jam remove standard bin jam 203 168 x page jam remove tray 1 to clear duplex 235 239 169 Cartridge low 88 xy 179 Cartridge nearly low 88 xy 179 Cartridge very low x estimated pages remain 88 xy 179 Cartridge imaging unit mismatch 41 xy 179 Change paper source to custom string load orientation 179 Change paper source to custom type name load orientat...

Страница 251: ...abled 56 194 Supply needed to complete job 194 Too many bins attached 58 194 Too many disks installed 58 195 Too many flash options installed 58 195 Too many trays attached 58 195 Tray x paper size unsupported 195 Unformatted flash detected 53 195 Unsupported disk 195 Unsupported option in slot x 55 196 Unsupported USB hub please remove 182 USB port x disabled 56 196 printer options troubleshootin...

Страница 252: ... 550 sheet tray loading 43 Standard Network menu 92 Standard network software error 54 194 standard tray loading 43 Standard USB menu 97 Standard USB port disabled 56 194 staple cartridge replacing 152 staple cartridges ordering 145 statement of volatility 138 status of parts and supplies checking 143 Stop or Cancel button printer control panel 11 storing paper 67 supplies 146 storing print jobs 7...

Страница 253: ...ackground shading appears on prints 226 toner rubs off 227 toner specks appear on prints 226 transparency print quality is poor 228 uneven print density 228 white streaks on a page 228 troubleshooting printer options 2100 sheet tray problems 199 internal option is not detected 200 internal print server 200 Internal Solutions Port 202 tray problems 201 USB parallel interface card 202 troubleshootin...

Отзывы: