background image

1

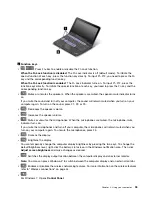
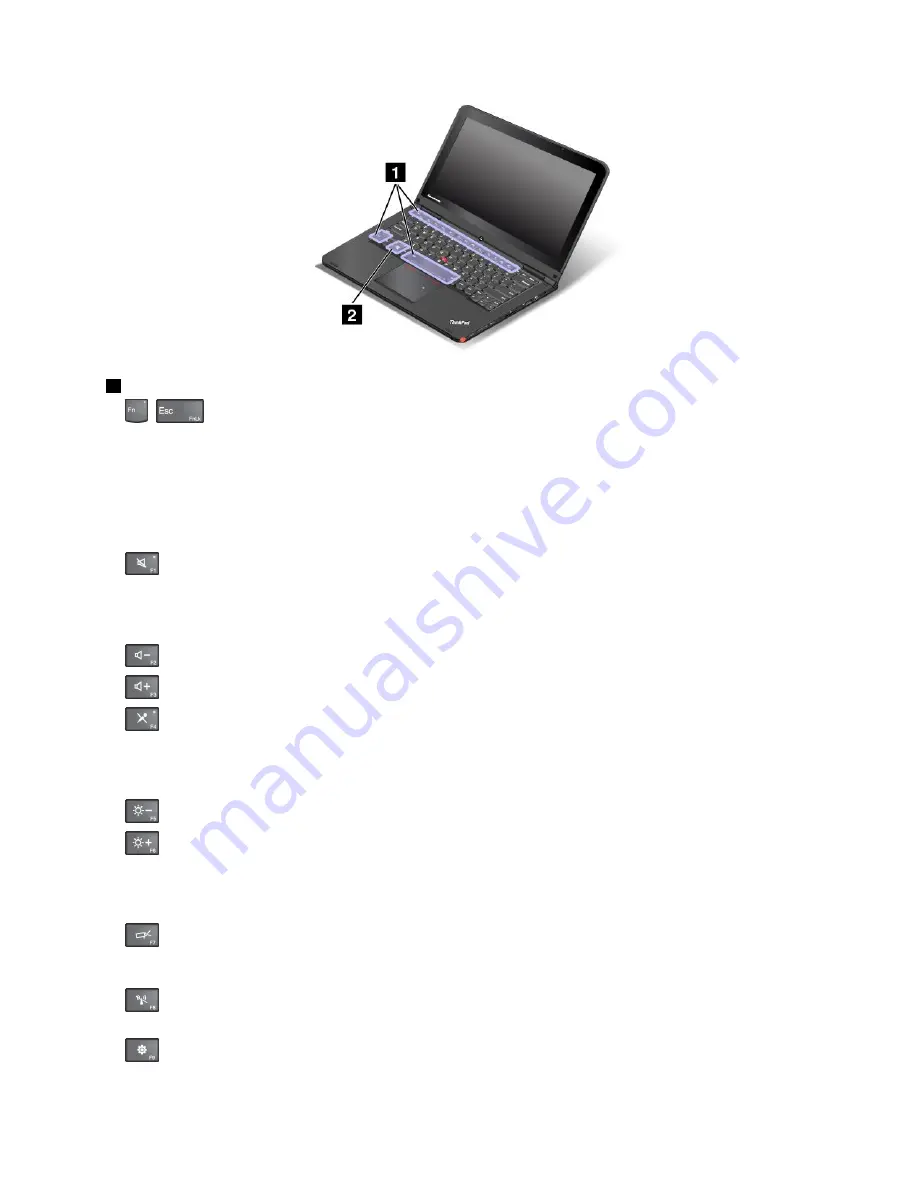
Function keys

+

: Press Fn+Esc to enable or disable the Fn Lock function.

When the Fn Lock function is disabled

: The Fn Lock indicator is off (default mode). To initiate the

special function of each key, press the function key directly. To input F1–F12, you need to press the Fn
key and the corresponding function key.

When the Fn Lock function is enabled

: The Fn Lock indicator turns on. To input F1–F12, press the

function keys directly. To initiate the special function of each key, you need to press the Fn key and the
corresponding function key.

: Mutes or unmutes the speakers. When the speakers are muted, the speaker-mute indicator turns

on.

If you mute the sound and turn off your computer, the sound will remain muted when you turn on your
computer again. To turn on the sound, press F1, F2, or F3.

: Decreases the speaker volume.

: Increases the speaker volume.

: Mutes or unmutes the microphones. When the microphones are muted, the microphone-mute

indicator turns on.

If you mute the microphones and turn off your computer, the microphones will remain muted when you
turn on your computer again. To unmute the microphones, press F4.

: Darkens the display.

: Brightens the display.

You can temporarily change the computer display brightness by pressing the two keys. To change the
default brightness level, right-click the battery-status icon in the Windows notification area. Then click

Adjust screen brightness

and make changes as desired.

: Switches the display output location between the computer display and an external monitor.

Note:

You also can press P to switch between the computer display and an external monitor.

: Enables or disables the wireless networking features. For more information on the wireless features,

refer to “Wireless connections” on page 44.

:

For Windows 7: Opens

Control Panel

.

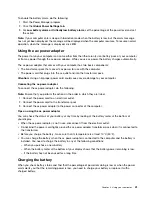
Chapter 2

.

Using your computer

35

Содержание Thinkpad s1 yoga

Страница 1: ...User Guide ThinkPad S1 Yoga ...

Страница 2: ...ty and Setup Guide and the Regulatory Notice have been uploaded to the Web site To refer to them go to http www lenovo com UserManual and follow the instructions on the screen Second Edition December 2013 Copyright Lenovo 2013 LIMITED AND RESTRICTED RIGHTS NOTICE If data or software is delivered pursuant a General Services Administration GSA contract use reproduction or disclosure is subject to re...

Страница 3: ...r management 40 Checking the battery status 40 Using the ac power adapter 41 Charging the battery 41 Maximizing the battery life 42 Managing the battery power 42 Power saving modes 42 Connecting to the network 43 Ethernet connections 43 Wireless connections 44 Presentations and multimedia 46 Changing display settings 47 Using an external monitor 47 Using a projector 48 Using dual display 49 Using ...

Страница 4: ...ms with the keyboard and other pointing devices 105 Problems with the display and multimedia devices 106 Battery and power problems 110 Problems with drives and other storage devices 113 A software problem 113 Problems with ports and connectors 114 Chapter 10 Getting support 115 Before you contact Lenovo 115 Getting help and service 115 Using diagnostic programs 116 Lenovo Support Web site 116 Cal...

Страница 5: ...mation for China 127 Appendix C Restriction of Hazardous Substances Directive RoHS 129 European Union RoHS 129 China RoHS 129 Turkish RoHS 129 Ukraine RoHS 130 India RoHS 130 Appendix D ENERGY STAR model information 131 Appendix E Notices 133 Trademarks 134 Copyright Lenovo 2013 iii ...

Страница 6: ...iv User Guide ...

Страница 7: ...yboard by lifting your hands from the palm rest Protect yourself from the heat generated by the ac power adapter When the ac power adapter is connected to an electrical outlet and your computer it generates heat Extended contact with your body even through clothing may cause a skin burn Do not place the ac power adapter in contact with any part of your body while it is in use Never use it to warm ...

Страница 8: ... this document does not alter the terms of your purchase agreement or the Lenovo Limited Warranty For more information see Warranty Information in the Safety Warranty and Setup Guide that comes with your computer Customer safety is important Our products are developed to be safe and effective However personal computers are electronic devices Power cords power adapters and other features can create...

Страница 9: ...ken or damaged Signs of overheating smoke sparks or fire Damage to a battery such as cracks dents or creases discharge from a battery or a buildup of foreign substances on the battery A cracking hissing or popping sound or strong odor that comes from the product Signs that liquid has been spilled or an object has fallen onto the computer product the power cord or power adapter The computer product...

Страница 10: ...rack or crimp This can present a safety hazard Always route power cords so that they will not be walked on tripped over or pinched by objects Protect power cords and power adapters from liquids For instance do not leave your power cord or power adapter near sinks tubs toilets or on floors that are cleaned with liquid cleansers Liquids can cause a short circuit particularly if the power cord or pow...

Страница 11: ...ectricity otherwise unstable voltage might damage your computer data or attached devices Some products are equipped with a three pronged plug This plug fits only into a grounded electrical outlet This is a safety feature Do not defeat this safety feature by trying to insert it into a non grounded outlet If you cannot insert the plug into the outlet contact an electrician for an approved outlet ada...

Страница 12: ...ions included in the product documentation Battery abuse or mishandling can cause the battery to overheat which can cause gasses or flame to vent from the battery pack or coin cell If you notice any signs of bulging leakage or corrosion on the exterior of the product this may be the result of an internal battery fault If this occurs stop using the product immediately and please contact the Lenovo ...

Страница 13: ...cally take breaks from using the keyboard by lifting your hands from the palm rest and be careful not to use the keyboard for any extended length of time Do not operate your computer or charge the battery near flammable materials or in explosive environments Ventilation slots fans and or heat sinks are provided with the product for safety comfort and reliable operation These features might inadver...

Страница 14: ...duct or attached devices To connect 1 Turn everything OFF 2 First attach all cables to devices 3 Attach signal cables to connectors 4 Attach power cords to outlets 5 Turn devices ON To disconnect 1 Turn everything OFF 2 First remove power cords from outlets 3 Remove signal cables from connectors 4 Remove all cables from devices The power cord must be disconnected from the wall outlet or receptacle...

Страница 15: ...s or earphones are used ensure that they comply with EN 50332 1 Clause 6 5 Limitation Values Using headphones that do not comply with EN 50332 1 can be dangerous due to excessive sound pressure levels Additional safety information Plastic bag notice DANGER Plastic bags can be dangerous Keep plastic bags away from babies and children to avoid danger of suffocation Notice for tablet personal compute...

Страница 16: ...xiv User Guide ...

Страница 17: ...Features on page 10 Specifications on page 12 Operating environment on page 12 Lenovo programs on page 13 Locating computer controls connectors and indicators This section introduces the computer hardware features to give you the basic information you will need to start using the computer Front view Note Your computer might look slightly different from the illustration in this topic Figure 1 Front...

Страница 18: ... location and meaning of each indicator see Status indicators on page 7 ThinkPad pointing device 6 TrackPoint pointing stick 8 ThinkPad trackpad The keyboard contains the ThinkPad pointing device Pointing selecting and dragging are all part of a single process that you can perform without moving your fingers from a typing position For more information see Using the ThinkPad pointing device on page...

Страница 19: ...ms Then click Settings Power Shut down If your computer stops responding and you cannot turn it off press and hold the power button for four seconds or more If the computer still is not responding remove the ac power adapter or the supported ThinkPad OneLink Dock and reset the computer by inserting a needle or a straightened paper clip into the emergency reset hole to turn off the computer To loca...

Страница 20: ...facing upward Otherwise the connector might be damaged 7 Mini HDMI connector Your computer has a mini high definition multimedia interface HDMI connector This connector is a digital audio and video interface that can connect a compatible digital audio device or video display such as a high definition television HDTV You also can connect your computer to a compatible video graphics array VGA video ...

Страница 21: ...nnector first 3 Always on USB connector USB 3 0 connector By default the Always on USB connector enables you to charge some mobile digital devices and smartphones when your computer is in the following situations When your computer is on or in sleep mode When your computer is in hibernation mode or is turned off but connected to ac power If you want to charge these devices when your computer is in...

Страница 22: ...adset with a function switch do not press this switch while using the headset If you press it the headset microphone will be disabled and the integrated microphones on the computer will be enabled instead The audio connector does not support a conventional microphone For more information see Using audio features on page 49 Bottom view Note Your computer might look slightly different from the illus...

Страница 23: ... Notes To ensure proper airflow do not place any obstacles in front of the fan louvers The fan louvers of your computer might get too hot when the computer is running heavy tasks When you are using or carrying the computer take care to avoid direct contact to the fan louvers Status indicators Your computer has several status indicators that show the status of your computer Note Your computer might...

Страница 24: ...us of your computer Blink for three times The computer is initially connected to power On The computer is on in normal use Blink fast The computer is entering hibernation mode Blink slowly The computer is in sleep mode Off The computer is off or in hibernation mode Locating important product information This section provides information to help you locate your machine type and model label FCC ID a...

Страница 25: ...city label The Certificate of Authenticity label is provided on models that are licensed to use a Windows 7 operating system The licensed Windows version and product key associated with the computer are printed on this label Record this information and keep it in a safe place You might need these numbers to start your computer or reinstall the Windows 7 operating system Depending on the model the ...

Страница 26: ...into the computer hardware Depending on the computer model the Genuine Microsoft label can be on the computer cover under the battery or on the power adapter For more information about the Genuine Microsoft label go to http www microsoft com en us howtotell Hardware aspx The following figure shows the location of the Genuine Microsoft label on the computer cover Note Your computer might look sligh...

Страница 27: ...ve 2 5 inch form factor 7 mm height hybrid drive M 2 solid state drive for cache only Display Display size 317 5 mm 12 5 inches Display resolution LCD 1366 by 768 or 1920 by 1080 depending on the model External monitor up to 1920 by 1200 depending on the monitor model Color display with the thin film transistor TFT technology Brightness control Camera Microphones Keyboard Fn key function Keyboard ...

Страница 28: ...rogram Click the Battery tab For instructions on how to start the Access Connections program see Accessing Lenovo programs on the Windows 7 operating system on page 13 For Windows 8 1 Press the Windows key to go to the Start screen Click Lenovo Settings Power Operating environment This section provides information about your computer operating environment Environment Maximum altitude without press...

Страница 29: ... operating system you can access Lenovo programs from either the Lenovo ThinkVantage Tools program or from Control Panel Accessing Lenovo programs from the Lenovo ThinkVantage Tools program To access Lenovo programs from the Lenovo ThinkVantage Tools program click Start All Programs Lenovo ThinkVantage Tools Then double click a program icon to access the program Note If a program icon is dimmed in...

Страница 30: ...he corresponding sections and green texts in Control Panel Notes Depending on the model some of the programs might not be available The Lenovo QuickCast program and the Lenovo QuickControl program are not listed in Control Panel Use the Lenovo ThinkVantage Tools program to access them Table 2 Programs in Control Panel Program Control Panel section Green text in Control Panel Access Connections Net...

Страница 31: ...or connecting to a network infrastructure from a specific location such as a home or an office By switching between location profiles as you move your computer from place to place you can quickly and easily connect to a network with no need to manually reconfigure your settings and restart the computer each time Client Security Solution Windows 7 The Client Security Solution program protects your ...

Страница 32: ...iding easy access to various program such as Lenovo Fingerprint Manager Lenovo Solution Center and so on Active Protection System Windows 7 and Windows 8 1 The Active Protection System program protects your hard disk drive or hybrid drive when the shock sensor inside your computer detects a condition that could damage the drive such as system tilt excessive vibration or shock The hard disk drive o...

Страница 33: ... keep the software on the computer up to date by downloading and installing software packages including ThinkVantage programs device drivers Unified Extensible Firmware Interface UEFI basic input output system BIOS updates and other third party programs Chapter 1 Product overview 17 ...

Страница 34: ...18 User Guide ...

Страница 35: ...mputer information is entered into a database which enables Lenovo to contact you in case of a recall or other severe problem In addition some locations offer extended privileges and services to registered users When you register your computer with Lenovo you also will receive the following benefits Quicker service when you call Lenovo for help Automatic notification of free software and special p...

Страница 36: ...he data on the hard disk drive solid state drive or hybrid drive be sure to read Notice on deleting data from your hard disk drive solid state drive or hybrid drive on page 63 Is getting connected in different locations a challenge To troubleshoot a wireless networking issue go to http www lenovo com support faq Take advantage of the networking features by use of the Access Connections program on ...

Страница 37: ...he following To set the desktop as your default startup screen select When I sign in or close all apps on a screen go to the desktop instead of Start so a check is visible To set the Start screen as your default startup screen remove the check from the When I sign in or close all apps on the screen go to desktop instead of Start checkbox 4 Click or tap OK to save the new setting Print the followin...

Страница 38: ...ndows button Press it to switch between the current workspace and the Start screen or to wake up the computer from sleep mode Using the Tablet Digitizer Pen Some models are equipped with a Tablet Digitizer Pen as a standard feature The Tablet Digitizer Pen enables you to input text in a natural manner as well as taking notes annotating Portable Document Format PDF files and drawing graphics togeth...

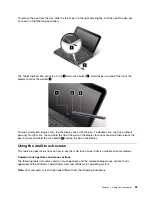
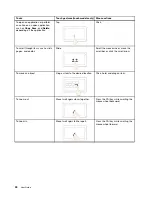
Страница 39: ...nd hold the tip of the pen on the display for one second and then release the pen or press and hold the click button 3 and tap the tip on the display Using the multi touch screen This topic provides instructions on how to use the multi touch screen that is available on some models Common touch gestures and mouse actions The following table lists some common touch gestures and the corresponding mou...

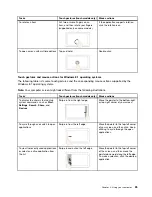
Страница 40: ...ms such as lists pages and photos Slide Scroll the mouse wheel move the scroll bar or click the scroll arrow To move an object Drag an item to the desired location Click hold and drag an item To zoom out Move two fingers closer together Press the Ctrl key while scrolling the mouse wheel backward To zoom in Move two fingers farther apart Press the Ctrl key while scrolling the mouse wheel forward 24...

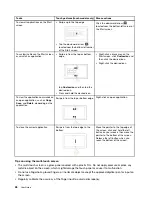
Страница 41: ...s Tasks Touch gestures touch models only Mouse actions To display the charms that contain system commands such as Start Settings Search Share and Devices Swipe in from the right edge Move the pointer to the bottom right or top right corner of your screen To cycle through and switch to open applications Swipe in from the left edge Move the pointer to the top left corner of your screen and then clic...

Страница 42: ...uch as Copy Save and Delete depending on the application Swipe in from the top or bottom edge Right click an open application To close the current application Swipe in from the top edge to the bottom Move the pointer to the top edge of the screen click and hold the left button on your mouse then move the pointer to the bottom of the screen Release the left button when you reach the bottom of the s...

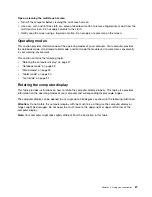
Страница 43: ...e following topics Rotating the computer display on page 27 Notebook mode on page 28 Stand mode on page 29 Tablet mode on page 30 Tent mode on page 32 Rotating the computer display This topic provides instructions on how to rotate the computer display properly This topic also provides information on the operating modes of your computer and corresponding display angle ranges The computer display ca...

Страница 44: ...grees Notebook mode This section provides information about notebook mode You can use the computer in notebook mode in scenarios that require using a keyboard and a mouse such as editing documents and writing e mails Attention Do not rotate the computer display with too much force otherwise the computer display or hinges might be damaged Do not apply too much force to the upper right or upper left...

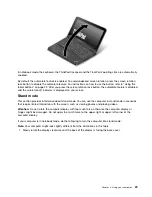
Страница 45: ...is section provides information about stand mode You can use the computer in stand mode in scenarios that require limited interaction with the screen such as viewing photos and playing videos Attention Do not rotate the computer display with too much force otherwise the computer display or hinges might be damaged Do not apply too much force to the upper right or upper left corner of the computer d...

Страница 46: ... to Using the tablet buttons on page 22 After you press the screen rotation lock button the autorotate feature is disabled and the autorotate off indicator is displayed on your screen In stand mode you can use the tablet buttons to control your computer For instructions on how to use the tablet buttons refer to Using the tablet buttons on page 22 Tablet mode This section provides information about...

Страница 47: ...is topic 1 Position your computer as shown and slowly rotate the computer display clockwise 2 Position your computer as shown Your computer is now in tablet mode By default the autorotate feature is enabled 3 To avoid undesired screen rotation in tablet mode press the screen rotation lock button to disable the autorotate feature For instructions on how to use the button refer to Using the tablet b...

Страница 48: ...up or hold the computer by the display only Do not hit vibrate or bump the computer display To allow free ventilation do not place any obstacle such as a thick piled carpet or a soft cushion in front of the fan louvers If you hold the computer with one hand while using it in tablet mode do not expose it to excessive vibration shock or rotation When using computer outdoors protect against exposure ...

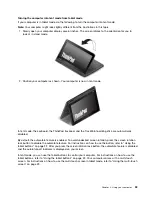
Страница 49: ...lt the autorotate feature is enabled To avoid undesired screen rotation press the screen rotation lock button to disable the autorotate feature For instructions on how to use the button refer to Using the tablet buttons on page 22 After you press the screen rotation lock button the autorotate feature is disabled and the autorotate off indicator is displayed on your screen In tent mode you can use ...

Страница 50: ...hown Your computer is now in stand mode Special keys The following figure shows the locations of main special keys for your computer Notes Your computer might look slightly different from the illustrations in this topic In notebook mode the keyboard the ThinkPad trackpad and the TrackPoint pointing stick are automatically enabled In stand mode tablet mode and tent mode the keyboard the ThinkPad tr...

Страница 51: ...peaker volume Increases the speaker volume Mutes or unmutes the microphones When the microphones are muted the microphone mute indicator turns on If you mute the microphones and turn off your computer the microphones will remain muted when you turn on your computer again To unmute the microphones press F4 Darkens the display Brightens the display You can temporarily change the computer display bri...

Страница 52: ...ws key Press the Windows key to switch between the current workspace and the Start screen For information about using the Windows key with other keys refer to the help information system of the Windows operating system Using the keyboard Your computer keyboard features the frame travel function This topic provides information on the behavior of the keyboard Notes Your computer might look slightly ...

Страница 53: ...s not travel when you rotate the computer display from 10 degrees to 190 degrees The following illustration shows the keyboard when the keyboard frame does not travel When you rotate the computer display from 190 degrees to 360 degrees the frame of the keyboard travels upward for about 2 0 mm 0 08 inch The following illustration shows the keyboard after the keyboard frame travels upward Chapter 2 ...

Страница 54: ...en follow the instructions on the screen Using the ThinkPad pointing device The ThinkPad pointing device consists of the TrackPoint pointing stick 1 and ThinkPad trackpad 2 The whole ThinkPad trackpad is an active area sensitive to finger movement The left click zones 3 and right click zones 5 work as the left and right mouse buttons on a conventional mouse The scroll zone 4 enables you to scroll ...

Страница 55: ... pointer moves depends on the pressure you apply to the pointing stick Using the ThinkPad trackpad The ThinkPad trackpad of your computer supports multi touch with which you can zoom in zoom out scroll or rotate on the screen while browsing the Internet or reading or editing a document Customizing the ThinkPad pointing device You can customize the ThinkPad pointing device to achieve the extended f...

Страница 56: ...emaining The rate at which you use battery power will determine how long you can use the battery of your computer between charges Because each computer user has different habits and needs it is difficult to predict how long a battery charge will last There are two main factors How much energy is stored in the battery when you begin to work The way you use your computer For example How often you ac...

Страница 57: ...nsure that you perform the actions in the order in which they are listed 1 Connect the power cord to an electrical outlet 2 Connect the power cord to the transformer pack 3 Connect the ac power adapter to the power connector of the computer Tips on using the ac power adapter You can check the status of your battery at any time by looking at the battery meter at the bottom of your display When the ...

Страница 58: ...dows notification area and click Power Options Then click Change plan settings that is next to your power plan For more information refer to the help information system Power saving modes There are several modes that you can use at any time to conserve power This section introduces each mode and gives tips on the effective use of the battery power Screen blank mode for Windows 7 only The computer ...

Страница 59: ...ck box for Wake the computer to run this task To put the computer into hibernation mode change your power plan settings by doing the following For Windows 7 Start the Power Manager program and then click the Power Plan tab Then follow the instructions on the screen For instructions on how to start the Power Manager program see Accessing Lenovo programs on the Windows 7 operating system on page 13 ...

Страница 60: ...AN connection do the following For Windows 7 1 Press F8 and follow the instructions on the screen to enable the wireless feature 2 Click the wireless network connection status icon in the Windows notification area A list of available wireless networks is displayed 3 Double click a network to connect to it Provide required information if needed For Windows 8 1 1 Go to the desktop and click the wire...

Страница 61: ...he signal strength of the wireless connection is marginal Power to the wireless radio is on The signal strength of the wireless connection is excellent Access Connections status icon No location profile is active or none exists Current location profile is disconnected Current location profile is connected Access Connections wireless status icon Power to the wireless radio is off Power to the wirel...

Страница 62: ...he radio communications between your computer and another NFC enabled device over a distance no more than a few centimeters By default the NFC feature is enabled If the NFC feature of your computer is disabled do the following to enable the NFC feature For Windows 7 1 Start the ThinkPad Setup program See Security menu on page 84 2 Select Security I O Port Access 3 Set the NFC device option to Enab...

Страница 63: ...uter display the external monitor or both in the Display Settings window Connecting an external monitor To connect an external monitor do the following 1 Connect the external monitor to the mini HDMI connector of your computer 2 Connect the external monitor to an electrical outlet 3 Turn on the external monitor 4 Change the display output location by pressing F7 This enables you to switch between ...

Страница 64: ...nnecting an external monitor When installing an operating system you must install the display driver for your monitor that is provided with the computer and the monitor INF file that is provided with the external monitor If you set a resolution higher than the resolution you are using on the computer monitor and use an external monitor that does not support that resolution take advantage of the vi...

Страница 65: ...e Monitor 1 icon which is for the primary display the computer display by default 3 Set the resolution for the primary display 4 Click the Monitor 2 icon which is for the secondary display the external display by default 5 Set the resolution for the secondary display 6 Click Advanced settings and set up the color quality on the Monitor tab 7 Click OK to apply the changes Considerations for using t...

Страница 66: ...supported Configuring for sound recording To configure the microphone for optimal sound recording use the Conexant HD Audio Manager program To start the program go to Control Panel and click Hardware and Sound Conexant HD Audio Manager Using the camera If your computer has a camera you can use the camera to preview your video image and take a snapshot of your current image To start the camera do t...

Страница 67: ... metal table or a grounded metal object This action reduces any static electricity from your body Static electricity could damage the card To install a flash media card do the following 1 Ensure that the card is correctly oriented 2 Insert the card firmly into the slot of the 4 in 1 media card reader If the plug and play feature is not enabled for the installed flash media card do the following to...

Страница 68: ...ur computer 4 Remove the card and store it safely for future use Note If you do not remove the card from your computer after you eject the card from the Windows operating system the card can no longer be accessed To access the card you must remove it first then insert it again 52 User Guide ...

Страница 69: ... to our customers with disabilities Refer to our accessibility information which outlines our efforts in this area See Accessibility information on page 54 Ergonomic information Working in the virtual office might mean adapting to frequent changes in your environment Following some simple rules will make things easier and bring you the maximum benefits of your computer Keeping in mind such basics ...

Страница 70: ... Of course any concentrated and sustained visual activity can be tiring If you have questions on eye fatigue or visual discomfort consult a vision care specialist for advice Comfort Observe the following guidelines to achieve greater comfort and improve performance Active sitting and rest breaks The longer you sit and work with your computer the more important it is to observe your working posture...

Страница 71: ... many languages One conversion option converts PDF documents on the Internet A second option enables users to submit the URL of an Adobe PDF file through e mail to convert it to HTML or ASCII text Adobe PDF files on a local hard disk drive or hybrid drive local CD ROM or LAN also can be converted by attaching the Adobe PDF file to an e mail message Traveling with your computer This topic provides ...

Страница 72: ...if you are accustomed to using one A quality carrying case that provides adequate cushion and protection External storage device mini HDMI cable Lenovo Mini HDMI to VGA Monitor Cable ThinkPad USB 3 0 Ethernet Adapter Lenovo USB 2 0 Ethernet Adapter If you are traveling to another country you might need to consider an ac power adapter for the country to which you are travelling To purchase travel a...

Страница 73: ...s no comments judgments or warranties about the function quality or performance of locking devices and security features Using passwords You can help prevent your computer from unauthorized use by using passwords Once you set a password a prompt is displayed on the screen each time you turn on the computer Enter your password at the prompt You cannot use the computer unless you type the correct pa...

Страница 74: ...ress Enter twice 5 A Setup Notice window is displayed Press Enter to continue 6 Press F10 A Setup Confirmation window is displayed Select Yes to save the configuration changes and exit Note You might want to record your password and store it in a safe place Otherwise if you forget the password you have to take your computer to a Lenovo reseller or a marketing representative to have the password ca...

Страница 75: ...pending on your needs do one of the following To set a password do the following a In the Enter New Password field type a desired password and press Enter b In the Confirm New Password field retype the password and press Enter To change a password do the following a In the Enter Current Password field type the current supervisor password and press Enter b In the Enter New Password field type the n...

Страница 76: ...F1 to start the ThinkPad Setup program 3 Select Security Password Hard disk 1 Password by using the directional keys 4 A password window is displayed You are prompted to select User or User Master Select User if you want to set only one hard disk password Select User Master if you want to set a user hard disk password and a master hard disk password for example if you are an administrator or a sup...

Страница 77: ... steps 1 through 7 in Setting a hard disk password on page 60 typing your password to start the ThinkPad Setup program 2 Type the current user hard disk password in the Enter Current Password field and press Enter 3 Type the new password in the Enter New Password field and press Enter then retype the new password in the Confirm New Password field and press Enter 4 A Setup Notice window is displaye...

Страница 78: ...n integral security feature of the Windows 7 and Windows 8 1 operating systems It is supported in the Ultimate and Enterprise editions of the Windows 7 Professional and Enterprise editions of the Windows 8 1 operating system It can help you protect the operating system and data stored on your computer even if your computer is lost or stolen BitLocker works by encrypting all user and system files i...

Страница 79: ...curity chip Ensure that the supervisor password has been set in ThinkPad Setup Otherwise anyone can change the settings for the security chip If you are using Client Security Solution handle the security chip by doing the following Do not clear the security chip If you do the functions assigned to the keys will be erased Do not disable the security chip If you do Client Security Solution will not ...

Страница 80: ... the Cryptographic Key and Erasing the Solid State Drive tool For disposing of data on the hard disk drive or hybrid drive Lenovo provides the Secure Data Disposal tool Go to http www lenovo com support to download these tools If an Encryption solid state drive a Disk Encryption hard disk drive or a Disk Encryption hybrid drive is supported and installed in your computer you can logically dispose ...

Страница 81: ...later To start the Symantec Norton Ghost program do the following 1 Click Start Run The Run window opens 2 Type cmd in the field Then click OK 3 Type ghost align 1mb and press Enter Acronis True Image 2010 or later Paragon Backup Recovery 10 Suit or later Paragon Backup Recovery 10 Home or later Creating and using a recovery media You can use recovery media to restore the hard disk drive or hybrid...

Страница 82: ...e with Microsoft Office or Microsoft Works preinstalled If you need to recover or reinstall your Microsoft Office or Microsoft Works applications you must use the Microsoft Office CD or Microsoft Works CD These discs are provided only with computers preinstalled with Microsoft Office or Microsoft Works Performing backup and recovery operations The Rescue and Recovery program enables you to back up...

Страница 83: ...ackup If you have backed up your hard disk drive or hybrid drive using the Rescue and Recovery program you can restore the hard disk drive or hybrid drive from a Rescue and Recovery backup even if you cannot start the Windows operating system Restore your hard disk drive or hybrid drive to the factory default settings The Rescue and Recovery workspace enables you to restore the complete contents o...

Страница 84: ...erations you can perform using a rescue medium vary depending on the operating system 2 The rescue disc can be started in all types of external optical drives Creating a rescue medium This section provides instructions on how to create a rescue medium 1 From the Windows desktop click Start All Programs Lenovo ThinkVantage Tools Enhanced Backup and Restore The Rescue and Recovery program opens 2 In...

Страница 85: ...ck Setup and then follow the on screen steps to reinstall the program Reinstalling preinstalled device drivers Attention When you reinstall device drivers you are changing the current configuration of your computer Reinstall device drivers only when it is necessary to correct a problem with your computer To reinstall a device driver for a factory installed device do the following 1 Turn on your co...

Страница 86: ...medium and a set of recovery media as early as possible and store them in a safe place for future use Recovery overview for the Windows 8 1 operating system This section provides information about the recovery solutions for the Windows 8 1 operating system A Windows recovery image is preinstalled in the recovery partition on your computer The Windows recovery image enables you to refresh your comp...

Страница 87: ... computer change the startup settings of the Windows operating system start the computer from an external device or restore the Windows operating system from a system image To use the advanced startup options do the following 1 Move your pointer to the top right or bottom right corner of the screen to bring up the charms Click Settings Change PC settings Update and recovery Recovery 2 In the Advan...

Страница 88: ...n of the recovery media starts 7 When the creation of the recovery media finishes do one of the following To keep the recovery partition on your computer click Finish To delete the recovery partition on your computer click Delete the recovery partition Attention If you delete the recovery partition on your computer do keep the recovery media in a safe place The Windows recovery image will not be s...

Страница 89: ... need is an Internet connection and a credit card To shop at Lenovo go to http www lenovo com essentials ThinkPad OneLink Dock Depending on the model your computer might support the ThinkPad OneLink Dock hereafter referred to as the dock Attach your computer to the dock to expand the working capability This topic provides basic information about the dock For detailed information about using the do...

Страница 90: ...USB 2 0 connector Used to connect devices that are compatible with USB 2 0 2 Ethernet connector Used to connect the dock to an Ethernet LAN The indicators on this connector have the same function as the ones on the computer 3 HDMI connector Used to connect a digital audio device or video monitor that is compatible with HDMI 4 Power connector Used to connect the ac power adapter 5 Lenovo OneLink co...

Страница 91: ...u to charge some mobile digital devices and smartphones no matter when your computer is in sleep mode hibernation mode or is off For more information refer to the documentation that comes with the dock 4 Combo audio connector Used to connect headphones or a headset that has a 3 5 mm 0 14 inch 4 pole plug 5 System status indicator The indicator on the illuminated ThinkPad logo functions the same as...

Страница 92: ...n this connector have the same function as the ones on the computer 4 DisplayPort connector Used to attach a high performance monitor a direct drive monitor or other devices that use a DisplayPort connector 5 Power connector Used to connect the ac power adapter 6 DVI connector Used to connect a monitor that supports Digital Visual Interface DVI connection 7 Lenovo OneLink connector Connect the Len...

Страница 93: ... is equipped with both a hard disk drive and an M 2 solid state drive do not use the M 2 solid state drive as a bootable device The M 2 solid state drive is used for cache function and to support the Intel Rapid Start Technology To install the Windows 7 operating system do the following 1 Copy all the subdirectories and files in the C SWTOOLS directory to a removable storage device The supplement ...

Страница 94: ...ou start print these instructions Attention The process of installing a new operating system deletes all the data on your hard disk drive solid state drive or hybrid drive including the data that were stored in a hidden folder If your computer is equipped with both a hard disk drive and an M 2 solid state drive do not use the M 2 solid state drive as a bootable device The M 2 solid state drive is ...

Страница 95: ...t name to view all the device drivers for your computer 3 Select the device drivers that you need and follow the instructions on the screen Attention Do not download the device drivers from the Windows Update Web Always download the device drivers from http www lenovo com ThinkPadDrivers If you use the Windows 7 operating system you also can find the device drivers in the C SWTOOLS DRIVERS directo...

Страница 96: ...d Setup menu and restart your computer with one of the provided options Note You can press the Fn F9 key to restore to the default settings Main menu When you enter the ThinkPad Setup program you will first see the Main menu as follows UEFI BIOS Version UEFI BIOS Date Embedded Controller Version ME Firmware Version Machine Type Model System unit serial number System board serial number Asset Tag C...

Страница 97: ... function of charging external devices when your computer is in hibernation mode or is turned off without connecting to ac power If you select Enabled your computer can charge external devices when your computer is in hibernation mode or is turned off without connecting to ac power If you select Disabled your computer cannot charge external devices when your computer is in hibernation mode or is t...

Страница 98: ...wer If you select Disabled the processor always works at the highest speed CPU Power Management Enabled Disabled Enable or disable the power saving feature that stops the microprocessor clock automatically when there are no system activities Disable Built in Battery Use this feature to temporarily disable the built in battery The system will be automatically powered off after you select this item ...

Страница 99: ...additional processors but share some resources with the other threads within a processor If you select Disabled only one processor thread is enabled within each execution core unit Intel R AMT Intel R AMT Control Disabled Enabled Permanently Disabled Enable or disable the Intel Active Management Technology AMT function Note If you set the Intel R AMT Control as Permanently Disabled you cannot enab...

Страница 100: ...item Selection Comments Supervisor Password Disabled Enabled Refer to Supervisor password on page 58 Lock UEFI BIOS Settings Disabled Enabled Enable or disable the function that protects items in the ThinkPad Setup program from being changed by unauthorized users By default this is set to Disabled If you set the supervisor password and enable this function no one but you can change the items in th...

Страница 101: ... item is available when your computer is equipped with an M 2 solid state drive Security Chip Active Inactive Disabled If you select Active the security chip will be functional If you select Inactive the Security Chip option will be visible but the security chip will not be functional If you select Disabled the Security Chip option will be hidden and the security chip will not be functional Securi...

Страница 102: ...hen provisioning the security chip Physical Presence for Clear Disabled Enabled This option enables or disables confirmation of a user physical presence when clearing the security chip If you select Enabled a user confirmation screen will be displayed when clearing the security chip If you select Disabled no user confirmation screen will be displayed when clearing the security chip Flash BIOS Upda...

Страница 103: ...lization Technology for directed I O When enabled a VMM can utilize the platform infrastructure for I O virtualization Note This item is available when the processor of your computer supports this feature Wireless LAN Disabled Enabled If you select Enabled you can use the Wireless LAN device Bluetooth Disabled Enabled If you select Enabled you can use the Bluetooth device USB Port Disabled Enabled...

Страница 104: ...ure The computrace feature enables you to track and secure your computer Note If you set the Computrace item as Permanently Disabled it cannot be enabled again Secure Boot Disabled Enabled Enable or disable the Secure Boot feature If you enable the Secure Boot the following item settings on the Startup menu also will change automatically 1 The UEFI Legacy Boot setting will change to UEFI Only 2 Th...

Страница 105: ...puter select the Startup tab from the ThinkPad Setup menu Attention After you change the startup sequence ensure that you select a correct device during a copy a save or a format operation Otherwise your data might be erased or overwritten If you are using the BitLocker drive encryption do not change the startup sequence BitLocker drive encryption locks the computer from starting once detects the ...

Страница 106: ... will not be selectable Note The Both and the CSM Support selections are available when theOS Optimized Defaults on the Restart menu is set as Disabled the UEFI Only selection is available when theOS Optimized Defaults on the Restart menu is set as Enabled Boot Mode Quick Diagnostics Quick The diagnostic splash screen will not be displayed unless you press Esc during starting the system Diagnostic...

Страница 107: ...ndows 7 operating system Discard Changes Discard the changes Note The changes of the following submenu items will not be discarded and can be reset in ThinkPad Setup menu Date Time Supervisor password Power on password Hard disk password Save Changes Save the changes Updating the UEFI BIOS The UEFI BIOS is the first program that the computer runs when the computer is turned on The UEFI BIOS initia...

Страница 108: ...r It is the responsibility of the UEFI BIOS to provide information about itself and the devices on the system board This specification documents the standards for getting access to this BIOS information Preboot eXecution Environment The Preboot eXecution Environment PXE technology makes the computer more manageable by enabling the computer to start from a server Your computer supports the personal...

Страница 109: ...mprove data seek and read times To free up disk space uninstall unused application programs Note You also might want to look for program duplication or overlapping versions Clean out your Inbox Sent and Trash folders from your e mail client program Back up your data at least once a week If critical data is present it is a good idea to perform a daily backup operation Lenovo has many backup options...

Страница 110: ...m correctly if corruption occurs It is not always necessary to download the latest drivers However you should download the latest driver for a component if you notice poor performance from that component or if you added a new component This might eliminate the driver as the potential cause of a problem Getting the latest drivers from the Web site You can download and install updated device drivers...

Страница 111: ...rostatic discharge ESD is the opposite of a discharge from your body or clothing to the computer it poses the same risk of a computer malfunction Your computer is designed and manufactured to minimize any effects of electrostatic charge An electrostatic charge above a certain limit however can increase the risk of ESD Therefore when using the computer close to an appliance that can produce negativ...

Страница 112: ...epair your computer Do not modify or tape the latches to keep the display open or closed Cleaning the cover of your computer Occasionally clean your computer by doing the following 1 Prepare a mixture of a gentle kitchen use detergent one that does not contain abrasive powder or strong chemicals such as acid or alkaline Use 5 parts water to 1 part detergent 2 Absorb the diluted detergent into a sp...

Страница 113: ...ssed from the outside 2 Wipe or dust the stain gently with a soft dry cloth 3 If the stain remains moisten a soft lint free cloth with water or a 50 50 mixture of isopropyl alcohol and water that does not contain impurities Note Avoid spraying cleaner directly onto the display or the keyboard 4 Wring out as much of the liquid as you can 5 Wipe the display again do not let any liquid drip into the ...

Страница 114: ...98 User Guide ...

Страница 115: ...pts you to create recovery media which you can use to restore the hard disk drive or hybrid drive to the factory default state For more information see Creating and using a recovery media on page 65 To run the Lenovo Solution Center program see Lenovo programs on page 13 For additional information refer to the Lenovo Solution Center help system Note If you are unable to isolate and repair the prob...

Страница 116: ...creates a short circuit between you and the ac power adapter if in use Although you might lose some data or work by turning off the computer immediately leaving the computer on might make your computer unusable 1 Carefully unplug the ac power adapter immediately 2 Turn off the computer immediately The more quickly you stop the current from passing through the computer the more likely you will redu...

Страница 117: ...e system CMOS might have been corrupted by an application program The computer uses the default settings Run ThinkPad Setup to reconfigure the settings If you still see the same error code have the computer serviced Message 0271 Real Time Clock Error Check Date and Time settings Solution Neither the date nor the time is set in the computer Enter ThinkPad Setup to set the date and time Message 2000...

Страница 118: ...e whether you heard any beeps turn off the computer by pressing and holding the power button for four seconds or more Turn it on and listen again Solution Ensure that The battery is installed correctly The ac power adapter is connected to the computer and the power cord is plugged into a working electrical outlet The computer is turned on Turn the power button on again for confirmation If a power ...

Страница 119: ...unction has a problem Have the computer serviced Four cycles of four short beeps The Security Chip has a problem Have the computer serviced Five short beeps The system board has a problem Have the computer serviced Five short beeps pause five short beeps and pause Continue to boot immediately when the error was detected Memory module problems Print these instructions now and keep the instructions ...

Страница 120: ...lost connections You have installed all networking software that is necessary for your network environment Check with your LAN administrator for the necessary networking software Problem The adapter stops working for no apparent reason Solution The network driver files might be corrupt or missing Update the driver by referring to the previous solution for the procedure to make sure that the correc...

Страница 121: ...rrectly into the address book of any other Bluetooth enabled device Solution The Windows 7 operating system sends PIM items in XML format but most Bluetooth enabled devices handle PIM items in vCard format If another Bluetooth enabled device can receive a file through Bluetooth a PIM item sent from the Windows 7 might be saved as a file with the extension contact Problems with the keyboard and oth...

Страница 122: ...If your computer is in sleep mode press Fn to resume from the sleep mode If the problem persists follow the solution for the following problem Problem The screen is unreadable or distorted Solution Ensure that The display device driver is installed correctly The screen resolution and color quality are correctly set The monitor type is correct To check these settings do the following 1 Right click ...

Страница 123: ...ect the external monitor to another computer to ensure that it works 2 Reconnect the external monitor to your computer 3 Refer to the manual shipped with the external monitor to check the resolutions and refresh rates that are supported If the external monitor supports the same resolution as the computer display or a higher resolution view output on the external monitor or on both the external mon...

Страница 124: ... the changes Note To change the color settings right click on the desktop and click Screen resolution Click Advanced Settings select the Monitor tab then set Colors Problem If you use the Extend desktop function you cannot set a higher resolution or higher refresh rate on the secondary display Solution Change the resolution and the color depth to lower settings for the primary display Refer to the...

Страница 125: ...ce when some audio applications are used Solution It is normal for the sliders to change position when certain sound applications are used The applications are aware of the settings in the Volume Mixer window and are allowed to change the settings themselves An example is the Windows Media Player Usually the application has sliders available to control the sound from within the application Problem...

Страница 126: ...puter and let it charge If a quick charger is available use it to charge the over discharged built in battery If the built in battery cannot be fully charged in 24 hours call Lenovo Customer Service Center to have it serviced Problem Your computer shuts down before the battery status icon shows that the battery is empty or the computer operates after the battery status icon shows that the battery ...

Страница 127: ... the adapter brick and the computer 4 Verify the ac power source is working by attaching another device to the outlet If your computer does not run on battery power do the following 1 If the battery runs out of power attach ac power adapter to recharge the battery 2 If the battery is charged but the computer does not run call Lenovo Customer Service Center to have it serviced A power button proble...

Страница 128: ...ed ThinkPad logo blinks slowly and the computer does not work Solution If the system does not return from sleep mode it might have entered sleep or hibernation mode automatically because the battery is depleted Check the system status indicator illuminated ThinkPad logo If the system status indicator illuminated ThinkPad logo blinks slowly your computer is in sleep mode Connect the ac power adapte...

Страница 129: ...ter setting a hard disk password on the hard disk drive or hybrid drive of the computer you moved the drive to another computer Now you cannot unlock the hard disk password Solution Your computer supports an enhanced password algorithm Computers older than yours might not support such a security function A solid state drive problem Problem When you compress files or folders by use of the data comp...

Страница 130: ... work Solution Open the Device Manager window Ensure that the USB device setup is correct and that the assignment of computer resource and the installation of the device driver are correct To open the Device Manager window go to Control Panel and click Hardware and Sound Device Manager If you are prompted for an administrator password or confirmation type the password or provide confirmation Refer...

Страница 131: ...computer Recording problem symptoms and details Collect the answers to the questions below before you call for help Then you will be able to get help as quickly as possible What is the problem Is it continuous or intermittent Is there an error message What is the error code if any What operating system are you using Which version Which software applications were running at the time of the problem ...

Страница 132: ...s The troubleshooting information or the diagnostic programs might tell you that you need additional or updated device drivers or other software You can get the latest technical information and download device drivers and updates from the Lenovo Web site at http www lenovo com support Lenovo Support Web site Technical support information is available on the Lenovo Support Web site at http www leno...

Страница 133: ...chnical assistance have the following information available Machine type and model Serial numbers of your computer monitor and other components or your proof of purchase Description of the problem Exact wording of any error messages Hardware and software configuration information for your system Telephone numbers For a list of the Lenovo Support phone numbers for your country or region go to http ...

Страница 134: ...118 User Guide ...

Страница 135: ...orted by the Bluetooth devices Advanced Audio Distribution Profile A2DP Audio Video Control Transport Protocol AVCTP Audio Video Distribution Transport Protocol AVDTP A V Remote Control Profile AVRCP Basic Imaging Profile BIP Basic Printing Profile BPP Dial Up Networking Profile DUN File Transfer Profile FTP Generic Access Profile GAP Generic A V Distribution Profile GAVDP Hardcopy Cable Replaceme...

Страница 136: ...se situations and areas might for example include Using the integrated wireless cards on board of airplanes in hospitals or near petrol stations blasting areas with electro explosive devices medical implants or body worn electronic medical devices such as pace makers In any other environment where the risk of interference to other devices or services is perceived or identified as harmful If you ar...

Страница 137: ...ision reception which can be determined by turning the equipment off and on the user is encouraged to try to correct the interference by one or more of the following measures Reorient or relocate the receiving antenna Increase the separation between the equipment and receiver Connect the equipment into an outlet on a circuit different from that to which the receiver is connected Consult an authori...

Страница 138: ...dieses sicherzustellen sind die Geräte wie in den Handbüchern beschrieben zu installieren und zu betreiben Des Weiteren dürfen auch nur von der Lenovo empfohlene Kabel angeschlossen werden Lenovo übernimmt keine Verantwortung für die Einhaltung der Schutzanforderungen wenn das Produkt ohne Zustimmung der Lenovo verändert bzw wenn Erweiterungskomponenten von Fremdherstellern ohne Empfehlung der Len...

Страница 139: ...Brazil regulatory notice Ouvir sons com mais de 85 decibéis por longos períodos pode provocar danos ao sistema auditivo Mexico regulatory notice Advertencia En Mexico la operación de este equipo estásujeta a las siguientes dos condiciones 1 es posible que este equipo o dispositivo no cause interferencia perjudicial y 2 este equipo o dispositivo debe aceptar cualquier interferencia incluyendo la qu...

Страница 140: ...124 User Guide ...

Страница 141: ...ble to them for the return recycle and recovery of WEEE and to minimize any potential effects of EEE on the environment and human health due to the presence of hazardous substances For additional WEEE information go to http www lenovo com recycling Japan recycling statements Collecting and recycling a disused Lenovo computer or monitor If you are a company employee and need to dispose of a Lenovo ...

Страница 142: ...who uses a Lenovo notebook computer and need to dispose of a battery pack contact the proper person in Lenovo sales service or marketing and follow that person s instructions You also can refer to the instructions at http www lenovo com jp ja environment recycle battery If you use a Lenovo notebook computer at home and need to dispose of a battery pack you must comply with local ordinances and reg...

Страница 143: ...collected separately and recycled at end of life The label on the battery may also include a chemical symbol for the metal concerned in the battery Pb for lead Hg for mercury and Cd for cadmium Users of batteries and accumulators must not dispose of batteries and accumulators as unsorted municipal waste but use the collection framework available to customers for the return recycling and treatment ...

Страница 144: ...128 User Guide ...

Страница 145: ...azardous substances in electrical and electronic equipment RoHS recast or RoHS 2 For more information about Lenovo progress on RoHS go to http www lenovo com social_responsibility us en RoHS_Communication pdf China RoHS Turkish RoHS The Lenovo product meets the requirements of the Republic of Turkey Directive on the Restriction of the Use of Certain Hazardous Substances in Electrical and Electroni...

Страница 146: ...Ukraine RoHS India RoHS RoHS compliant as per E Waste Management Handling Rules 2011 130 User Guide ...

Страница 147: ...of your day to day operations To help in this endeavor Lenovo has preset the following power management features to take effect when your computer has been inactive for a specified length of time Power plan Energy Saver settings when plugged into ac power Turn off the display After 10 minutes Put the computer into sleep After 20 minutes Advanced power settings Turn off hard disks After 15 minutes ...

Страница 148: ...4 Right click your network adapter device and click Properties 5 Click the Power Management tab 6 Clear the Allow this device to wake the computer check box 7 Click OK 132 User Guide ...

Страница 149: ...e publication Lenovo may make improvements and or changes in the product s and or the program s described in this publication at any time without notice The products described in this document are not intended for use in implantation or other life support applications where malfunction may result in injury or death to persons The information contained in this document does not affect or change Len...

Страница 150: ...Intel SpeedStep and Intel vPro are trademarks of Intel Corporation in the U S and or other countries BitLocker Microsoft and Windows are trademarks of the Microsoft group of companies The terms HDMI and HDMI High Definition Multimedia Interface are trademarks or registered trademarks of HDMI Licensing LLC in the United States and other countries Other company product and service names may be trade...

Страница 151: ......

Страница 152: ......

Отзывы: