9. Touch the static-protective package that contains the new hot-swap hard-disk-drive backplane to
any unpainted surface on the outside of the storage product. Then, remove the new backplane from
the package.
Note:
Carefully handle the backplane by its edges.
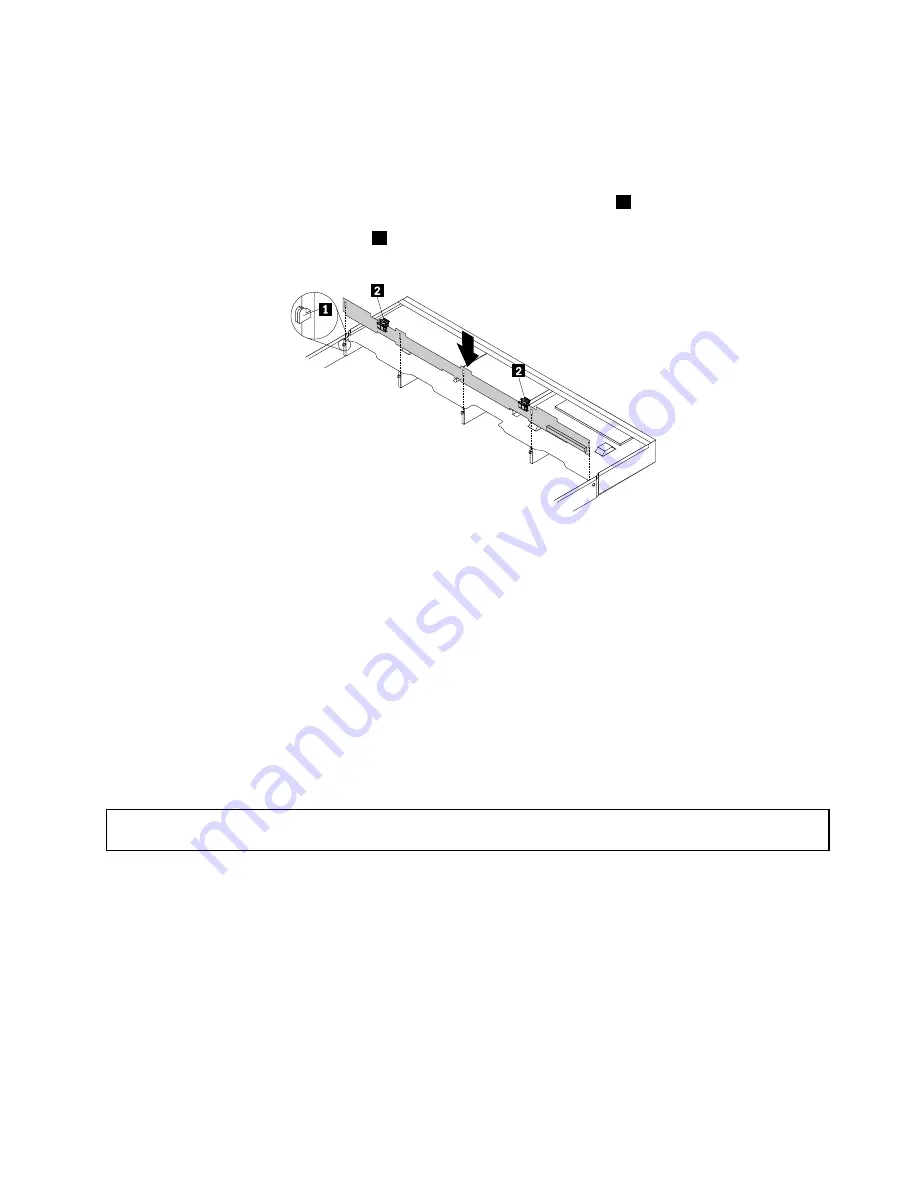
10. Note the orientation of the new backplane. Ensure that the small hooks
1
on the chassis pass through
the corresponding holes in the new backplane. Then, carefully press the new backplane straight down
so that it is secured by the latches
2
on the backplane.
Figure 79. Installing the hot-swap hard-disk-drive backplane
11. Reinstall all the hot-swap hard disk drives and dummy trays (if any) on the backplane. See “Installing or
replacing a hot-swap hard disk drive” on page 86.
12. Refer to your note to reconnect the cables to the backplane.
13. If you are instructed to return the old hot-swap hard-disk-drive backplane, follow all packaging
instructions and use any packaging materials that are supplied to you for shipping.
What to do next:
• To work with another piece of hardware, go to the appropriate section.
• To complete the replacement, go to “Completing the parts replacement” on page 112.
Replacing a system fan
Attention:
Do not open your storage product or attempt any repair before reading and understanding “Safety
information” on page iii and “Guidelines” on page 41.
Your storage product supports up to six system fans. This design helps you to avoid significant cooling
problems when a system fan fails.
.
99
Содержание Storage N3310
Страница 1: ...Lenovo Storage N3310 User Guide and Hardware Maintenance Manual Machine Types 70FX and 70FY ...
Страница 14: ...xii Lenovo Storage N3310 User Guide and Hardware Maintenance Manual ...
Страница 18: ...4 Lenovo Storage N3310 User Guide and Hardware Maintenance Manual ...
Страница 20: ...6 Lenovo Storage N3310 User Guide and Hardware Maintenance Manual ...
Страница 138: ...124 Lenovo Storage N3310 User Guide and Hardware Maintenance Manual ...
Страница 151: ......
Страница 152: ......


